المواضيع ذات الصلة
Troubleshooting - Device Boots Directly into BIOS, Aptio Setup Utility, or MyASUS in UEFI Screen
Applicable Products: Notebook, Desktop, All-in-One PC, Gaming Handheld, MiniPC,
If you experience that the computer directly enters BIOS Utility, Aptio Setup Utility, or MyASUS in UEFI rather than Operating System after power on, please refer to the following troubleshooting steps.
Note: The BIOS screen displays various system information of your computer, such as the CPU model, memory size, product serial number, disk type, and storage capacity.
To provide you more detailed instruction, you can also click ASUS YouTube video link below to know more about How to fix Computer directly enters BIOS configuration after power on.
https://www.youtube.com/watch?v=VyOA2FFMafA
Method 1: Remove accessories and update BIOS
- Remove the accessories, including the keyboard, mouse, external hard drives, printers, memory cards, discs from the optical drive, as well as any adapters in card readers, and similar peripherals. Sometimes, external devices may prevent your system from functioning properly.
Note: Please disconnect all external monitors as well. For desktop computers, connect only one external monitor initially to verify that the system can boot and display properly. - Update BIOS to the latest version. Here you can learn more about How to Update BIOS with ASUS Firmware Update/EZ Flash. (For desktop products, please refer to ASUS Motherboard EZ Flash 3 Introduction.)
Note: Please use another PC to search and download the BIOS on the ASUS support site for the defective model, then copy the BIOS into a USB drive. If you have no other PCs, USB drives, or the BIOS has been updated to date, please ignore this step.
Method 2: Confirm the settings in BIOS
For those utilizing Notebook, All-in-One PC, or Gaming Handheld devices, the following are the methods to check BIOS settings for UEFI interface, Legacy interface, and MyASUS in UEFI:
UEFI Mode (BIOS Utility)
In the UEFI interface, you can navigate and confirm using the Arrow Keys and Enter key on the keyboard, Touchpad, or Mouse.
Note: The BIOS screen below may vary slightly depending on the model.
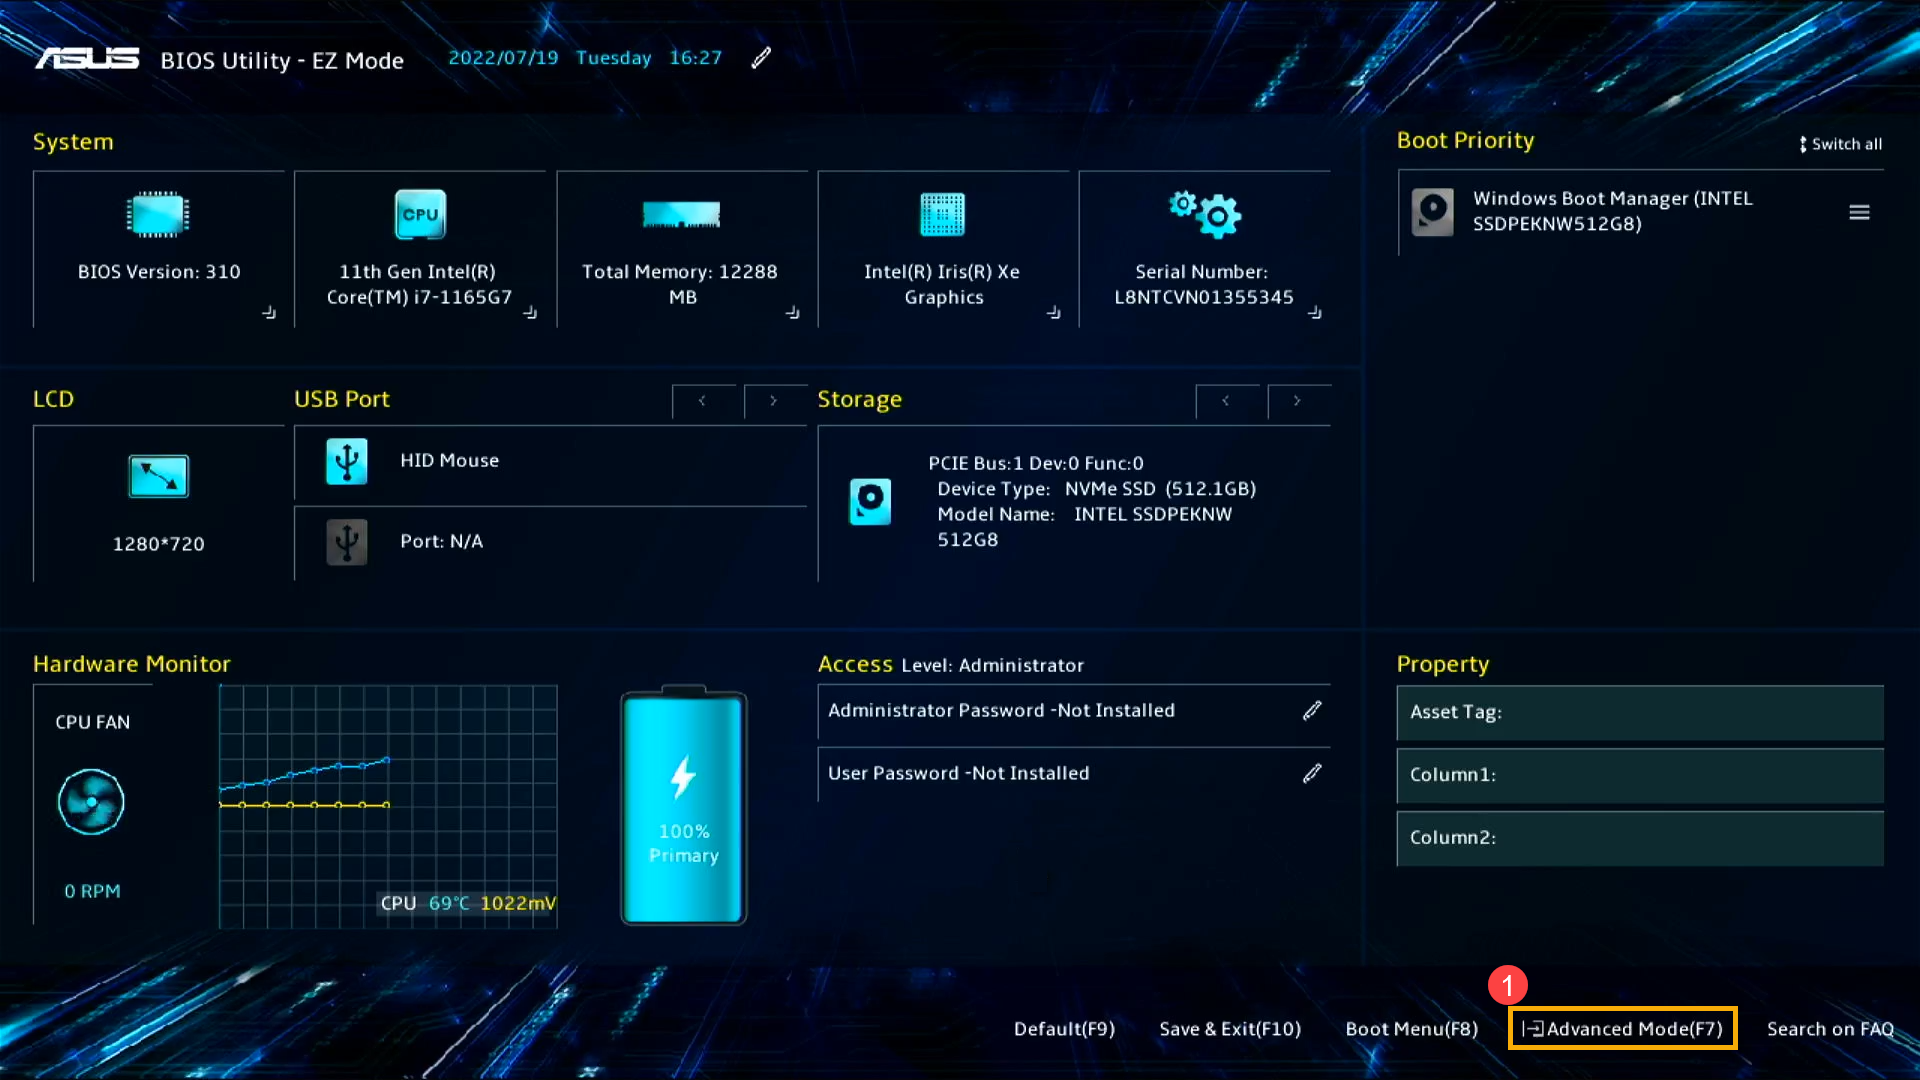
- After entering the BIOS utility, press Hotkey[F7], or you can click the [Advanced Mode] on the screen①.
- After entering the Advanced Mode, Load BIOS optimized defaults. Go to [Save & Exit] screen②, then select [Restore Defaults] item③.
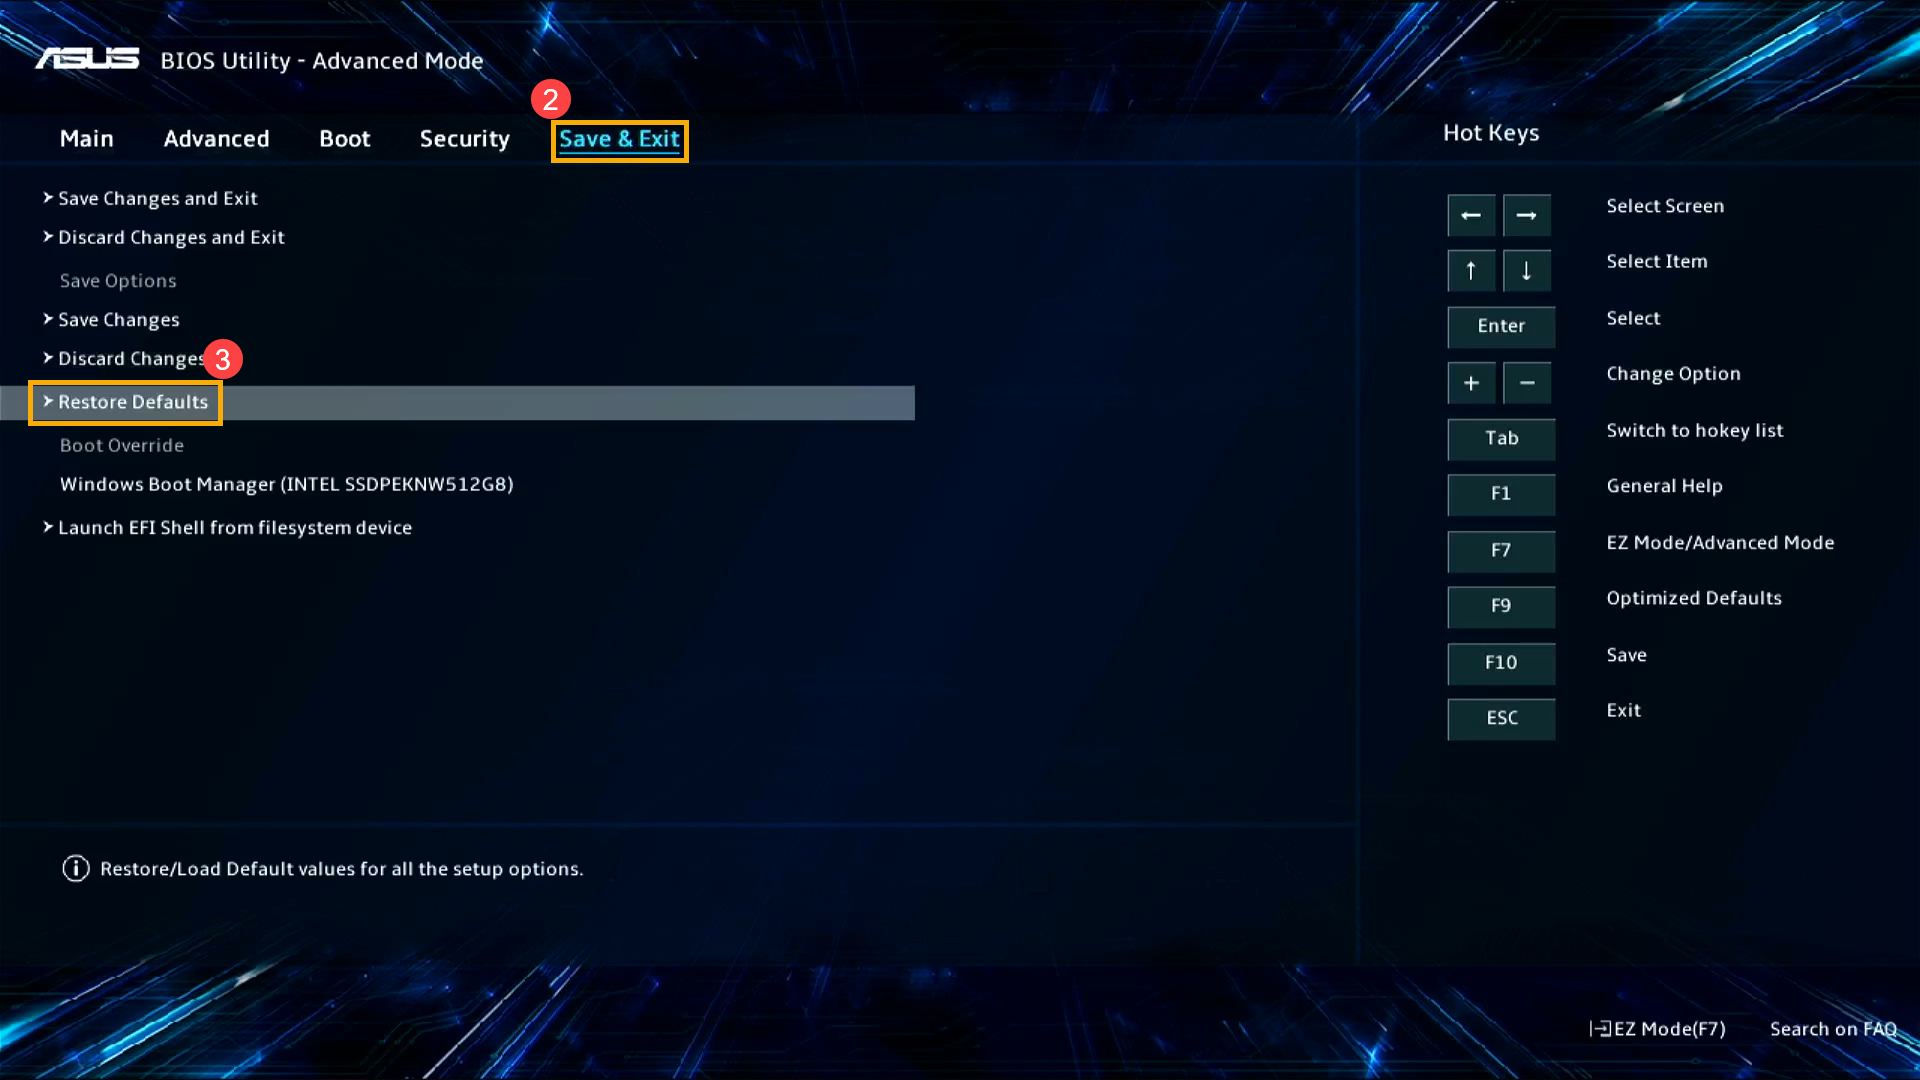
- Confirm whether to load the BIOS optimized defaults, select Ok and press [Enter] key, or you can click [Ok] on the screen④.

- Check whether the boot option is correct. Go to the [Boot] page⑤, find the [Boot Option #1]⑥, select the correct hard disk drive which has the operating system⑦.
Note: If there is no operating system installation file in your hard disk drive, please install it first. Here you can learn more about How to create and use installation media to reinstall Windows 11/10 via USB drive.
Note: If no hard drives are listed in the Boot Option menu, it indicates that your device is unable to detect the hard drive properly. We recommend visiting an ASUS authorized service center for further inspection.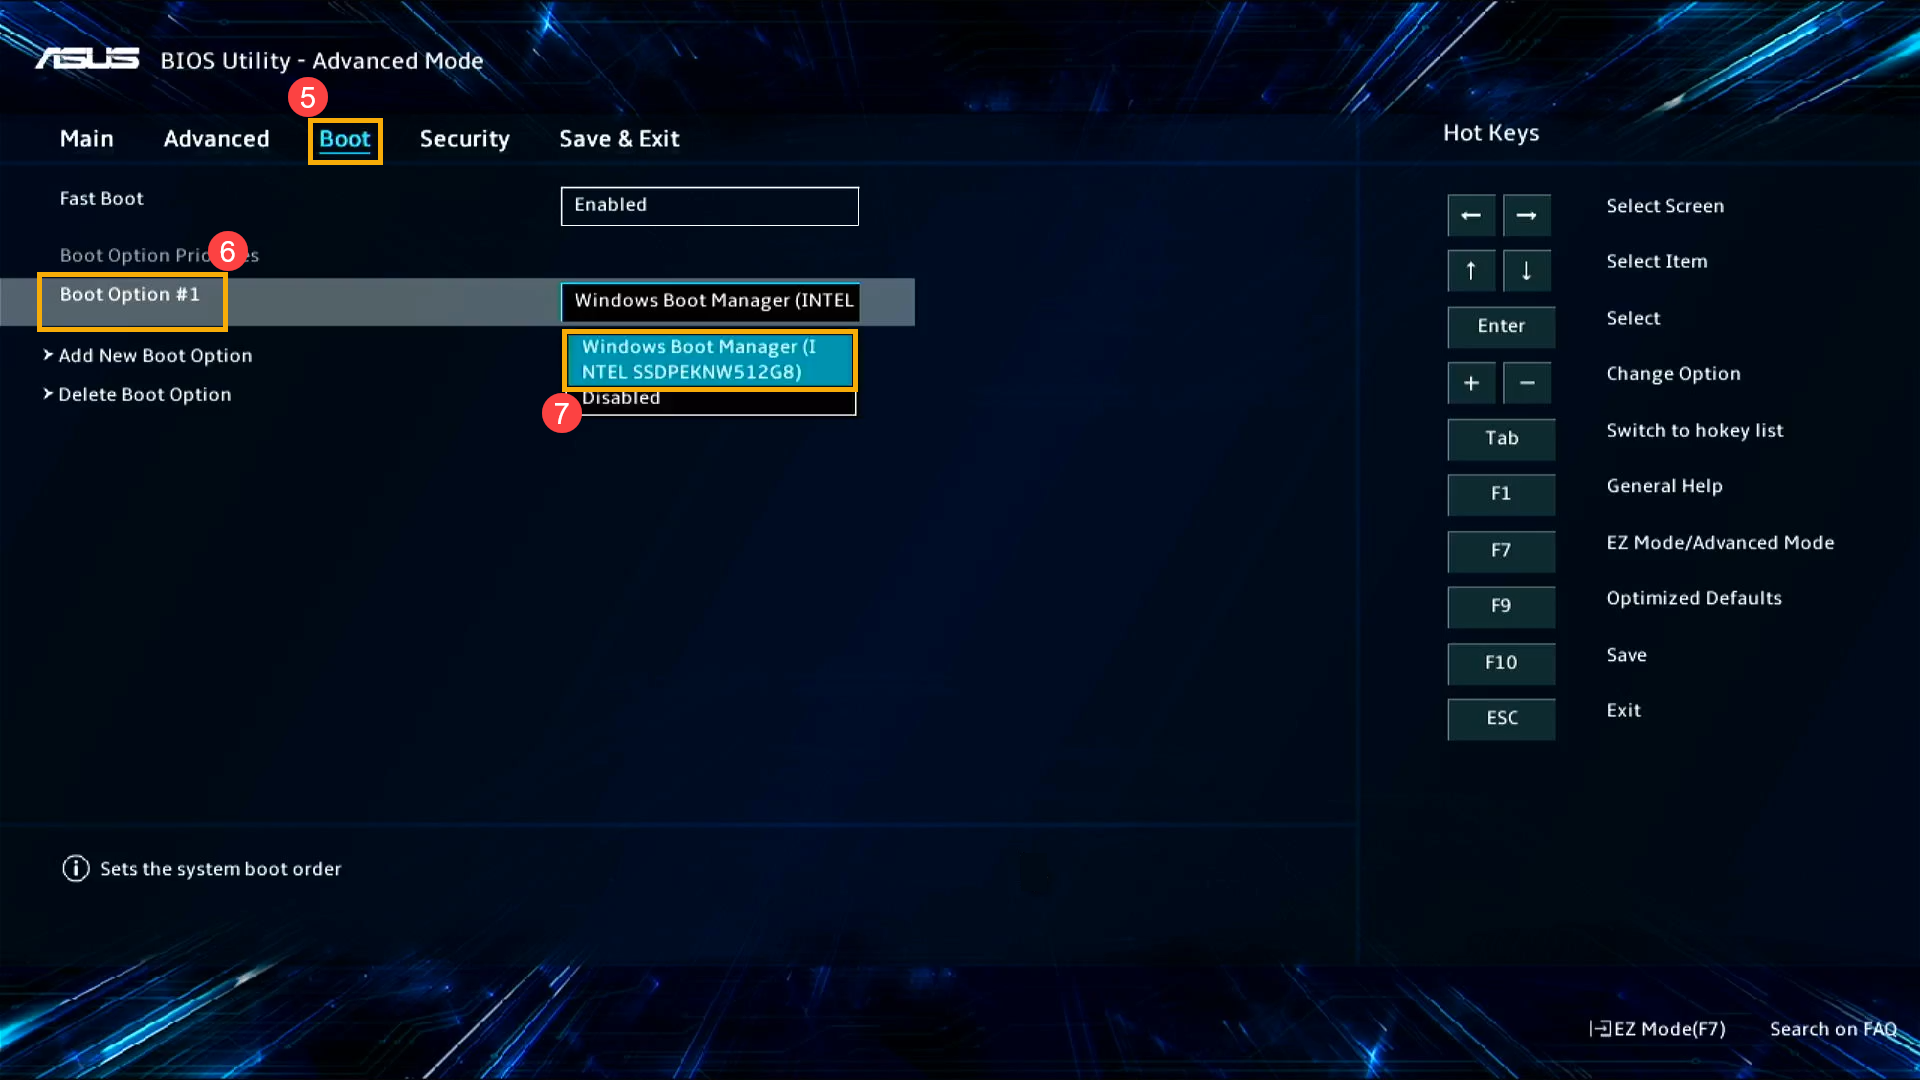
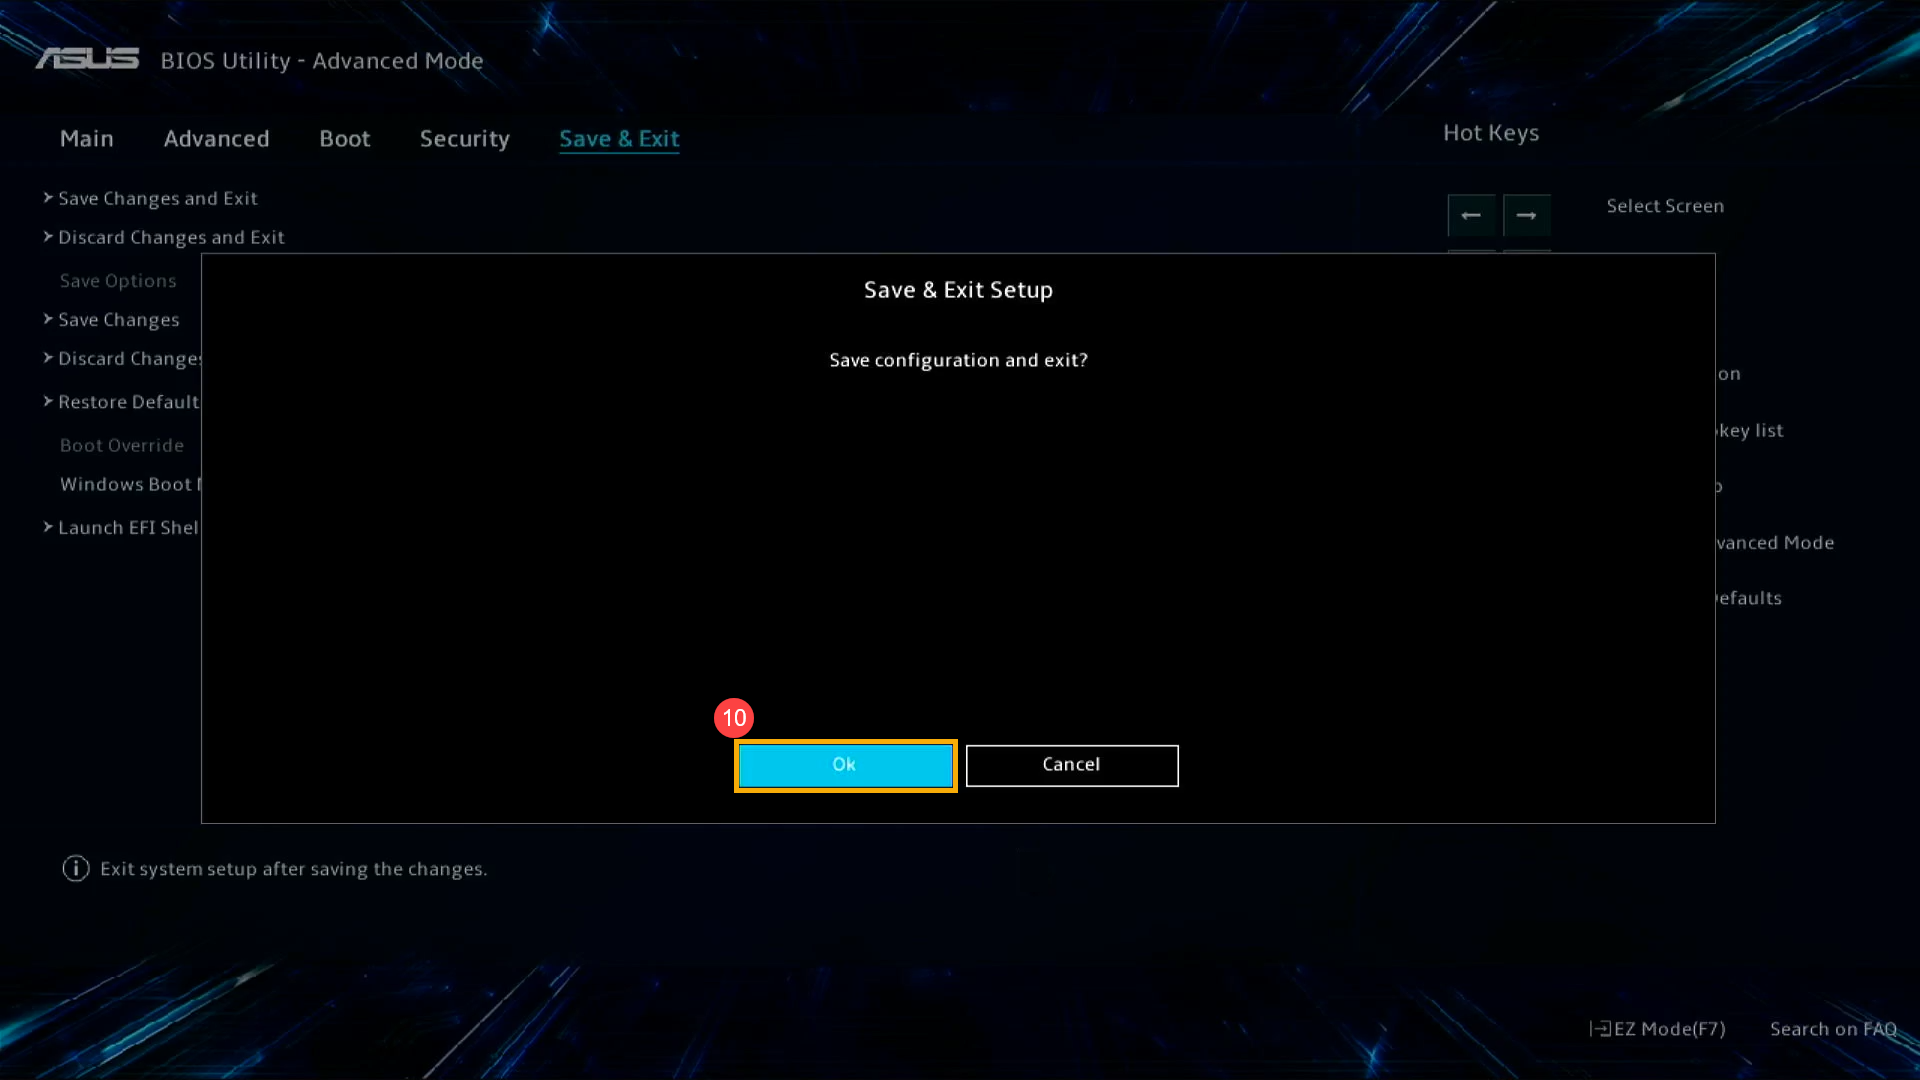
- Save & Exit Setup. Go to [Save & Exit] screen⑧, then select [Save Changes and Exit] item⑨.
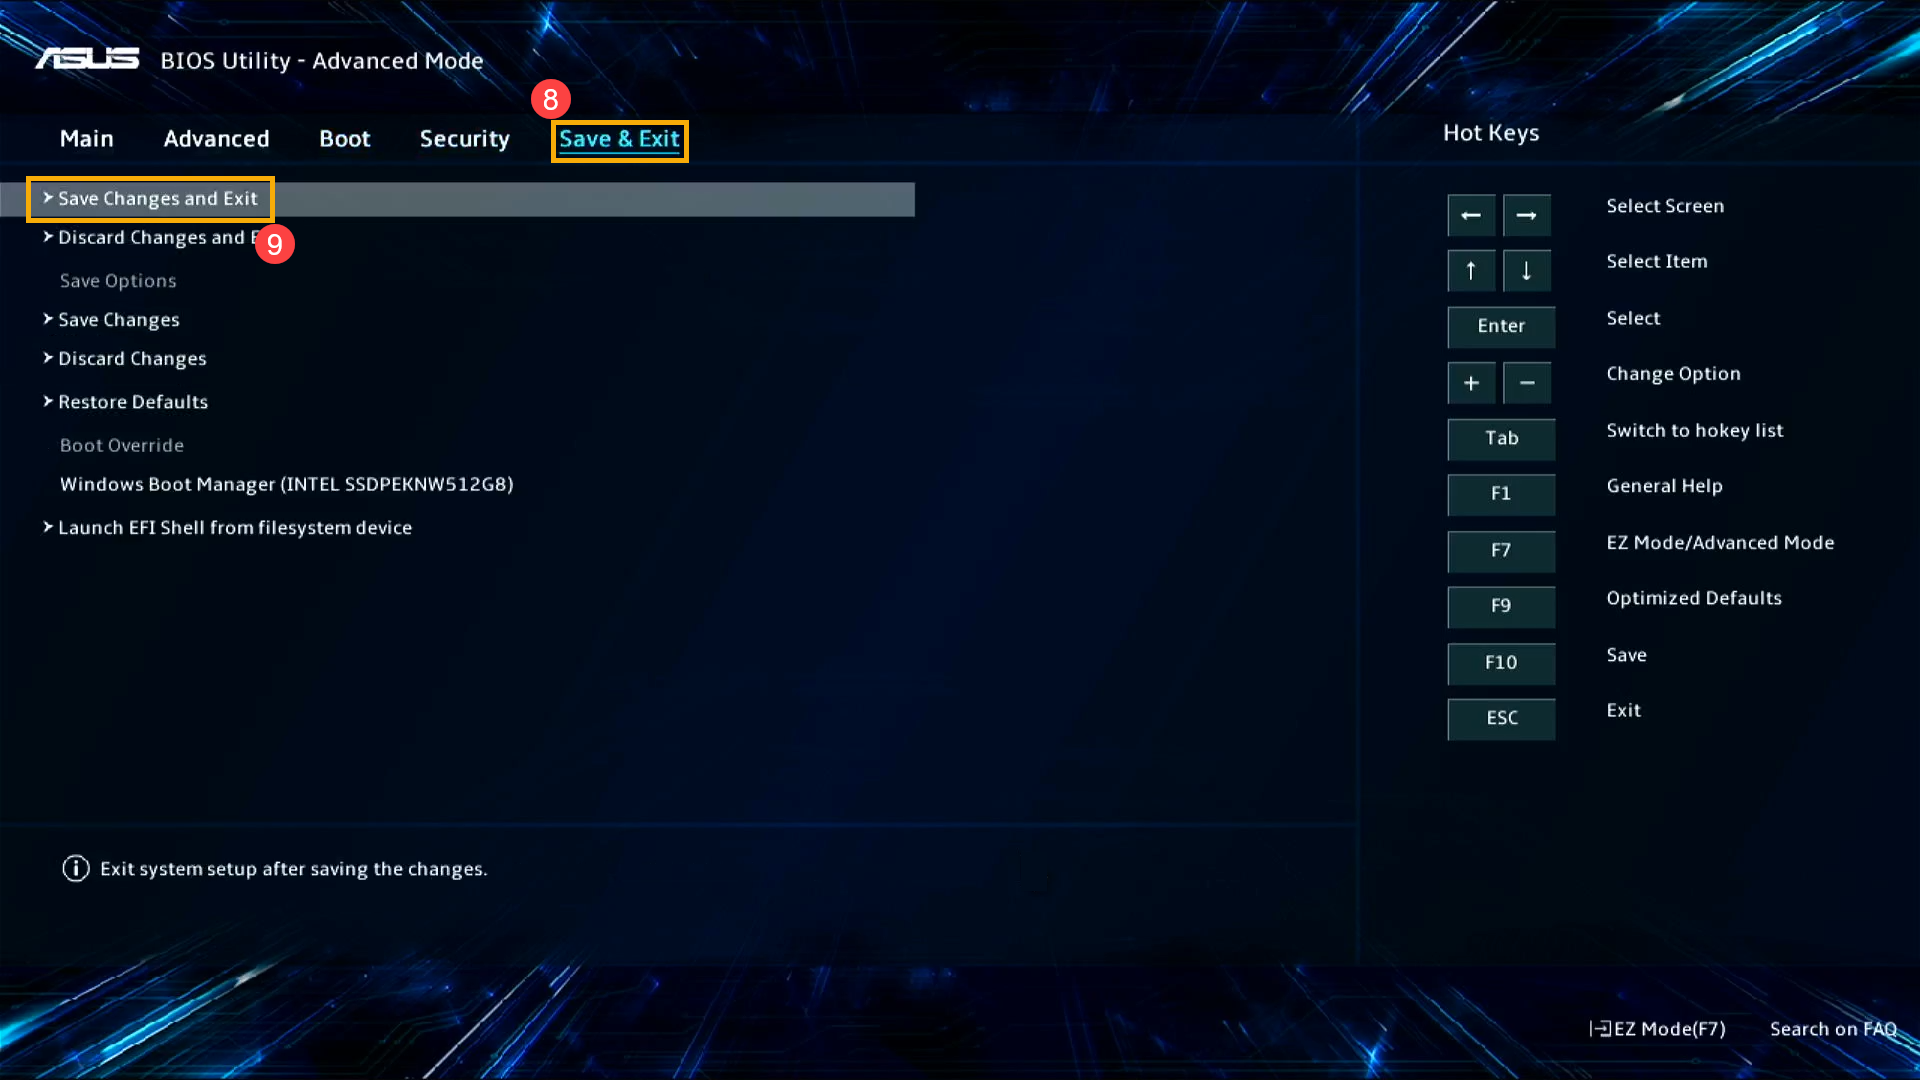
- Confirm whether to save and exit the BIOS configuration, select Ok and press [Enter] key, or you can click [Ok] on the screen⑩.
Legacy Mode (Aptio Setup Utility)
In the Legacy mode, you can only select and choose item via Arrow Keys and Enter of keyboard.
Note: The BIOS screen below may vary slightly depending on the model.
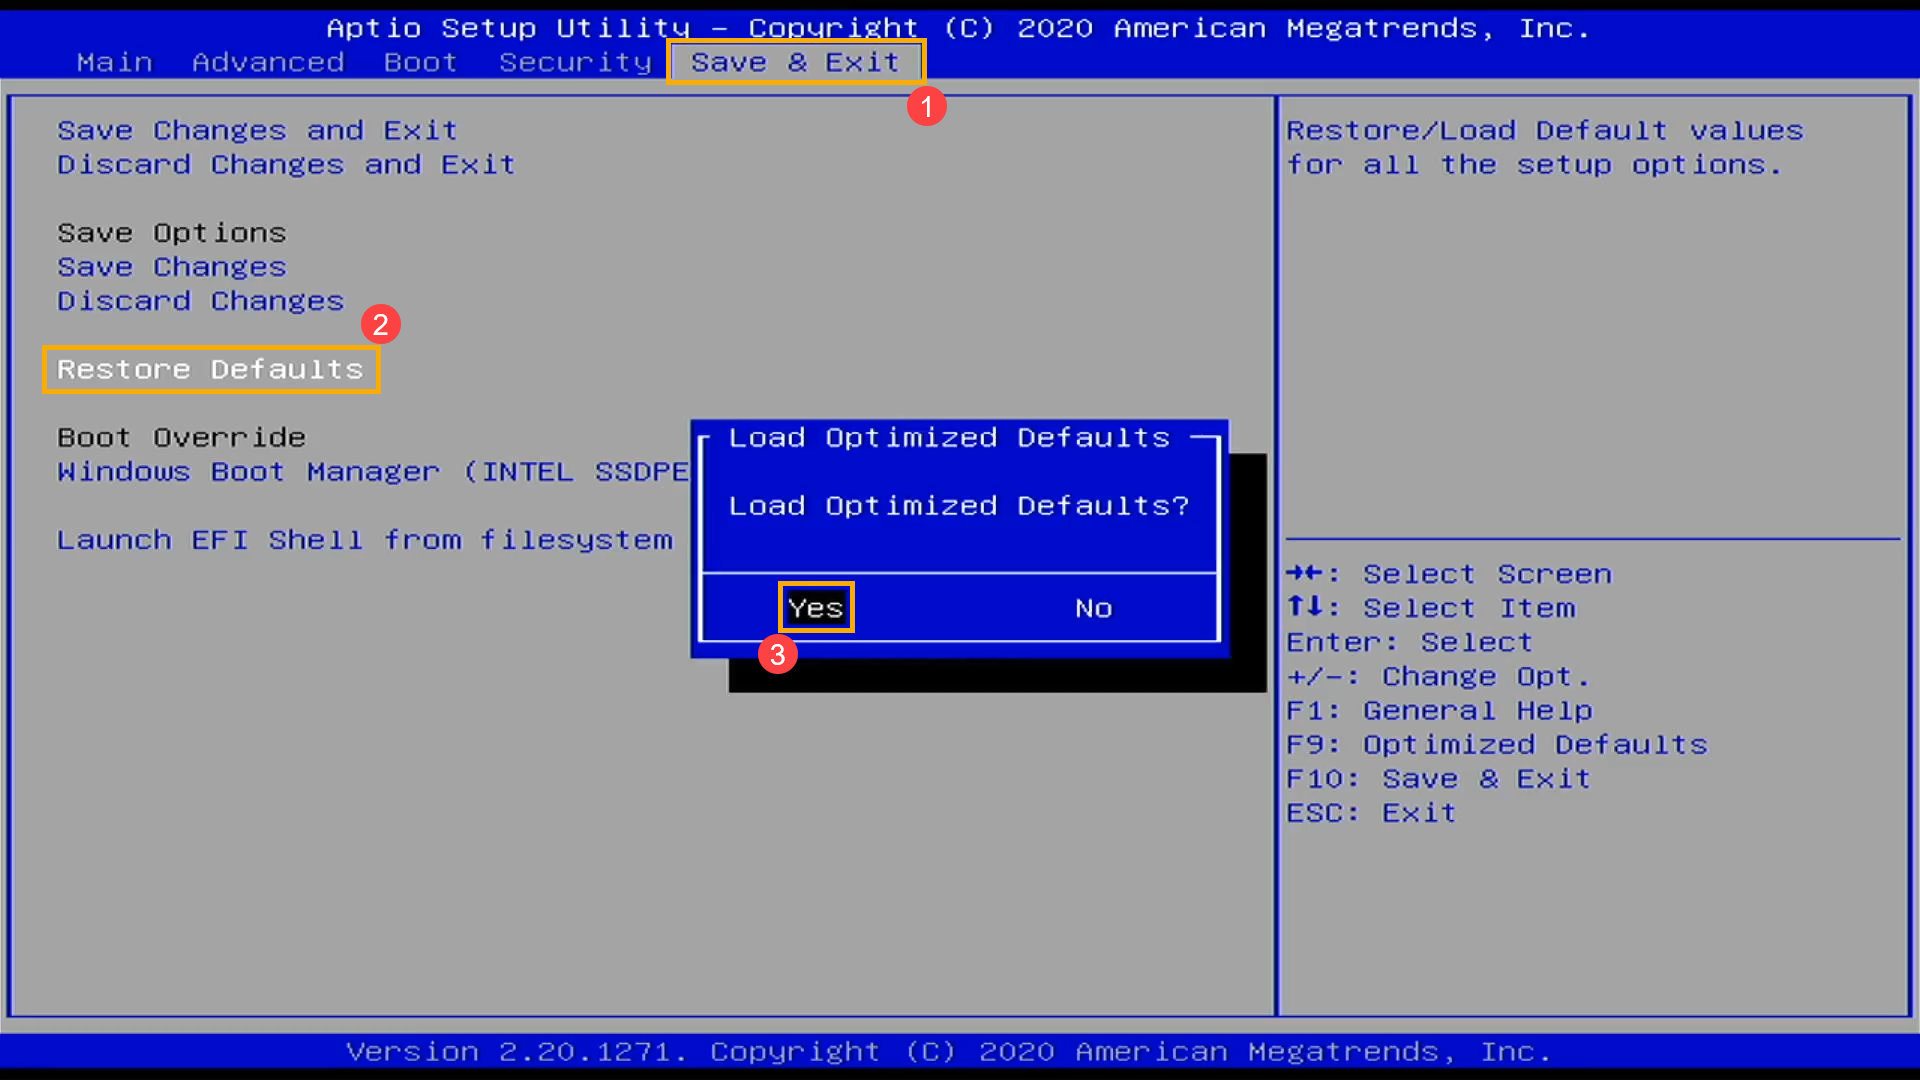
- After entering the BIOS screen, Load BIOS optimized defaults. Go to [Save & Exit] screen①, select [Restore Defaults] item② and then select [Yes]③.
- Check whether the Boot option is correct. Go to the [Boot] page④, find the [Boot Option #1]⑤, select the correct hard disk drive which has the operating system⑥.
Note: If there is no operating system installation file in your hard disk drive, please install it first. Here you can learn more about How to create and use installation media to reinstall Windows 11/10 via USB drive.
Note: If no hard drives are listed in the Boot Option menu, it indicates that your device is unable to detect the hard drive properly. We recommend visiting an ASUS authorized service center for further inspection.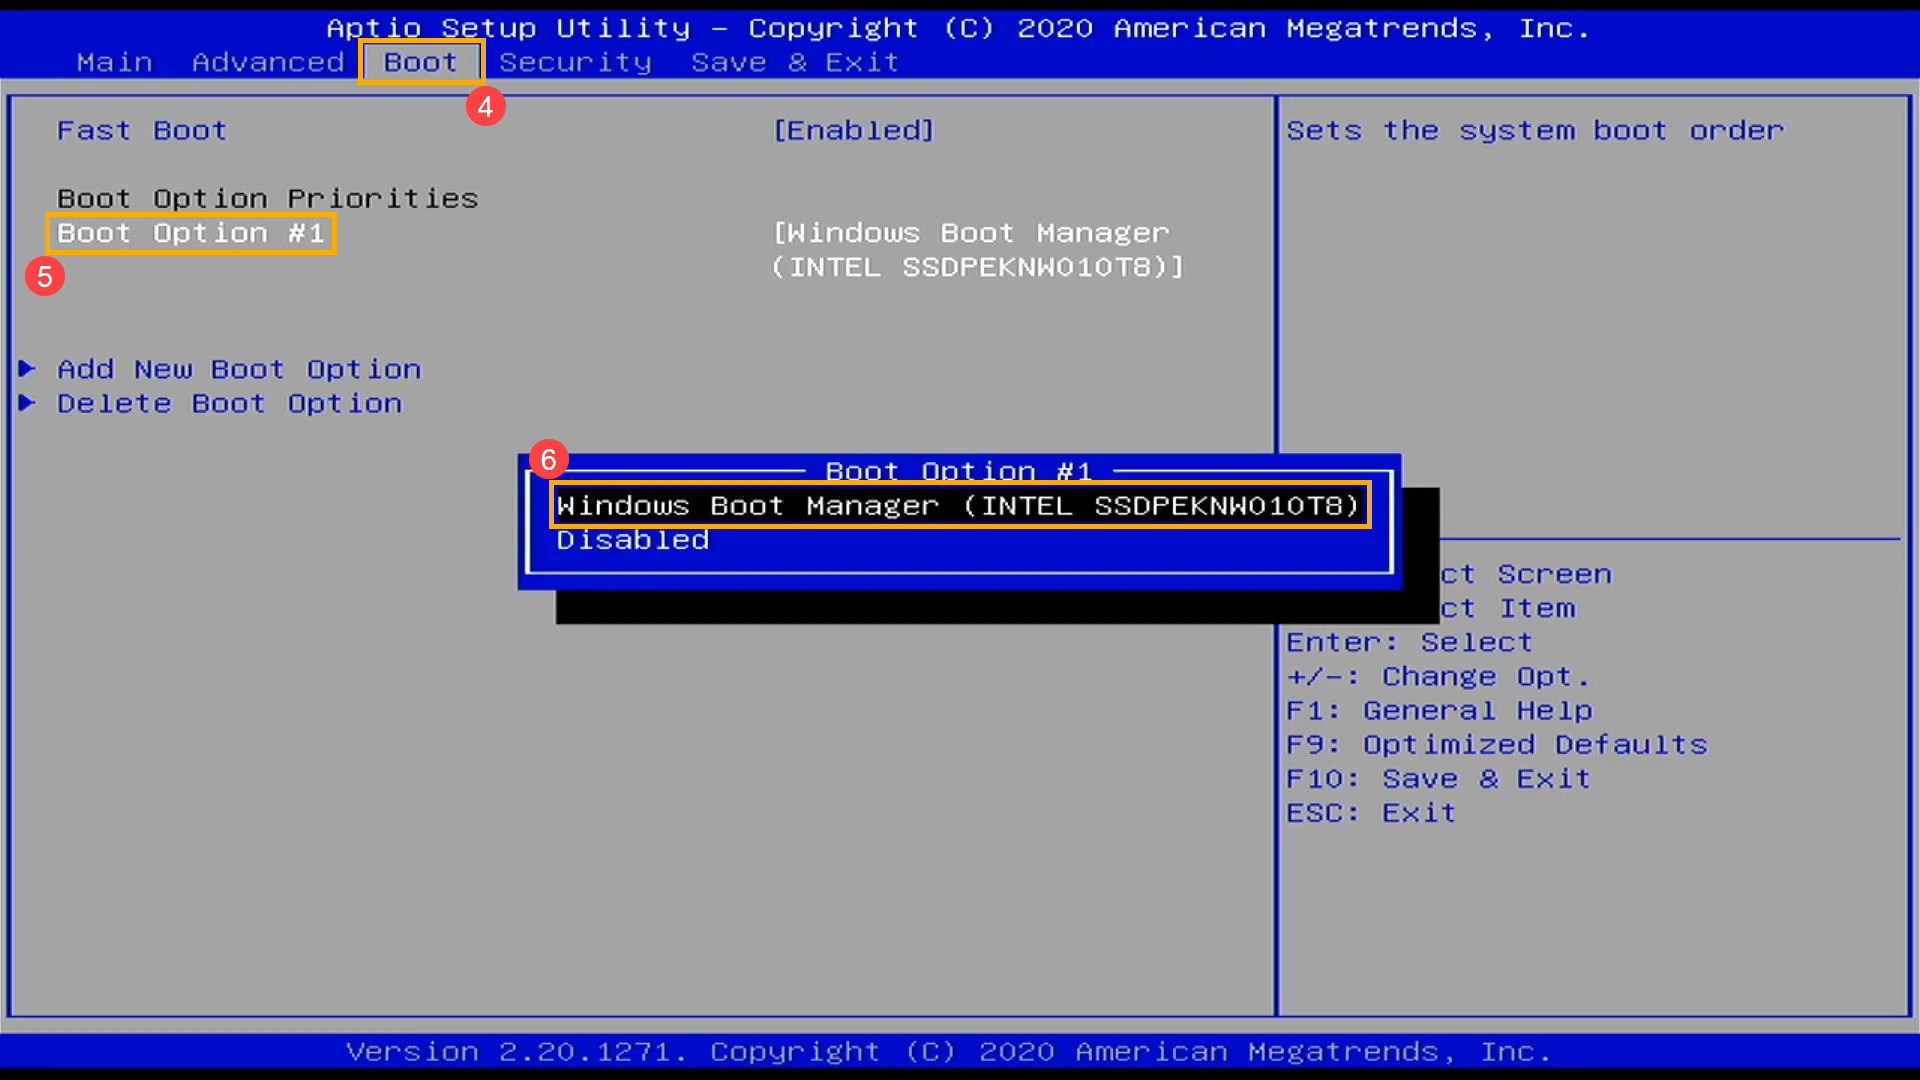
- Save & Exit Setup. Go to [Save & Exit] screen⑦, select [Save Changes and Exit] item⑧ and then select [Yes]⑨.

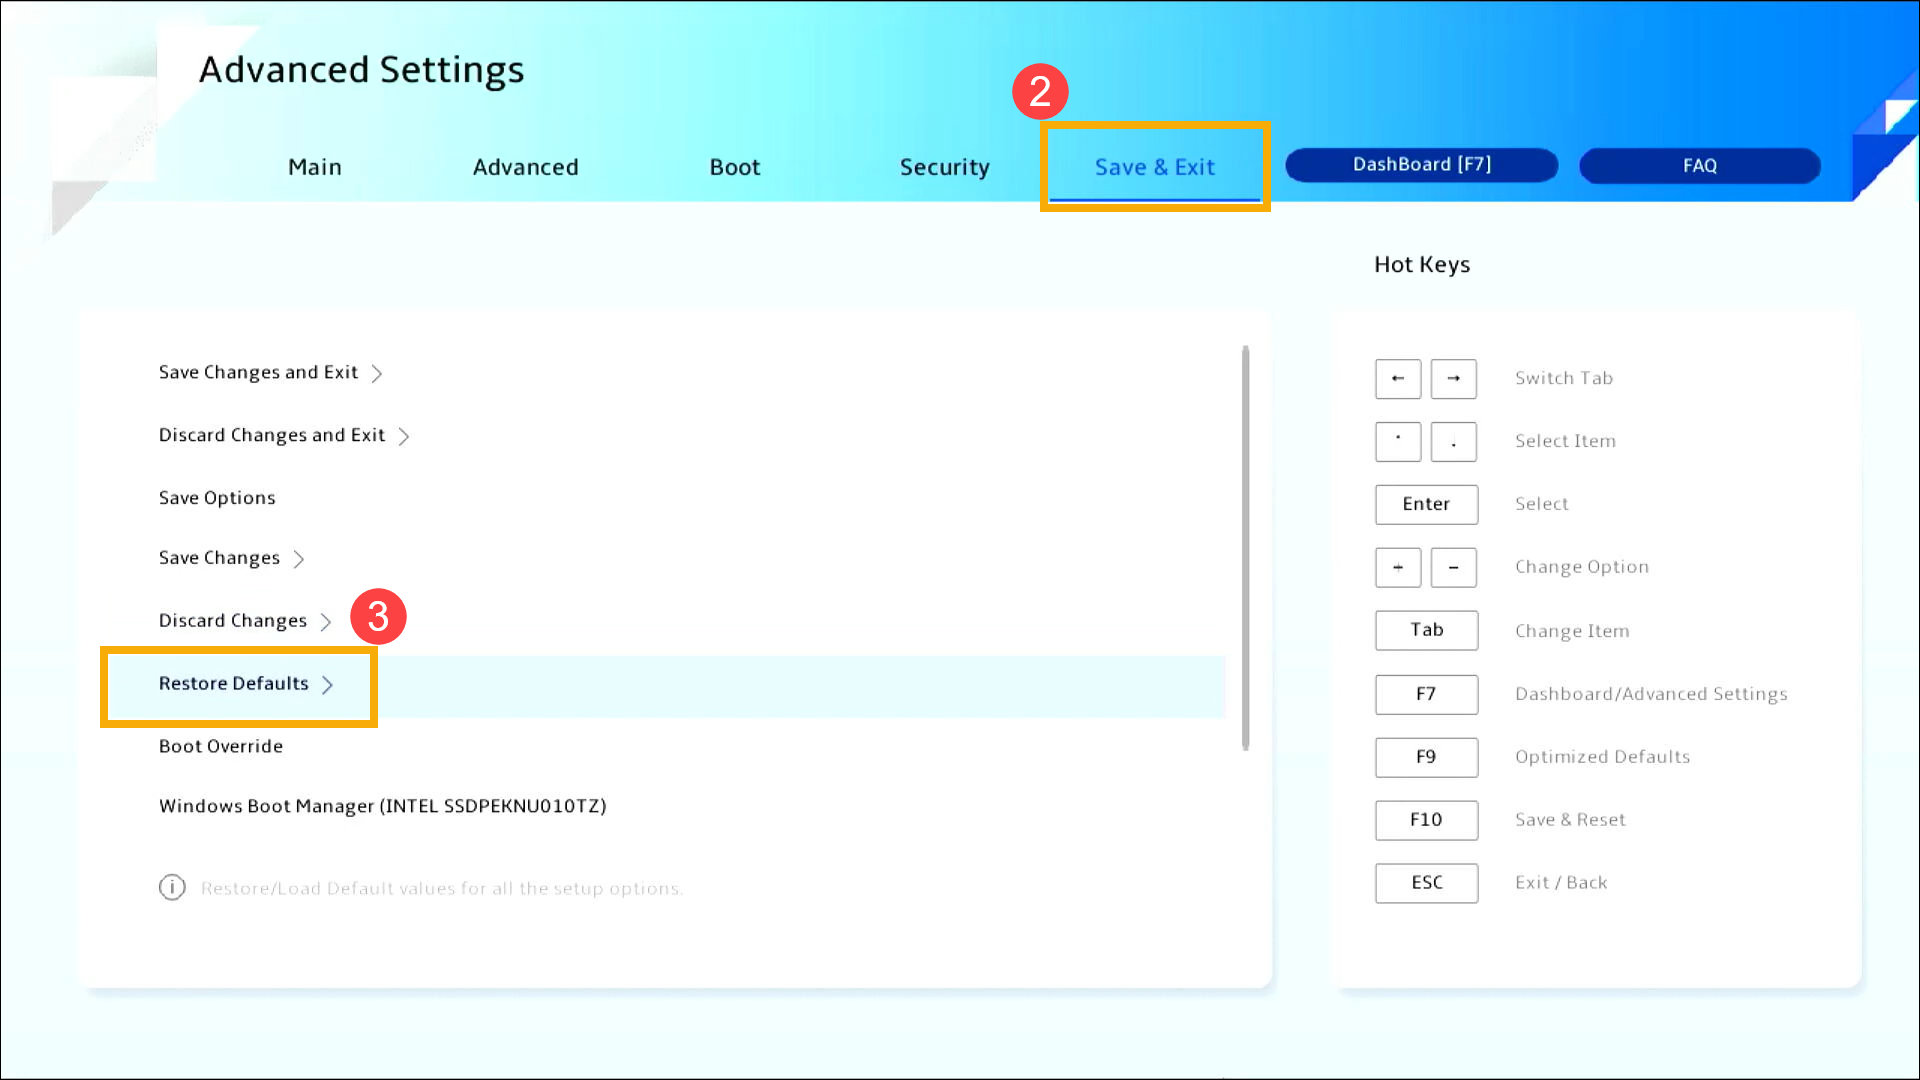
MyASUS in UEFI
In the MyASUS in UEFI, you can navigate and confirm using the Arrow Keys and Enter key on the keyboard, Touchpad, or Mouse.
Note: The BIOS screen below may vary slightly depending on the model.
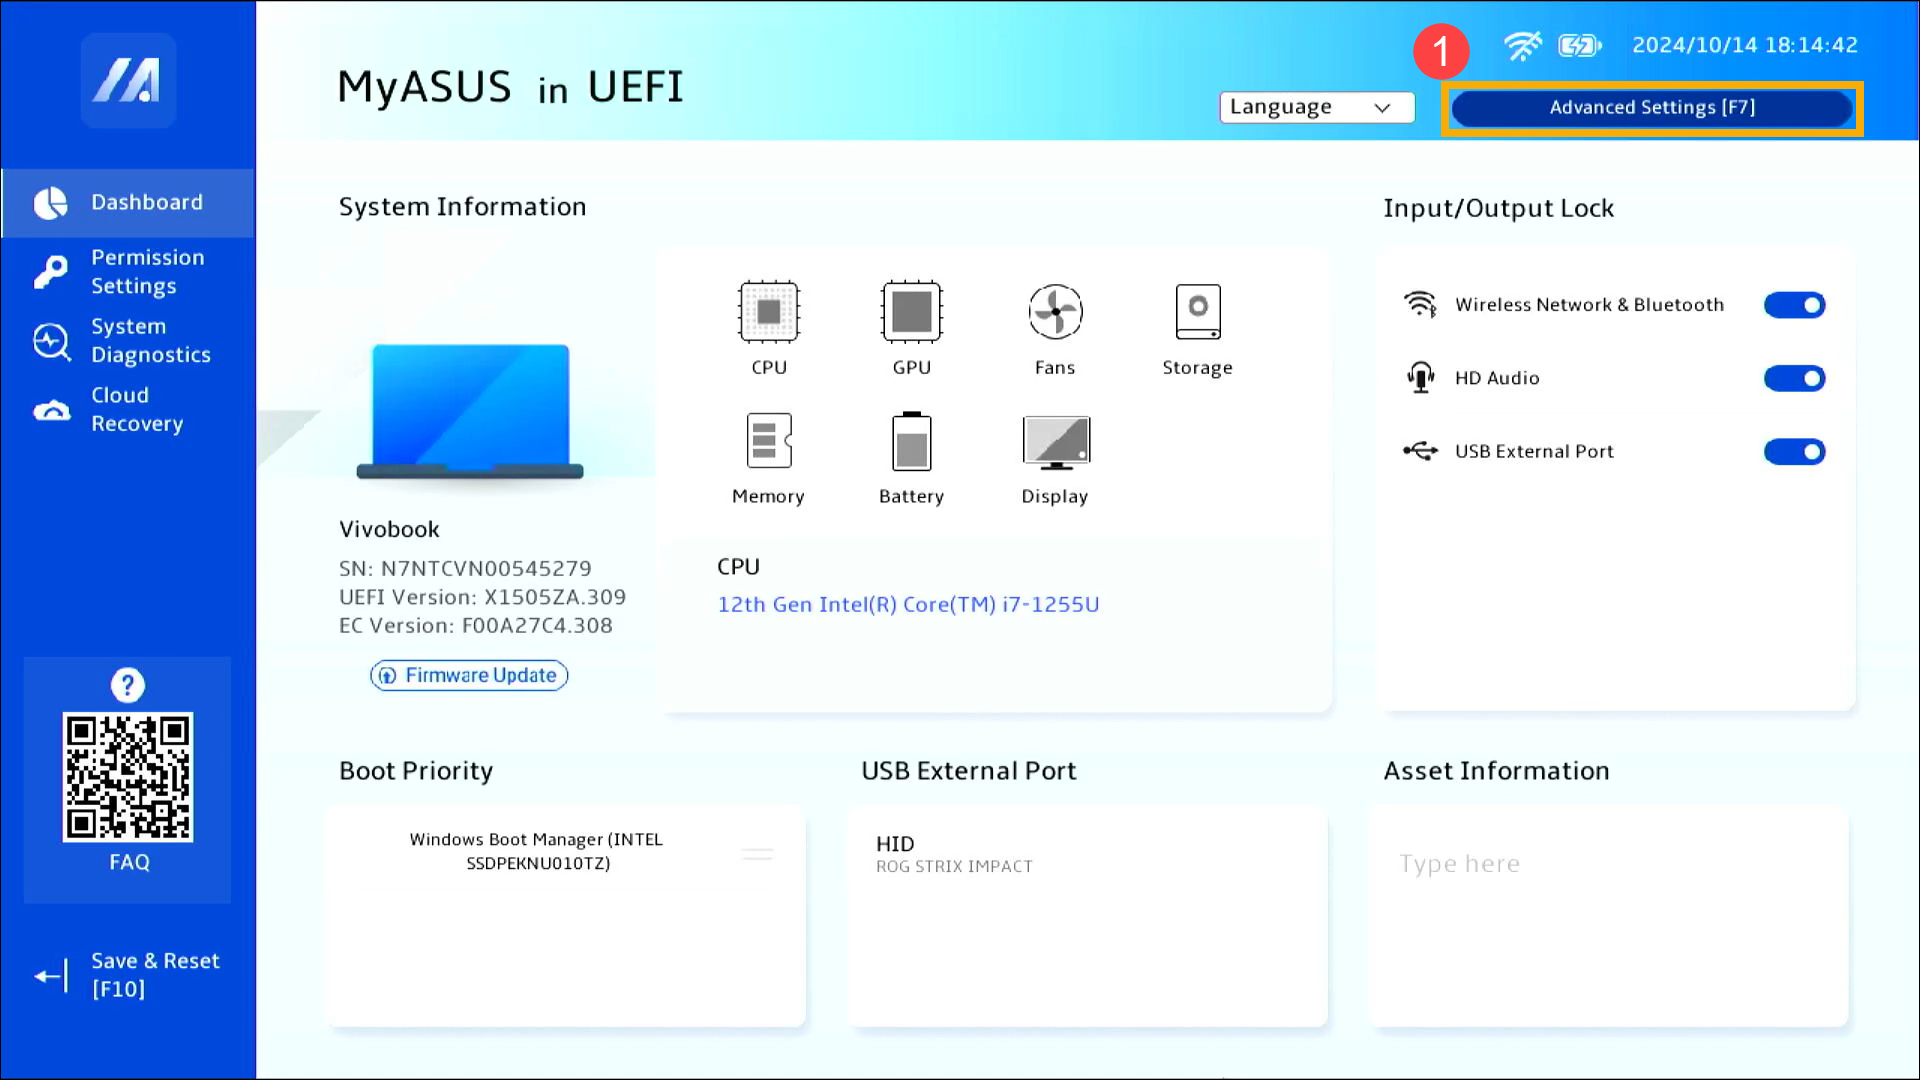
- After entering the MyASUS in UEFI, press Hotkey[F7], or you can click the [Advanced Settings] on the screen①.
- After entering the Advanced Settings, Load BIOS optimized defaults. Go to [Save & Exit] screen②, then select [Restore Defaults] item③.
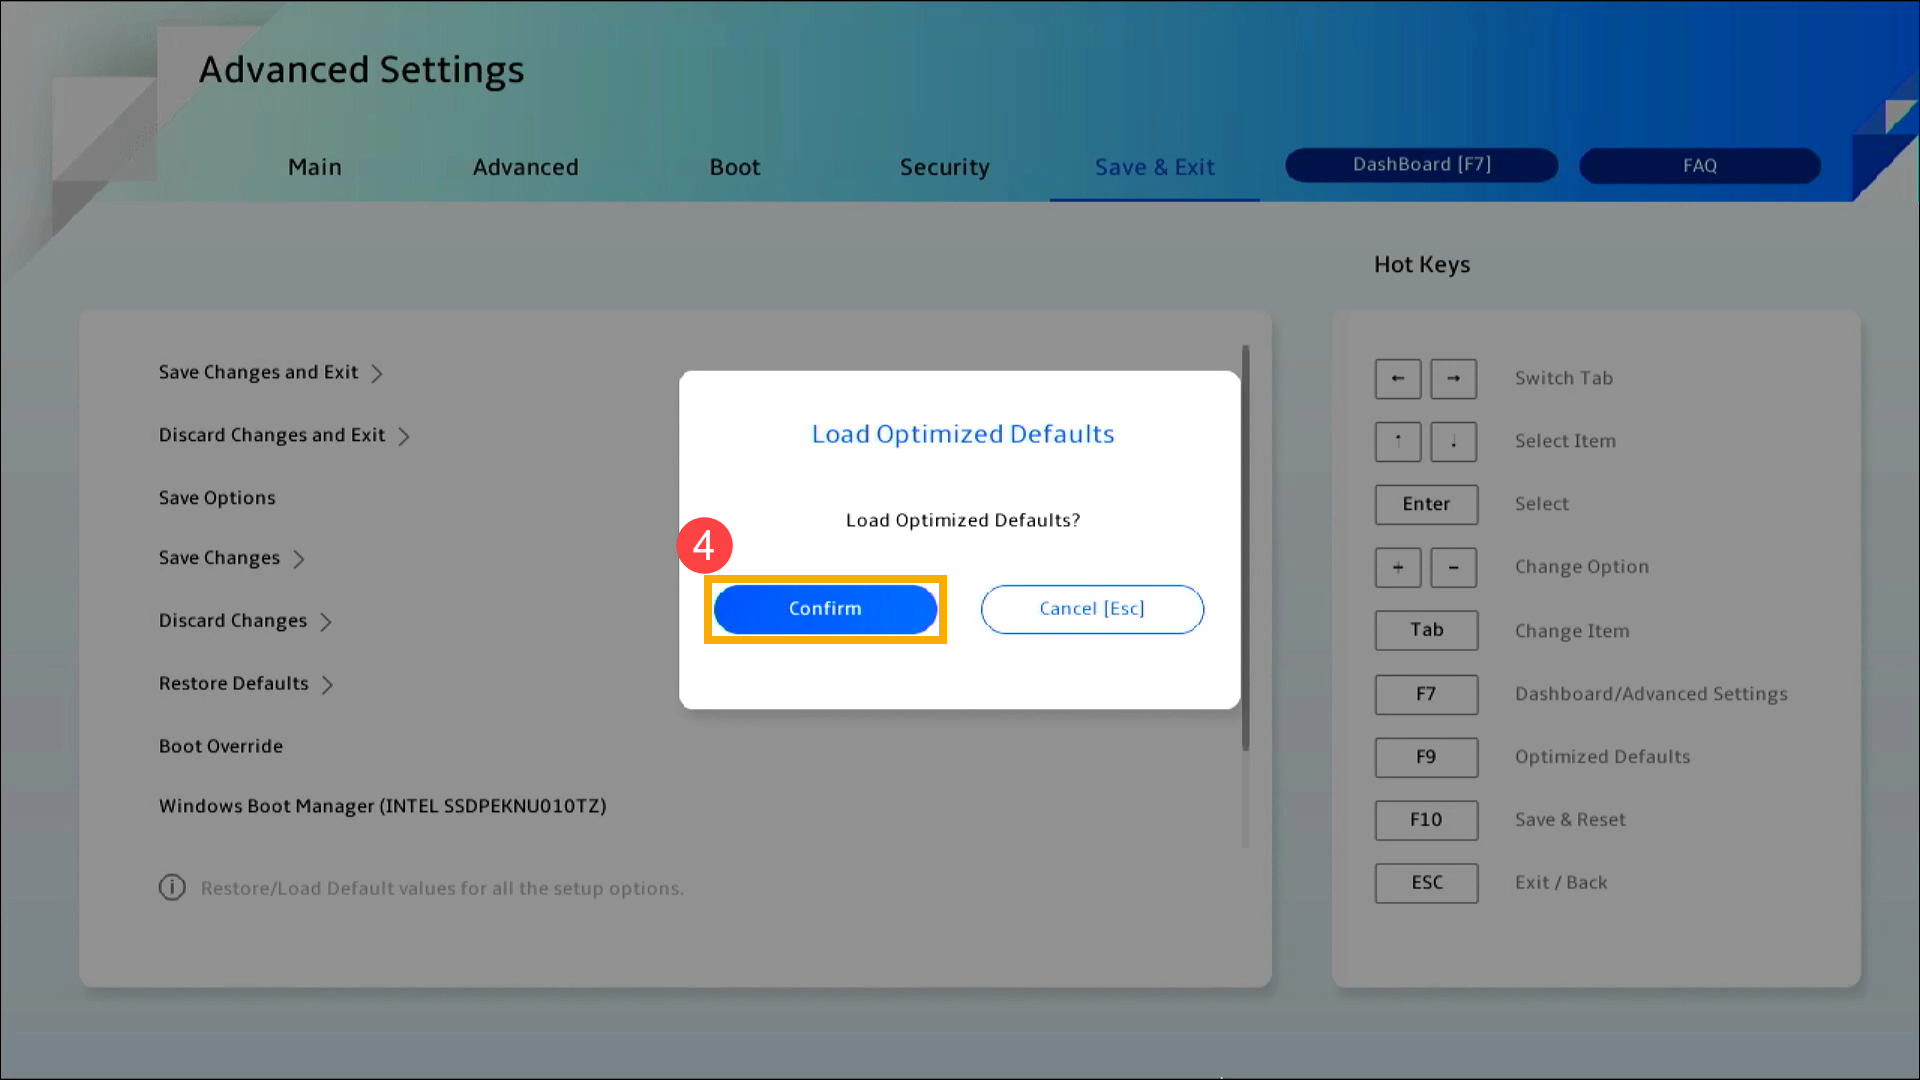
- Confirm whether to load the BIOS optimized defaults, select Confirm and press [Enter] key, or you can click [Confirm] on the screen④.
- Check whether the boot option is correct. Go to the [Boot] page⑤, find the [Boot Option #1]⑥, select the correct hard disk drive which has the operating system⑦.
Note: If there is no operating system installation file in your hard disk drive, please install it first. Here you can learn more about How to create and use installation media to reinstall Windows 11/10 via USB drive.
Note: If no hard drives are listed in the Boot Option menu, it indicates that your device is unable to detect the hard drive properly. We recommend visiting an ASUS authorized service center for further inspection.
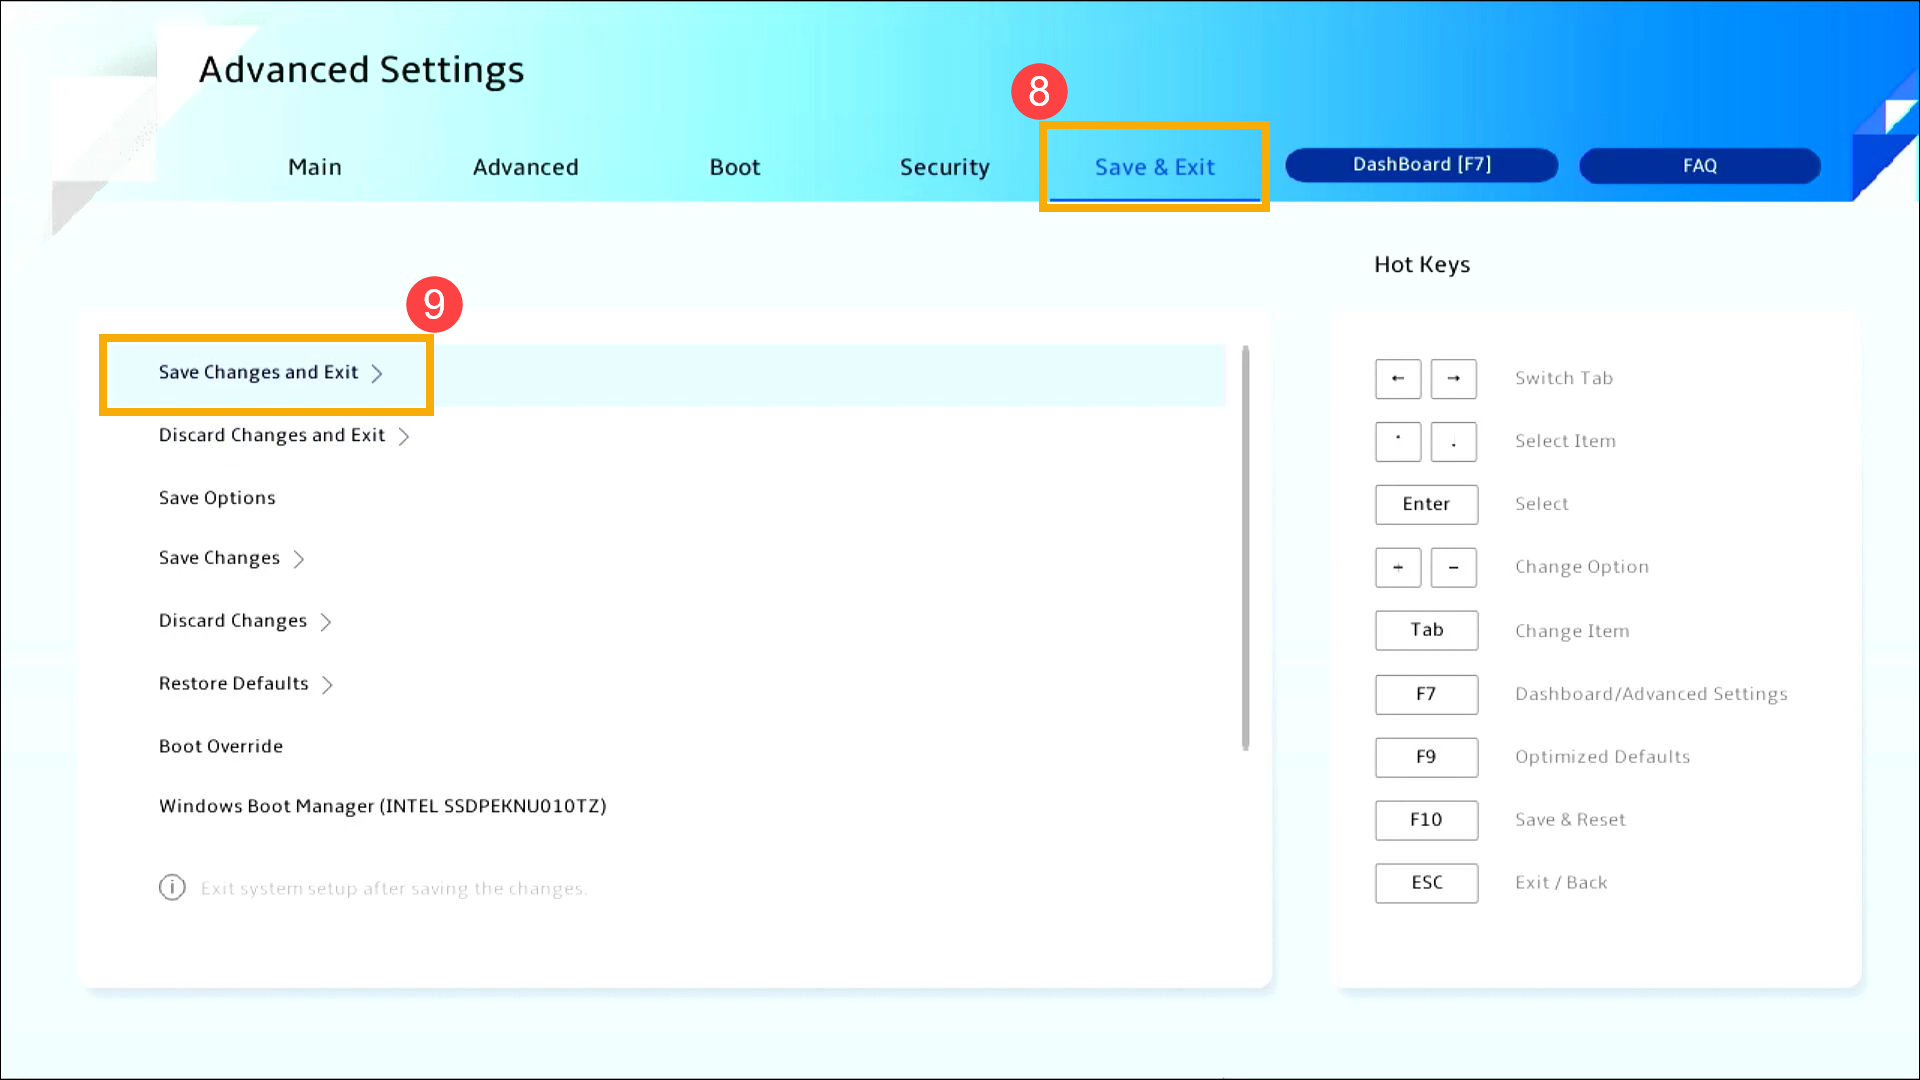
- Save & Exit Setup. Go to [Save & Exit] screen⑧, then select [Save Changes and Exit] item⑨.
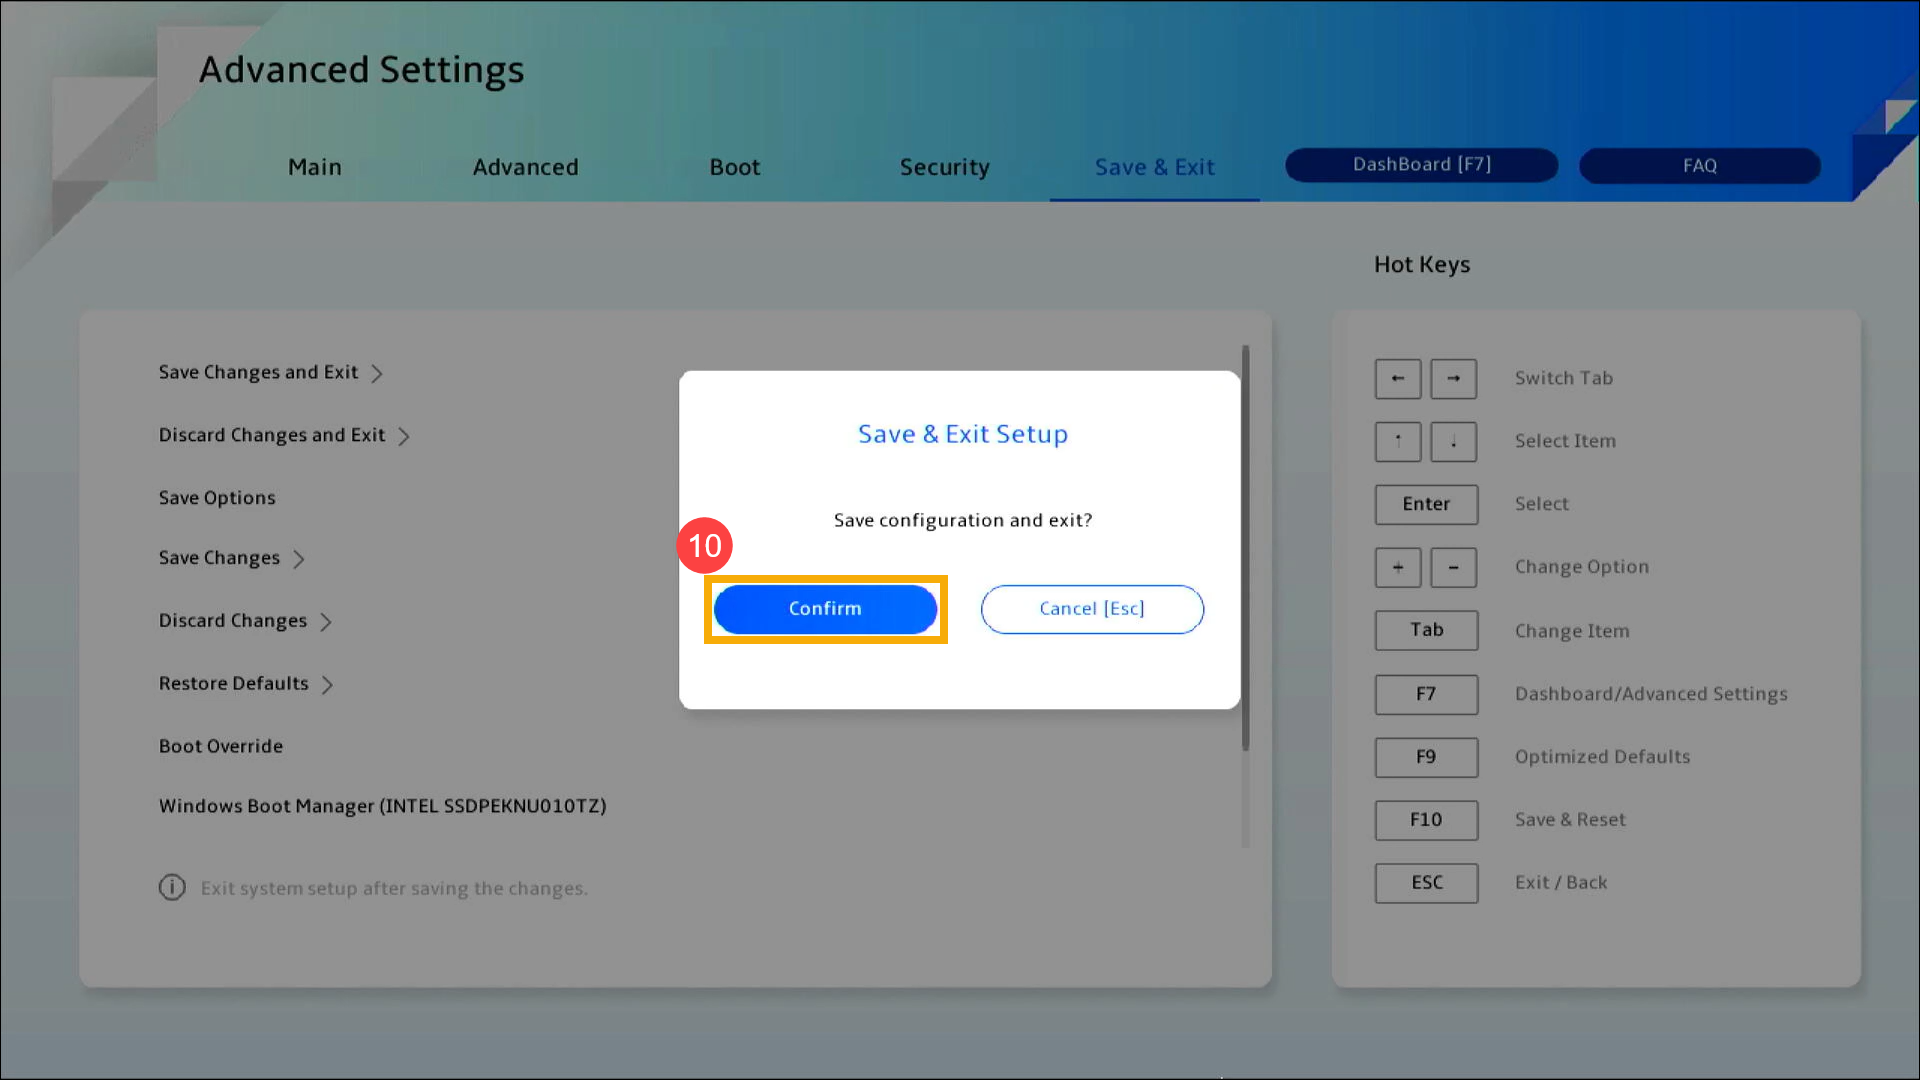
- Confirm whether to save and exit the BIOS configuration, select Confirm and press [Enter] key, or you can click [Confirm] on the screen⑩.
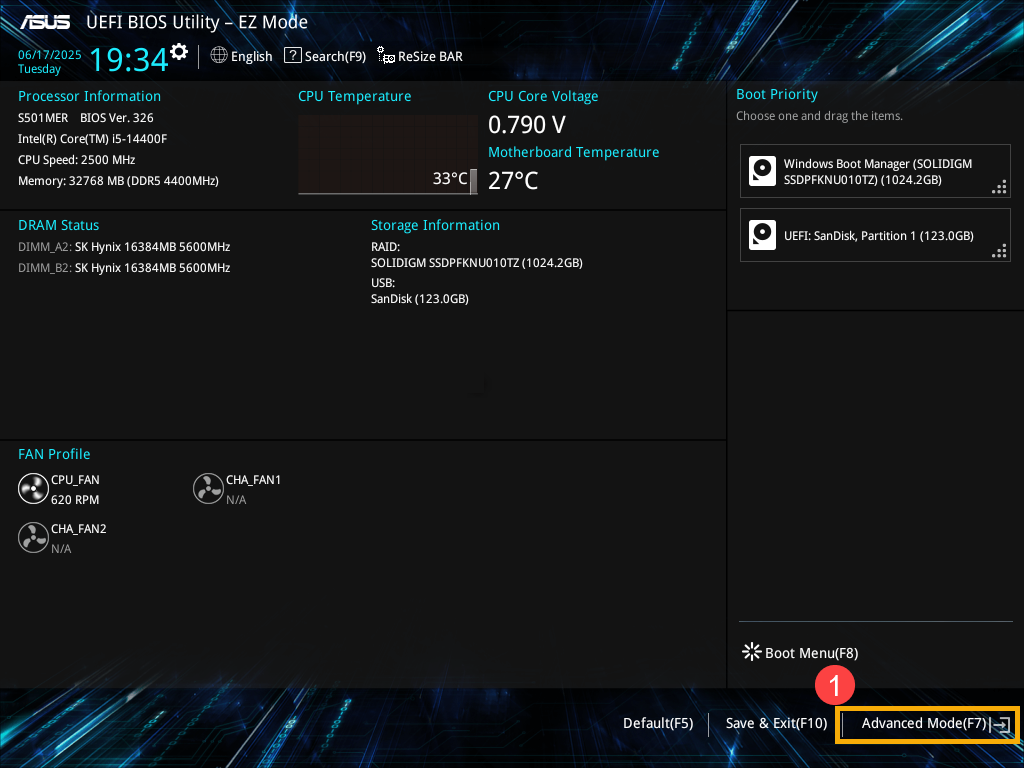
Check BIOS settings on a Desktop Computer:
In the UEFI interface, you can navigate and confirm using the Arrow Keys and Enter key on the keyboard, or Mouse.
Note: The BIOS screen below may vary slightly depending on the model.
- After entering the BIOS utility, press Hotkey[F7], or you can click the [Advanced Mode] on the screen①.
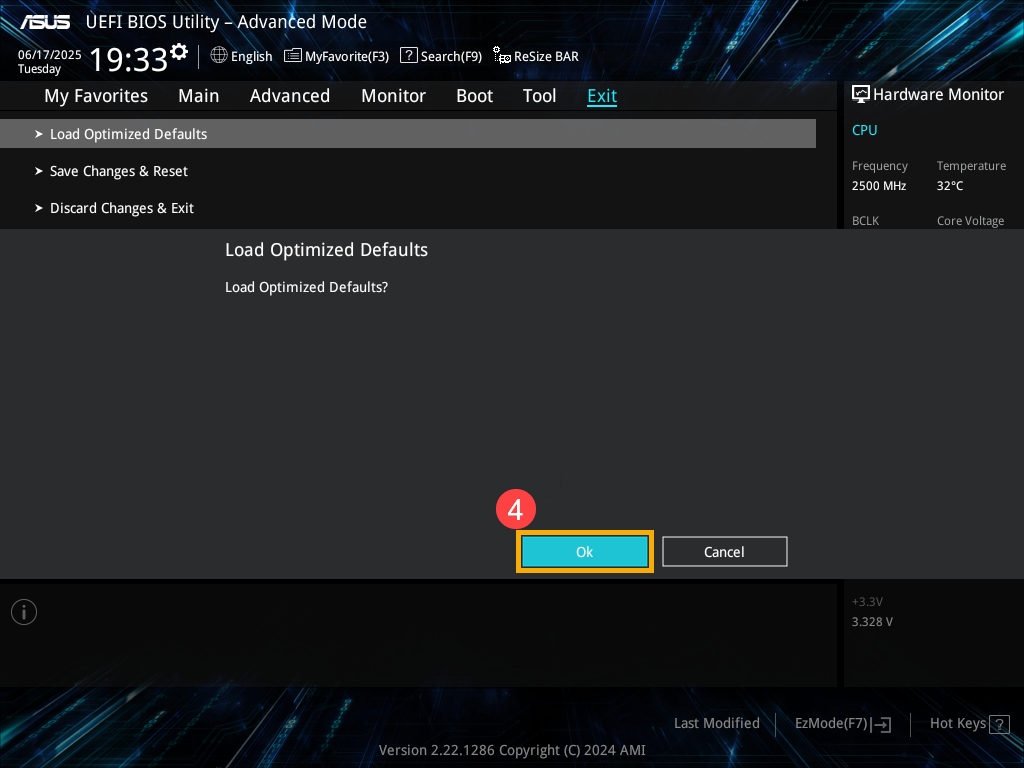
- After entering the Advanced Mode, Load BIOS optimized defaults. Go to [Exit] screen②, then select [Load Optimized Defaults] item③.

- Confirm whether to load the BIOS optimized defaults, select Ok and press [Enter] key, or you can click [Ok] on the screen④.
- Check whether the boot option is correct. Go to the [Boot] page⑤, find the [Boot Option #1]⑥, select the correct hard disk drive which has the operating system⑦.
Note: If there is no operating system installation file in your hard disk drive, please install it first. Here you can learn more about How to create and use installation media to reinstall Windows 11/10 via USB drive.
Note: If no hard drives are listed in the Boot Option menu, it indicates that your device is unable to detect the hard drive properly. We recommend visiting an ASUS authorized service center for further inspection.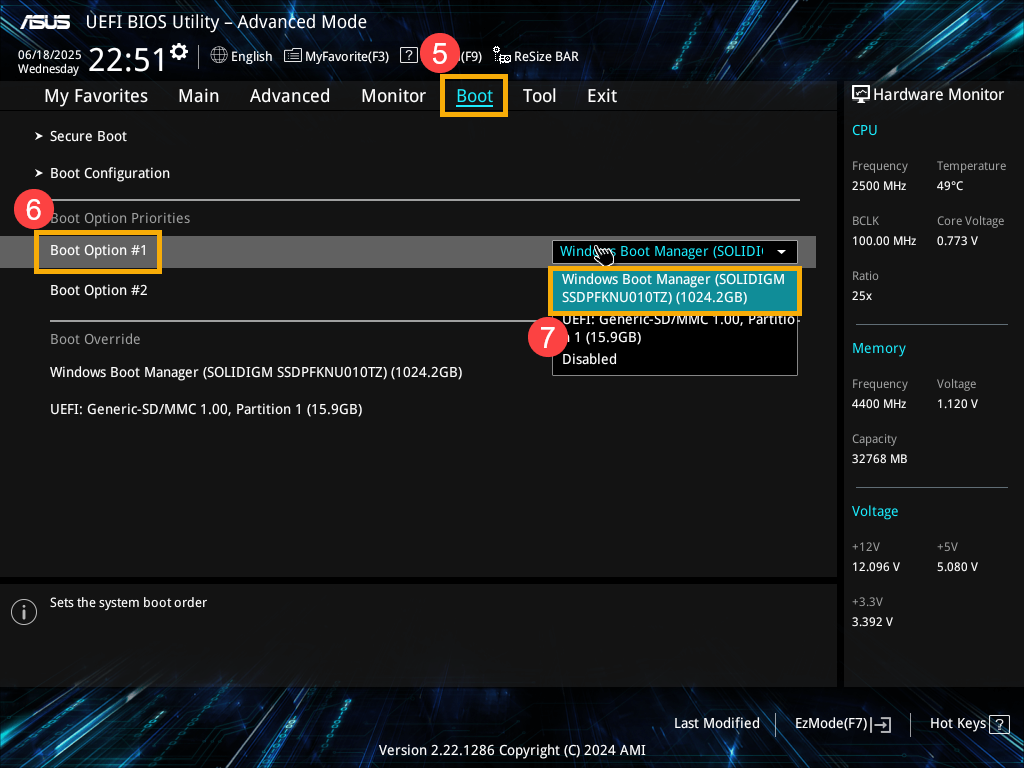
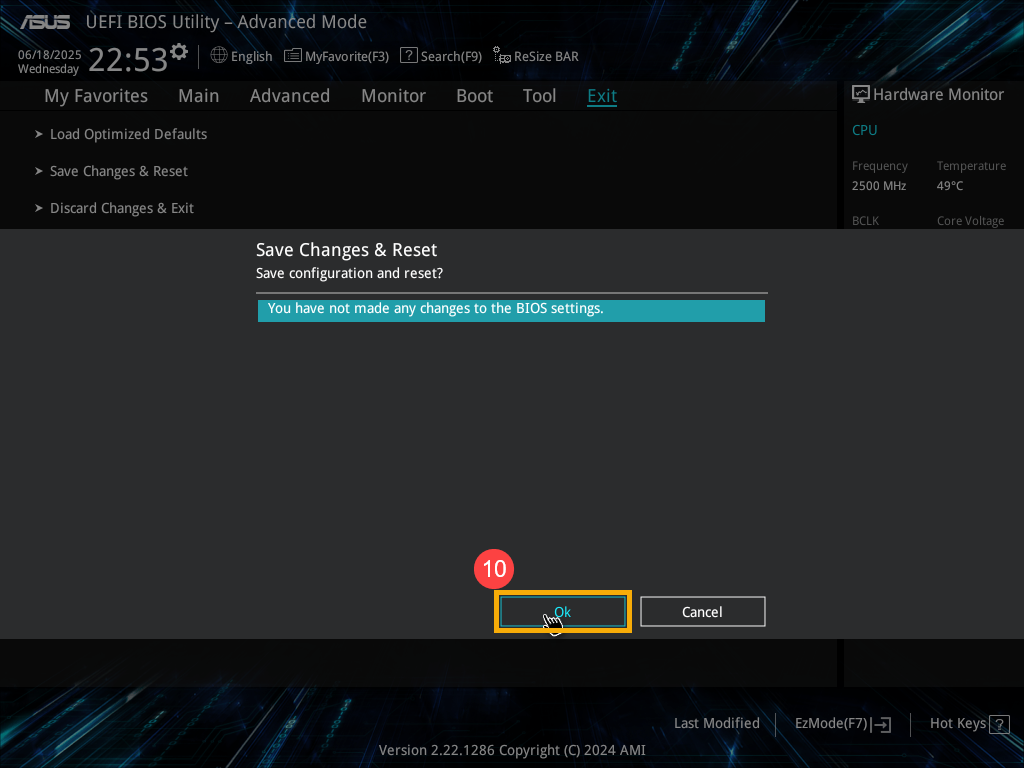
- Save & Exit Setup. Go to [Exit] screen⑧, then select [Save Changes & Exit] item⑨.
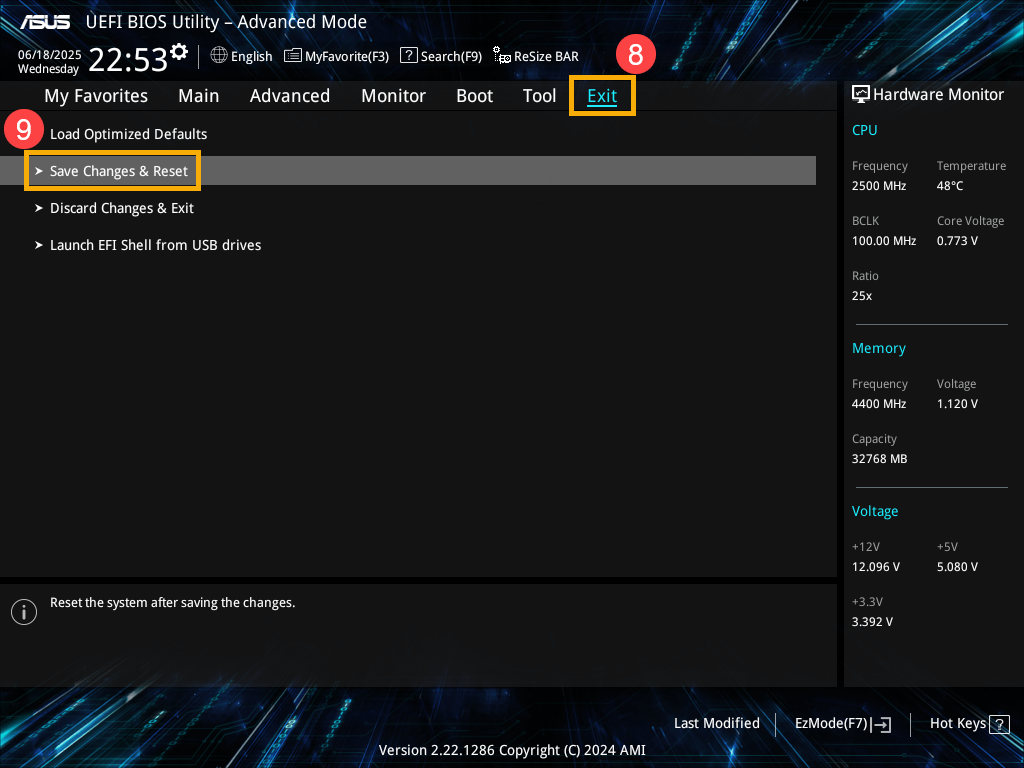
- Confirm whether to save and exit the BIOS configuration, select Ok and press [Enter] key, or you can click [Ok] on the screen⑩.
Method 3: Enter Safe Mode and Perform a System Restore
If your device still cannot enter the Windows operating system after you adjust the BIOS settings, the operating system may encounter some issues. You are able to reset the system via Safe mode.
- Here you can learn more about: How to enter Safe Mode when the system is inaccessible.
- After entering the Safe mode, please backup your personal files, then reset the system. Here you can learn more about: How to reset the system.
If your problem cannot be resolved with the above solution and information, please contact ASUS Product Support for further information.