Turn on suggestions
Auto-suggest helps you quickly narrow down your search results by suggesting possible matches as you type.
Showing results for
- Republic of Gamers Forum
- Discussions
- Overclocking & Tweaking
- A Simple Guide To Overclocking Your Graphics Card ...
Options
- Subscribe to RSS Feed
- Mark Topic as New
- Mark Topic as Read
- Float this Topic for Current User
- Bookmark
- Subscribe
- Mute
- Printer Friendly Page
A Simple Guide To Overclocking Your Graphics Card With GPU Tweak
Options
- Mark as New
- Bookmark
- Subscribe
- Mute
- Subscribe to RSS Feed
- Permalink
04-09-2012
02:30 AM
- last edited on
03-05-2024
07:08 PM
by
![]() ROGBot
ROGBot
2012 is an exciting time to need a graphic card upgrade. New PCI-Express 3 cards have hit the market and include the Nvidia GeForce GTX 600 series, such as the recent GTX 680, and AMD’s Radeon HD 7000 Series, including ASUS designed cards such as the Radeon HD 7970 DirectCU II, 7950 DirectCU II and 7870 DirectCU II as well as their TOP pre-overclocked variants.
While these cards fill the news and people’s upgrade anticipations right now, you don’t need PCI-Express 3.0 or even the latest series of graphics cards to overclock though – generally speaking any graphics card can be overclocked in some way. This guide explains the process of how to overclock your graphics card with GPU Tweak, and applies to Nvidia and AMD graphics cards alike.

The Radeon HD 7970 DirectCU II TOP has an upgraded PCB designed by ASUS engineers, giving it potentially more overclocking overhead.
Downloads you will need:
First of all download the latest version of ASUS GPU Tweak and AMD Catalyst drivers to get support for the latest models. For CrossFireX setups also download the latest version of CAP.
What is ASUS GPU Tweak?
GPU Tweak allows you to optimize clock speeds, voltage and fan speeds on up to four graphics cards independently or simultaneously, you can also select between GPU Tweak’s Standard or Advanced modes depending on your level of experience.

A good stress test to push your overclock stability is FurMark, while GPU-Z is a must and is included with the ASUS GPU Tweak; however you can also download the latest version separately as an ROG Skinned GPU-Z.
What is FurMark?
FurMark is an OpenGL-based GPU stress test utility (also called GPU burn-in test). It makes it possible to push the GPU to the max in order to test the stability of the graphics card (and the PSU too!) leading to maximum GPU and VRM temperatures. That’s why FurMark is often used by overclockers and graphics cards fanatics to validate an overclocking, to test a new VGA cooler or to check the max power consumption of a video card.
Before we start
Open which ever version of GPU-Z you are using. Select the sensor tab, look at the bottom and tick both the boxes. You will be prompted to select a default location for the log file it will be creating. Why do we want this? Well if the overclock fails it is handy to look at the logged file and see what the possible cause of the failure was, as if your system freezes up you cannot check what you’re GPU temperatures were when the system froze. This way we can check the history and then make informed calls on the correct way forward.

Create a baseline
Open your FurMark stress test – Select the profile you wish to run, I suggest you use the profile that will match as close to your gaming resolution. I used the 1920×1080 (1080p) setting. Remember the point of this exercise is to establish knowledge of the baseline stability of your graphic card at stock speeds. You can use any of the pre-set profiles too, as long as you are using the same settings each time we do a stability test.

Once we have these temperature numbers and are confident that the card is running perfectly at stock speeds, then we can overclock!
First: Memory Overclocking
The first thing to do is see what the maximum memory frequency is.

Open GPU Tweak
Either move the slider for the memory to up by 100MHz using the mouse, the keyboard arrow keys, or directly key in a value 100MHz higher. The offset value will tell you how far from stock MHz it’s been changed.
Apply the setting.
Open FurMark and run the benchmark preset that you prefer.
If your system passes, increase the frequency by 100MHz on the slider again.
Apply and run FurMark again
Repeat until your system fails the benchmark test or crashes.
Drop back 100MHz from the last used setting using the slider
Run the benchmark again to check
If passed successfully stop there and record the frequency that your system passed the benchmark test successfully at.
Reset GPU Tweak to default
We are not going to change any voltages in this basic guide until the very end. We now have the stand alone maximum memory frequency for our graphics card. It is actually unlikely that we will achieve this frequency when the GPU core is overclocked as well (due to reasons such as EMI, power draw, and induced heat from the GPU affecting the GDDR5 chips and PCB tracing, but what we do have is a known range within which we can work.
While these cards fill the news and people’s upgrade anticipations right now, you don’t need PCI-Express 3.0 or even the latest series of graphics cards to overclock though – generally speaking any graphics card can be overclocked in some way. This guide explains the process of how to overclock your graphics card with GPU Tweak, and applies to Nvidia and AMD graphics cards alike.
The Radeon HD 7970 DirectCU II TOP has an upgraded PCB designed by ASUS engineers, giving it potentially more overclocking overhead.
Downloads you will need:
First of all download the latest version of ASUS GPU Tweak and AMD Catalyst drivers to get support for the latest models. For CrossFireX setups also download the latest version of CAP.
What is ASUS GPU Tweak?
GPU Tweak allows you to optimize clock speeds, voltage and fan speeds on up to four graphics cards independently or simultaneously, you can also select between GPU Tweak’s Standard or Advanced modes depending on your level of experience.
A good stress test to push your overclock stability is FurMark, while GPU-Z is a must and is included with the ASUS GPU Tweak; however you can also download the latest version separately as an ROG Skinned GPU-Z.
What is FurMark?
FurMark is an OpenGL-based GPU stress test utility (also called GPU burn-in test). It makes it possible to push the GPU to the max in order to test the stability of the graphics card (and the PSU too!) leading to maximum GPU and VRM temperatures. That’s why FurMark is often used by overclockers and graphics cards fanatics to validate an overclocking, to test a new VGA cooler or to check the max power consumption of a video card.
Before we start
Open which ever version of GPU-Z you are using. Select the sensor tab, look at the bottom and tick both the boxes. You will be prompted to select a default location for the log file it will be creating. Why do we want this? Well if the overclock fails it is handy to look at the logged file and see what the possible cause of the failure was, as if your system freezes up you cannot check what you’re GPU temperatures were when the system froze. This way we can check the history and then make informed calls on the correct way forward.
Create a baseline
Open your FurMark stress test – Select the profile you wish to run, I suggest you use the profile that will match as close to your gaming resolution. I used the 1920×1080 (1080p) setting. Remember the point of this exercise is to establish knowledge of the baseline stability of your graphic card at stock speeds. You can use any of the pre-set profiles too, as long as you are using the same settings each time we do a stability test.
Once we have these temperature numbers and are confident that the card is running perfectly at stock speeds, then we can overclock!
First: Memory Overclocking
The first thing to do is see what the maximum memory frequency is.
Open GPU Tweak
Either move the slider for the memory to up by 100MHz using the mouse, the keyboard arrow keys, or directly key in a value 100MHz higher. The offset value will tell you how far from stock MHz it’s been changed.
Apply the setting.
Open FurMark and run the benchmark preset that you prefer.
If your system passes, increase the frequency by 100MHz on the slider again.
Apply and run FurMark again
Repeat until your system fails the benchmark test or crashes.
Drop back 100MHz from the last used setting using the slider
Run the benchmark again to check
If passed successfully stop there and record the frequency that your system passed the benchmark test successfully at.
Reset GPU Tweak to default
We are not going to change any voltages in this basic guide until the very end. We now have the stand alone maximum memory frequency for our graphics card. It is actually unlikely that we will achieve this frequency when the GPU core is overclocked as well (due to reasons such as EMI, power draw, and induced heat from the GPU affecting the GDDR5 chips and PCB tracing, but what we do have is a known range within which we can work.
Labels:
- Labels:
-
Overclocking
-
Tuning
-
Tweaking
147,582 Views
12 REPLIES 12
Options
- Mark as New
- Bookmark
- Subscribe
- Mute
- Subscribe to RSS Feed
- Permalink
04-09-2012 02:30 AM
GPU Core
The next thing we are going to do is see what our maximum GPU frequency is.

Open GPU Tweak
Either move the slider for the GPU to up by 10MHz using the mouse, the keyboard arrow keys, or directly key in a value 10MHz higher. The offset value will tell you how far from stock MHz it’s been changed.
Apply the setting.
Open FurMark and run the benchmark preset that you prefer.
If your system passes, increase the frequency by 10MHz on the slider again.
Apply and run FurMark again
Repeat until your system fails the benchmark test or crashes.
Drop back 10MHz from the last used setting using the slider
Run the benchmark again to check
If passed successfully stop there and record the frequency that your system passed the benchmark test successfully at.
Once again we have is a known frequency that our GPU can achieve, but yet without voltage changes.
Putting the Core and Memory together
Now the moment of truth: putting them both together. Most of the time it will not be possible to get the max core frequency and the max memory frequency that we achieved separately to be stable at the same time, but we will try and get as close as possible.
Open GPU Tweak
Leave the GPU core voltage linked to GPU frequency (this is the default setting)
Move the slider for the core to 50MHz below your maximum previously achieved
Move the slider for the memory to 200MHz below your maximum previously achieved
Open FurMark and run the benchmark preset that you have selected
Optional: If your system still passes, repeat 2-4 but increasing the core up by 10MHz and memory by 25MHz each time.
If your system passes, run the 15 minutes burn in test and keep an eye on your temperatures.
You have a stable overclock of your graphic card at close to the maximum that can be achieved without any additional voltages or special cooling.
If your overclock did not pass the FurMark stress test then do the following.
Open GPU Tweak
Move the slider for the core to 75MHz below your maximum previously achieved
Move the slider for the memory to 200MHz below your maximum previously achieve
Open FurMark and run the benchmark preset that you have selected
If your system passes run the 15 minutes burn in test.
You have a stable overclock of your graphic card at close to the maximum that can be achieved without any additional voltages or special cooling.
But wait there is more
At present we have the GPU core voltage and the GPU frequency linked in GPU Tweak. This works but it is less than ideal as it’s a bit overprovisioned. Normally we can reduce the amount of voltage needed to achieve what we currently have. Here is how we are going to find that out.

If you have an ASUS graphics card, unlink the Voltage/Frequency by clicking on the little lock symbol, otherwise it will already be unlinked.
Ensure your Graphic Core frequency remains at the final stable overclock achieved
Reduce the voltage by small increments: I use 10mV steps.
So if your voltage was at 1.050V reduce to 1.040V
Run the FurMark test and if passes, lower the voltage again
Repeat until your system does not pass
Increase your voltage by one 10mV from the previous value
Optional: Run FurMark to double-check.
You are done! Enjoy your overclocked graphic card. Please post GPU-Z screen shots with your best stable overclock and include the voltages you have used.
The next thing we are going to do is see what our maximum GPU frequency is.
Open GPU Tweak
Either move the slider for the GPU to up by 10MHz using the mouse, the keyboard arrow keys, or directly key in a value 10MHz higher. The offset value will tell you how far from stock MHz it’s been changed.
Apply the setting.
Open FurMark and run the benchmark preset that you prefer.
If your system passes, increase the frequency by 10MHz on the slider again.
Apply and run FurMark again
Repeat until your system fails the benchmark test or crashes.
Drop back 10MHz from the last used setting using the slider
Run the benchmark again to check
If passed successfully stop there and record the frequency that your system passed the benchmark test successfully at.
Once again we have is a known frequency that our GPU can achieve, but yet without voltage changes.
Putting the Core and Memory together
Now the moment of truth: putting them both together. Most of the time it will not be possible to get the max core frequency and the max memory frequency that we achieved separately to be stable at the same time, but we will try and get as close as possible.
Open GPU Tweak
Leave the GPU core voltage linked to GPU frequency (this is the default setting)
Move the slider for the core to 50MHz below your maximum previously achieved
Move the slider for the memory to 200MHz below your maximum previously achieved
Open FurMark and run the benchmark preset that you have selected
Optional: If your system still passes, repeat 2-4 but increasing the core up by 10MHz and memory by 25MHz each time.
If your system passes, run the 15 minutes burn in test and keep an eye on your temperatures.
You have a stable overclock of your graphic card at close to the maximum that can be achieved without any additional voltages or special cooling.
If your overclock did not pass the FurMark stress test then do the following.
Open GPU Tweak
Move the slider for the core to 75MHz below your maximum previously achieved
Move the slider for the memory to 200MHz below your maximum previously achieve
Open FurMark and run the benchmark preset that you have selected
If your system passes run the 15 minutes burn in test.
You have a stable overclock of your graphic card at close to the maximum that can be achieved without any additional voltages or special cooling.
But wait there is more
At present we have the GPU core voltage and the GPU frequency linked in GPU Tweak. This works but it is less than ideal as it’s a bit overprovisioned. Normally we can reduce the amount of voltage needed to achieve what we currently have. Here is how we are going to find that out.
If you have an ASUS graphics card, unlink the Voltage/Frequency by clicking on the little lock symbol, otherwise it will already be unlinked.
Ensure your Graphic Core frequency remains at the final stable overclock achieved
Reduce the voltage by small increments: I use 10mV steps.
So if your voltage was at 1.050V reduce to 1.040V
Run the FurMark test and if passes, lower the voltage again
Repeat until your system does not pass
Increase your voltage by one 10mV from the previous value
Optional: Run FurMark to double-check.
You are done! Enjoy your overclocked graphic card. Please post GPU-Z screen shots with your best stable overclock and include the voltages you have used.
Options
- Mark as New
- Bookmark
- Subscribe
- Mute
- Subscribe to RSS Feed
- Permalink
04-13-2012 09:27 AM
Hi there, I have done what I`ve been told. But there is a öittle problem understanding "stable". Furmark runs clean over 1 hour, but ingame, the graphic driver resets the OC to stock value after a few seconds/minutes. The same In Furmark if I choose an other solution. This could be a driver problem, because I`m still running the 275.xx and you can see that physix is disabled. Can`t update the driver because of an "%1 is not...." message. I have to wait for my new HDDs to solve this. Here are the pics:


Options
- Mark as New
- Bookmark
- Subscribe
- Mute
- Subscribe to RSS Feed
- Permalink
05-14-2012 03:47 PM
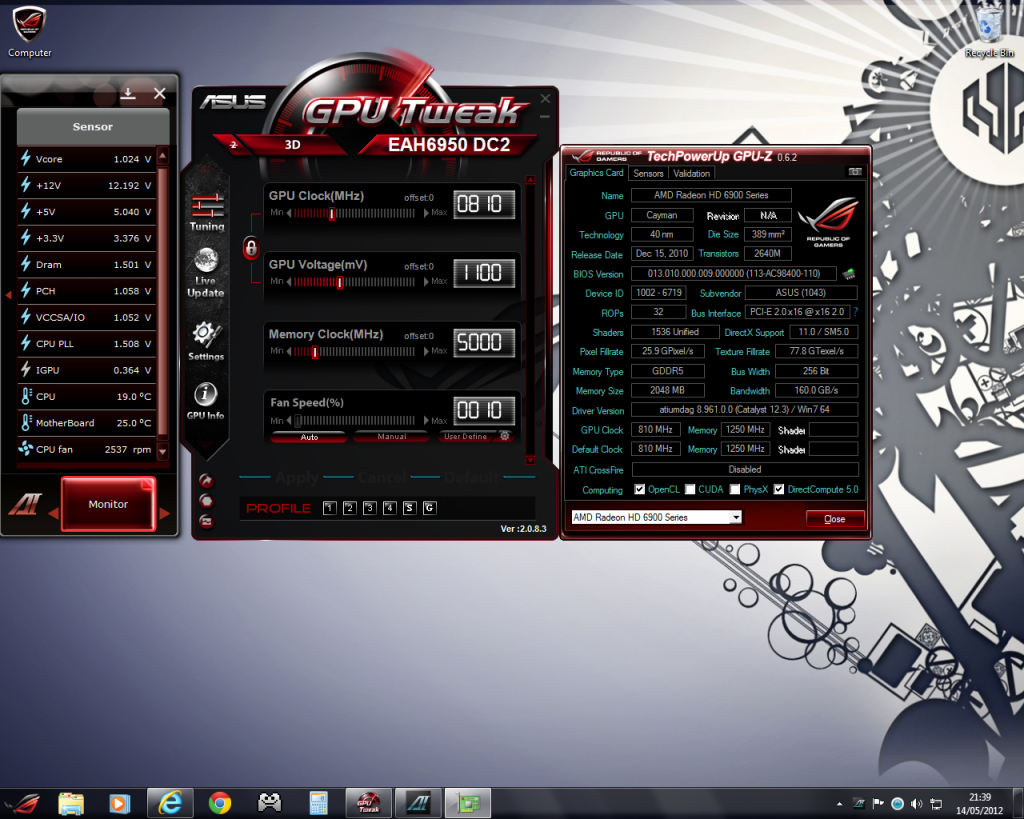
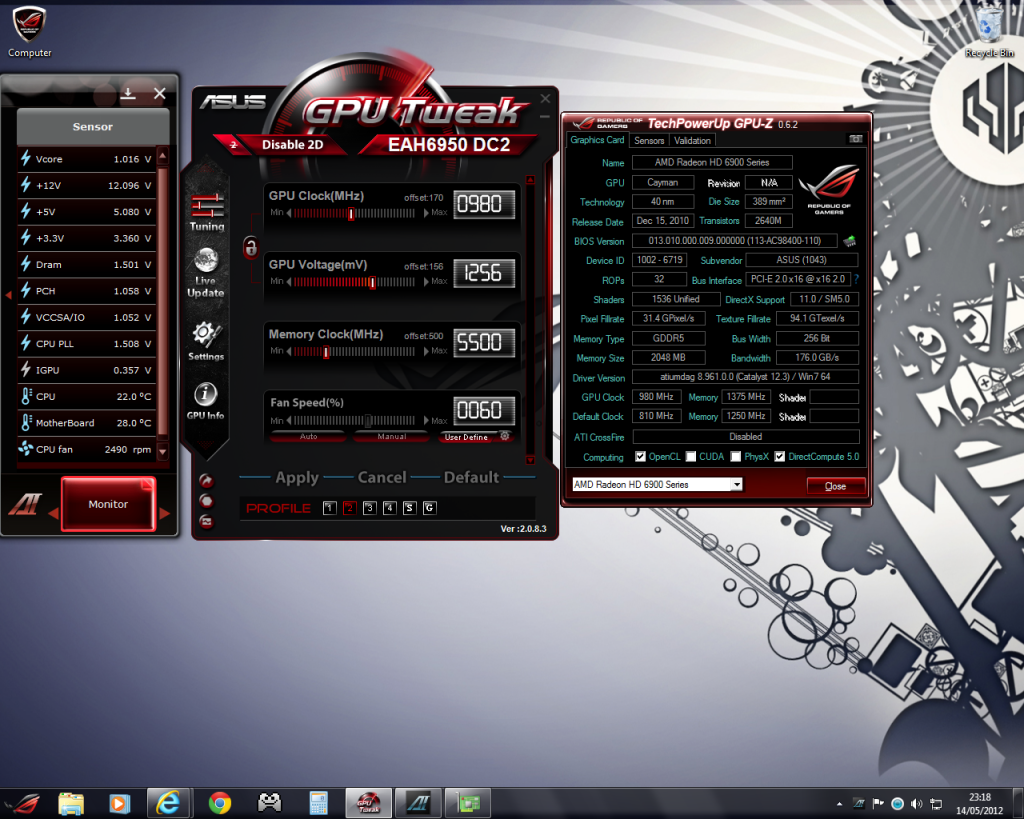
Lovin my Asus DC2 6950, have done the 6970 shader unlock and used GPU Tweak to overclock my card to 980/5500 from the stock 810/5000 clocks.
I haven't used FurMark to test stability tho as I prefer to use games like BF3 to real world test stability instead and so far using the 980/5500 overclock with a voltage of 1.256v I've had 0 issues, temps on all 3 cores never exceed 68'c.
I saved the overclock to profile 2 and left profile 1 at default so that I can have stock settings when im not gaming (profile 1) and a simple click on profile 2 when its game time xD
Tested with 3DMark 2011 and BF3 with ultra settings (constant 75FPS @1080p:)
Profile 1 (default)
Profile 2 (overclock)
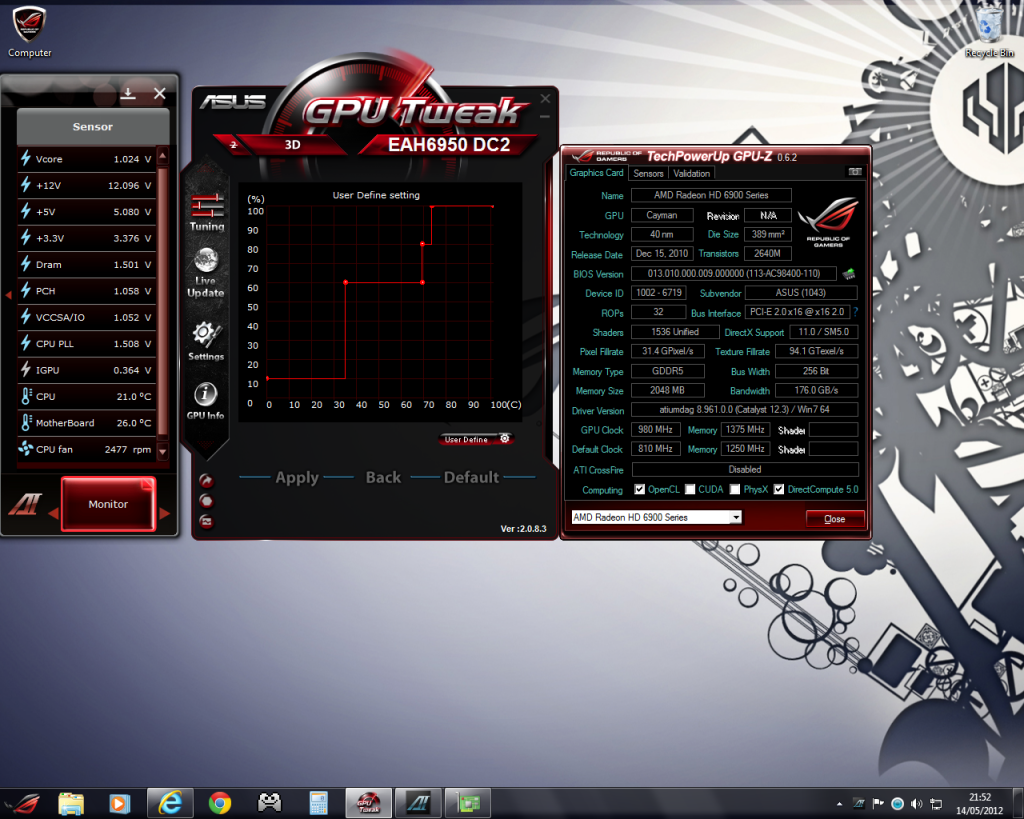
Profile 2 custom fan speed
I haven't used FurMark to test stability tho as I prefer to use games like BF3 to real world test stability instead and so far using the 980/5500 overclock with a voltage of 1.256v I've had 0 issues, temps on all 3 cores never exceed 68'c.
I saved the overclock to profile 2 and left profile 1 at default so that I can have stock settings when im not gaming (profile 1) and a simple click on profile 2 when its game time xD
Tested with 3DMark 2011 and BF3 with ultra settings (constant 75FPS @1080p:)
Profile 1 (default)
Profile 2 (overclock)
Profile 2 custom fan speed
Chassis: NZXT Switch 810. - MB: Rampage v Extreme x99. - CPU: Intel Core i7 5820k. - Memory: 16GB Ripsaw 4 DDR4 2400MHz. - GPU: 2x Sapphire Tri-X R9 290 OC Edition 4GB.
PSU: Corsair AX1200i. - Storage: 1x Samsung 830 60GB SSD + 1x Samsung evo 840 120GB SSD + 1x Samsung 850 Evo 250GB SSD + 1x Seagate Barracuda 500GB HDD.
OS: Windows 10 Pro x64.
PSU: Corsair AX1200i. - Storage: 1x Samsung 830 60GB SSD + 1x Samsung evo 840 120GB SSD + 1x Samsung 850 Evo 250GB SSD + 1x Seagate Barracuda 500GB HDD.
OS: Windows 10 Pro x64.
Options
- Mark as New
- Bookmark
- Subscribe
- Mute
- Subscribe to RSS Feed
- Permalink
05-27-2012 04:38 AM
hi this is my first post on what seems to be a great site, i have a question about overclocking my hd6950 c/f i have noticed they have a different bios will this make any difference to o/c.
________________________________________________________________________________
Display device : MSI R6950 Twin Frozr III PE on Cayman GPU
Display driver : 7.14.10.0903, Catalyst 12.3
On-board memory : 2048MB
BIOS : 013.011.000.007
GUID : VEN_1002&DEV_6719&SUBSYS_24611462&REV_00&BUS_1&DEV_0&FN_0
Multi-GPU role : master
GPU2
________________________________________________________________________________
Display device : MSI R6950 Twin Frozr II on Cayman GPU
Display driver : 7.14.10.0903, Catalyst 12.3
On-board memory : 2048MB
BIOS : 013.011.000.001
GUID : VEN_1002&DEV_6719&SUBSYS_24601462&REV_00&BUS_6&DEV_0&FN_0
Multi-GPU role : synchronized with master
________________________________________________________________________________
Display device : MSI R6950 Twin Frozr III PE on Cayman GPU
Display driver : 7.14.10.0903, Catalyst 12.3
On-board memory : 2048MB
BIOS : 013.011.000.007
GUID : VEN_1002&DEV_6719&SUBSYS_24611462&REV_00&BUS_1&DEV_0&FN_0
Multi-GPU role : master
GPU2
________________________________________________________________________________
Display device : MSI R6950 Twin Frozr II on Cayman GPU
Display driver : 7.14.10.0903, Catalyst 12.3
On-board memory : 2048MB
BIOS : 013.011.000.001
GUID : VEN_1002&DEV_6719&SUBSYS_24601462&REV_00&BUS_6&DEV_0&FN_0
Multi-GPU role : synchronized with master
Options
- Mark as New
- Bookmark
- Subscribe
- Mute
- Subscribe to RSS Feed
- Permalink
05-17-2013 05:46 PM
I have followed all the instruction but am having problems. My GTX-680 seems to be set at the minimum voltage and won't let me change it.

Is it the card??
Is it the card??
Options
- Mark as New
- Bookmark
- Subscribe
- Mute
- Subscribe to RSS Feed
- Permalink
04-22-2014 06:49 PM
f1schu wrote:
Lovin my Asus DC2 6950, have done the 6970 shader unlock and used GPU Tweak to overclock my card to 980/5500 from the stock 810/5000 clocks.
I haven't used FurMark to test stability tho as I prefer to use games like BF3 to real world test stability instead and so far using the 980/5500 overclock with a voltage of 1.256v I've had 0 issues, temps on all 3 cores never exceed 68'c.
I saved the overclock to profile 2 and left profile 1 at default so that I can have stock settings when im not gaming (profile 1) and a simple click on profile 2 when its game time xD
Tested with 3DMark 2011 and BF3 with ultra settings (constant 75FPS @1080p:)
Profile 1 (default)
Profile 2 (overclock)
Profile 2 custom fan speed
I have wasted at least 30 hours trying to flash my HD6950 Directcu ii without any luck. How did you do it?
Options
- Mark as New
- Bookmark
- Subscribe
- Mute
- Subscribe to RSS Feed
- Permalink
02-12-2015 03:39 PM
Unsure how to do this with 2 cards: SLI
Devils Canyon Intel i7-4970K ~ Asus Maximus Ranger VII ~ 16 GB HyperX Beast ~ Plextor M6e 256GB M.2 - 2280 SSD ~ CPU Cooler Corsair H105 73.0 CFM Liquid ~ PSU: Thermaltake Smart M 850W 80+ Windows Home Premium x64
Related Content
- Asus ROG Acting Up? Here's How to Solve Common Software Issues in Promotions & General Discussions
- On Becoming a Computer Technician Part Two. in Hardware & Build Advice
- On Becoming a Technician. in Hardware & Build Advice
- Ryzen 7600 all-core limit ~2.7Ghz if iGPU active on B650E-I? in Overclocking & Tweaking
- Monitor not posting in Bios or windows safe mode with HDMI or DP cable in Hardware & Build Advice
