Turn on suggestions
Auto-suggest helps you quickly narrow down your search results by suggesting possible matches as you type.
Showing results for
- Republic of Gamers Forum
- Discussions
- Case Mods & PC Builds
- "LEGION" MybadOmen's NZXT Phantom 820 Build !
Options
- Subscribe to RSS Feed
- Mark Topic as New
- Mark Topic as Read
- Float this Topic for Current User
- Bookmark
- Subscribe
- Mute
- Printer Friendly Page
"LEGION" MybadOmen's NZXT Phantom 820 Build !
Options
- Mark as New
- Bookmark
- Subscribe
- Mute
- Subscribe to RSS Feed
- Permalink
09-07-2012
06:47 PM
- last edited on
03-06-2024
07:15 PM
by
![]() ROGBot
ROGBot
The project has now begun !
Take Care and hope you guys Like this one, as most of you know I Love NZXT Cases and Parts !
MybadOmen
I would also like to take a second to pay respect to a good friend Adam myself and many others have lost and i will be thinking of you Mate though this whole build.Somewhere i will sneak something into the build for you mate. R.I.P. my friend and i will never forget you.
Special thanks goes out to my sponsors who believe in my work and i believe in them as very good companies that are close to the community and sell top notch Products!
Sponsors so far:
http://www.nzxt.com/new/product_all.php
http://www.ekwb.com/shop/
http://www.primochill.com/
http://www.enermax.com/
http://www.mod-smart.com/
http://mnpctech.com/
http://www.avexir.com/
http://www.nvidia.com/page/home.html

http://www.crucial.com/store/ssd.aspx
31,764 Views
35 REPLIES 35
Options
- Mark as New
- Bookmark
- Subscribe
- Mute
- Subscribe to RSS Feed
- Permalink
10-27-2012 09:51 AM
UPDATE 1 !
I know its been a long wait but yes its true ! Update #1 is here and its a very small update but also a HUGE update. Reason this update is going to be small is because the updates following this will be in depth and something new from me if it all works out.
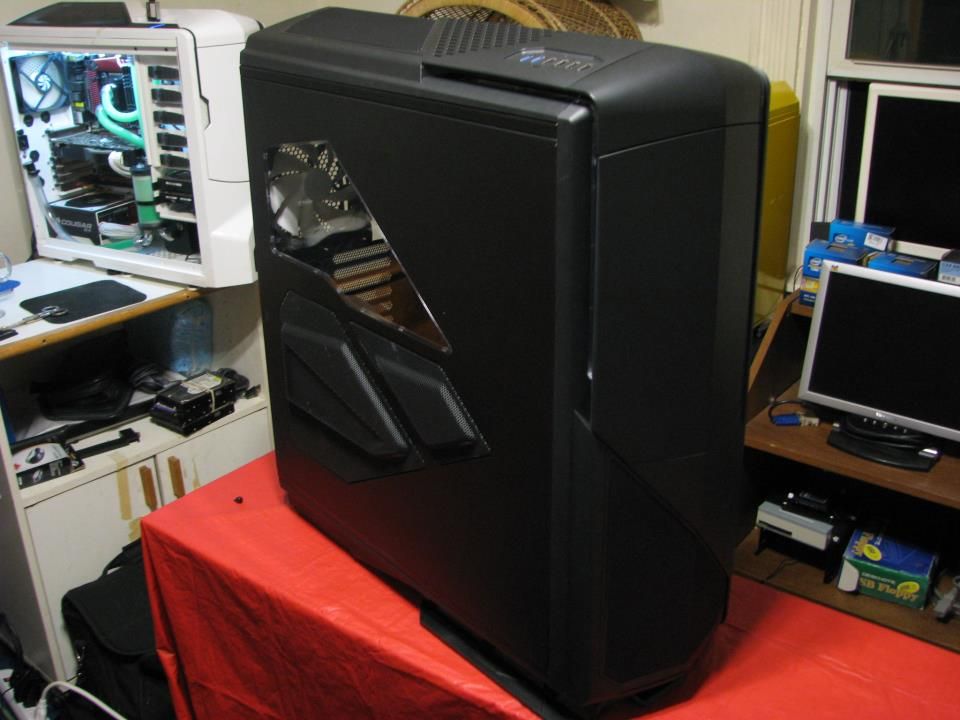
Anyway not much more to say then October 26th 2012 the NEW NZXT Phantom in Matte Black has arrived and is ready for Modding !
Quick look for now but it will stay in the box until i open it with you guys and give a quick review and my thoughts on the case. Seeing i have owned and built many many Phantoms and a Switch 810 i think i should be able to give you guys a really nice review from a Modder / Water coolers point of view that is very familiar with NZXT.
Here she sits till i open here with you guys:

Thank you NZXT and all my friends that come back to watch another Mod . This should be good.
Take Care and be back Very soon
MybadOmen
I know its been a long wait but yes its true ! Update #1 is here and its a very small update but also a HUGE update. Reason this update is going to be small is because the updates following this will be in depth and something new from me if it all works out.
Anyway not much more to say then October 26th 2012 the NEW NZXT Phantom in Matte Black has arrived and is ready for Modding !
Quick look for now but it will stay in the box until i open it with you guys and give a quick review and my thoughts on the case. Seeing i have owned and built many many Phantoms and a Switch 810 i think i should be able to give you guys a really nice review from a Modder / Water coolers point of view that is very familiar with NZXT.
Here she sits till i open here with you guys:
Thank you NZXT and all my friends that come back to watch another Mod . This should be good.
Take Care and be back Very soon
MybadOmen
Options
- Mark as New
- Bookmark
- Subscribe
- Mute
- Subscribe to RSS Feed
- Permalink
10-27-2012 09:53 AM
Update 2 !
Here is my first ever Video UN-Boxing and Review .They will get better as i go but i don't want them to become professional either.They are meant to be from a Modder /Enthusiast to other Modder's and Enthusiast . Also didn't realize there was such a short video time on YouTube so i had to post it on Veoh which seems to be pretty nice.
My first ever Review was of the NZXT Phantom 820 and i feel pretty good about the video besides some improvements i need to make.
Also i want you guys to know i waited 2 days as i had the Phantom 820 sitting in my house to even open it till i did it with you guys watching.It was very difficult to hold out but i wanted it to be a special thing i did with you guys that follow my work so in the long run was very much worth the wait.
Please watch the Video and let me know what you think as i plan on continuing to make them if you guys like them.Will try to make them shorter to fit on YouTube though from now on.
Take Care and Enjoy guys !
My First Ever Video Un-Boxing & Review "" NZXT Phantom 820 ""
http://www.veoh.com/watch/v393656918kgBZzBS
And Keep watching guys Parts are on the way and tools are ready to go !!
MybadOmen
Options
- Mark as New
- Bookmark
- Subscribe
- Mute
- Subscribe to RSS Feed
- Permalink
11-20-2012 11:29 PM
If you guys are wondering why not updates on either of the 2 Sponsored builds i am doing its because i am Human like everyone else and struggling with something on each of them right now. Normal process usually in my Mods but will jump the hoop soon and keep on moving with them. Some of the things i think up just don't work and i don't want to do what i know everyone else would.I try to as much as possible to keep everything Unique which we all know is almost impossible at this point on a Case Mod. So i have to totally rethink it. But in the end it will all come together. I just need to think and get past the issues.
Just being straight up Honest on why no updates. Its because i'm currently stuck on both and back to the drawing board. Just once again proves i no different then anyone else.
There you have it. As soon as i have a full update together it will be posted immediately.
Take Care,
MybadOmen
Just being straight up Honest on why no updates. Its because i'm currently stuck on both and back to the drawing board. Just once again proves i no different then anyone else.
There you have it. As soon as i have a full update together it will be posted immediately.
Take Care,
MybadOmen
Options
- Mark as New
- Bookmark
- Subscribe
- Mute
- Subscribe to RSS Feed
- Permalink
11-30-2012 01:48 PM
Update
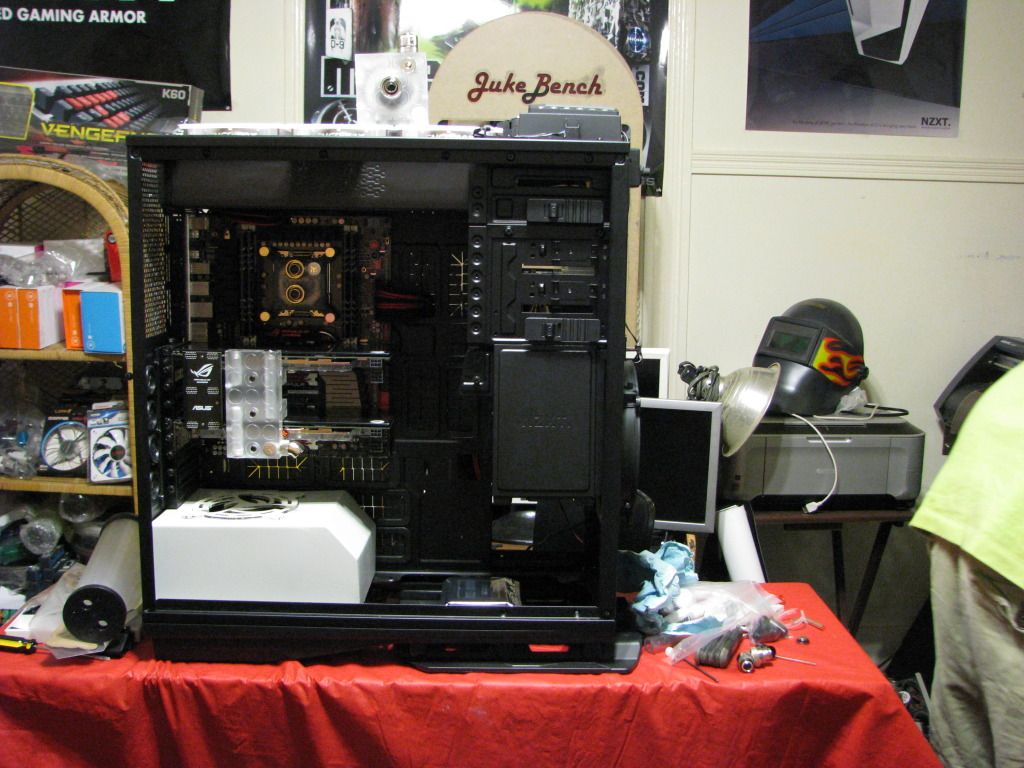
Just want to show you guys im in the middle of a bunch of things at the same time on the build so once i post some updates there will be allot of them and then i will have the thread moved back to the Build Log section.I am currently working on 4 builds right now well actually 3 as i just completed one for a client 2 are the Mods you guys see posted here and the other is a new test bench that i badly need for product testing and my own research. I also have been putting together guides for everything i have been doing which you will also see soon but right now im focused on the Phantom 820 and the JukeBench Mod.
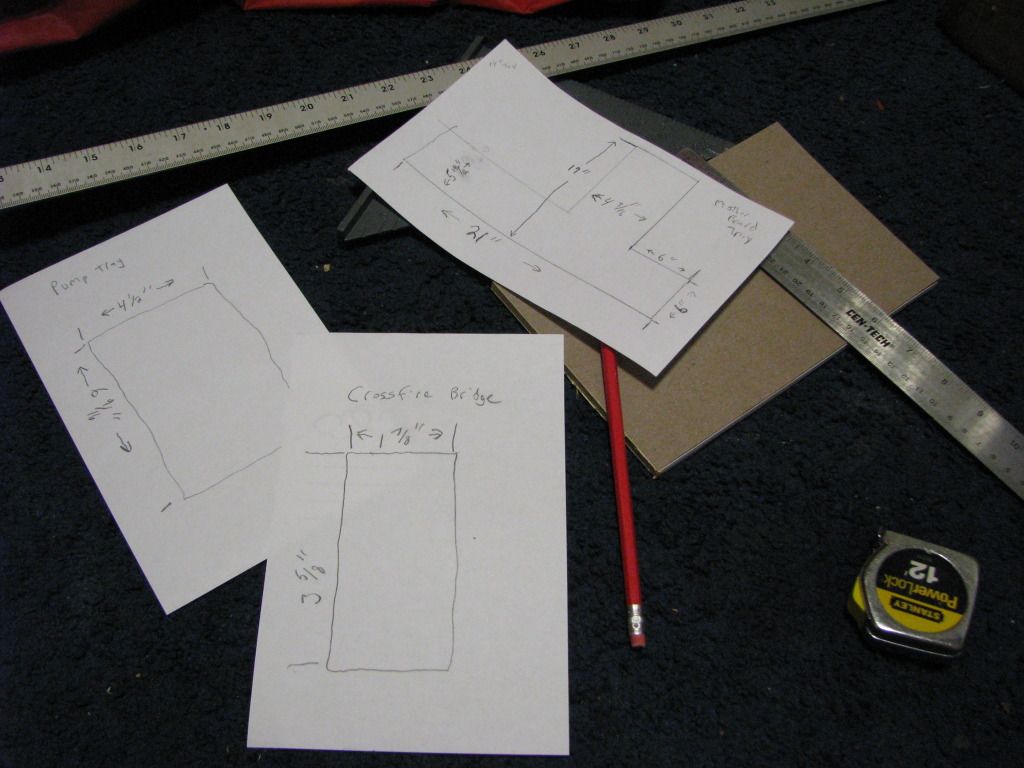
Here is what i am working on now as well as my Google sketches and some designs i left out that would give the project away.
First i will start with just a few Photos of the first phase of the design (Not to exciting but in a way it is because i see what it looks like done and you will also soon).
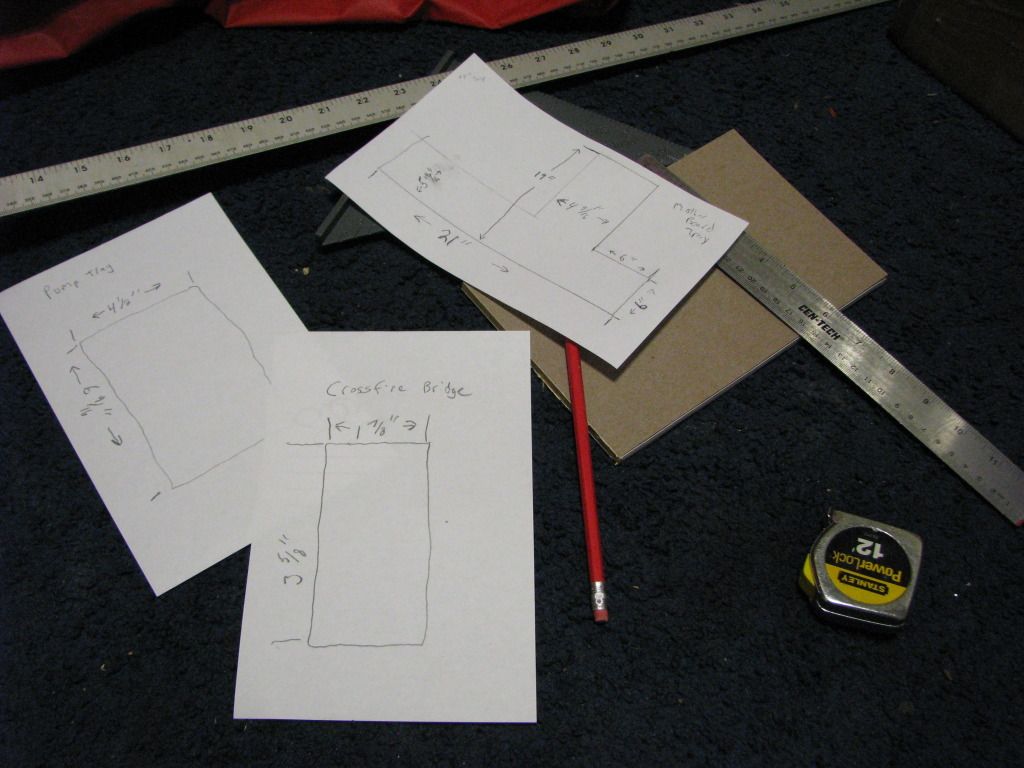
Taking measurements on Paper and then i transfer them into Google Sketchup and then order what i need and start cutting.
As most know from my previous projects i dislike the stock motherboard trays so here i am designing the fix for that.
5.25 bays will be Modded but i want to try to keep them usable in this build but if not i already have a plan be for that. Plus a bunch of mods going into the drive bays.
Messy scribbles but this is how it all begins every build.
Thats about all i can share on that part right now without giving away the whole theme of the build and its way to early for that..
Next some work to the Pump
Getting the Pump Ready.And i made it sorta a Tutorial at the same time for those that never seen inside a D5 Pump before.
This is the Pump going in this build and before its asked yes the wife will be sleeved also 🙂
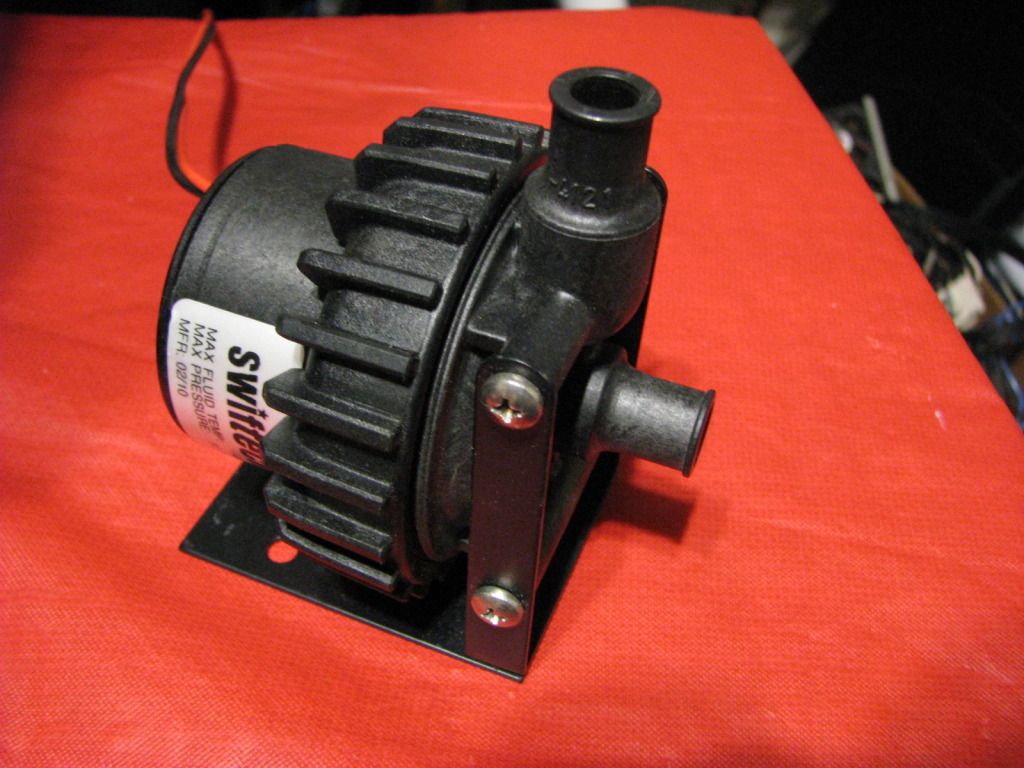
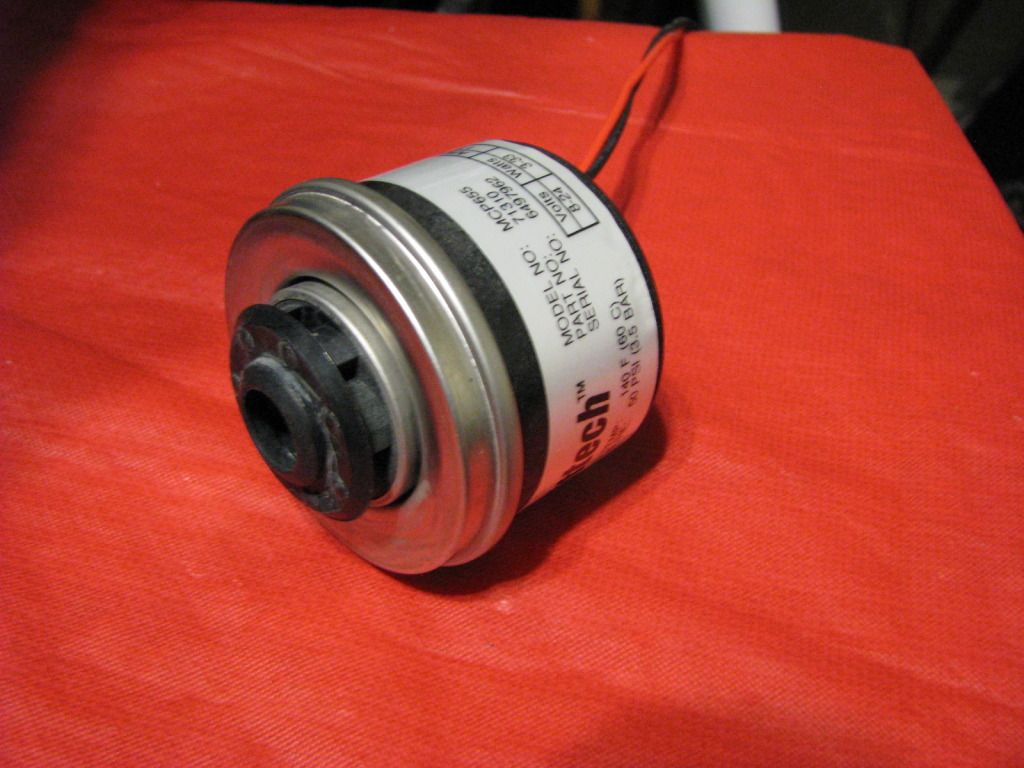
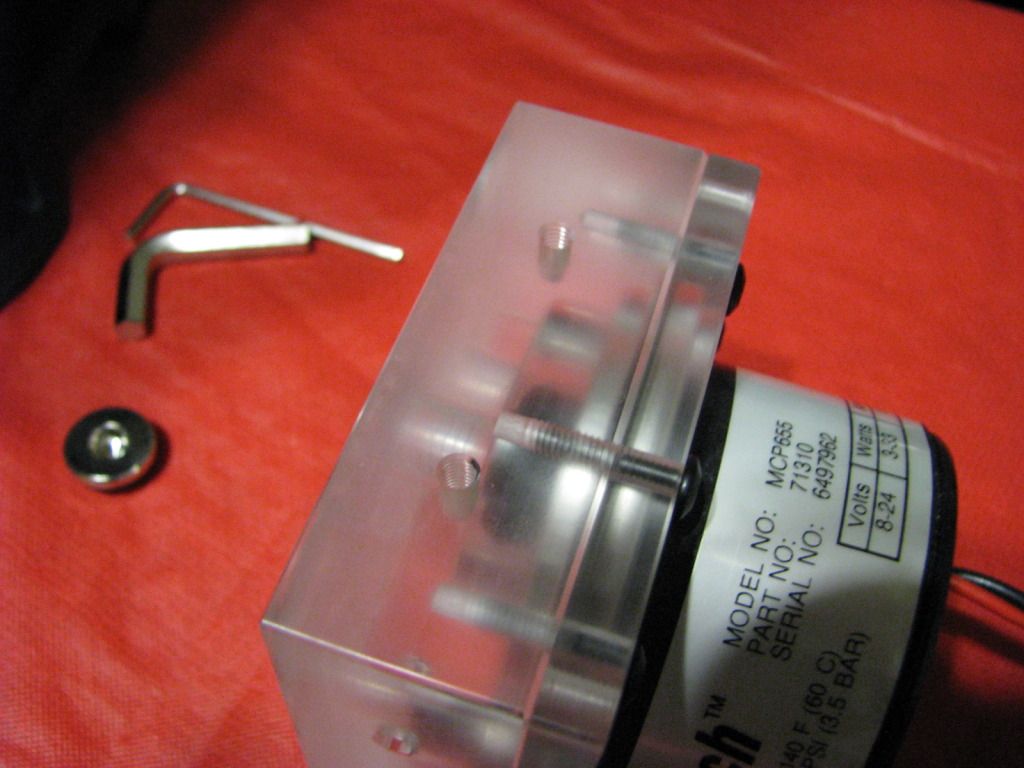
Here is a Stock D5 (MCP655) which come in many flavors , Single speed,Variable speed, and just about every brand name carries the D5 under a different name. One in this little guide is Swiftech variable speed, but like i said brand and speed control doesn't matter its all the same.
D5 stock pump:
First spin of the big plastic nut that you see me taking off now. Left to loosen it.
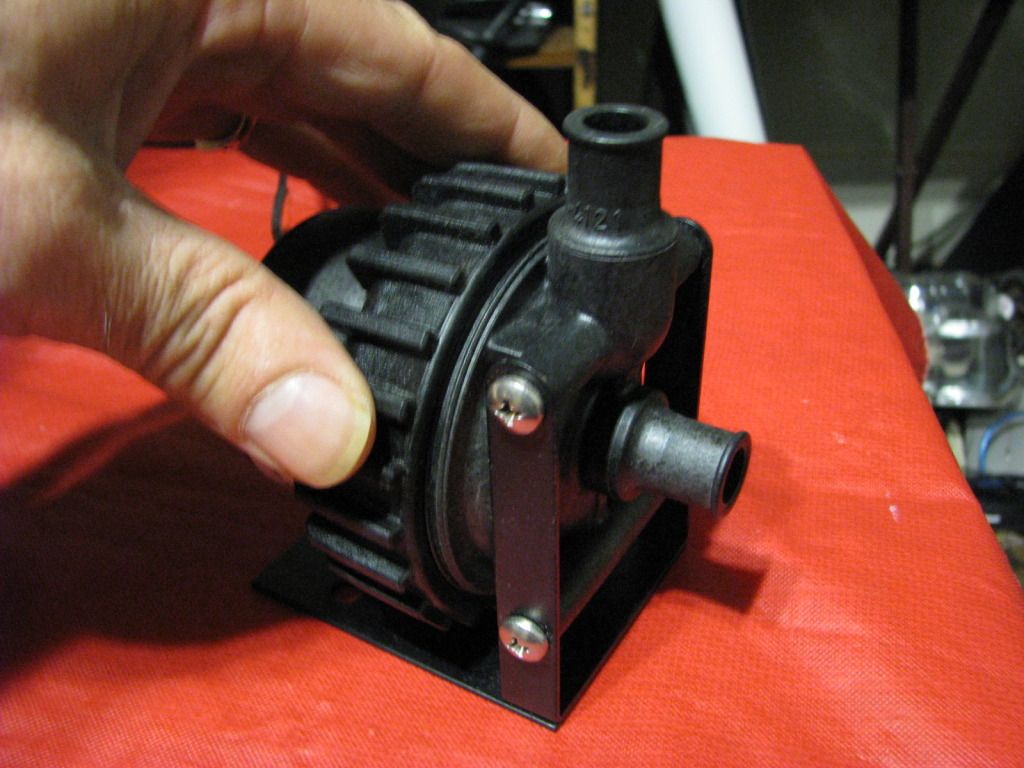
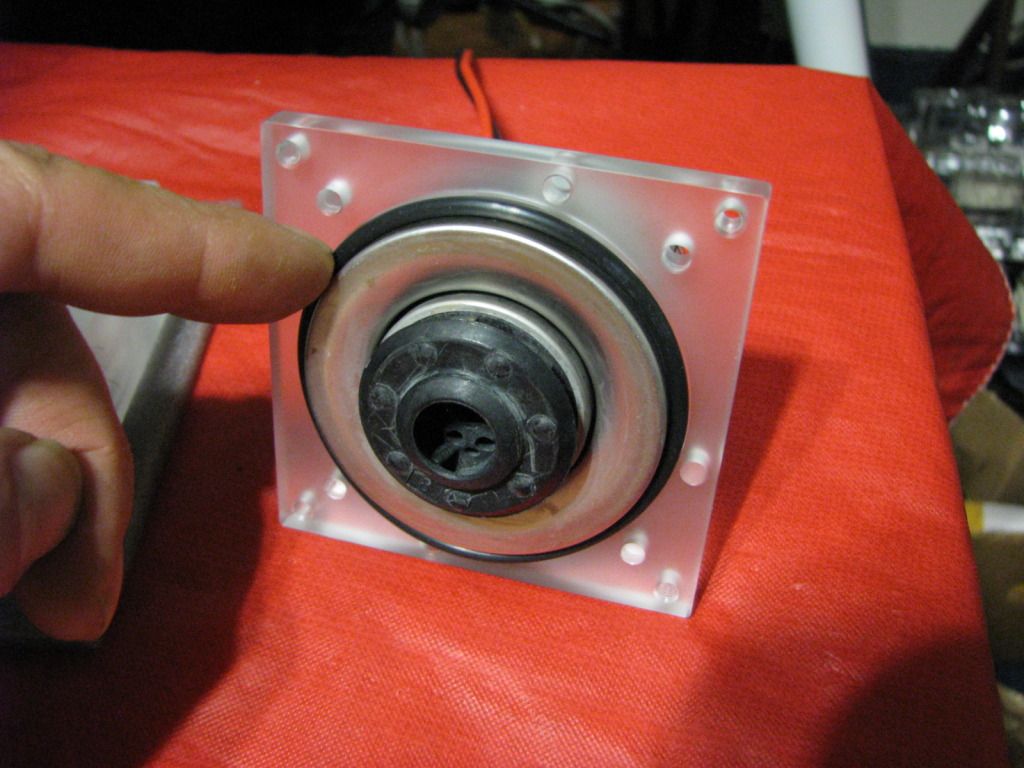
The Pump should now Split in 2 parts as shown:
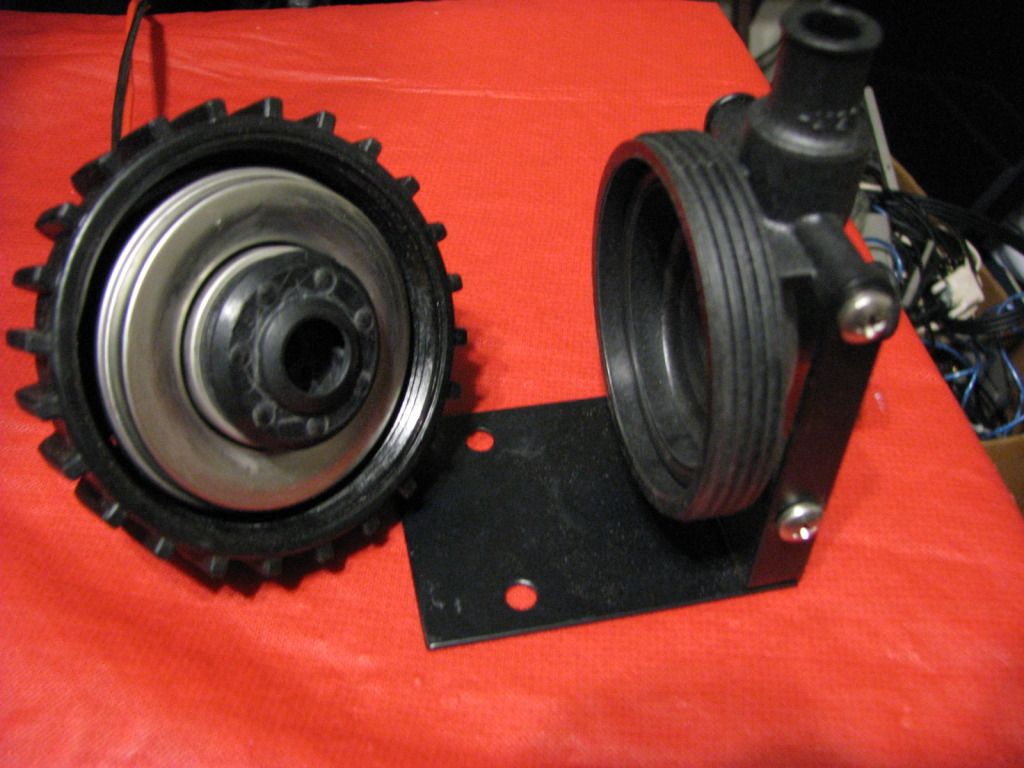
The old top we can now put away because we will no longer be needing it.(Make sure you save the O-ring that is inside the old top in case you plan on putting it back together later.)
Now we simply remove the plastic nut from the wire by sliding it down over the wire. We will no longer be using this either.
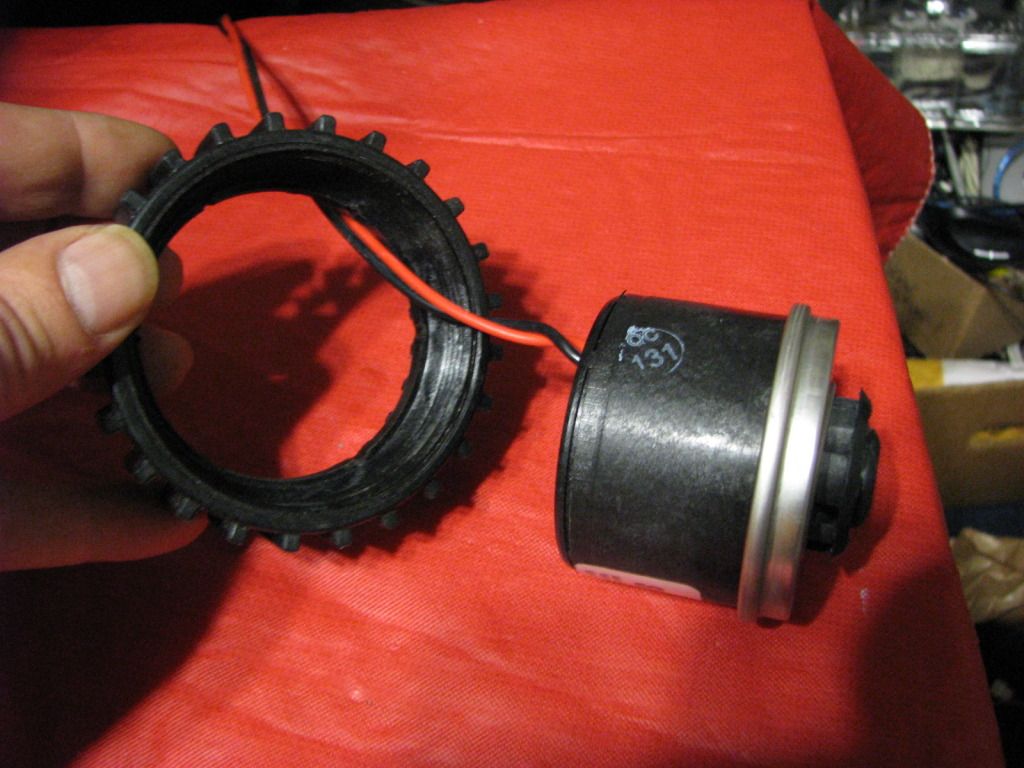
And here is what we are left with the actual D5 pump itself.
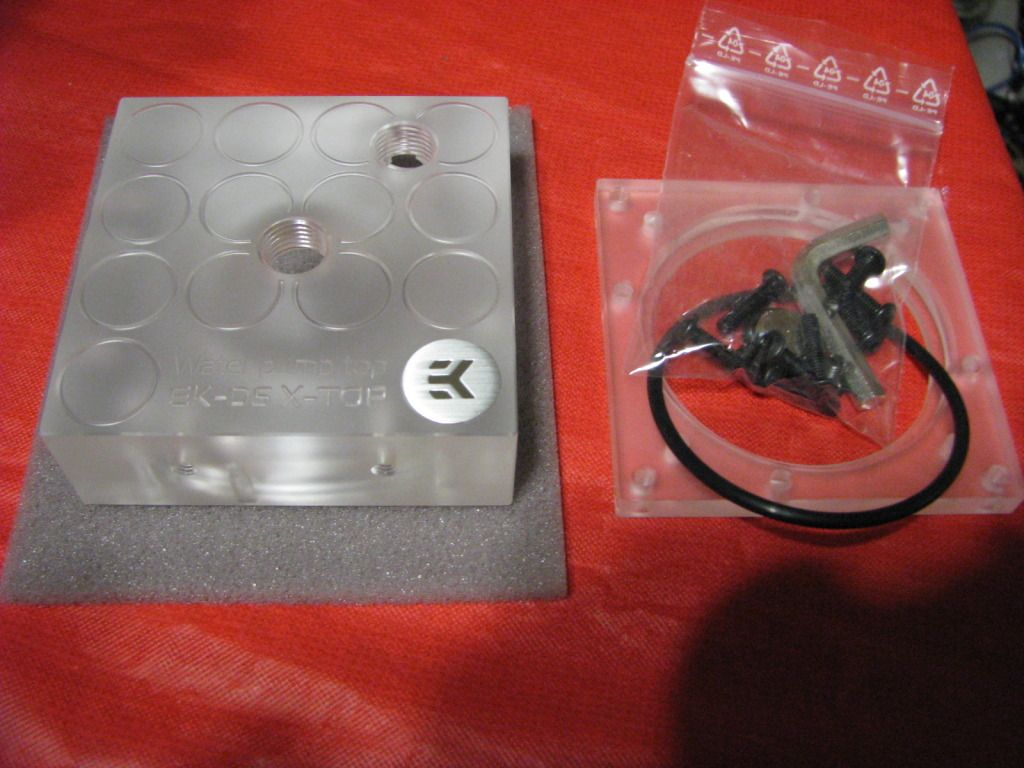
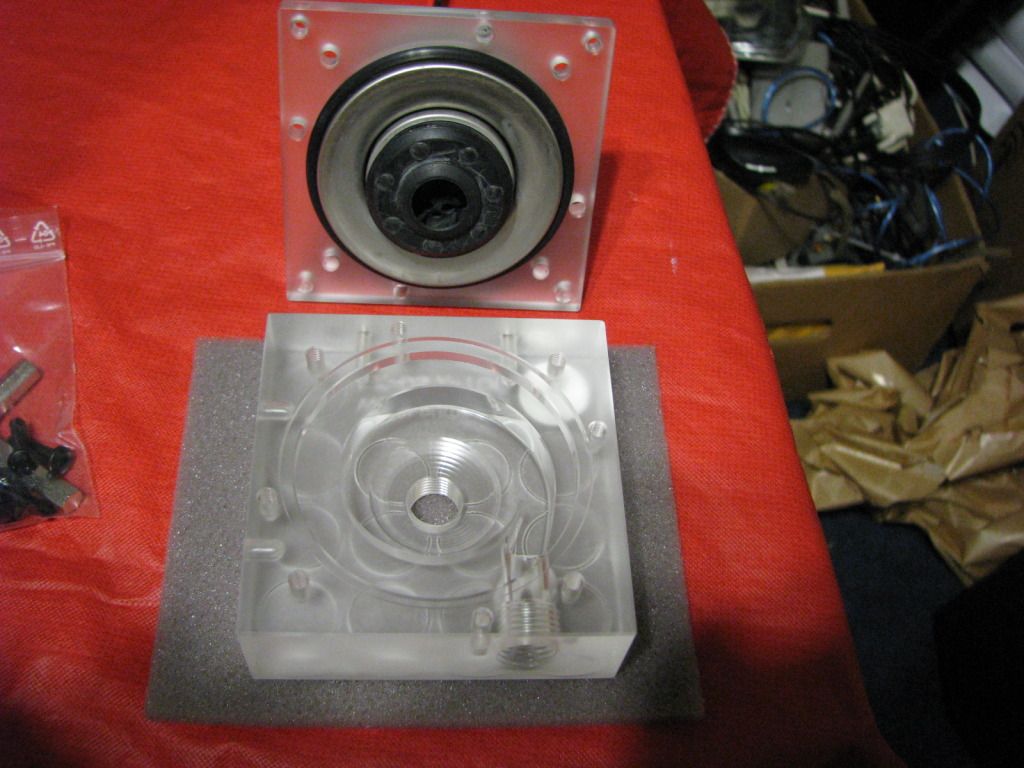
There are a bunch of different tops on the Market to choose from. I just happen to be using the EK CSQ Plexi Top for this pump which is a high flow top so not only do pump tops improve the looks of a D5 but also the performance.
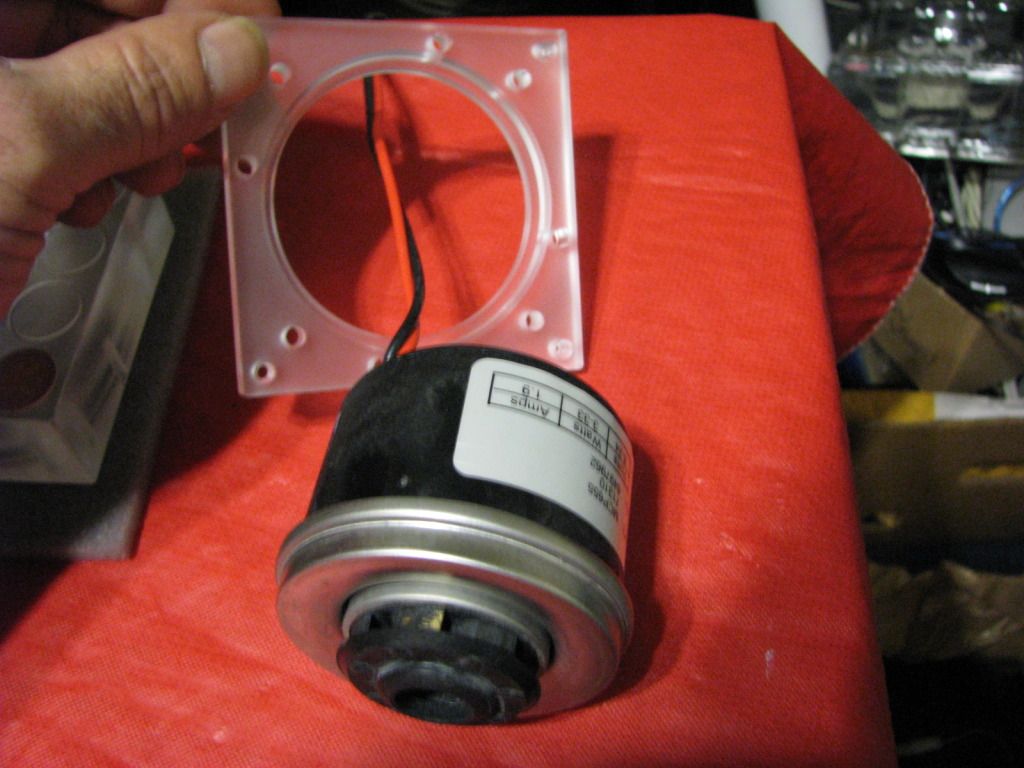
First i slide the new back plate over the wire with the inside groove facing the front of the pump. This back plate takes the place or the Plastic nut we removed earlier.
The new Top should come with a new O-ring which simply slides over the pump as shown.
Next since i don't want to scratch the pump top i place it face down on a piece of soft foam in the direction i want the top to sit when i place the pump into it.
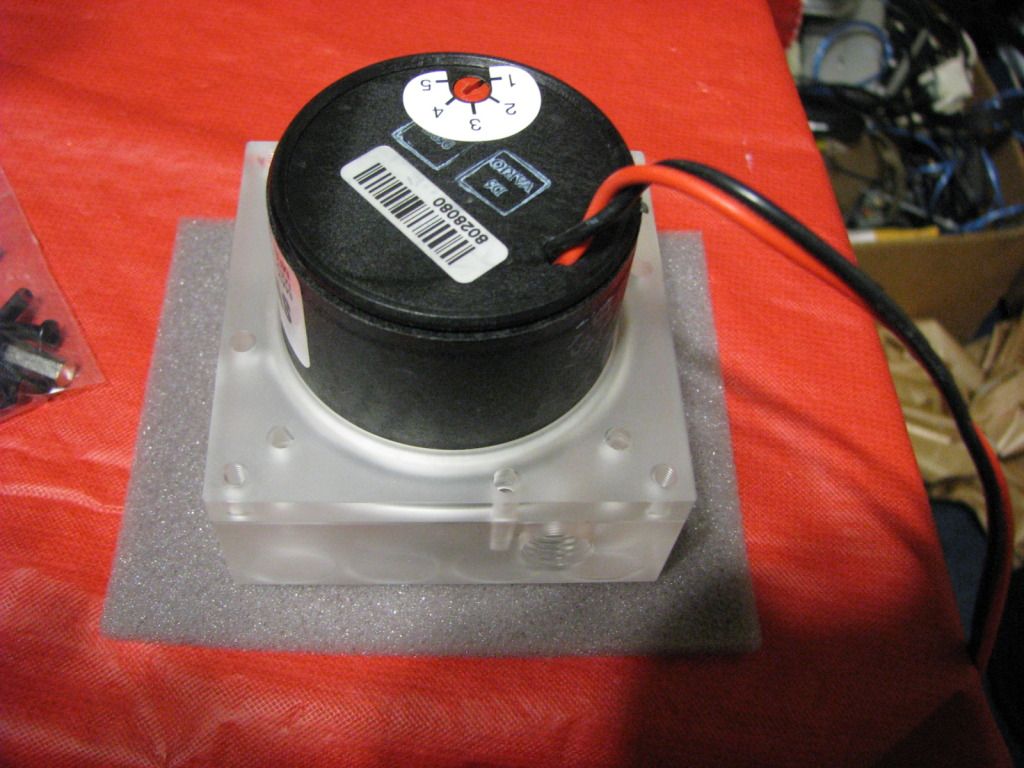
Simply Place the pump assembly onto the top lining the screw holes up at this point.
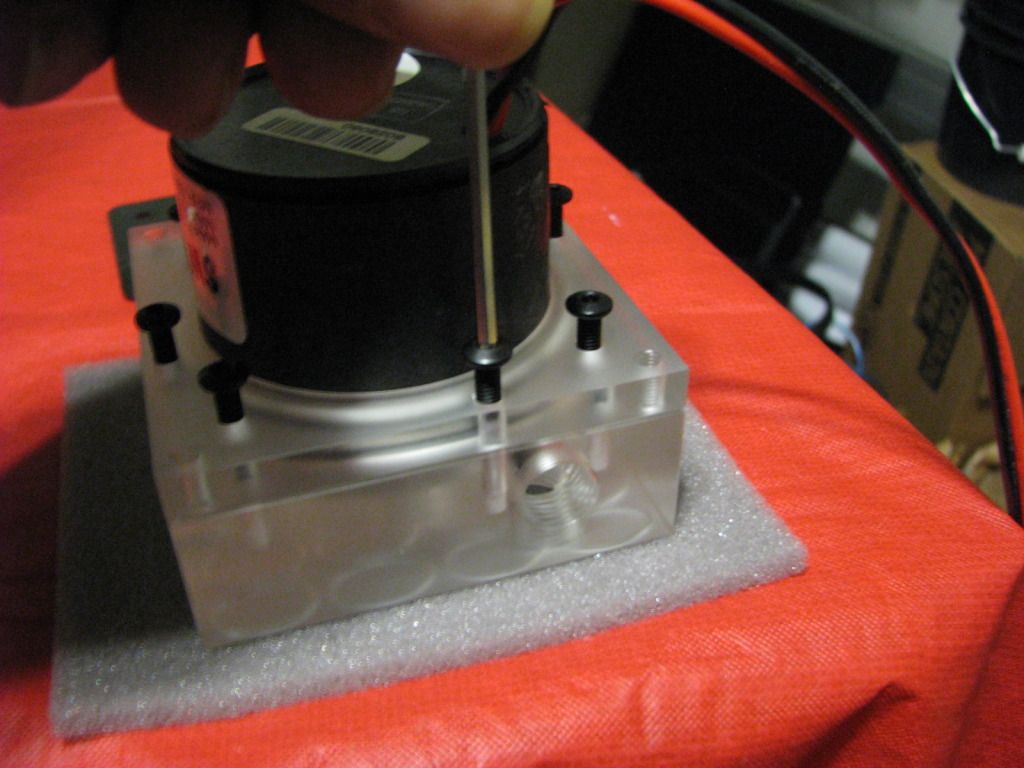
Most Pump tops will come with all the tools needed and the hardware to assemble it. So take the small Allen wrench and the long screws as that's what we will need next.
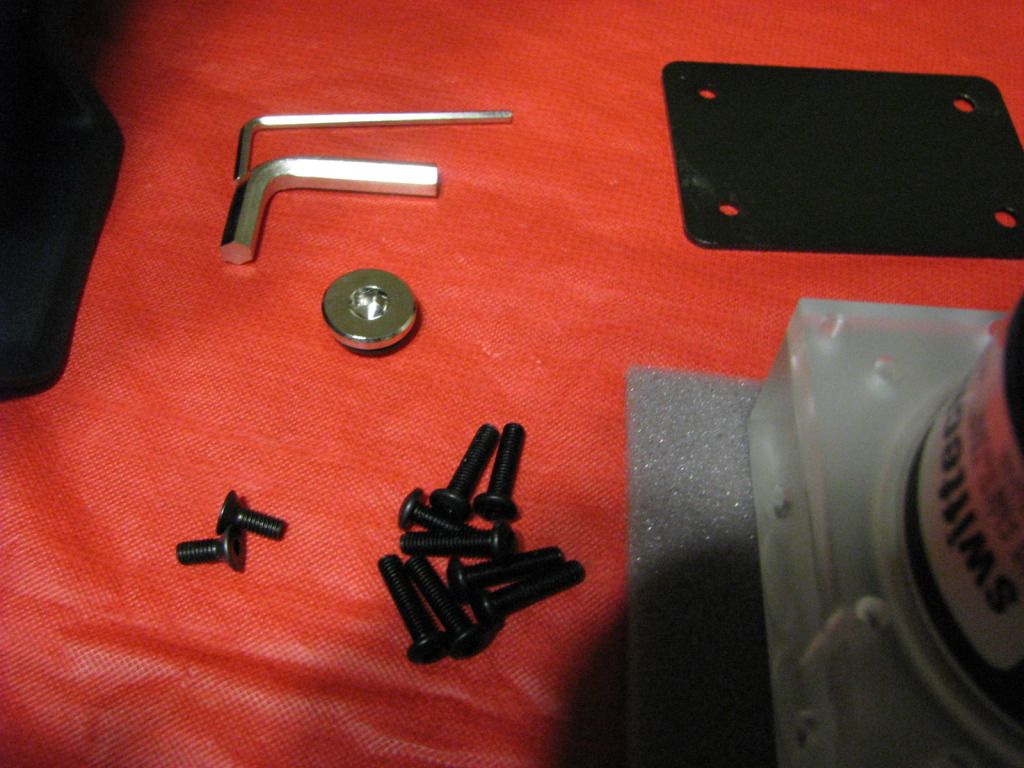
This part is rather important since the Plexi or whatever top you are using can easily be stripped.Turn all the screws in with your fingers a good 5 threads before using the Allen wrench to avoid stripping the delicate threads.
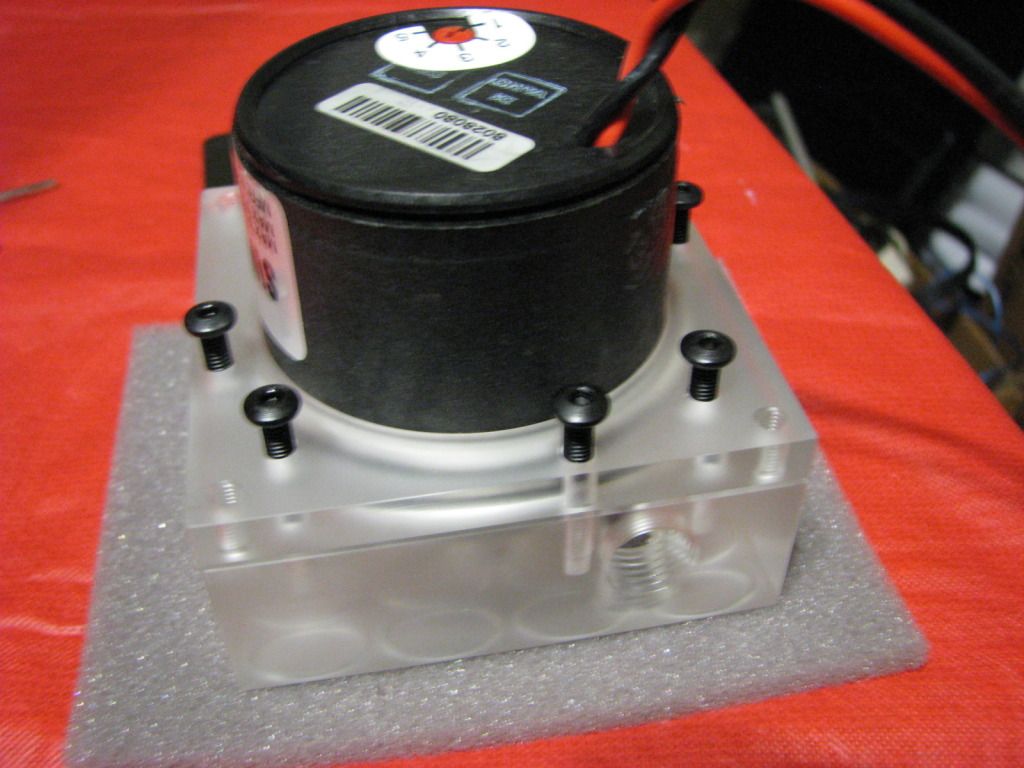
Now use the Allen wrench and tighten the screws evenly in a criss cross pattern. Just snug them don't crank them down as you will destroy the top. All you are trying to do is compress the O-ring which don't take much pressure.
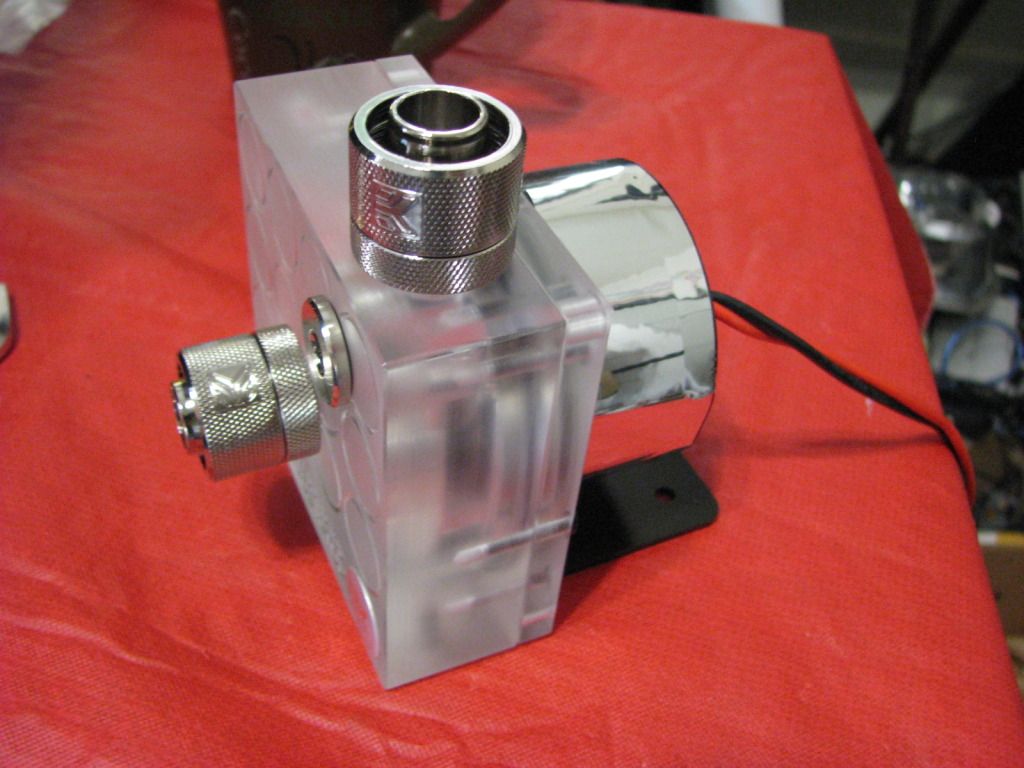
And there we go ,Not done yet but starting to look like a much better pump then what we started with and we should only be minutes into this project.
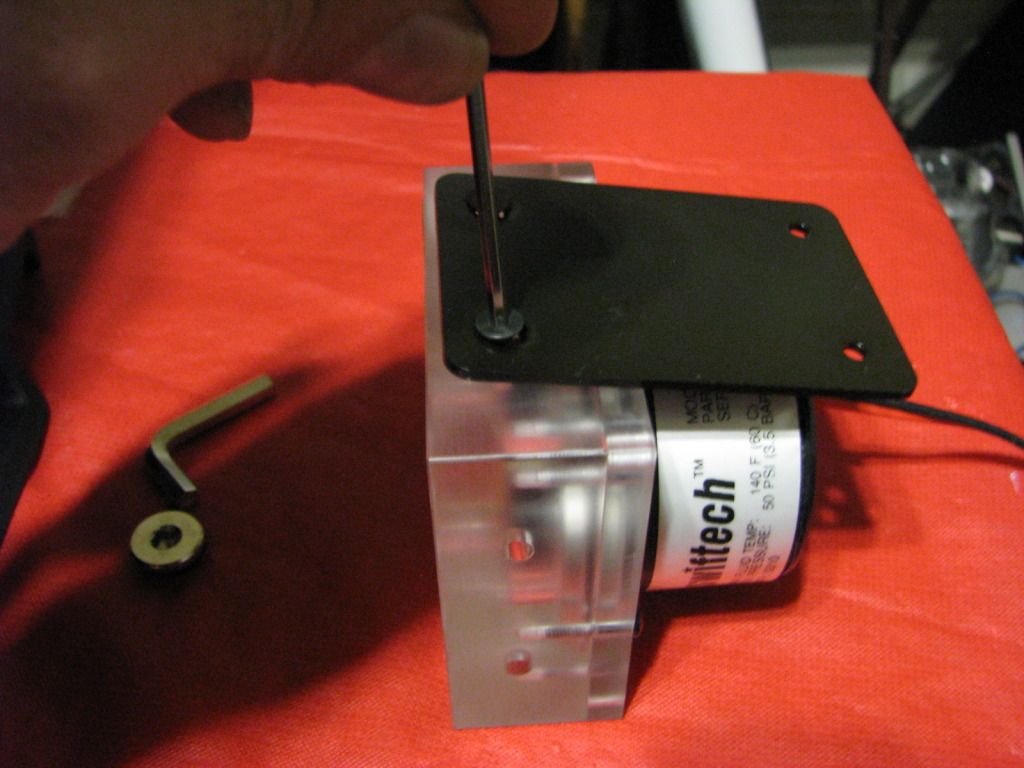
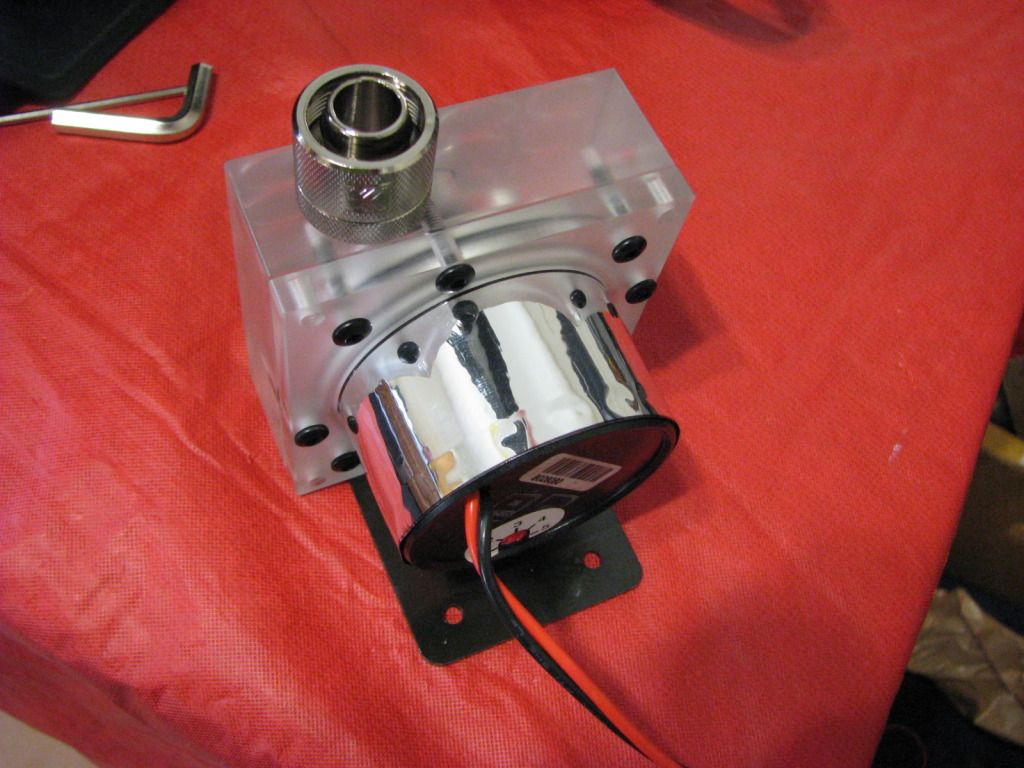
Next we need this Plate that comes with the kit. This is the Mounting plate to actually mount the plat inside the case. Optional mounting kits are also available again from different manufacturers.But this is what comes supplied. Also the last 2 screws (The short ones) are used in this step.
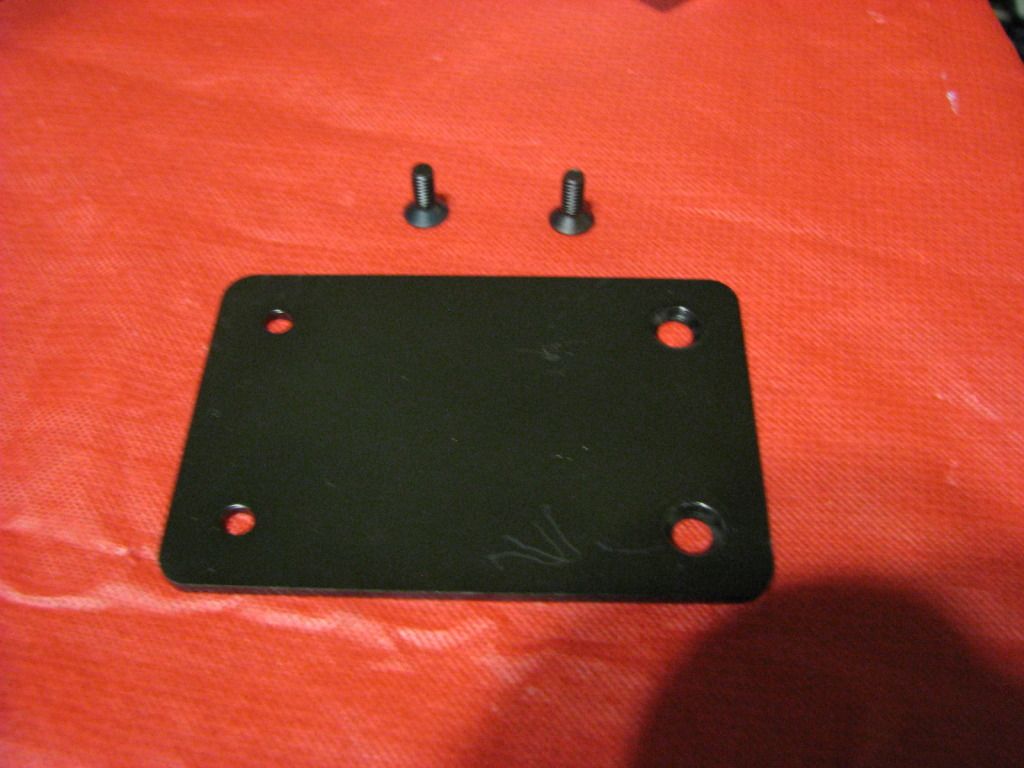
On the Bottom of the Pump Top you will see 2 holes.Make sure you are looking at the bottom as the other 2 holes on the side are for LED's if its a Plexi clear block.Easy way to tell is to make sure the holes have threads inside as shown in photo.
Next the same thing start the screws with your fingers first and then snug them with the Allen Wrench.
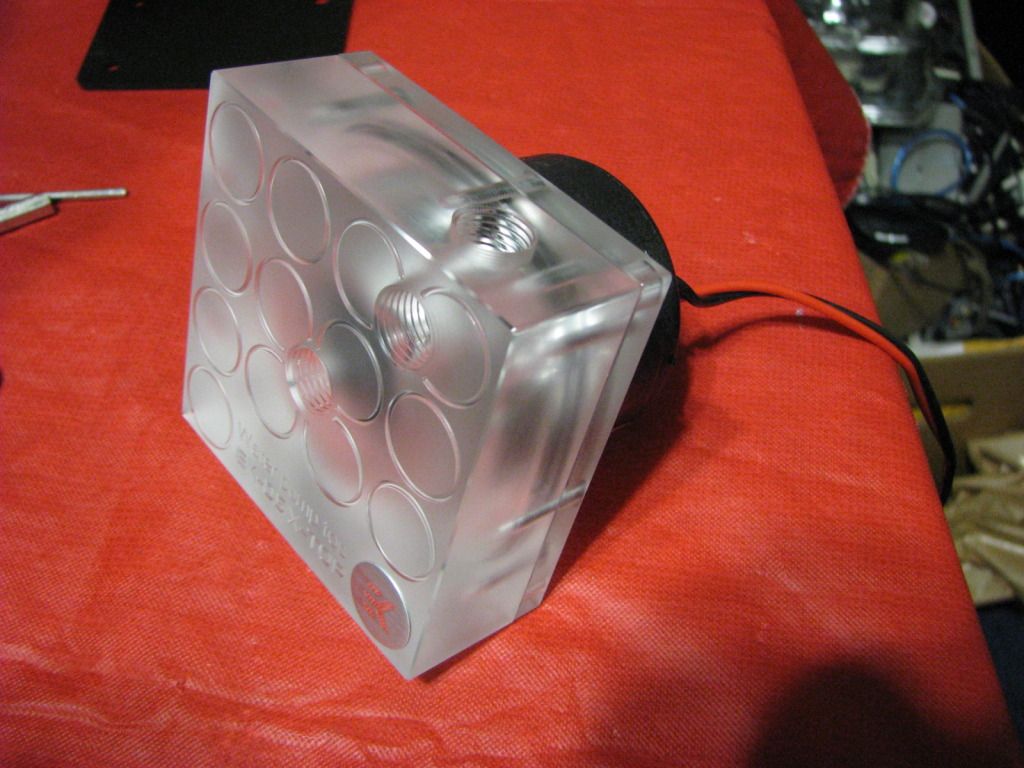
On the EK tops there are 2 outlets and 1 inlet so the Pump Top comes with 1 Plug so you can choose which outlet to use. I will show both outlets blocked so you know which are the outlets.
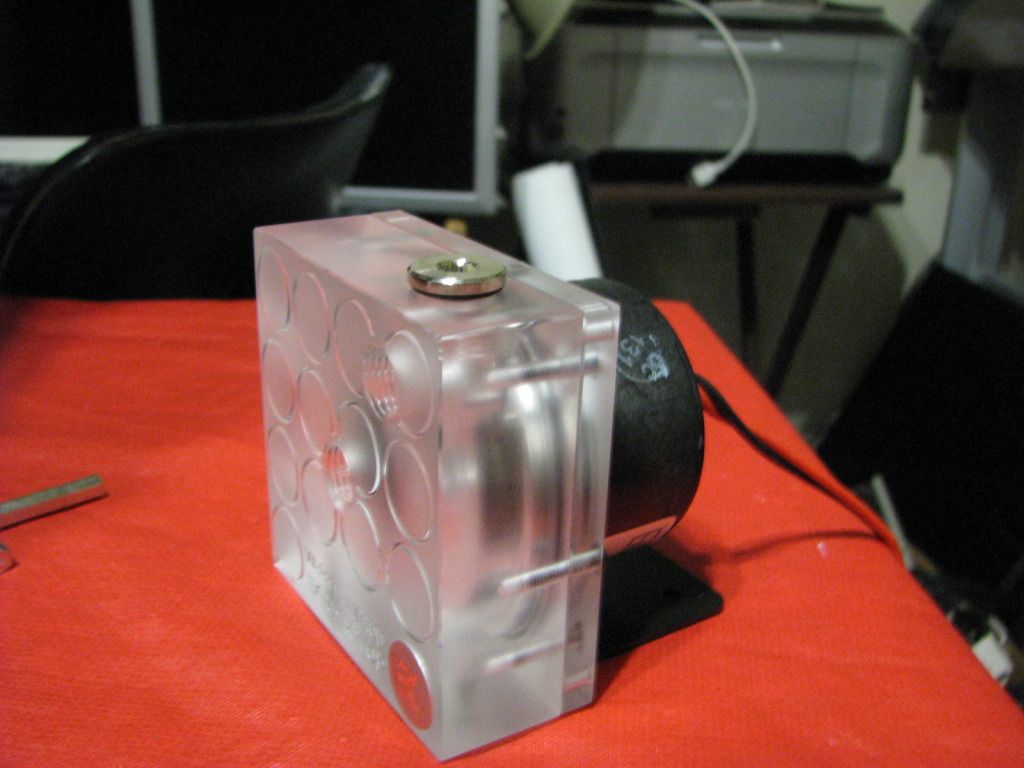
And finally drop in the Fittings and there you have it. Allot better looking pump with a higher flow rate and the use of G1/4 compression fittings or barbs.
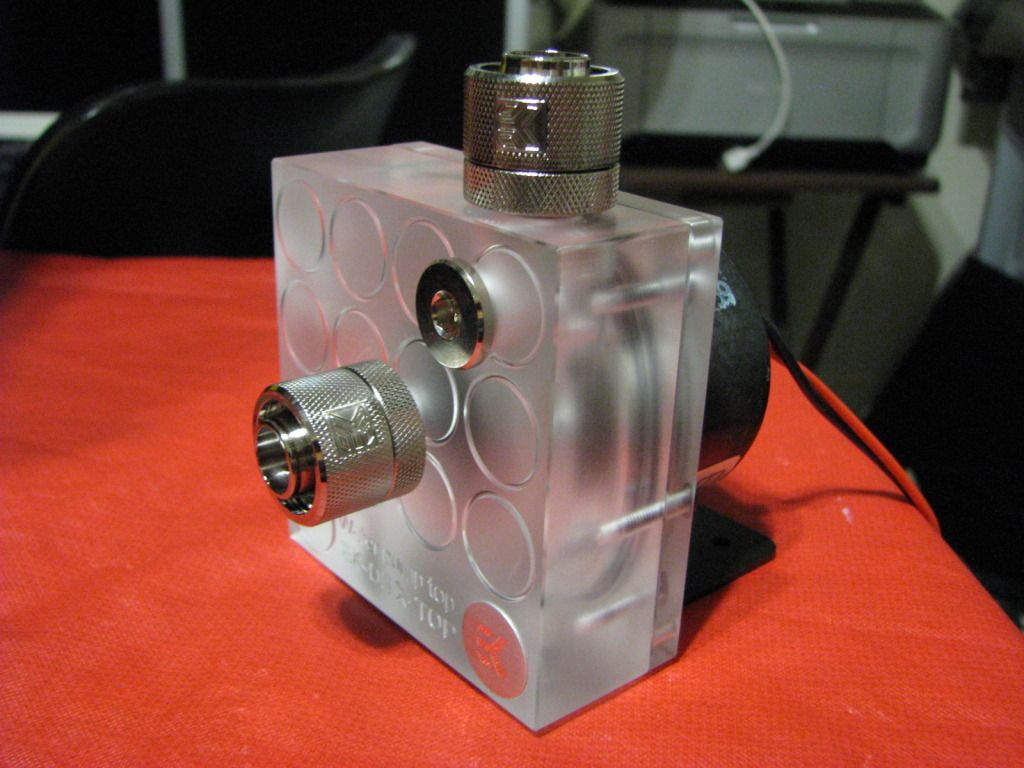
If you actually followed this guide you would see the whole precess only takes a few minutes tops.Its a very simple Mod that any one can do to their pump thats make a huge difference in both looks and performance..
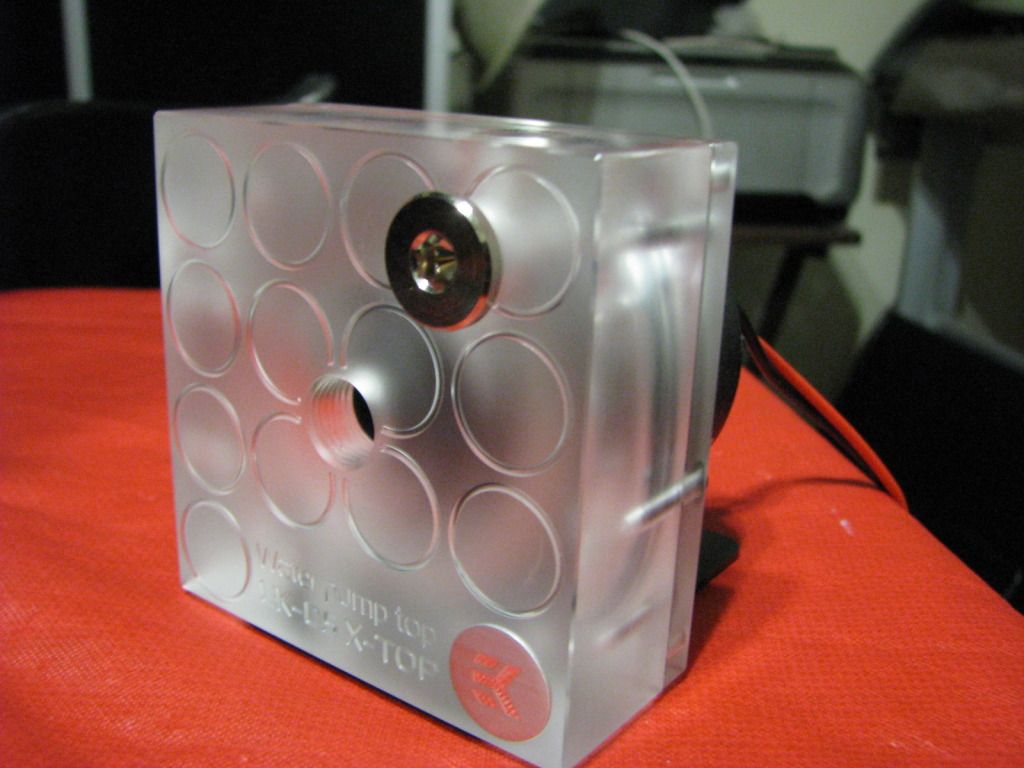
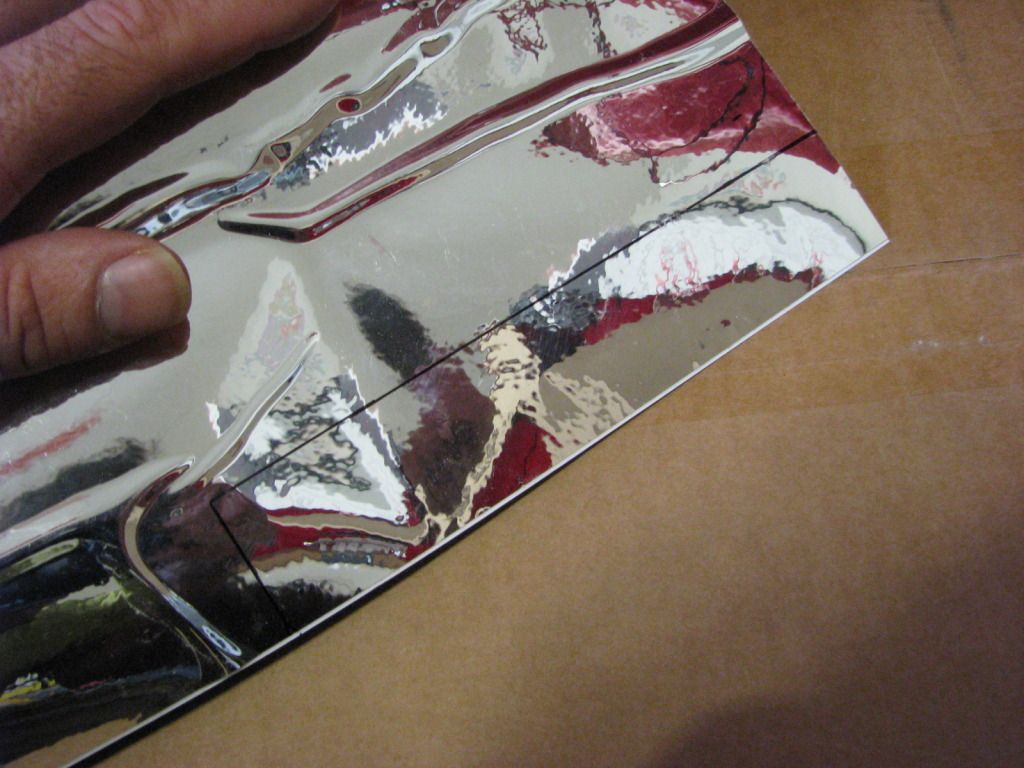
Now i am just going to do a simple Mod that makes a huge difference. This is only optional and you can use your own creative ideas on yours. I decided i wanted to make the back of the pump Chrome as i had some old Chrome Vinyl i had for using on cars. Its kinda like a stick on Chrome used for decorating cars. Any auto shop should carry it.Or you can simply paint your pump or even use Di noc its basically whatever you want to do.
This took 2 seconds to do and made a huge difference:
And finally a side by side before and after or what we just did.
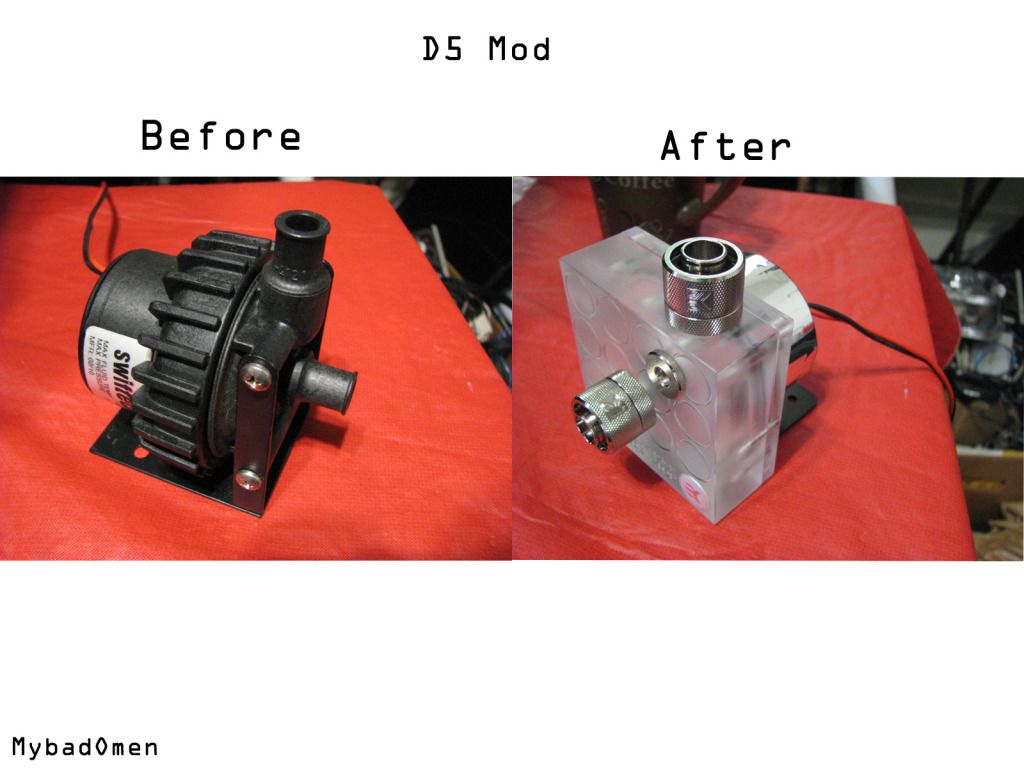
Hope you guys enjoyed the Update/Guide and hope it helps someone out there.
MybadOmen
Just want to show you guys im in the middle of a bunch of things at the same time on the build so once i post some updates there will be allot of them and then i will have the thread moved back to the Build Log section.I am currently working on 4 builds right now well actually 3 as i just completed one for a client 2 are the Mods you guys see posted here and the other is a new test bench that i badly need for product testing and my own research. I also have been putting together guides for everything i have been doing which you will also see soon but right now im focused on the Phantom 820 and the JukeBench Mod.
Here is what i am working on now as well as my Google sketches and some designs i left out that would give the project away.
First i will start with just a few Photos of the first phase of the design (Not to exciting but in a way it is because i see what it looks like done and you will also soon).
Taking measurements on Paper and then i transfer them into Google Sketchup and then order what i need and start cutting.
As most know from my previous projects i dislike the stock motherboard trays so here i am designing the fix for that.
5.25 bays will be Modded but i want to try to keep them usable in this build but if not i already have a plan be for that. Plus a bunch of mods going into the drive bays.
Messy scribbles but this is how it all begins every build.
Thats about all i can share on that part right now without giving away the whole theme of the build and its way to early for that..
Next some work to the Pump
Getting the Pump Ready.And i made it sorta a Tutorial at the same time for those that never seen inside a D5 Pump before.
This is the Pump going in this build and before its asked yes the wife will be sleeved also 🙂
Here is a Stock D5 (MCP655) which come in many flavors , Single speed,Variable speed, and just about every brand name carries the D5 under a different name. One in this little guide is Swiftech variable speed, but like i said brand and speed control doesn't matter its all the same.
D5 stock pump:
First spin of the big plastic nut that you see me taking off now. Left to loosen it.
The Pump should now Split in 2 parts as shown:
The old top we can now put away because we will no longer be needing it.(Make sure you save the O-ring that is inside the old top in case you plan on putting it back together later.)
Now we simply remove the plastic nut from the wire by sliding it down over the wire. We will no longer be using this either.
And here is what we are left with the actual D5 pump itself.
There are a bunch of different tops on the Market to choose from. I just happen to be using the EK CSQ Plexi Top for this pump which is a high flow top so not only do pump tops improve the looks of a D5 but also the performance.
First i slide the new back plate over the wire with the inside groove facing the front of the pump. This back plate takes the place or the Plastic nut we removed earlier.
The new Top should come with a new O-ring which simply slides over the pump as shown.
Next since i don't want to scratch the pump top i place it face down on a piece of soft foam in the direction i want the top to sit when i place the pump into it.
Simply Place the pump assembly onto the top lining the screw holes up at this point.
Most Pump tops will come with all the tools needed and the hardware to assemble it. So take the small Allen wrench and the long screws as that's what we will need next.
This part is rather important since the Plexi or whatever top you are using can easily be stripped.Turn all the screws in with your fingers a good 5 threads before using the Allen wrench to avoid stripping the delicate threads.
Now use the Allen wrench and tighten the screws evenly in a criss cross pattern. Just snug them don't crank them down as you will destroy the top. All you are trying to do is compress the O-ring which don't take much pressure.
And there we go ,Not done yet but starting to look like a much better pump then what we started with and we should only be minutes into this project.
Next we need this Plate that comes with the kit. This is the Mounting plate to actually mount the plat inside the case. Optional mounting kits are also available again from different manufacturers.But this is what comes supplied. Also the last 2 screws (The short ones) are used in this step.
On the Bottom of the Pump Top you will see 2 holes.Make sure you are looking at the bottom as the other 2 holes on the side are for LED's if its a Plexi clear block.Easy way to tell is to make sure the holes have threads inside as shown in photo.
Next the same thing start the screws with your fingers first and then snug them with the Allen Wrench.
On the EK tops there are 2 outlets and 1 inlet so the Pump Top comes with 1 Plug so you can choose which outlet to use. I will show both outlets blocked so you know which are the outlets.
And finally drop in the Fittings and there you have it. Allot better looking pump with a higher flow rate and the use of G1/4 compression fittings or barbs.
If you actually followed this guide you would see the whole precess only takes a few minutes tops.Its a very simple Mod that any one can do to their pump thats make a huge difference in both looks and performance..
Now i am just going to do a simple Mod that makes a huge difference. This is only optional and you can use your own creative ideas on yours. I decided i wanted to make the back of the pump Chrome as i had some old Chrome Vinyl i had for using on cars. Its kinda like a stick on Chrome used for decorating cars. Any auto shop should carry it.Or you can simply paint your pump or even use Di noc its basically whatever you want to do.
This took 2 seconds to do and made a huge difference:
And finally a side by side before and after or what we just did.
Hope you guys enjoyed the Update/Guide and hope it helps someone out there.
MybadOmen
Options
- Mark as New
- Bookmark
- Subscribe
- Mute
- Subscribe to RSS Feed
- Permalink
12-09-2012 04:27 AM
Update 6
Hiya Guys i'm back with some more updates. I decided to hang low for a bit and stop logging and just concentrate on Modding. But now im back. I have tons of Photo's for my logs and a bunch of new guides also that i havent decided where to post them yet.
So with that being said Lets get moving on to the build Log which as always i try to share as much as the process as possible so newcomers to this wonderful world of modding can have something to go by. It just makes me feel better showing how its done and explaining it rather then just posting pictures of completed parts.
Last Time we left off we were at about this point in the build.
The case in its stock wardrobe.
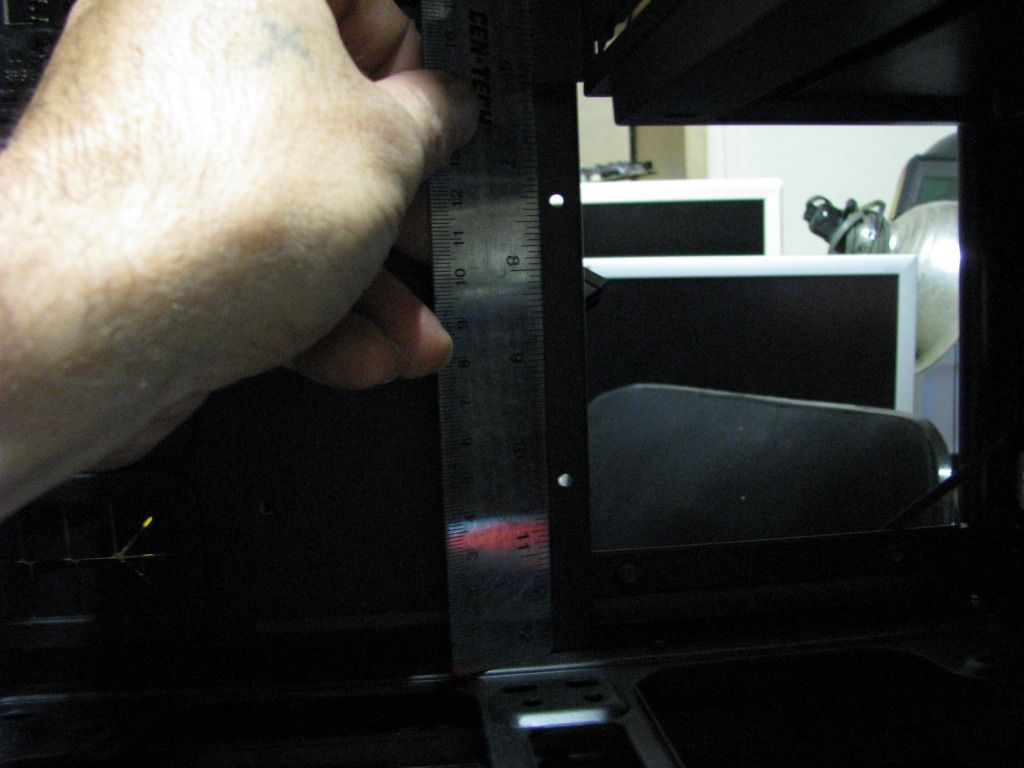
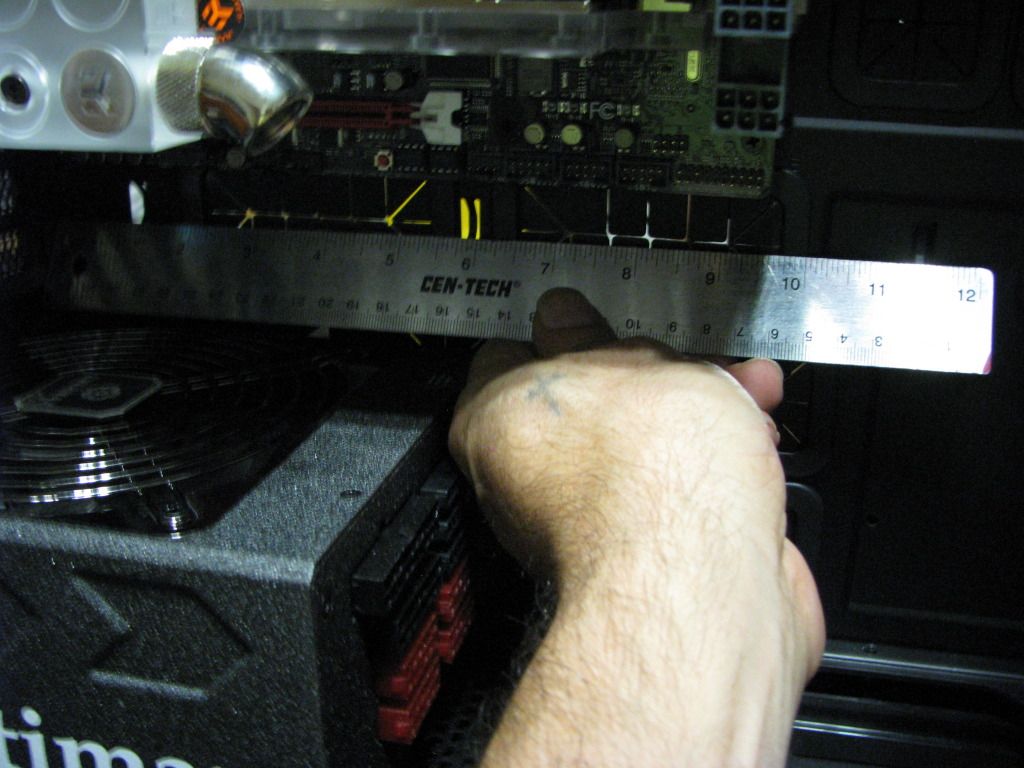
Here was me just trying somethings and getting some measurements. Mainly when things start to click and i get that little light bulb over my head.
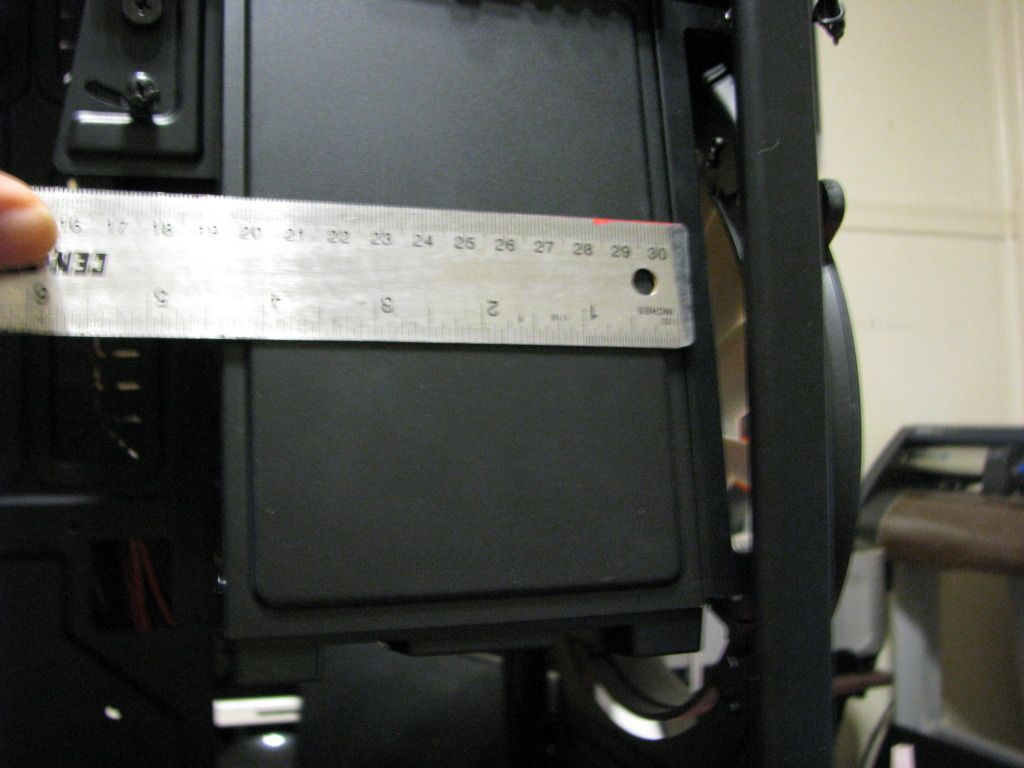
My scratching. Lol dont look like much but later in the log it will make sense.
I removed the top and front of the Phantom which both come apart basically the same so i will show just the top as its the one that's a little more difficult.
The Top
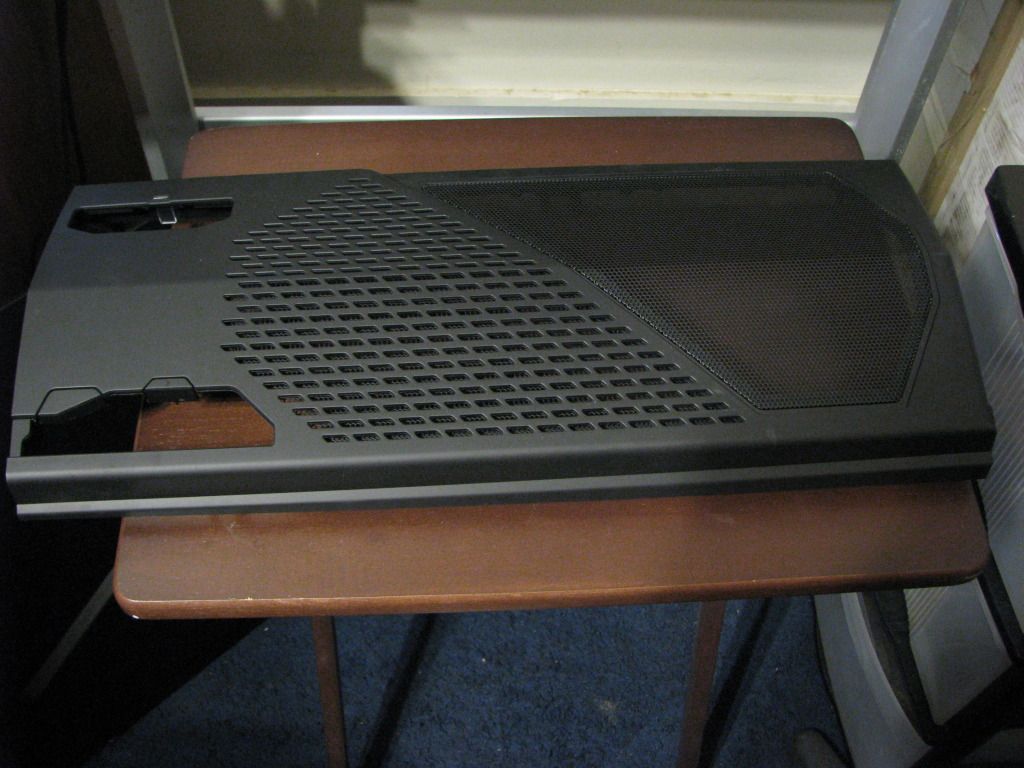
First i flipped the top over and you can see the 2 Mesh filters a bunch of screws and a new clip system from NZXT that i will explain in the next few photos.
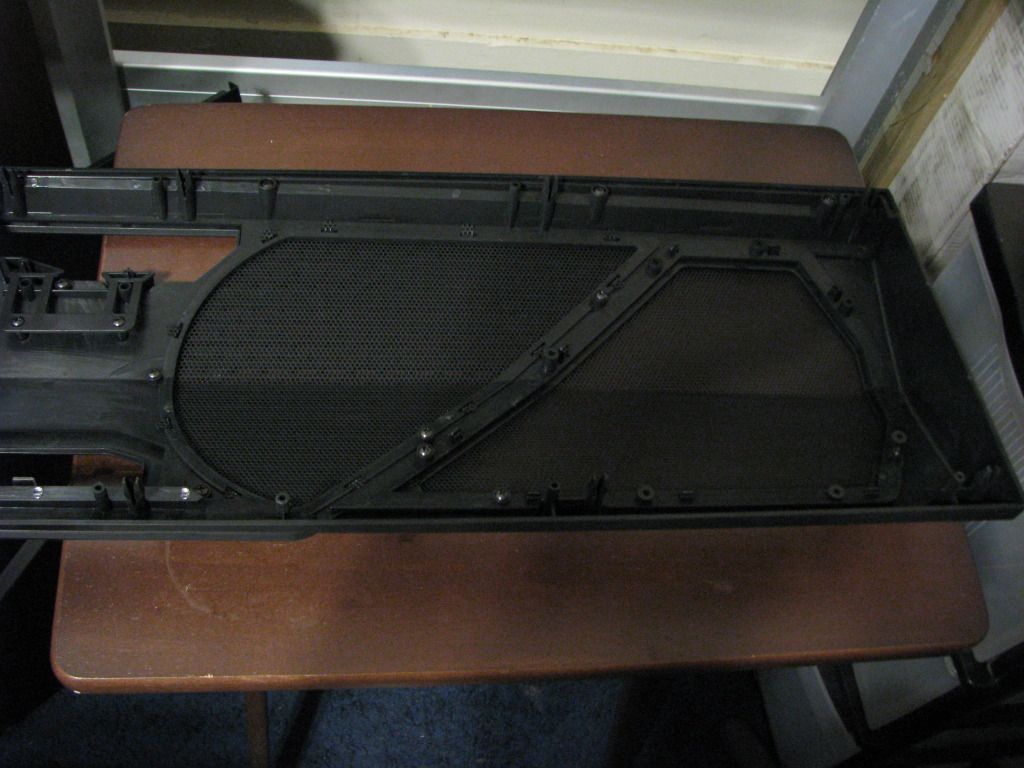
Here is a shot showing the screws and more importantly the new clip system they are using on the 820.
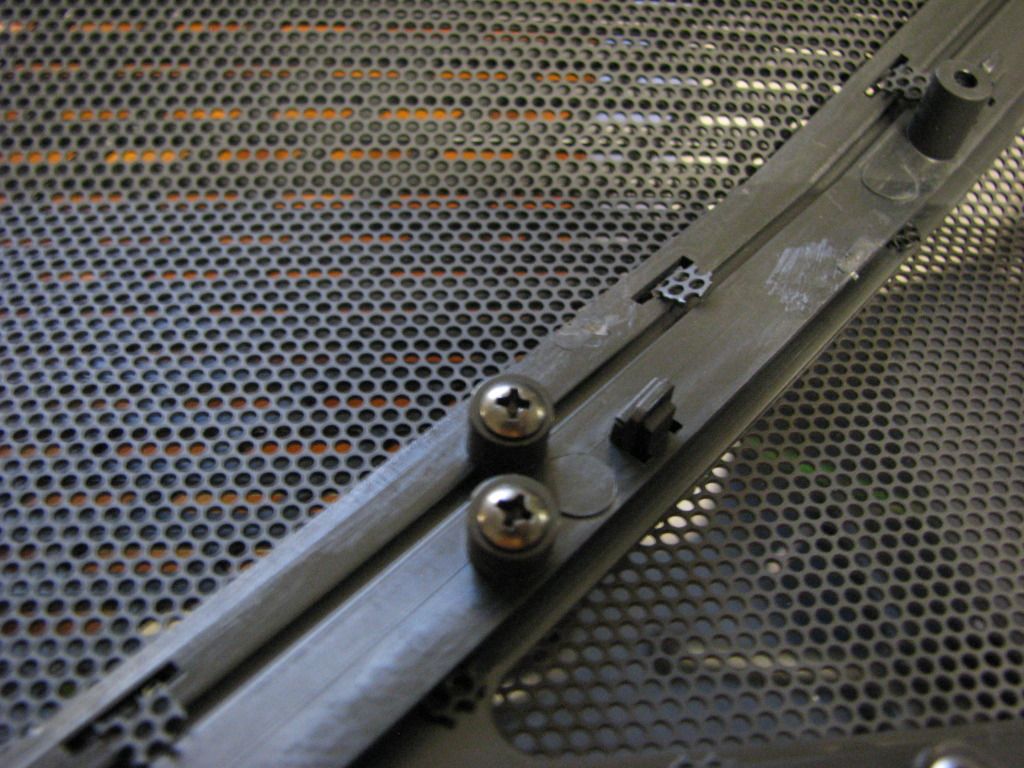
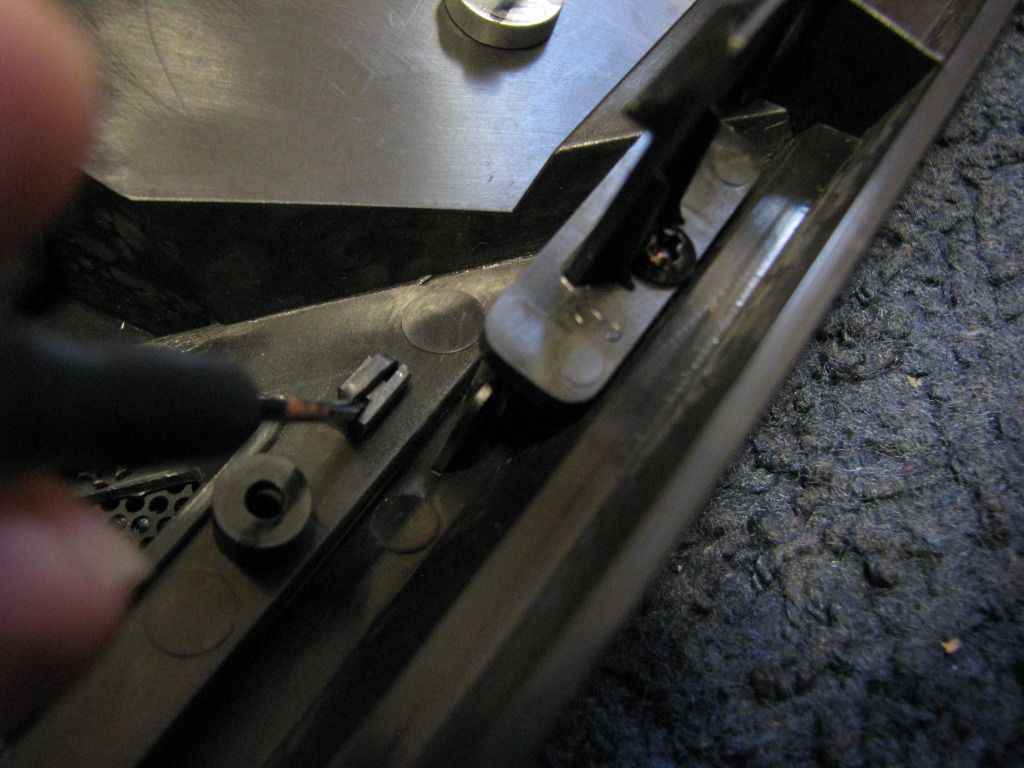
Next i removed all the screws and then figured out how the clips worked.To release the clips i used a small iPhone Flathead screwdriver and put it in between the clips as shown in the photo and gently pry outwards. (Away from the middle of the top) They seem they could break very easy if to much force was used so if you try it be careful.
And when your finished it should look just like this.If you break a thing or 2 just throw them over your shoulder and mod something to replace them. Lol just kidding.
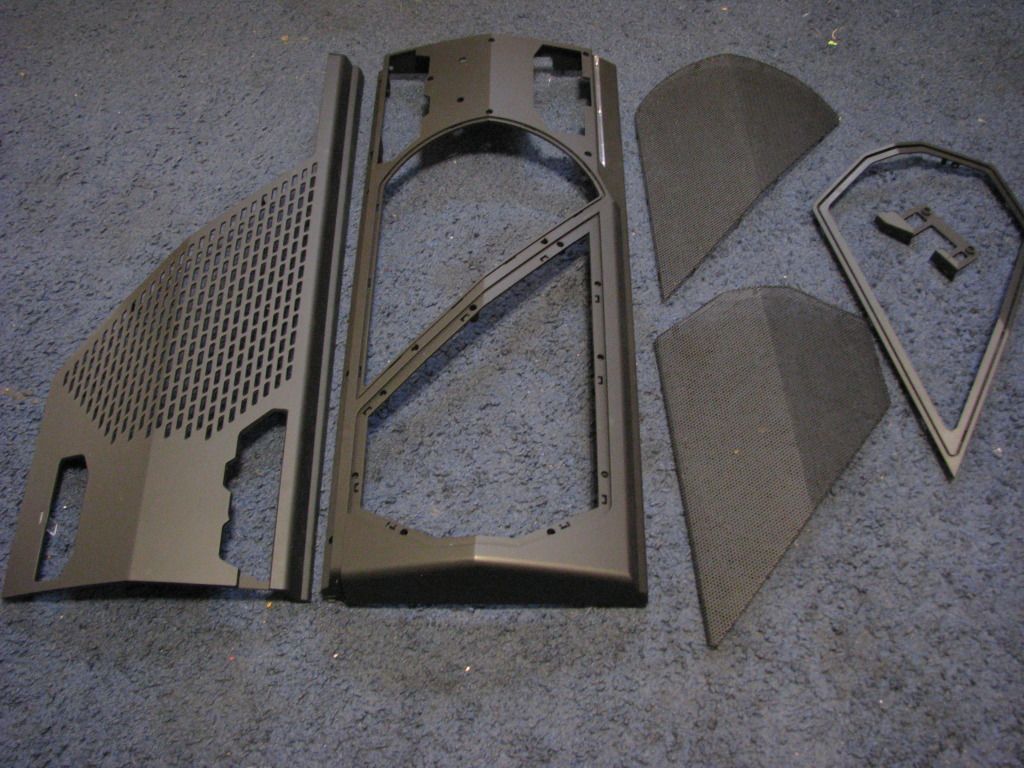
Ok here are the Pieces i am going to be starting with.But the painting process of those build will be done in a few stages and not to bum you out but that will be in the next update as i am trying to keep updates 15 photos or less do to some forum restrictions.
Ok now i am going to go over the materials i will be using and like i said continuing after into the next update.
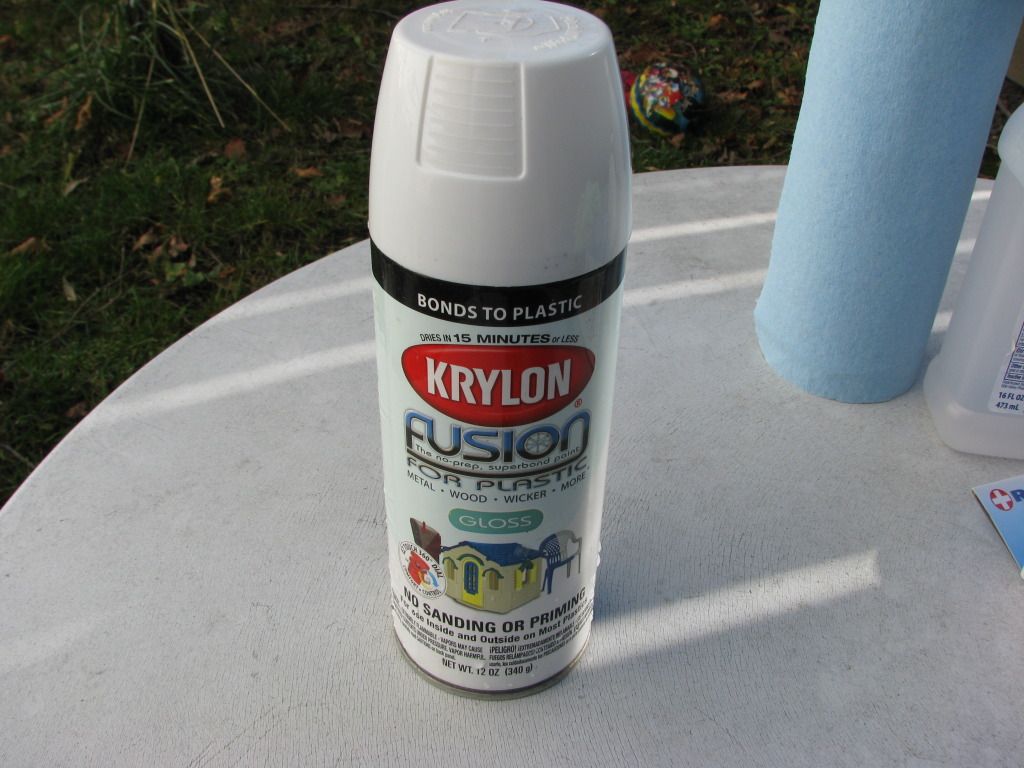
As many of you already know i can spray basically any paint and have 12 Real pain guns and a few airbrushes but after painting enough and trying plenty of paints i decided i will be just using Krylon Fusion Rattle cans. It is an incredible paint for both plastic and metal. No adhesion Promoter needed for plastics with this paint nor primer on metal (Unless its bare metal i would still use an etching primer. Anyway incredible paint. Dont believe me go buy a can and try it i promise you'll love it.
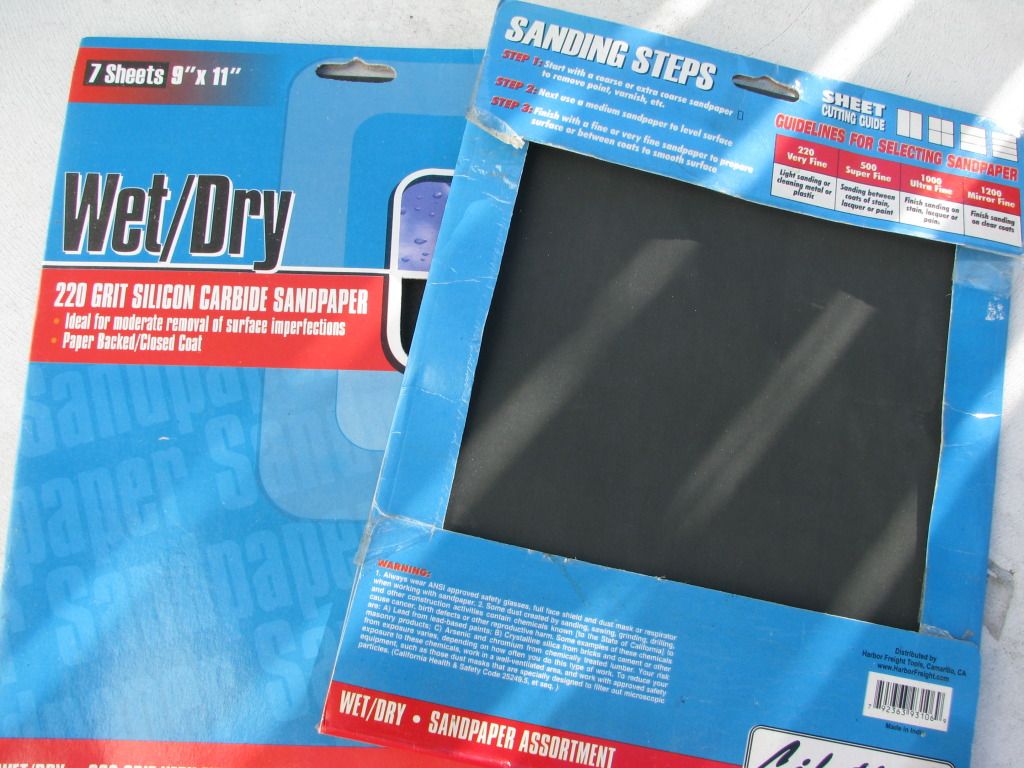
Next thing i will be using is a wet/dry sandpaper i have a pack of 220 and a multi pack . I usually use a 400 myself personally for this kind of thing. Dont but crappy sandpaper get wet/dry you wont regret it.
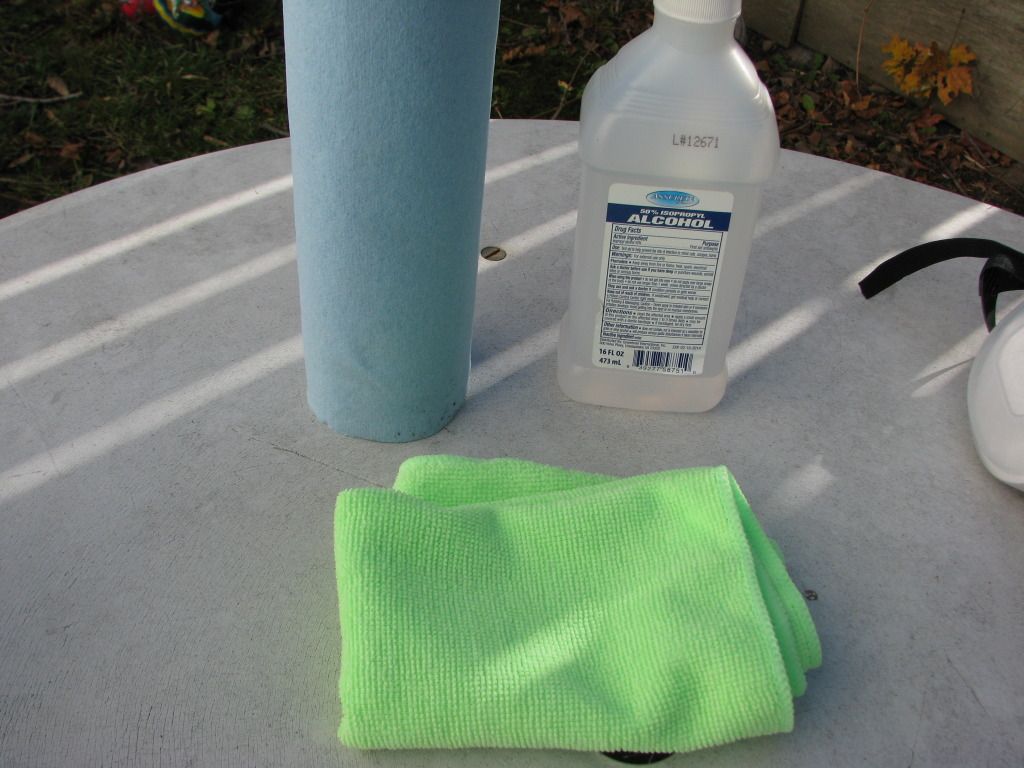
I also will be using some mechanic towels (Blue in photo) a lint free micro fiber cloth and some rubbing alcohol I prefer 70% but 50 % will do also if its all you can get.
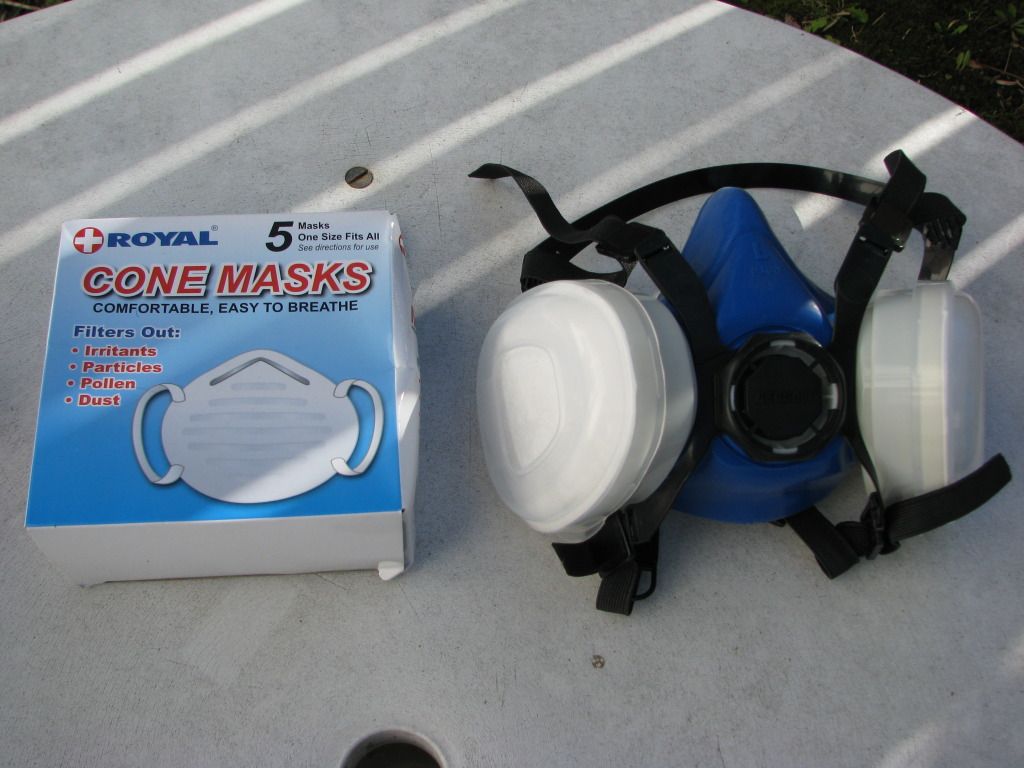
Never ever paint even spray paint without a mask. for spray paint in a well ventilated area use either of the ones in the photo but when you start getting into guns and Lacquers and more aggressive paints you should upgrade you masks. Its your life and your lungs and the 5 pack of masks you see cost me 1 dollar so their is no excuse not to wear one.But of course i am only giving advice as i would hate to see anyone get hurt over something so simple.
Stay tuned for the rest of this update and more soon and its nice to be back. I think you guys will really get a kick out of where this build is going.
Take Care my Friends,
MybadOmen
To be continued ......
Hiya Guys i'm back with some more updates. I decided to hang low for a bit and stop logging and just concentrate on Modding. But now im back. I have tons of Photo's for my logs and a bunch of new guides also that i havent decided where to post them yet.
So with that being said Lets get moving on to the build Log which as always i try to share as much as the process as possible so newcomers to this wonderful world of modding can have something to go by. It just makes me feel better showing how its done and explaining it rather then just posting pictures of completed parts.
Last Time we left off we were at about this point in the build.
The case in its stock wardrobe.
Here was me just trying somethings and getting some measurements. Mainly when things start to click and i get that little light bulb over my head.
My scratching. Lol dont look like much but later in the log it will make sense.
I removed the top and front of the Phantom which both come apart basically the same so i will show just the top as its the one that's a little more difficult.
The Top
First i flipped the top over and you can see the 2 Mesh filters a bunch of screws and a new clip system from NZXT that i will explain in the next few photos.
Here is a shot showing the screws and more importantly the new clip system they are using on the 820.
Next i removed all the screws and then figured out how the clips worked.To release the clips i used a small iPhone Flathead screwdriver and put it in between the clips as shown in the photo and gently pry outwards. (Away from the middle of the top) They seem they could break very easy if to much force was used so if you try it be careful.
And when your finished it should look just like this.If you break a thing or 2 just throw them over your shoulder and mod something to replace them. Lol just kidding.
Ok here are the Pieces i am going to be starting with.But the painting process of those build will be done in a few stages and not to bum you out but that will be in the next update as i am trying to keep updates 15 photos or less do to some forum restrictions.
Ok now i am going to go over the materials i will be using and like i said continuing after into the next update.
As many of you already know i can spray basically any paint and have 12 Real pain guns and a few airbrushes but after painting enough and trying plenty of paints i decided i will be just using Krylon Fusion Rattle cans. It is an incredible paint for both plastic and metal. No adhesion Promoter needed for plastics with this paint nor primer on metal (Unless its bare metal i would still use an etching primer. Anyway incredible paint. Dont believe me go buy a can and try it i promise you'll love it.
Next thing i will be using is a wet/dry sandpaper i have a pack of 220 and a multi pack . I usually use a 400 myself personally for this kind of thing. Dont but crappy sandpaper get wet/dry you wont regret it.
I also will be using some mechanic towels (Blue in photo) a lint free micro fiber cloth and some rubbing alcohol I prefer 70% but 50 % will do also if its all you can get.
Never ever paint even spray paint without a mask. for spray paint in a well ventilated area use either of the ones in the photo but when you start getting into guns and Lacquers and more aggressive paints you should upgrade you masks. Its your life and your lungs and the 5 pack of masks you see cost me 1 dollar so their is no excuse not to wear one.But of course i am only giving advice as i would hate to see anyone get hurt over something so simple.
Stay tuned for the rest of this update and more soon and its nice to be back. I think you guys will really get a kick out of where this build is going.
Take Care my Friends,
MybadOmen
To be continued ......
Options
- Mark as New
- Bookmark
- Subscribe
- Mute
- Subscribe to RSS Feed
- Permalink
12-12-2012 11:09 PM
Its a triple with a blank off in case i decide to add a third. Plus im pretty sure they don't make the dual with the correct spacing for the 2 x16 slots. At least that's what i was told when researching the blocks from EK.
Options
- Mark as New
- Bookmark
- Subscribe
- Mute
- Subscribe to RSS Feed
- Permalink
12-12-2012 11:12 PM
Update
Hiya guys and thanks for coming back to check out another update if you are here 🙂 This update is just continuing on from the last and seeing there will be a few different times i am painting on the case i will try and keep them in order the best i can.
Ok so last update we left off showing the meterials i was going to be using to paint the Mesh on the top and the fron of the Phantom 820 the old fashion Spray bomb method which with the right paint can be just as durable as using my guns and look just as nice to a point of course.
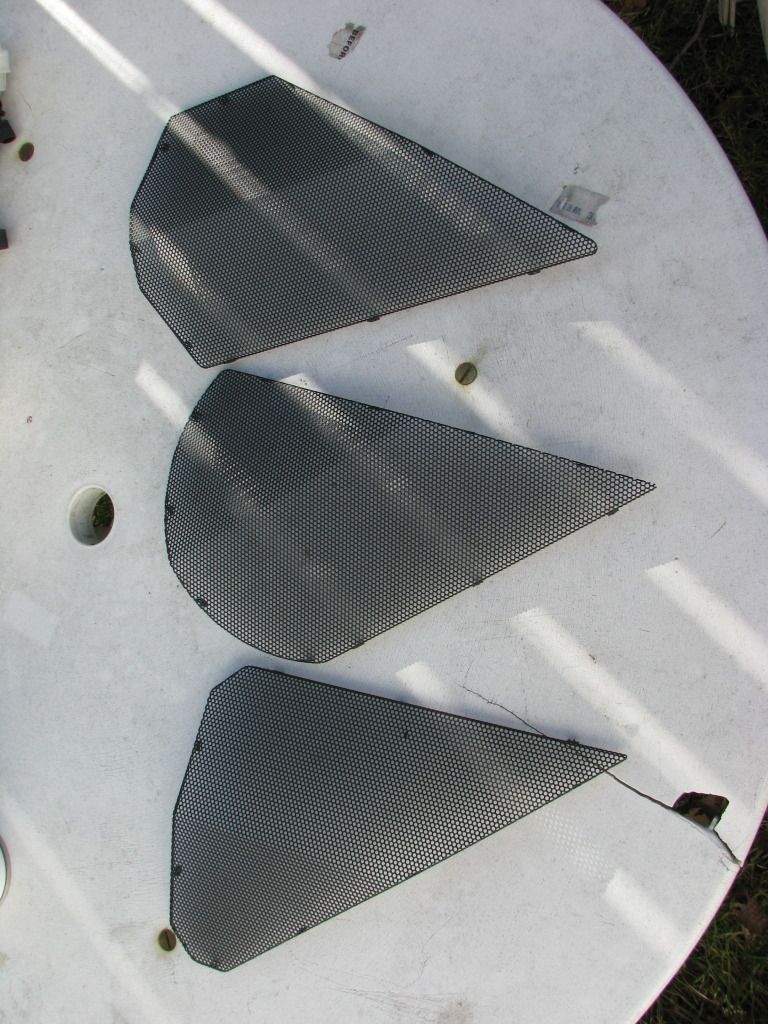
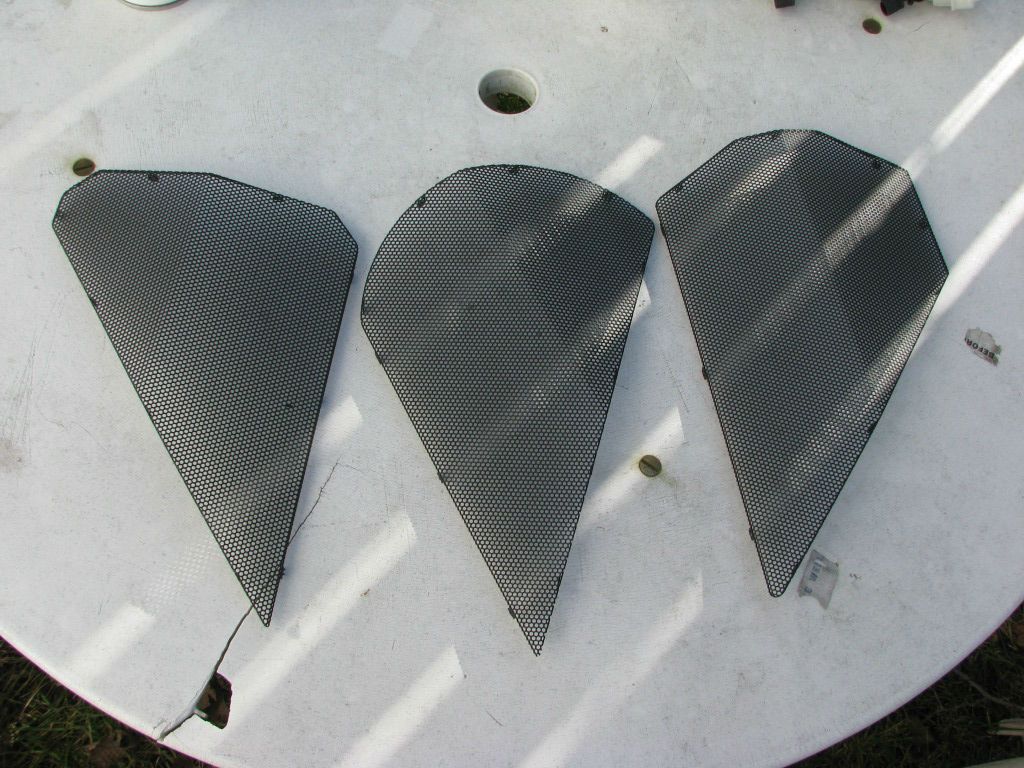
Here i will walk you through what i did to prep and paint the mesh. and here is where we left off in the last update.
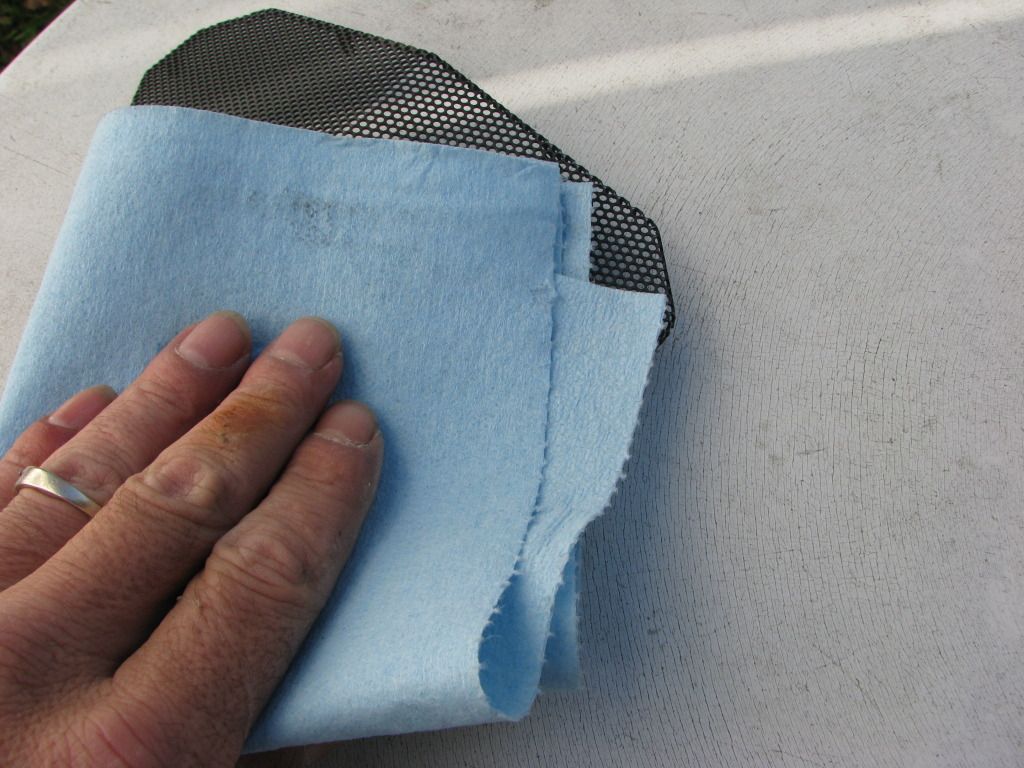
The Mesh just removed .
First i washed them in some luke warm water with Dawn brand dish soap to remove all the grease or anything that could be on the case.It is important to do this before sanding as the sanding will just spread the oils or whatever is on the case or part you are painting all over the place. ( Sorry no Photo of this step wasnt even thinking about it at the time i did it) But its simple enough.
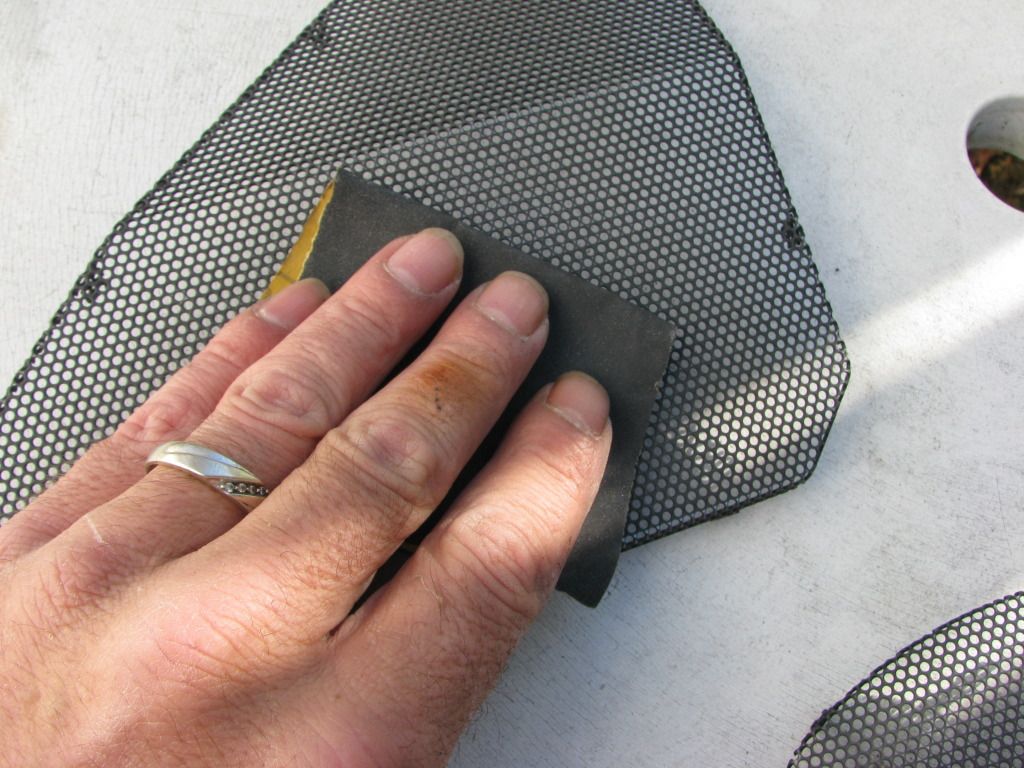
Next i decided to go with a 400 Grit wet/dry sandpaper for the Mesh because i dont want to remove the old paint, I only want to remove the shine or basically scuff it up so the paint can bond good to it. Seeing i know how good this Paint bonds i know i can easily get away with a 400 grit which is finer then a 220grit. (Higher the grit the finer the sandpaper).The reason i dont want to remove the old paint is because i will then be left with bare metal and in that situation you need to use an etching Primer before you can paint.
Sand everything and both sides.Try not to miss places as that will be the place you have the chance of peeling paint etc. With the paint i am using i doubt it ever but just be be safe thats what really should be done.
Now as in the update before this i showed and talked about the materials i would be using and as you can see i am using the 70% Alcohol and shop towels to wipe everything clean until no black shows on the towels. I then at then end whipe it quick with a clean Microfibre rag or a Rak rag depending on what i am painting. Microfiber is fine for what i am doing.
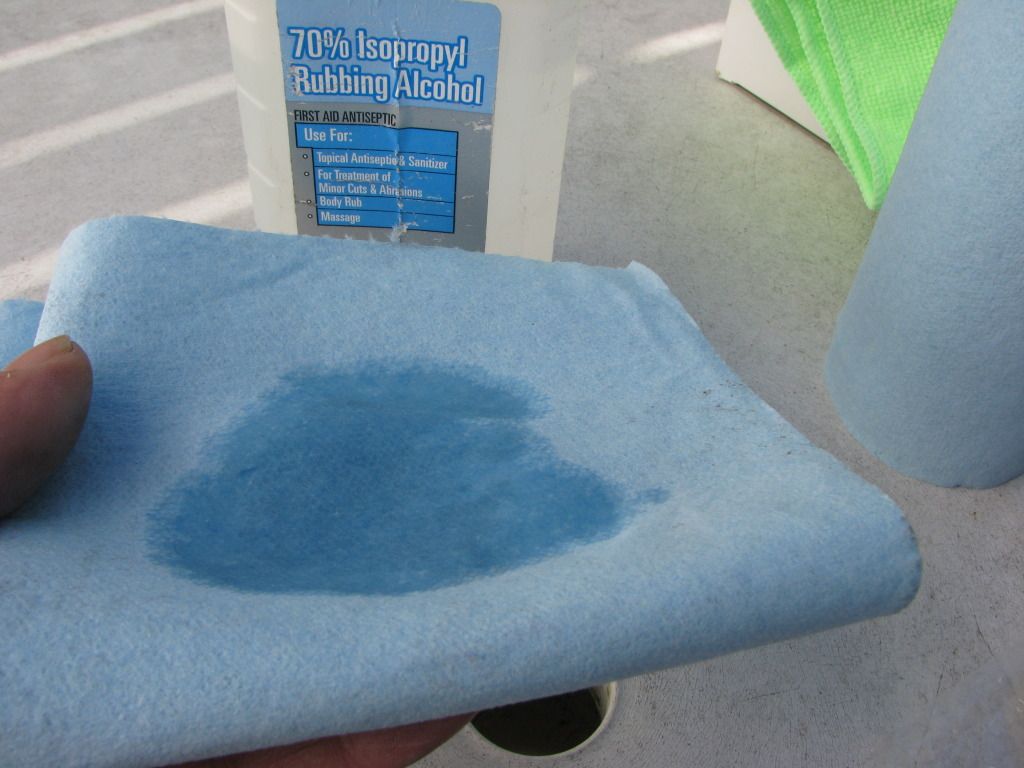
Here is how dirty it was even though after sanding it seems to be clean. So if i just painted without cleaning there is a good chance the paint would peel or fish eye on me.

Here is a Photo showing the mesh Properly prepped for painting, If you look close you can see its lighly scuffed up but not down to metal. (Dont worry there will be spots you go through to bare metal just try to avoid it is all)
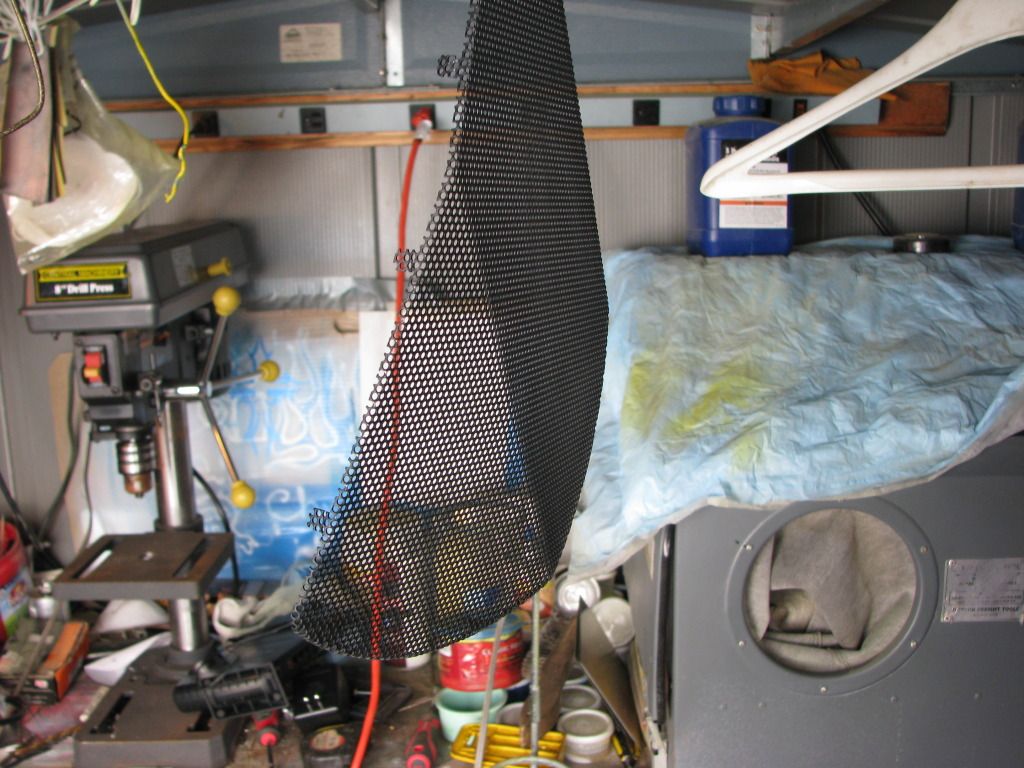
Next i hang the Mesh in my Messy Shed i i have been mosty using my shop inside the house now so havent got a chance to get it more organized. Besides that i blew all the dust out first with my air compressor and Vaccumed .Its also good practice to wet the floor if you are somewhere that is possible to do to keep the dust down. But again with what i am painting here its not really that necassary.
Note i am hanging the mesh by one of the clips in case i get a mark from where the hanger was ,this way the clip is hidden when the mesh is put back into the case.
Sorry i never get Photos of me actually spraying besides 1 time i think i did .Reason for this is the pain will destroy my camera as its floating in the air sorta like dust when im painting.Not to mention its a bit hard to focus on laying the paint down nice with a camera in my hand.
Anyway start with whats called a Tack coat. This is just a very light coat of paint that barely covers at all and then let it sit in the case of the paint i am using i gave it about 3 minutes as the complete dry time is 15 minutes but remeber thats still not the pain fully cured but it is handable.The reason for a Tack coat is to help avoid getting runs while painting and also to help the paint bond better also so it is rather important. Never try to just paint anything in 1 quick coat and always leave time in between coats.There is a good reason for this also. If you just try and throw a heavy coat of paint on something its for 1 most likely going to run on you or fish eye and also the top of the Paint will dry before the lower coats leaving the paint sorta sealed in so it cant dry. would be a soft finish or peal all kinds of nasty stuff so basically Tack coat and leave time between coats.
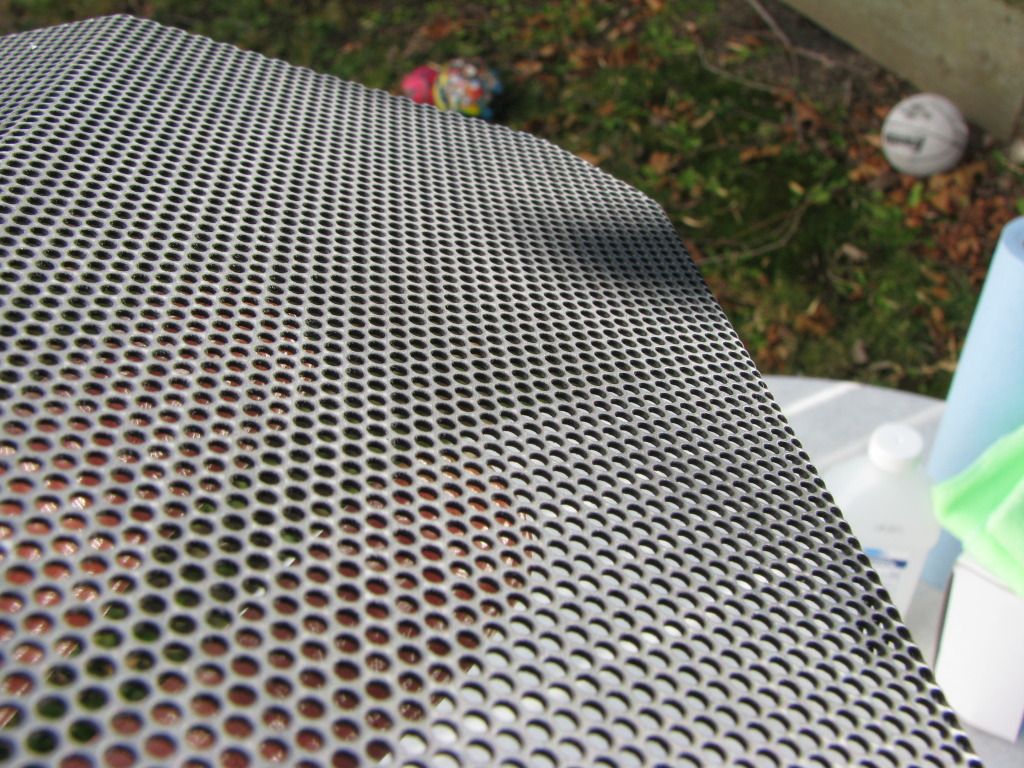
Showing the prepped and Finished Mesh:
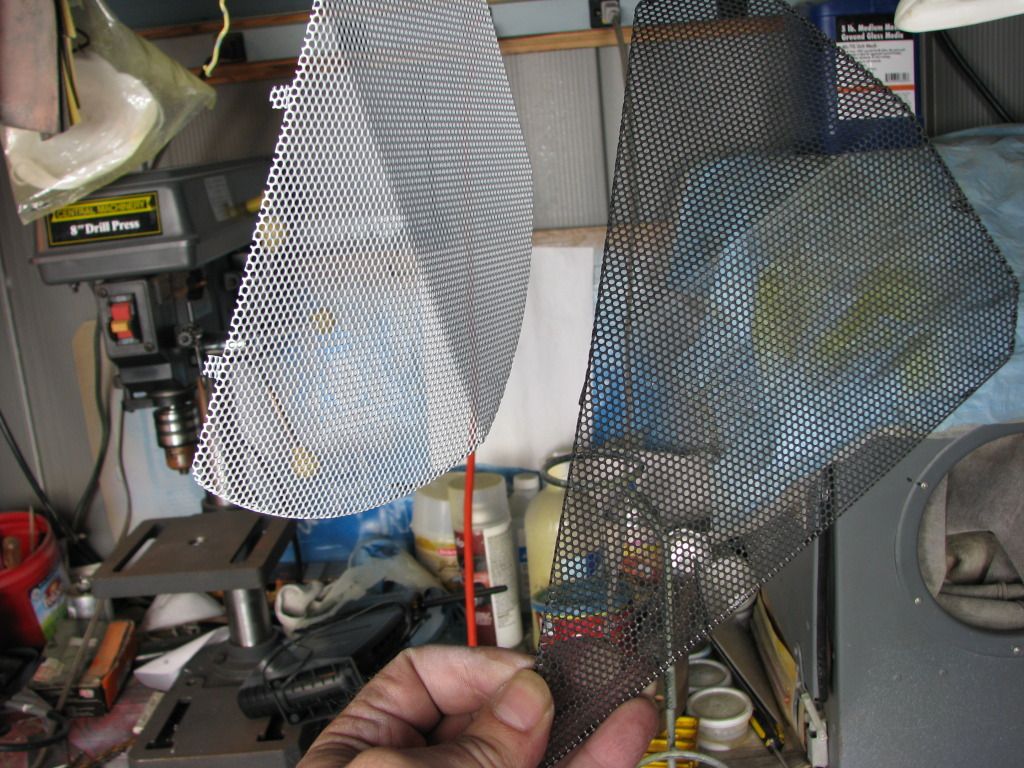
Looking Very Nice and very durable.
And everything else on the build is in shambles as im working on a few things at the same time on it so ignore the inside for now.But the white Mesh fits where i am heading with this build just right and i think im pretty pleased with it so far but tons to go as far as painting and Modding.
Thanks for Looking guys and i still have allot more to still get logged so will be back very soon with more.
Take Care and Keep Watching.
MybadOmen
Hiya guys and thanks for coming back to check out another update if you are here 🙂 This update is just continuing on from the last and seeing there will be a few different times i am painting on the case i will try and keep them in order the best i can.
Ok so last update we left off showing the meterials i was going to be using to paint the Mesh on the top and the fron of the Phantom 820 the old fashion Spray bomb method which with the right paint can be just as durable as using my guns and look just as nice to a point of course.
Here i will walk you through what i did to prep and paint the mesh. and here is where we left off in the last update.
The Mesh just removed .
First i washed them in some luke warm water with Dawn brand dish soap to remove all the grease or anything that could be on the case.It is important to do this before sanding as the sanding will just spread the oils or whatever is on the case or part you are painting all over the place. ( Sorry no Photo of this step wasnt even thinking about it at the time i did it) But its simple enough.
Next i decided to go with a 400 Grit wet/dry sandpaper for the Mesh because i dont want to remove the old paint, I only want to remove the shine or basically scuff it up so the paint can bond good to it. Seeing i know how good this Paint bonds i know i can easily get away with a 400 grit which is finer then a 220grit. (Higher the grit the finer the sandpaper).The reason i dont want to remove the old paint is because i will then be left with bare metal and in that situation you need to use an etching Primer before you can paint.
Sand everything and both sides.Try not to miss places as that will be the place you have the chance of peeling paint etc. With the paint i am using i doubt it ever but just be be safe thats what really should be done.
Now as in the update before this i showed and talked about the materials i would be using and as you can see i am using the 70% Alcohol and shop towels to wipe everything clean until no black shows on the towels. I then at then end whipe it quick with a clean Microfibre rag or a Rak rag depending on what i am painting. Microfiber is fine for what i am doing.
Here is how dirty it was even though after sanding it seems to be clean. So if i just painted without cleaning there is a good chance the paint would peel or fish eye on me.
Here is a Photo showing the mesh Properly prepped for painting, If you look close you can see its lighly scuffed up but not down to metal. (Dont worry there will be spots you go through to bare metal just try to avoid it is all)
Next i hang the Mesh in my Messy Shed i i have been mosty using my shop inside the house now so havent got a chance to get it more organized. Besides that i blew all the dust out first with my air compressor and Vaccumed .Its also good practice to wet the floor if you are somewhere that is possible to do to keep the dust down. But again with what i am painting here its not really that necassary.
Note i am hanging the mesh by one of the clips in case i get a mark from where the hanger was ,this way the clip is hidden when the mesh is put back into the case.
Sorry i never get Photos of me actually spraying besides 1 time i think i did .Reason for this is the pain will destroy my camera as its floating in the air sorta like dust when im painting.Not to mention its a bit hard to focus on laying the paint down nice with a camera in my hand.
Anyway start with whats called a Tack coat. This is just a very light coat of paint that barely covers at all and then let it sit in the case of the paint i am using i gave it about 3 minutes as the complete dry time is 15 minutes but remeber thats still not the pain fully cured but it is handable.The reason for a Tack coat is to help avoid getting runs while painting and also to help the paint bond better also so it is rather important. Never try to just paint anything in 1 quick coat and always leave time in between coats.There is a good reason for this also. If you just try and throw a heavy coat of paint on something its for 1 most likely going to run on you or fish eye and also the top of the Paint will dry before the lower coats leaving the paint sorta sealed in so it cant dry. would be a soft finish or peal all kinds of nasty stuff so basically Tack coat and leave time between coats.
Showing the prepped and Finished Mesh:
Looking Very Nice and very durable.
And everything else on the build is in shambles as im working on a few things at the same time on it so ignore the inside for now.But the white Mesh fits where i am heading with this build just right and i think im pretty pleased with it so far but tons to go as far as painting and Modding.
Thanks for Looking guys and i still have allot more to still get logged so will be back very soon with more.
Take Care and Keep Watching.
MybadOmen
Options
- Mark as New
- Bookmark
- Subscribe
- Mute
- Subscribe to RSS Feed
- Permalink
12-13-2012 12:04 PM
Update
Hiya again Fellow Modders / enthusiest /Overclockers / etc .
Today's update i would like to start by thanking another talented Modder named Kellen aka (Kaged) many of you may remeber him from his Pink Cancer awareness build that he Modded and raffled off and then donated the 100% of the proceeds to a cancer awareness program. He has also built another Phantom recently called "Lucky 13" which is also another nice mod. but the reason i am mentioning him is many of you may have already known but many dont.Kaged was the person that made all my Vinyl Decals for "Mass Effect 3" and the Masking for "Venom" but the funny part is i have a high end plotter sitting in my house that i just didnt know how to use. So some of the delay on the project is i wanted to learn Corel Draw ,The Plotter software ,how to work with Vectors,Welding Vectors etc. After a few nights with no sleep and Kaged on my PC via remote desktop i finally learned it all and this will be my first Project making my own Masking and Vinyls.So i think a huge Thank you goes out to Kaged for all the help he has given me with this as its not a simple thing to learn and took many days.
That being said lets get on with the Update :
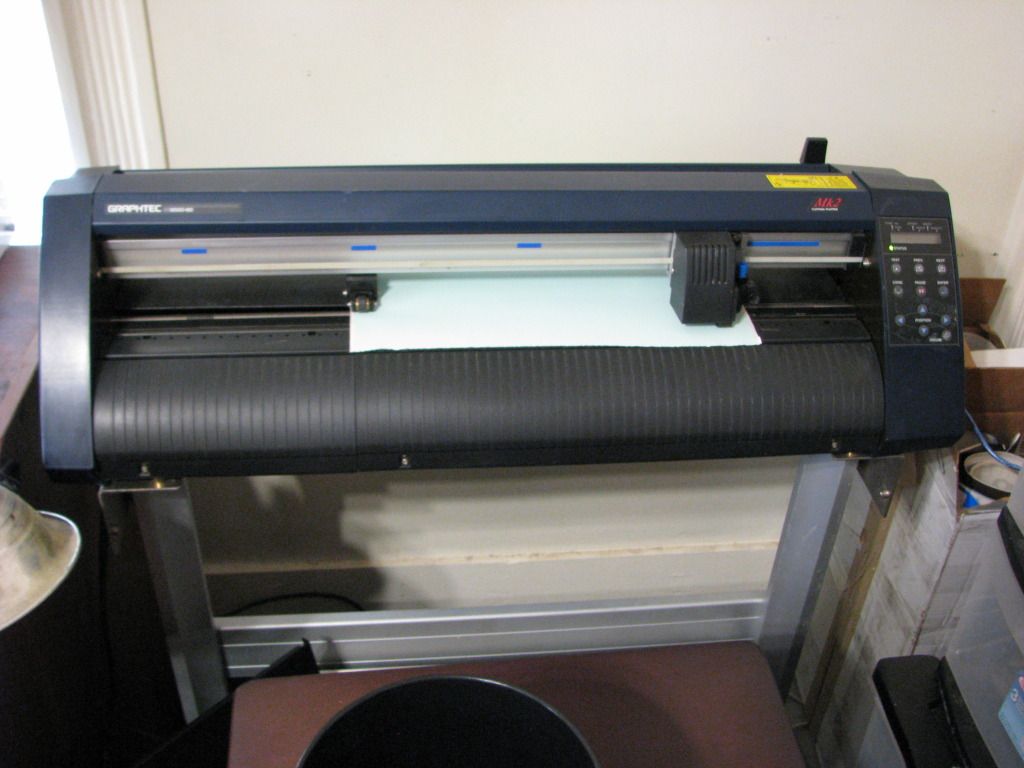
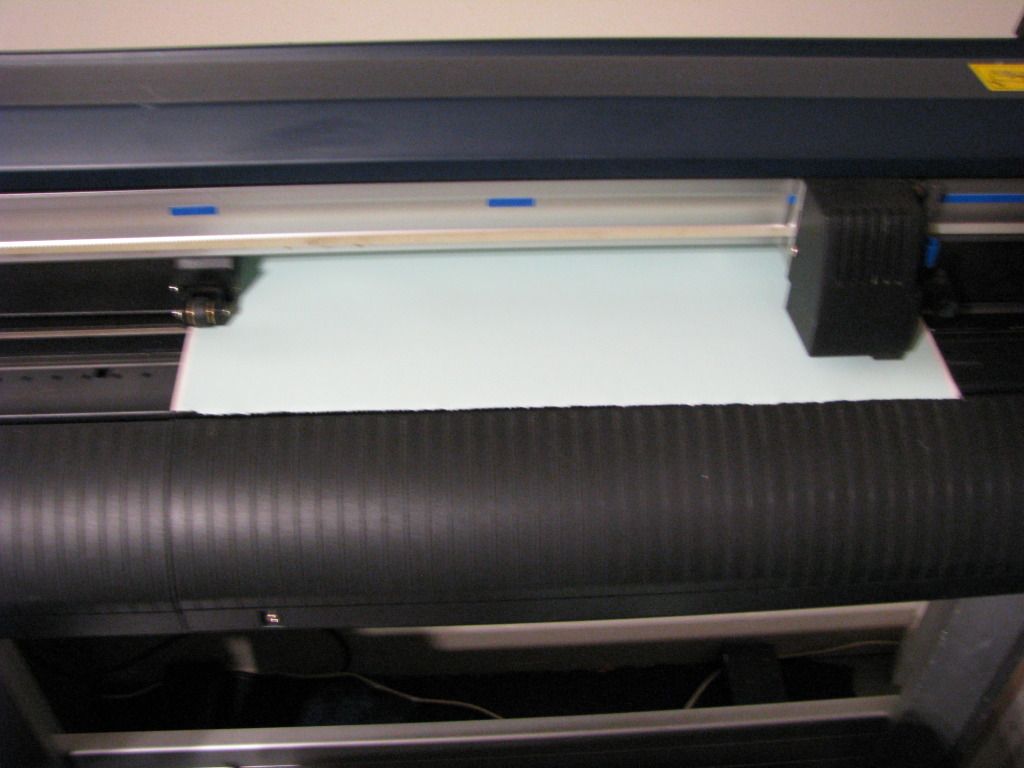
First off this is a Plotter for those that never seen one. This specific one is a Graphtec America Plotter and goes for roughly $2400. new without the stand but you can buy Plotters for a less that will basicaly do the same thing i believe the cricket is similiar also. This particular one cuts Din noc etc and meterial from 24 inches wide to any length. This Plotter was also a gift from someone for my birthday that i work for.Anyway what a plotter does is can take a drawing or name etc and cut a certain metarial like a sticker etc without cutting all the way through. Most sign makers use plotters or t shirt makes.
Here is the plotter i will be using
And here is the Plotter actually working.This is after i made the design i wanted,Converted it to Vector ,Improved the quality of the image and welded it also . (Welding basicaly makes sure the blade dont cross itself or go off the path that you want cut.Its hard to explain but if interested in it more you can Google Plotter welding) and finally i end up with a .cdr file that i sent to the plotter and position it where i want it then send the command to cut. Sorta like a printer.
Here are the first cuts i made but the face was a bit to big so i resized it and tried again. Live and learn .
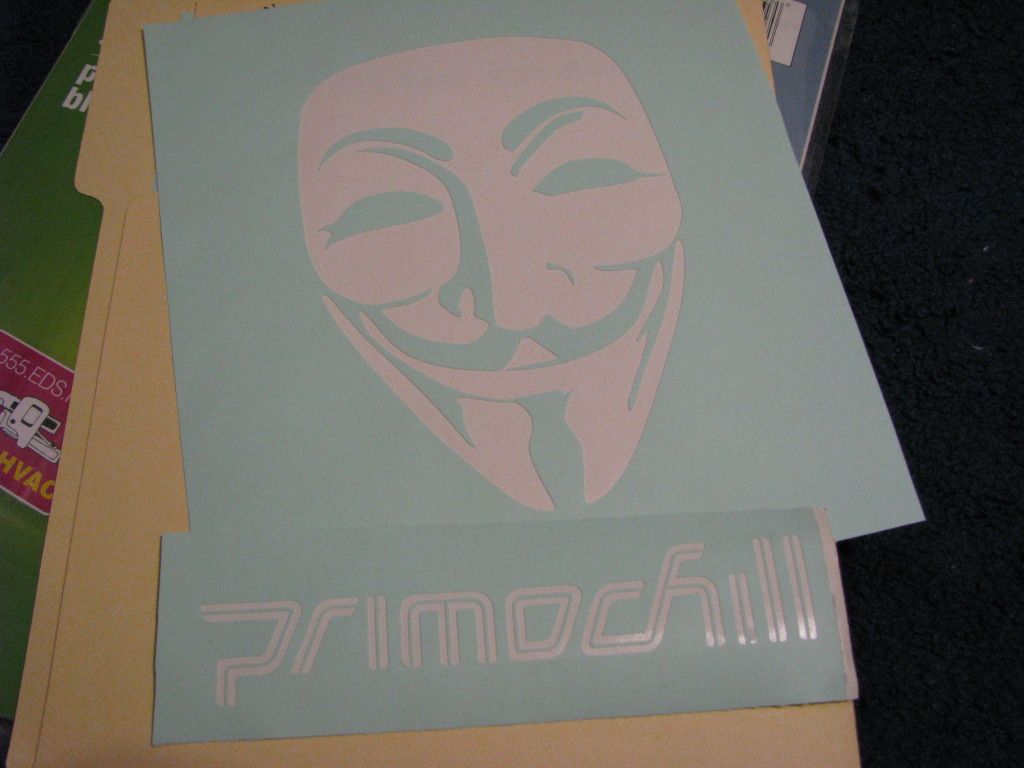
The material i was cutting was a medium tack masking but when i was finished i relized i had no transfrer tape which is extremly important to apply the masking or a decal and you will see why soon.So what i did was thought about it and went to the local hardware store. I happened to find some low tack Clear Contact plastic used for lining drawers and it was basically the same exact thing as transfer tape so i came back home and could continue working without another delay.
Here is the Contact drawer liner i bought and the other thing in the photo is a cutter i use for all kinds of projects but goes perfect with the plotter.

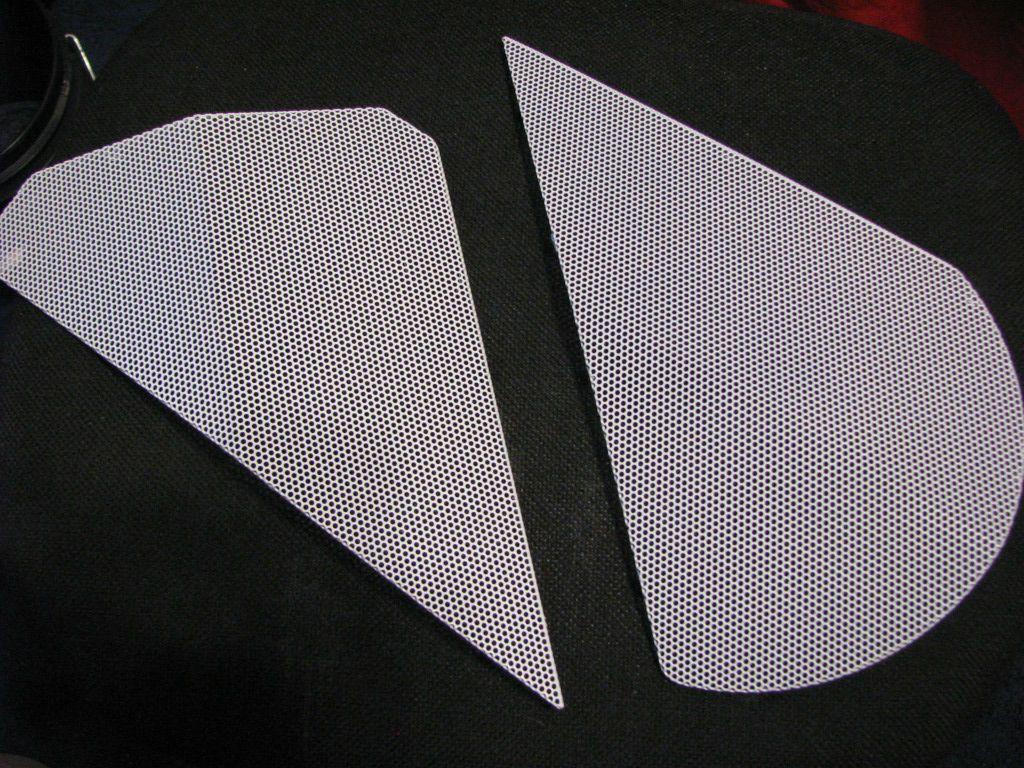
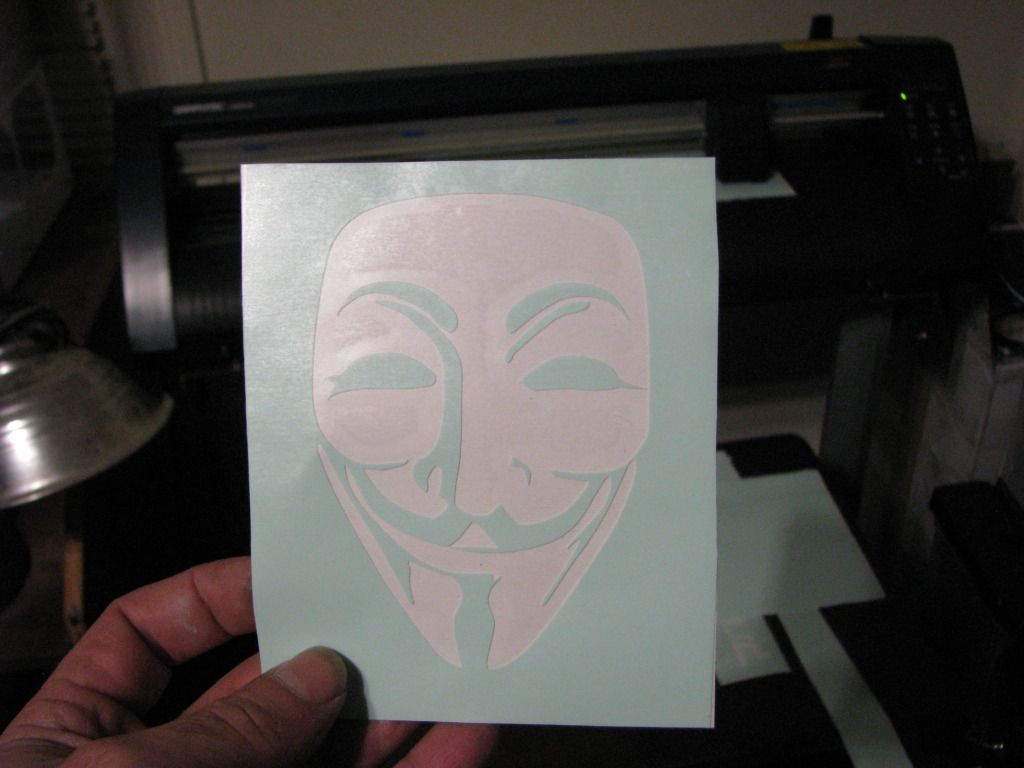
Now what i have to do is carefully lay the transfer tape or in this case the drawer liner 🙂 over the masking so it should look something like this when completed. (This is a completed Masking ready to go).
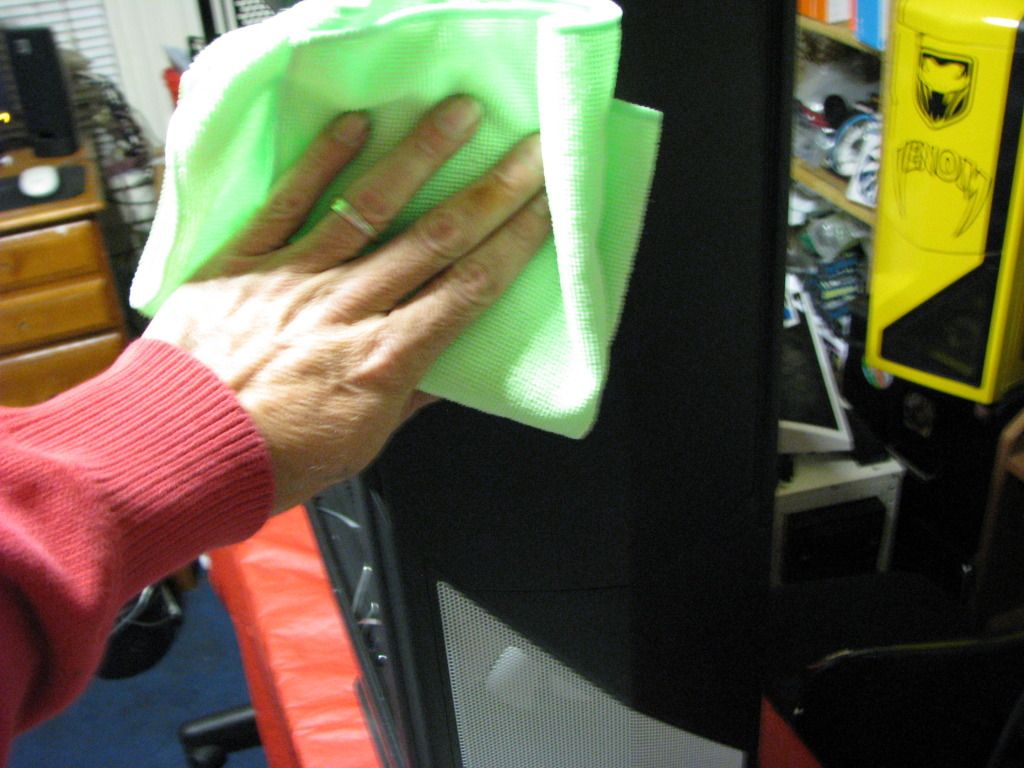
Now that i have the masking i need to clean the surface that i will be painting and placing the masking so just like in previos post i used alcohol ,Shop towels and Microfiber cloth.
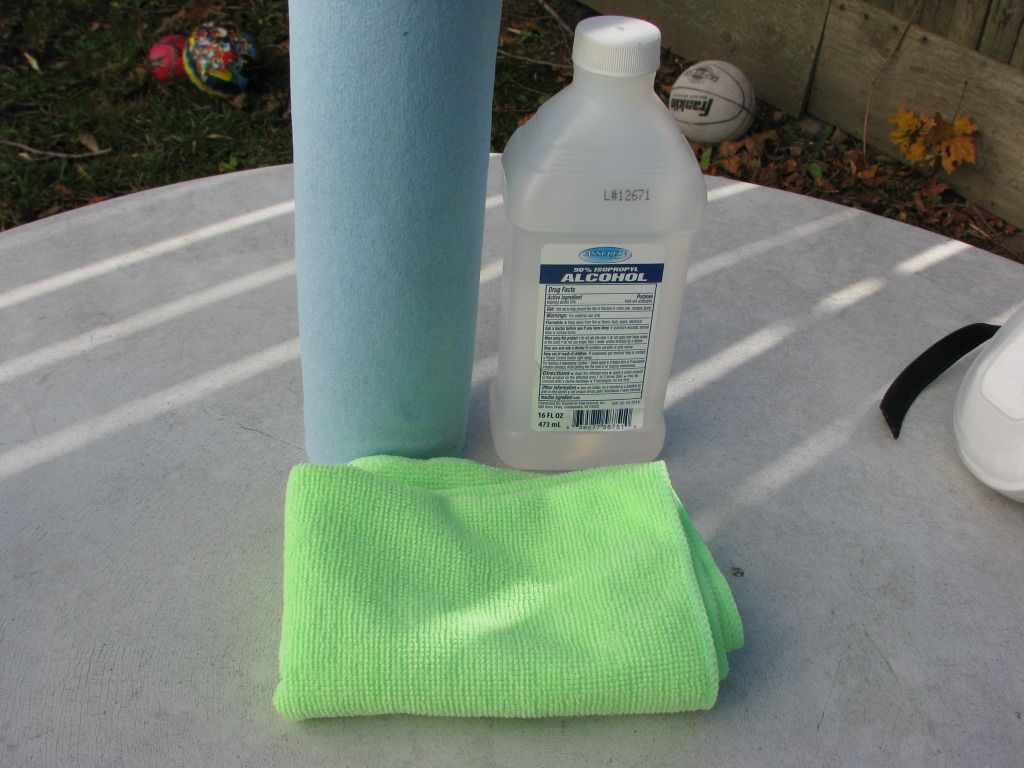
First i clean the surface good with the Alcohol
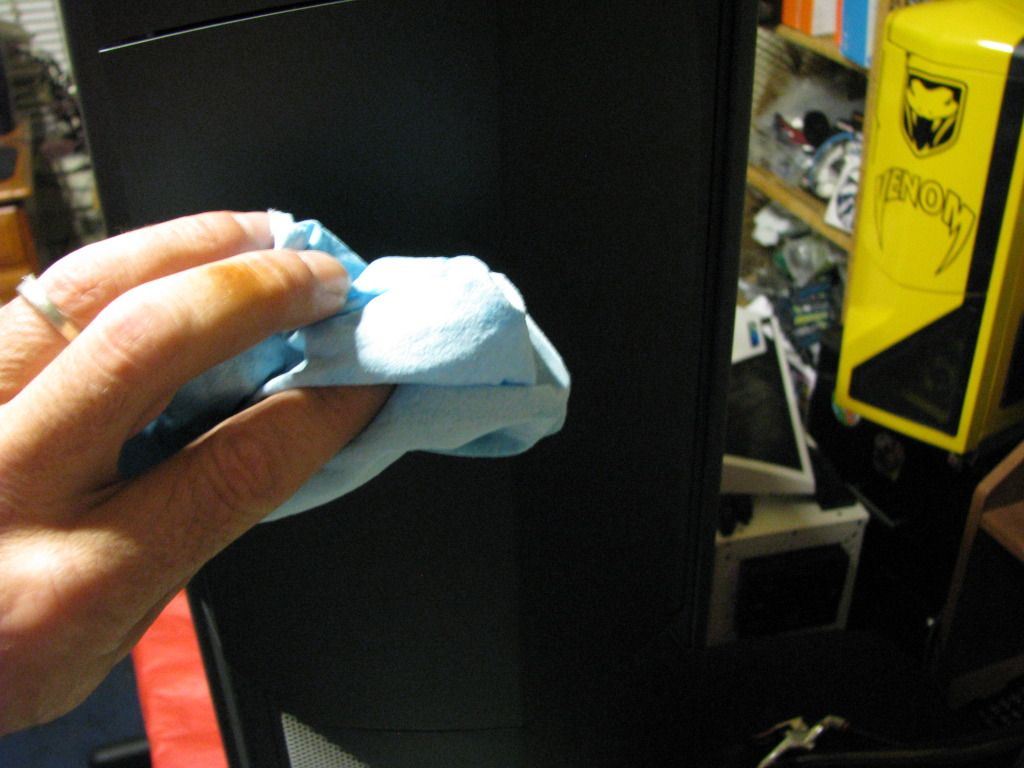
Then i wipe it clean with the Microfiber cloth ,I will repeat this again right before applying the masking to make sure there is no dust at all.
Now we take the backing off the masking (Not the clear transfer tape but the other side) And i then center or position the masking where i want it and since this is going on a pointed area i place the center of the decal or masking on first and then work away from the center with a credit card or squeegy to make sure there are no air bubbles in the blue masking.
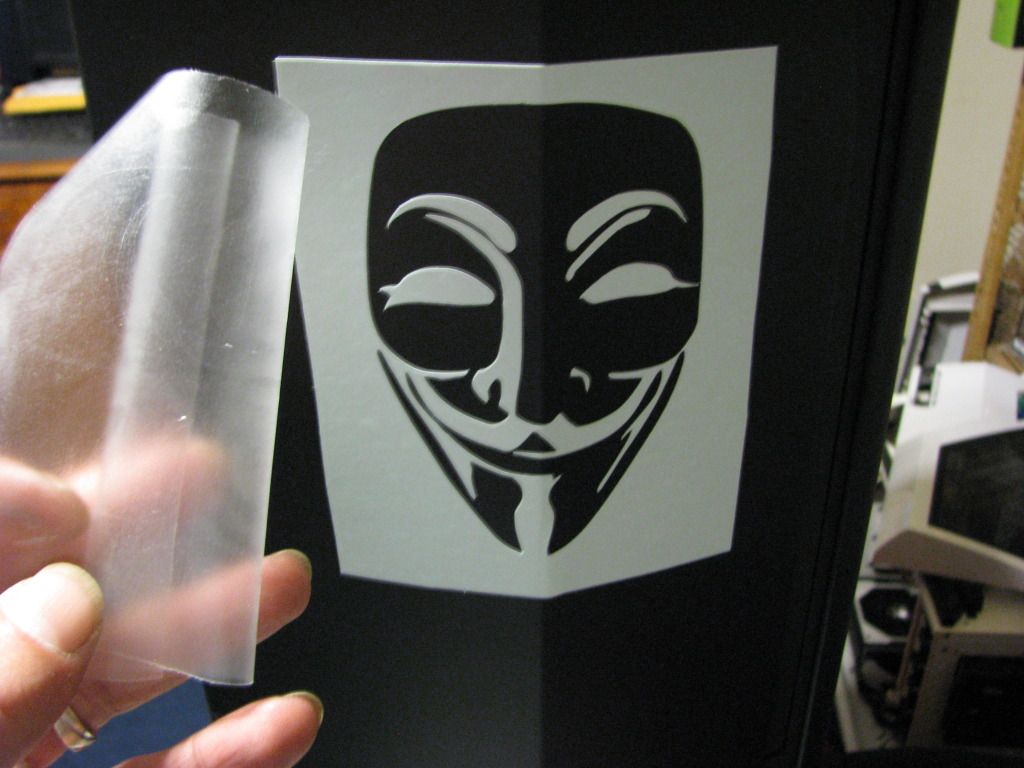
Next its time to peel the clear transfer tape off and this can be tricky depending on the design you are working with. The best way i found is pull towards yourself keeping the transfer tape pulled way back as shown in the photo. Also of you have long thin lines in your work start where the line is conected and then pull the tape from that point to the tip to avoid peeling the masking off.

And its off. Not i just make sure there are no bubbles or more important any spots that are lifted where i will be painting as that will destroy the paint job.The reason is the pain will go under the lifted area and just make it messy looking.
Now we simply mask of everything we dont want painted.I am using a medium tack painters tape. (Dollar store i think i got it)
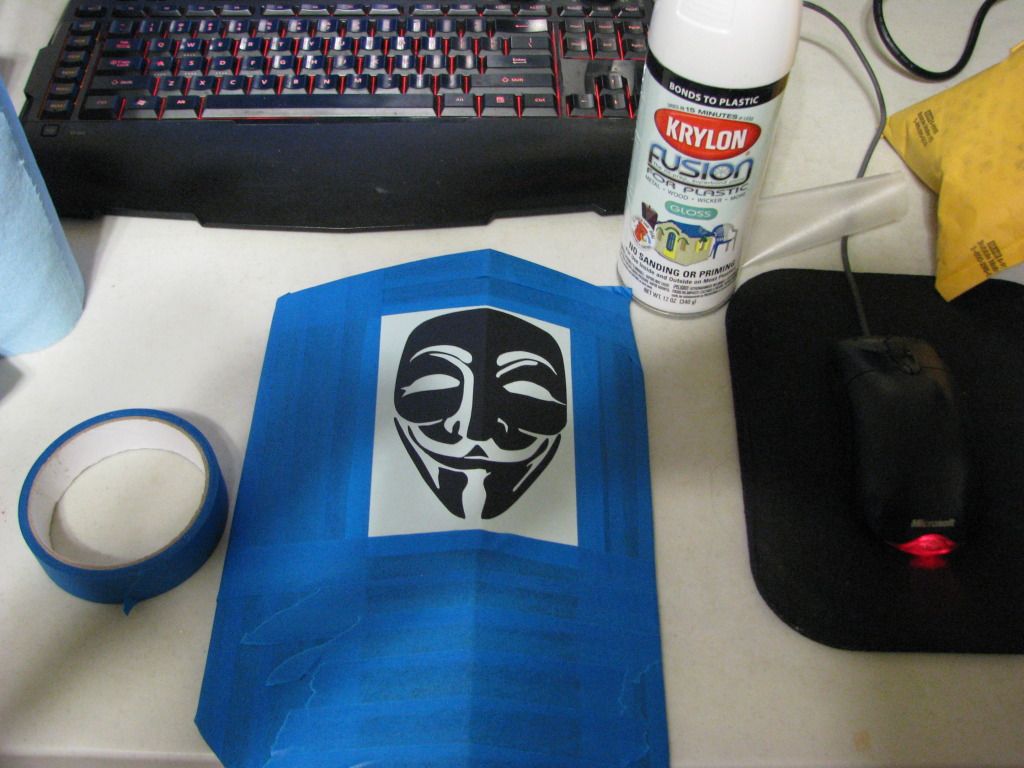
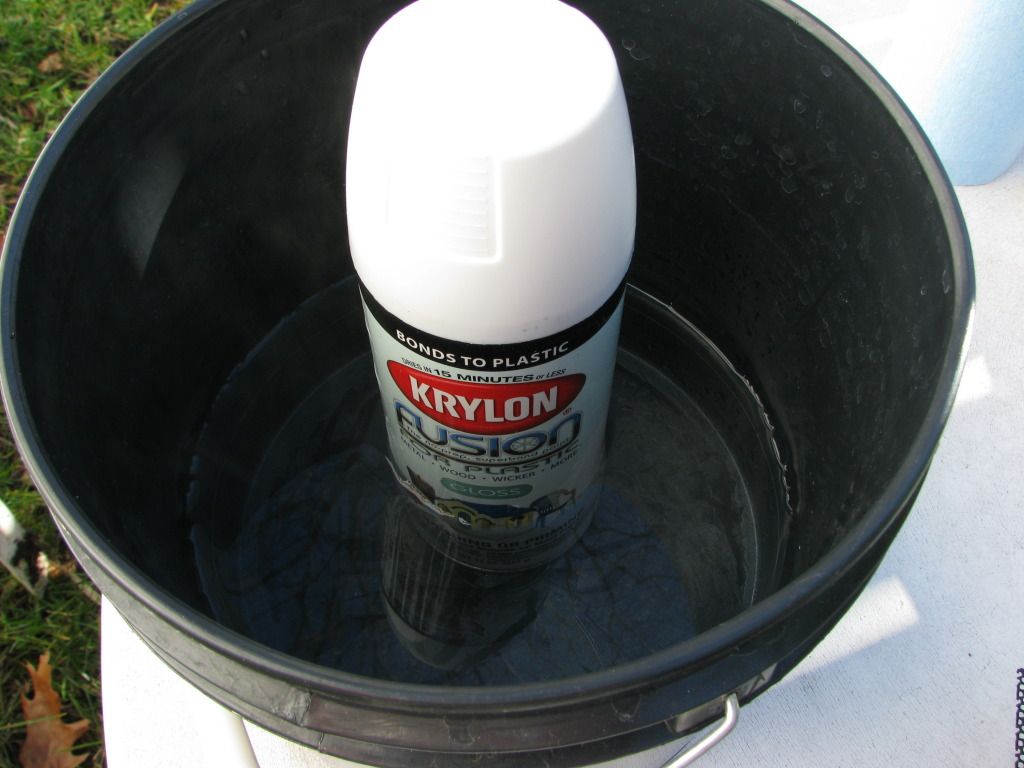
I forgot to mention this the previous update but when i do use Spay Paint i always warm the can in luke warm water first.Thius makes a huge differents in the way the paint flows from the can and gives a smoother finish.
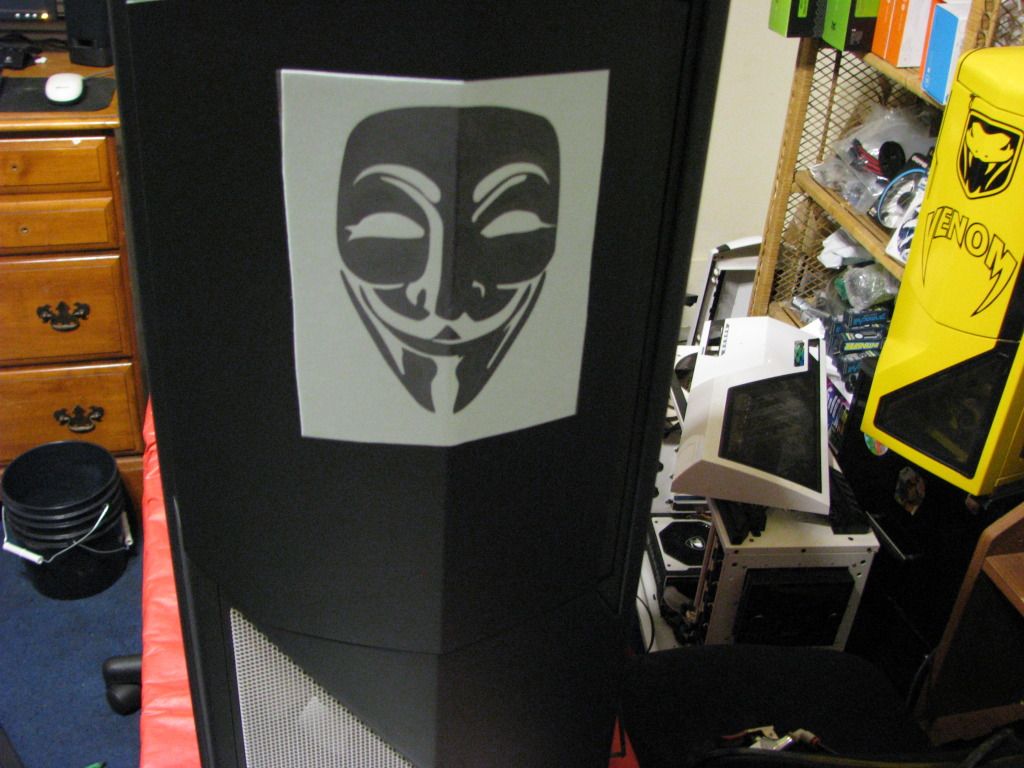
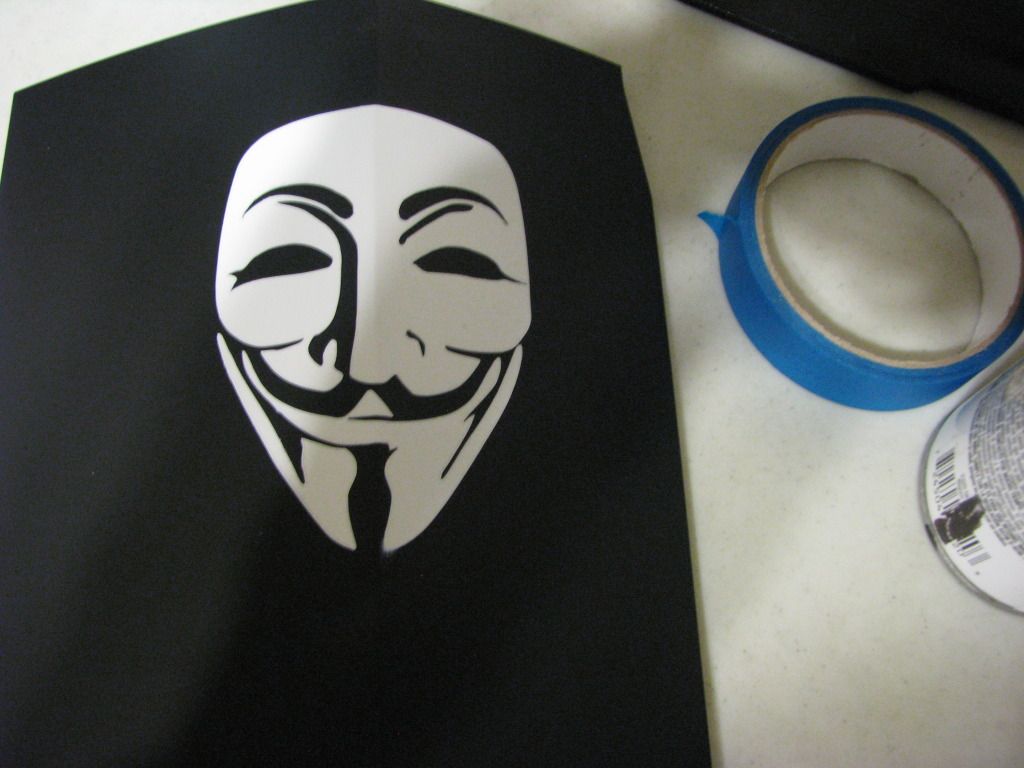
Next i peel the masking off. It takes a little time to get the perfect timing down on when to remove the maksing as to early the paint can be ruined from stringy looking paint thats not dry yet and to late the paint will be stuck to the masking and peal off with it. Its usually not a problem so dont worry to much about it as i am just saying it could happen.
In this case it came out perfect
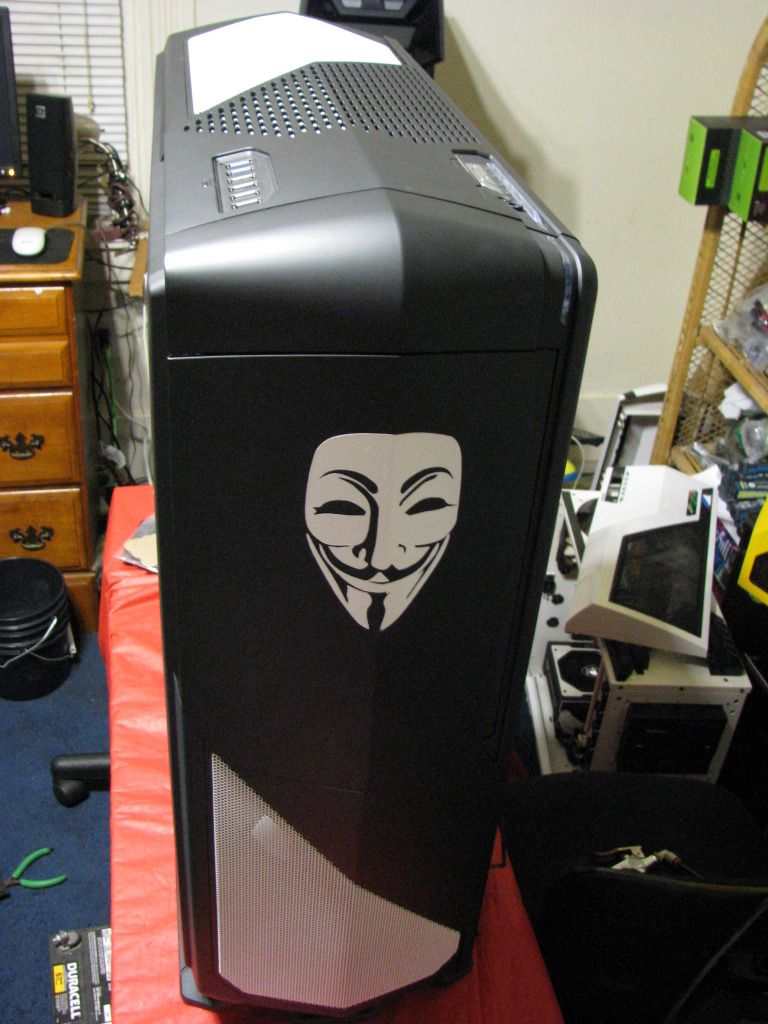
And still more painting to go but here it is with the door back on for now
Hope you liked the update and like i said the painting is far from done as well as the build as a whole .
Keep watching lots more to come
MybadOmen
Hiya again Fellow Modders / enthusiest /Overclockers / etc .
Today's update i would like to start by thanking another talented Modder named Kellen aka (Kaged) many of you may remeber him from his Pink Cancer awareness build that he Modded and raffled off and then donated the 100% of the proceeds to a cancer awareness program. He has also built another Phantom recently called "Lucky 13" which is also another nice mod. but the reason i am mentioning him is many of you may have already known but many dont.Kaged was the person that made all my Vinyl Decals for "Mass Effect 3" and the Masking for "Venom" but the funny part is i have a high end plotter sitting in my house that i just didnt know how to use. So some of the delay on the project is i wanted to learn Corel Draw ,The Plotter software ,how to work with Vectors,Welding Vectors etc. After a few nights with no sleep and Kaged on my PC via remote desktop i finally learned it all and this will be my first Project making my own Masking and Vinyls.So i think a huge Thank you goes out to Kaged for all the help he has given me with this as its not a simple thing to learn and took many days.
That being said lets get on with the Update :
First off this is a Plotter for those that never seen one. This specific one is a Graphtec America Plotter and goes for roughly $2400. new without the stand but you can buy Plotters for a less that will basicaly do the same thing i believe the cricket is similiar also. This particular one cuts Din noc etc and meterial from 24 inches wide to any length. This Plotter was also a gift from someone for my birthday that i work for.Anyway what a plotter does is can take a drawing or name etc and cut a certain metarial like a sticker etc without cutting all the way through. Most sign makers use plotters or t shirt makes.
Here is the plotter i will be using
And here is the Plotter actually working.This is after i made the design i wanted,Converted it to Vector ,Improved the quality of the image and welded it also . (Welding basicaly makes sure the blade dont cross itself or go off the path that you want cut.Its hard to explain but if interested in it more you can Google Plotter welding) and finally i end up with a .cdr file that i sent to the plotter and position it where i want it then send the command to cut. Sorta like a printer.
Here are the first cuts i made but the face was a bit to big so i resized it and tried again. Live and learn .
The material i was cutting was a medium tack masking but when i was finished i relized i had no transfrer tape which is extremly important to apply the masking or a decal and you will see why soon.So what i did was thought about it and went to the local hardware store. I happened to find some low tack Clear Contact plastic used for lining drawers and it was basically the same exact thing as transfer tape so i came back home and could continue working without another delay.
Here is the Contact drawer liner i bought and the other thing in the photo is a cutter i use for all kinds of projects but goes perfect with the plotter.
Now what i have to do is carefully lay the transfer tape or in this case the drawer liner 🙂 over the masking so it should look something like this when completed. (This is a completed Masking ready to go).
Now that i have the masking i need to clean the surface that i will be painting and placing the masking so just like in previos post i used alcohol ,Shop towels and Microfiber cloth.
First i clean the surface good with the Alcohol
Then i wipe it clean with the Microfiber cloth ,I will repeat this again right before applying the masking to make sure there is no dust at all.
Now we take the backing off the masking (Not the clear transfer tape but the other side) And i then center or position the masking where i want it and since this is going on a pointed area i place the center of the decal or masking on first and then work away from the center with a credit card or squeegy to make sure there are no air bubbles in the blue masking.
Next its time to peel the clear transfer tape off and this can be tricky depending on the design you are working with. The best way i found is pull towards yourself keeping the transfer tape pulled way back as shown in the photo. Also of you have long thin lines in your work start where the line is conected and then pull the tape from that point to the tip to avoid peeling the masking off.
And its off. Not i just make sure there are no bubbles or more important any spots that are lifted where i will be painting as that will destroy the paint job.The reason is the pain will go under the lifted area and just make it messy looking.
Now we simply mask of everything we dont want painted.I am using a medium tack painters tape. (Dollar store i think i got it)
I forgot to mention this the previous update but when i do use Spay Paint i always warm the can in luke warm water first.Thius makes a huge differents in the way the paint flows from the can and gives a smoother finish.
Next i peel the masking off. It takes a little time to get the perfect timing down on when to remove the maksing as to early the paint can be ruined from stringy looking paint thats not dry yet and to late the paint will be stuck to the masking and peal off with it. Its usually not a problem so dont worry to much about it as i am just saying it could happen.
In this case it came out perfect
And still more painting to go but here it is with the door back on for now
Hope you liked the update and like i said the painting is far from done as well as the build as a whole .
Keep watching lots more to come
MybadOmen
Related Content
- The Tower 100 (gold) build - B550-I and Thermalright Phantom Spirit in Case Mods & PC Builds
- New Crosshair VIII & 3900x Build in Hardware & Build Advice
- Sabertooth Z77 System Rejuvenation, RAM Dilemma & OC - HELP! in Hardware & Build Advice
- Sabertooth Z77 System Rejuvenation, RAM Dilemma & OC - HELP! in Hardware & Build Advice
- Ghostbusters Build in Case Mods & PC Builds
