Turn on suggestions
Auto-suggest helps you quickly narrow down your search results by suggesting possible matches as you type.
Showing results for
- Republic of Gamers Forum
- Discussions
- Case Mods & PC Builds
- Freestyle Scratchbuilt Bench Build A.K.A. The 8 Ho...
Options
- Subscribe to RSS Feed
- Mark Topic as New
- Mark Topic as Read
- Float this Topic for Current User
- Bookmark
- Subscribe
- Mute
- Printer Friendly Page
Freestyle Scratchbuilt Bench Build A.K.A. The 8 Hour Challenge
Options
- Mark as New
- Bookmark
- Subscribe
- Mute
- Subscribe to RSS Feed
- Permalink
12-07-2012
10:41 PM
- last edited on
03-06-2024
10:28 PM
by
![]() ROGBot
ROGBot
Hey guys, so I snagged a bunch of stuff at the Dangerden Fire Sale (Sad to see them go :sad-smile ) and I was jazzed with all of these parts headed my way and I was in the "modding" mood. However I am waiting on parts for my Bombproof Builders Desk and my Wall PC build. So knowing I needed a new benching station (traded away my Dimas) I got a crazy idea, build a bench from scratch and only give myself 8 hours to do it! Not only that but I decided I had to use free and found parts as much as possible and I had to make it up as I went along. No sketches, plans or CAD layouts. But wait theres more! I also decided I could not make any measurements, I would have to find templates or eyeball it, the only thing I could use was a strait edge, everything else would be improvised or found objects.
Now why would I put all of these totally unnecessary "limits" on myself? Well several reasons
1. If it isn't hard it's not worth doing. I live for challenge and its one of the main reason I build PC's.
2. To shake things up! I currently have my next 5 Desk/Case/Scratch builds planned out extensively (which by the way should end up being about 2 years worth of builds :thumb: ) But I can only take those on one at a time and between work, cashflow and life there can be stretches where I dont even get to work on them. By playing playing by an entirely different set of rules I force myself to think and create in entirely new ways and explore the dynamics of my creative proccess.
3. Success Teaches us nothing, We only learn from failure. I knew going into this build with these rules I was going to screw things up, but thats the beauty of this build is that every mistake I made i had to adjust to and improve upon. Even this far in I have already come up with a ton of better ways to work with my builds and perfected some of my techniques along the way.
DISCLAIMER: This is a build for the fun of it. It in no way reflects my standards for regular case modding or scratchbuilding I am just having a good time and taking the attitude of as long as it fits we're good.
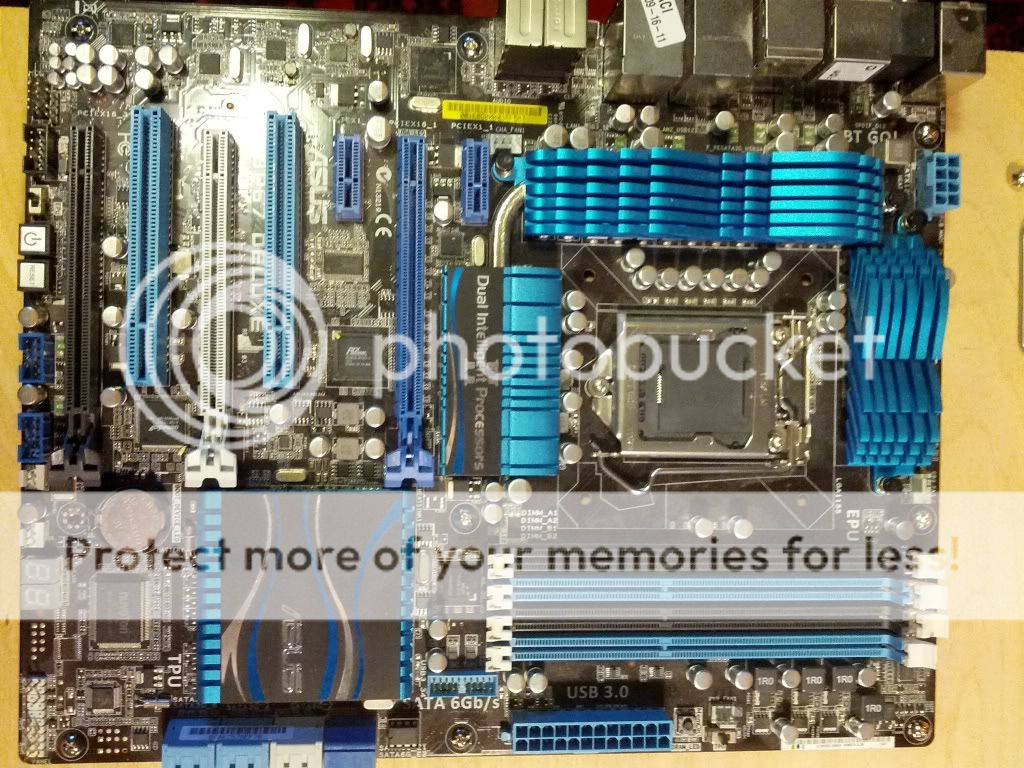
Ok so lets get into this build, the platform I am going to be using is a piece of scrap plywood from my desk build. I took a broken Asus Z68 Deluxe mobo and used it as my template for my standoffs. I then drilled the holes and threaded my standoffs in very very carefully :weirdsmil
First 4 in


Pretty happy with how it lined up

Then the Rest, not perfect but close enough (30 minutes in)

But dont think I have forgotten the mATX boards!

Bah one standoff short

Now we need to mark out some cable management holes

And its off to the Sawhorses!

First one was pretty rough

But with the second one I had gotten it pretty close to figured out

Third one was as close to perfect as I think I can get freestyling it

Now to the first leg, using 2x6 scraps from closing in my carport, didn't even cut them to fit this. (70 minutes in)

Pre-drilled then screwed in the leg

But then inspiration hits (I blame the Jawas, Utini!)


Beer decided to explode from vibration

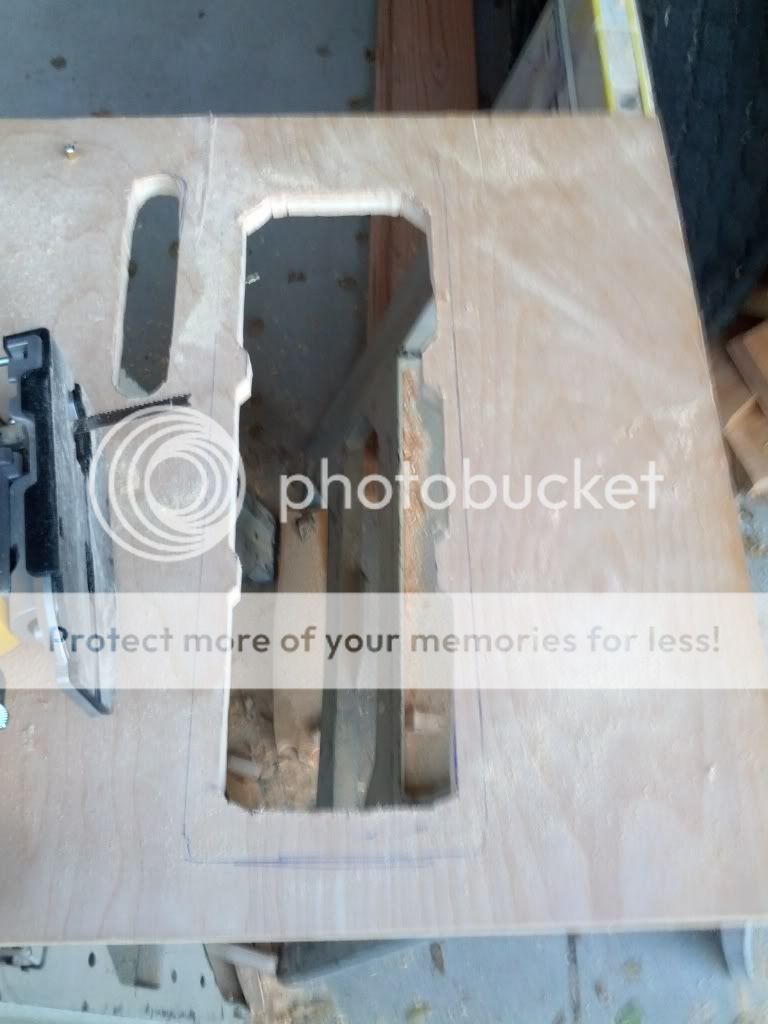
Next up we have the 360mm rad cutout (thats right I am going for the gold here) (110 Minutes in)


Rough left side cut

Cleanin up

Side Cut for the right
Cleaned up a bit

Figuring out where I need to drill my mounting holes

Test fitting

Where I am at 2 and a half hours of work


Next steps
PSU Mount
HDD mounts
PCIE Bracket
Router the Edges
fix some of the wood imperfections
Power and Reset Switches
USB ports
a Coat of High Gloss paint.
Now why would I put all of these totally unnecessary "limits" on myself? Well several reasons
1. If it isn't hard it's not worth doing. I live for challenge and its one of the main reason I build PC's.
2. To shake things up! I currently have my next 5 Desk/Case/Scratch builds planned out extensively (which by the way should end up being about 2 years worth of builds :thumb: ) But I can only take those on one at a time and between work, cashflow and life there can be stretches where I dont even get to work on them. By playing playing by an entirely different set of rules I force myself to think and create in entirely new ways and explore the dynamics of my creative proccess.
3. Success Teaches us nothing, We only learn from failure. I knew going into this build with these rules I was going to screw things up, but thats the beauty of this build is that every mistake I made i had to adjust to and improve upon. Even this far in I have already come up with a ton of better ways to work with my builds and perfected some of my techniques along the way.
DISCLAIMER: This is a build for the fun of it. It in no way reflects my standards for regular case modding or scratchbuilding I am just having a good time and taking the attitude of as long as it fits we're good.
Ok so lets get into this build, the platform I am going to be using is a piece of scrap plywood from my desk build. I took a broken Asus Z68 Deluxe mobo and used it as my template for my standoffs. I then drilled the holes and threaded my standoffs in very very carefully :weirdsmil
First 4 in
Pretty happy with how it lined up
Then the Rest, not perfect but close enough (30 minutes in)
But dont think I have forgotten the mATX boards!
Bah one standoff short
Now we need to mark out some cable management holes
And its off to the Sawhorses!
First one was pretty rough
But with the second one I had gotten it pretty close to figured out
Third one was as close to perfect as I think I can get freestyling it
Now to the first leg, using 2x6 scraps from closing in my carport, didn't even cut them to fit this. (70 minutes in)
Pre-drilled then screwed in the leg
But then inspiration hits (I blame the Jawas, Utini!)
Beer decided to explode from vibration
Next up we have the 360mm rad cutout (thats right I am going for the gold here) (110 Minutes in)
Rough left side cut
Cleanin up
Side Cut for the right
Cleaned up a bit
Figuring out where I need to drill my mounting holes
Test fitting
Where I am at 2 and a half hours of work
Next steps
PSU Mount
HDD mounts
PCIE Bracket
Router the Edges
fix some of the wood imperfections
Power and Reset Switches
USB ports
a Coat of High Gloss paint.
11,139 Views
12 REPLIES 12
Options
- Mark as New
- Bookmark
- Subscribe
- Mute
- Subscribe to RSS Feed
- Permalink
12-07-2012 10:41 PM
Ok guys, here is part 2 of the bench build and the next 2.5 hours leaving me 3 hours to finish it. I did in the meantime get to put the bench into service early as I needed to test 32gb of ram but I did not want to take my main system down running ramchecks for 2 days, I am happy to say everything fit perfectly.

Lets get to it.
First off was sanding my joints between the 3 pieces of wood to minimize the gaps and make sure I use the least amount of wood filler possible, however I dont have any pictures of me beltsanding as I had no one around to snap a pic. Here are some pics of the results though.


Next up was routering the edges so splinters wouldnt be an issue, I also did this for the cable management holes. (once again no pictures of me actually doing the work cause)

Not totally happy with how the edges turned out but with a couple more passes of the router and some sanding by hand they should be good to go.
After that it was on to setting up my solution for mounting the PSU. I feel I came up with the simplest and most functional solution for this design. First I needed to trace out my hole, once again I am not using any measuring tools other than a 12 inch metal ruler. Then I drill out some pilot holes for my jigsaw.

Next up is cutting out the template I have set up.


Then to the key to my PSU setup, a Lian Li PSU extension.


Screw that in then its time to mount my power and reset switches.
Drill out my first hole and test fit the switch


However the wood is thicker than the switch so I have to bore out the bottom so the mount ring can screw on. I used a router for this.


bang out the second one and we have to great looking switches.


Also for those wondering what the spacing is on the PSU here is a pic to show the clearance I will have for cable management at the bottom of the mobo

I also picked up a steel powdercoated radiator grill for this build as well.

Well I have 3 hours left for the challenge and I have to get the following things done,
Disk and hard drive mount
PCIE Support
Pump and reservoir mounts
holes for tubing
Sanding and some extra routering
Putting a stain or paint job on this bad boy
Thanks for following this build guys, I am really enjoying going back to basics with this one and having alot of fun with it. Please let me know what you think!
Lets get to it.
First off was sanding my joints between the 3 pieces of wood to minimize the gaps and make sure I use the least amount of wood filler possible, however I dont have any pictures of me beltsanding as I had no one around to snap a pic. Here are some pics of the results though.
Next up was routering the edges so splinters wouldnt be an issue, I also did this for the cable management holes. (once again no pictures of me actually doing the work cause)
Not totally happy with how the edges turned out but with a couple more passes of the router and some sanding by hand they should be good to go.
After that it was on to setting up my solution for mounting the PSU. I feel I came up with the simplest and most functional solution for this design. First I needed to trace out my hole, once again I am not using any measuring tools other than a 12 inch metal ruler. Then I drill out some pilot holes for my jigsaw.
Next up is cutting out the template I have set up.
Then to the key to my PSU setup, a Lian Li PSU extension.
Screw that in then its time to mount my power and reset switches.
Drill out my first hole and test fit the switch
However the wood is thicker than the switch so I have to bore out the bottom so the mount ring can screw on. I used a router for this.
bang out the second one and we have to great looking switches.
Also for those wondering what the spacing is on the PSU here is a pic to show the clearance I will have for cable management at the bottom of the mobo
I also picked up a steel powdercoated radiator grill for this build as well.
Well I have 3 hours left for the challenge and I have to get the following things done,
Disk and hard drive mount
PCIE Support
Pump and reservoir mounts
holes for tubing
Sanding and some extra routering
Putting a stain or paint job on this bad boy
Thanks for following this build guys, I am really enjoying going back to basics with this one and having alot of fun with it. Please let me know what you think!
Options
- Mark as New
- Bookmark
- Subscribe
- Mute
- Subscribe to RSS Feed
- Permalink
12-16-2012 08:09 AM
Was going to finish the bench yesterday but....
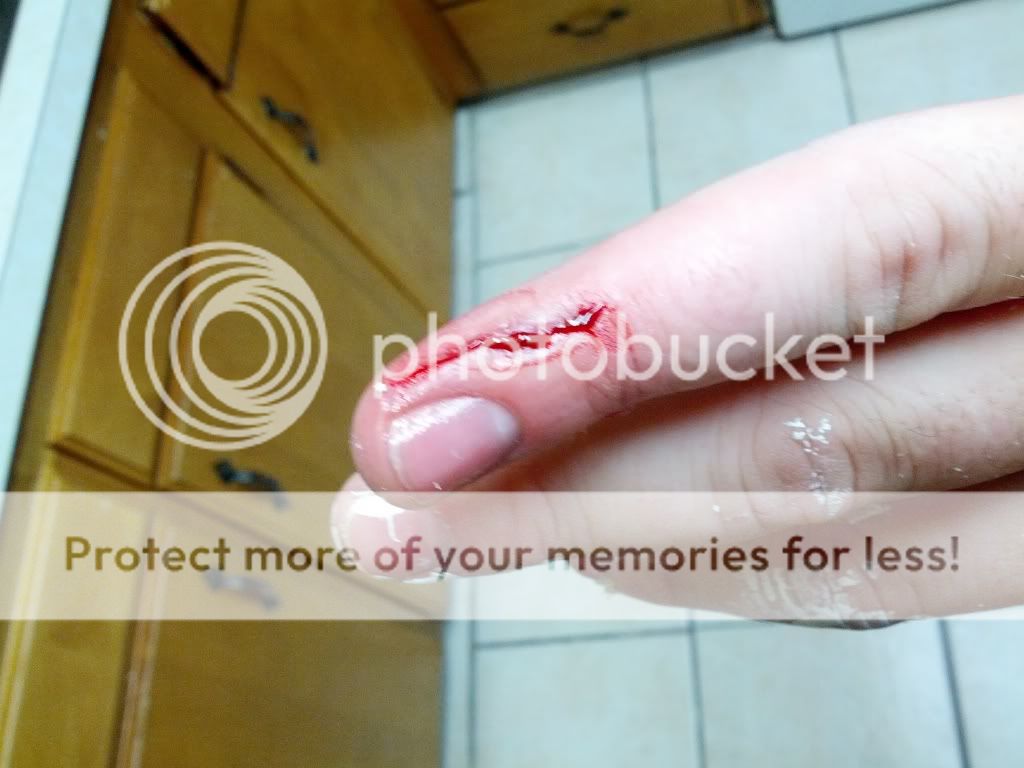
Smashed my finger between the crank for my enclosed trailer and my trucks tailgait, cut goes almost all the way through the finger. So no real updates until thats healed up a bit.
Smashed my finger between the crank for my enclosed trailer and my trucks tailgait, cut goes almost all the way through the finger. So no real updates until thats healed up a bit.
Options
- Mark as New
- Bookmark
- Subscribe
- Mute
- Subscribe to RSS Feed
- Permalink
12-16-2012 09:40 AM
Now this is cool ... lov'n it.
Sorry about the boo-boo ... hehehehe .. come on man .. suck it up ..
you gotts work to do .. haha .. (btw .. that looks nasty .. a few stiches eh ?)
Best of Luck .. Please - Keep us posted.c.
Sorry about the boo-boo ... hehehehe .. come on man .. suck it up ..
you gotts work to do .. haha .. (btw .. that looks nasty .. a few stiches eh ?)
Best of Luck .. Please - Keep us posted.c.
Options
- Mark as New
- Bookmark
- Subscribe
- Mute
- Subscribe to RSS Feed
- Permalink
12-16-2012 09:44 AM
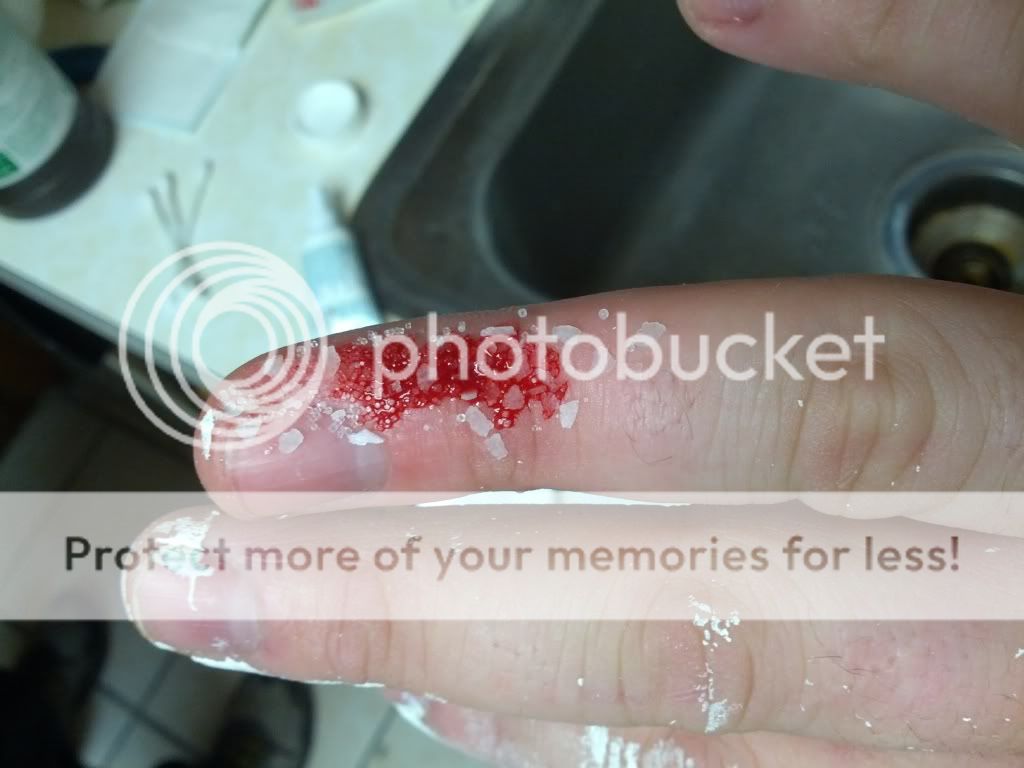
No stiches (I have no health insurance) Just rubbed some salt in it and bandaged and splinted it up.
Options
- Mark as New
- Bookmark
- Subscribe
- Mute
- Subscribe to RSS Feed
- Permalink
12-16-2012 09:58 AM
My kind of thread this. You keep on going mate. Want to see the end of this, have subscribed. And no build is a worth while build if you have not bleed just a little in the doing.
To help us help you - please provide as much information about your system and the problem as possible.
Options
- Mark as New
- Bookmark
- Subscribe
- Mute
- Subscribe to RSS Feed
- Permalink
12-16-2012 04:00 PM
Salt ?? HardCore ROGn+ ...
Next time give some SuperGlue a try ... skip the salt .. yikes.c.
Next time give some SuperGlue a try ... skip the salt .. yikes.c.
Options
- Mark as New
- Bookmark
- Subscribe
- Mute
- Subscribe to RSS Feed
- Permalink
12-17-2012 01:44 AM
If you want to stop bleeding toothpaste works well too. Not sure if you guys know this but all toothpaste has an coagulant built in.
To help us help you - please provide as much information about your system and the problem as possible.
Options
- Mark as New
- Bookmark
- Subscribe
- Mute
- Subscribe to RSS Feed
- Permalink
12-17-2012 07:21 AM
Other alternatives would be putting it under running water for a few seconds or look for some spiderwebs and apply it to the bleeding area. 😉
