Turn on suggestions
Auto-suggest helps you quickly narrow down your search results by suggesting possible matches as you type.
Showing results for
- Republic of Gamers Forum
- Discussions
- Overclocking & Tweaking
- After Market CPU cooler every thing to know. A BET...
Options
- Subscribe to RSS Feed
- Mark Topic as New
- Mark Topic as Read
- Float this Topic for Current User
- Bookmark
- Subscribe
- Mute
- Printer Friendly Page
After Market CPU cooler every thing to know. A BETA guide.
Options
- Mark as New
- Bookmark
- Subscribe
- Mute
- Subscribe to RSS Feed
- Permalink
11-14-2010
02:58 PM
- last edited on
03-05-2024
06:44 PM
by
![]() ROGBot
ROGBot
Hi everyone! After being in the enthusiast and overclocking world for a while, I realise there wasn’t any clean and easy guide to install an aftermarket CPU cooler. Most of the them are 2-3 advice and then refer to the instruction of your own cooler. That’s why I decided to make this little guide. One sure thing is I won’t show step-by-step how to install your cooler since there is many different mounting methods and different mounting hardware, but I will at least try to cover all the Q&A that are needed from choosing a cooler to finally powering the computer up. Also, giving clear explanation about the installation itself. Everything completed with advice and little old school trick. Even people that are in this world for long might benefit of this guide. If you think I ever forget something, don’t worry PM me and I’ll update if needed. After all, I am just half a god, my human side can make mistake.
See the end of the guide to see how to clean our CPU Before installing a new cooler!!
I think you see where I’m going, before installing everything, you have to choose a cooler!
Here are some of the important things to consider:
Q: What CPU socket am I using? 775/1156/1366 (soon to come 2011 & 1155 ) AM2/AM3
A: It’s important to know this info. Many cooler will fit on all the socket but some does not.
Q: Do you have a budget for the cooler?
A: If yes, this will reduce the list a lot. Helping you find the right one faster.
Q: Brand preference of look you would like to have?
A: That’s to your own preference. But some brand do suck.
Q: How extreme are you? Trying to run a 980X at 4.5 under air or just trying to get a mid OC on
your i3?
A: Knowing your need will help to know if you need to step to the Water Cooling level. Also, don’t buy a 90$ cooler if you want to get a extra 500Mhz on a CPU.
Q: If you worry about noise, you should consider a cooler with removable fan
A: Removable fan will also help if the stock one dies. Cooler do come very often with low quality fan to reduce price.
Q: Also consider to get some extra fan. Most of the time the stock one sucks.
A: Same as the above. Extra fan are also needed it you want to go for a Push/pull config.
Q: Do you have a preference on the orientation of the CPU cooler? North/south, East/West. Note
that many cooler only work North/South with AMD. The best orientation for airflow is East/West due to case airflow orientation and location of the Video card.
A: Some case will be better with North/South, some cooler won’t fit in a way or another. It’s important to know so you can make sure your cooler will fit and give you the best result
Q: What mother board am I using
A: ? Yes that DO matter. Some MOBO like the EVGA classified have a huge cooler on the NB that can interfere with some cooler.
Q: Is my ram ( if using tall ram )going to interfere with the cooler or the fan?
A: It can happen. Most of the time the fan will be in the way, there is a easy fix for that, Get the fan up a bit. If the retention kit can’t hold it like that, use Ziptie.
Q: Should I use the stock TIM?
A: This is a personal preference. Most of the good cooler from brand like Noctua, Prolimatech etc, come with decent TIM but I still say get a tube of AS-5 or MX-2 while ordering the cooler so you will have a spare if you need to reseat the thing.
Ok let’s talk of the hardware.
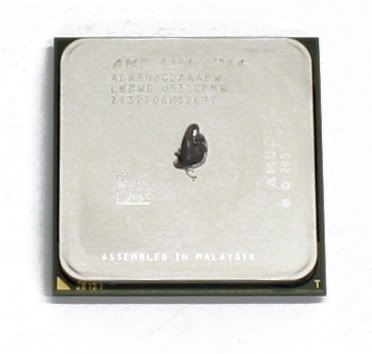
At the very first, you need a CPU and a motherboard ( yeah I am serious )
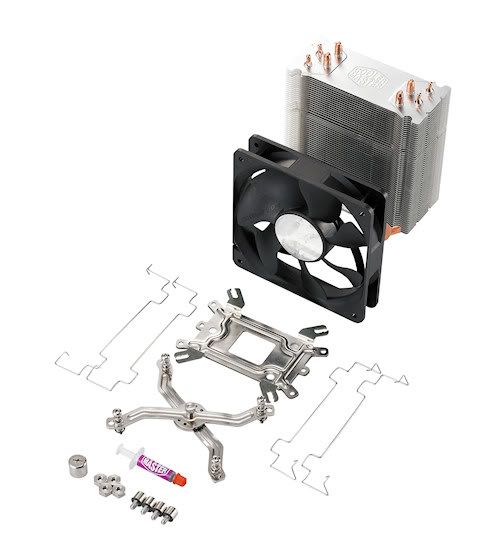
Then, the mounting hardware. Most of the actual cooler will include the following.
- A backplate ( some will come with 1 by socket, other work with every socket.
- The retention screw bracket
- Some screw and nuts
- Fan retention bracket ( usually for 2 fan )
- Some TIM
- Some cooler come with a screw driver or some tools.
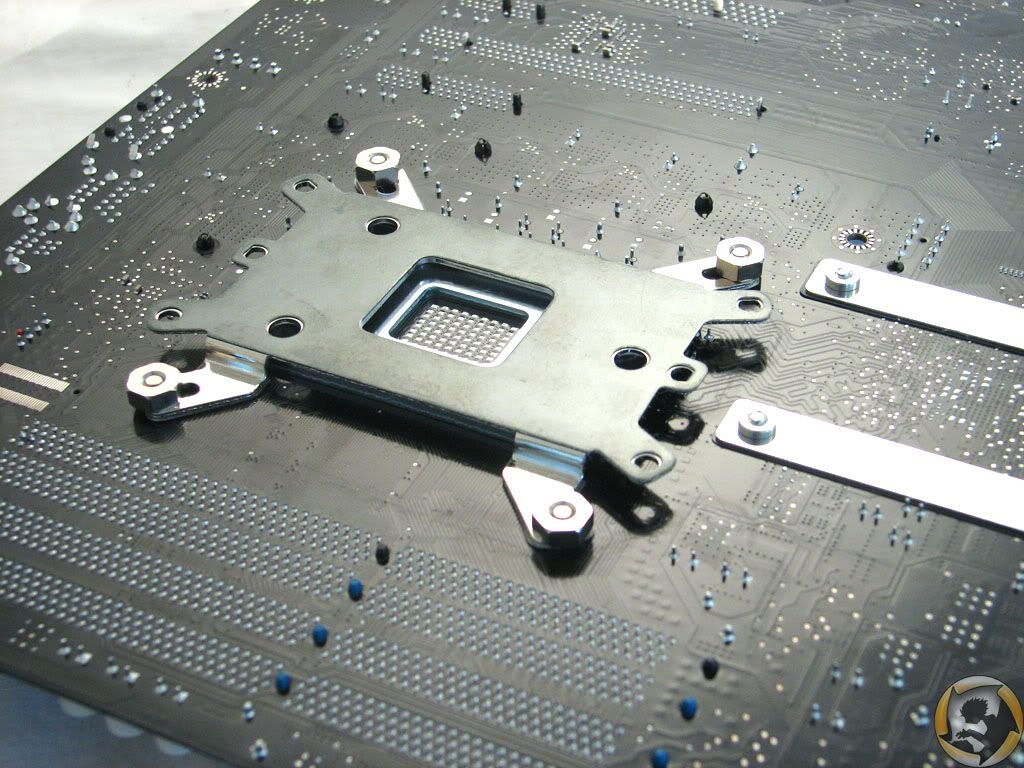
For the backplate. This piece of steel go behind the motherboard. She help reducing twisting pressure on the motherboard for heavy cooler. Also, prevent to break the clipping hole while putting to much weight around them. On this picture from a CoolerMaster Hyper 212 plus. You can see everything. Note on the back plate there is black film on the 4 corner. They prevent contact from the backplate ( metal to PCB ) to the board. Some back plate have a complete cover. DO NOT REMOVE THEM! It always happen and that simply short everything and kill the hardware. On this picture you also see the AMD side that is completely covered.
Finally, it’s time of being serious. Installing the hardware!
The first step is getting the motherboard out of the case. Many case have a hole behind the CPU on the MOBO tray but mounting the cooler while the case is up is not ideal and can lead to drop it and break something.
For this part I can’t say a lot. I have to refer you to the cooler reference info.
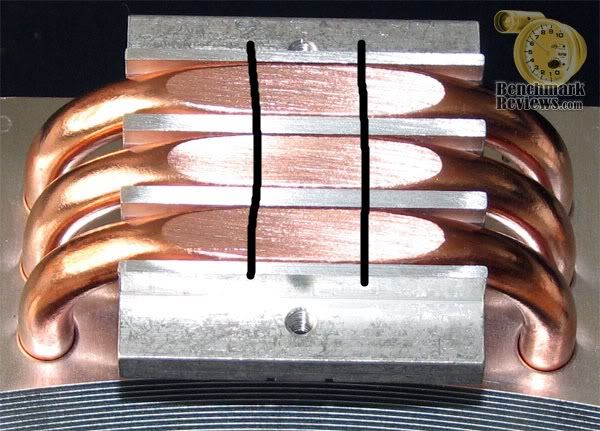
What this info never talk about is the tim. There is 2 type of base for the cooler, here they are. Full plated base or heat pipe direct contact one. For the full plated one, the amount of TIM you have to apply is the size of a little peas. This is far enough. With the pressure on the cooler it’s going to spread. The direct heat pipe are a bit different. There is many way to do it. They need a bit more paste since some will fell into the hole between base and heat pipe. The trick is to put 2 tiny line of tim like on this picture. Thank to Benchmark reviews.com for the picture.
Many people will ask, how tight I have to push the screw. They have to be really tight but no to much. The best hint is to run them to them maximum and release them by a lap. There is also a way to make it easy to screw. The X. Going clock wise, there is 4 screw, 1-2-3-4 if you do 1-3-2-4 it will be easier to screw them. At first just do few turn, then when all the screw are in their hole and hold in place you can screw them all the way down.

Now that it’s done, make sure everything is in place and the cooler is firm. Some cooler can have a little twist. That’s ok it’s just the way they are made.
After that, it’s time to put everything in the case. Note that at this point the fan are not on the cooler but you can always put them before if it’s easier to you.
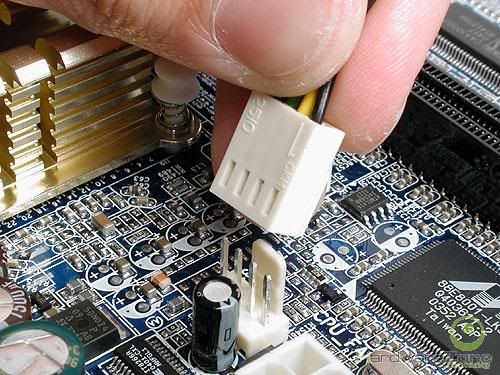
Finally, that the board is back in place with the cooler and the fan are installed. It’s time to plug the fan! While using a single fan you can plug them directly into the CPU fan header. But if you use dual fan config I would strongly suggest to get a fan controller. So you have both fan running at the same speed, reducing noise caused by air turbulence, and the fan wont push the other causing long term damage to the bearing. It can also reduce vibration. Note that most of the CPU fan header are 4 pin. If your fan use 3 pin it’s ok it will work without issue.
Then it’s time to power the computer and everything should work if every was plugged in like it should!!
How to :
Clean your CPU and old cooler base?
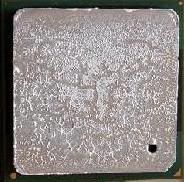
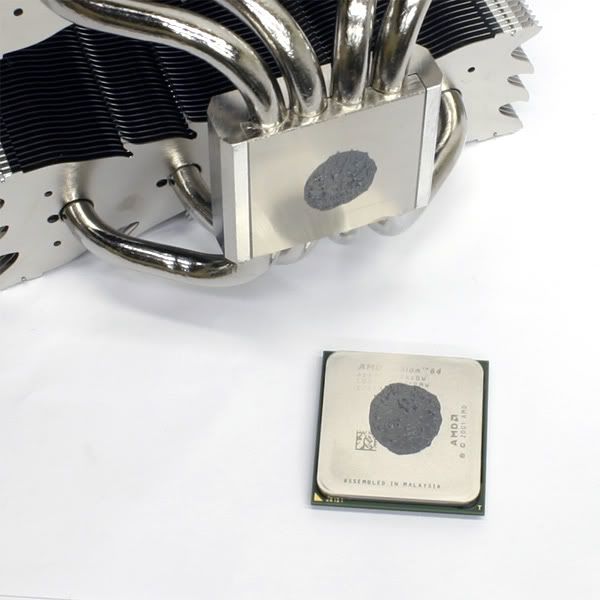
While removing the stock cooler or an older aftermarket heatsink, you will see that the base and the CPU are all dirty with TIM. Unfortunatly, she is kind of stuck on the part. You need to put new TIM to have good contact between your CPU and the Cooler. So, how to get rid of the old TIM? There is 2 easy ways to do it. Both only takes few seconds. 1 free 1 around 10-15$.
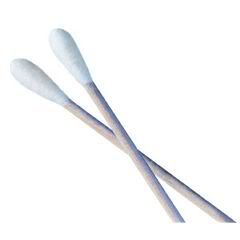
My favorite way is to use some Isopropyl alchool 70%, Q-tips and nose tissue. At first, sink the Q-tips inside the alchool then just pass it on the CPU or the cooler to make sure the old TIM is all wet. You can start to remove it at this point. After the Q-tips is all dirty, simply use a kleenex to finish the job ( you may want to use a wood teeth cleaner to clean the side ). If some resist, put some isopropyl on your Kleenex and do it again.

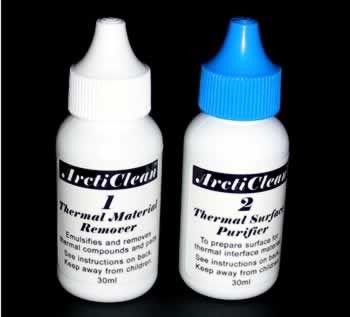
The second one is a pre-mix cleaning solution and shine called arctic clean. Apply 1 or 2 drop on the cpu, rob with a Kleenex, apply 1 drop of bottle 2 and shine and it's done.
*This is a BETA version of the guide. I will update it time to time adding new step, correcting hold one and answering your question.
See the end of the guide to see how to clean our CPU Before installing a new cooler!!
I think you see where I’m going, before installing everything, you have to choose a cooler!
Here are some of the important things to consider:
Q: What CPU socket am I using? 775/1156/1366 (soon to come 2011 & 1155 ) AM2/AM3
A: It’s important to know this info. Many cooler will fit on all the socket but some does not.
Q: Do you have a budget for the cooler?
A: If yes, this will reduce the list a lot. Helping you find the right one faster.
Q: Brand preference of look you would like to have?
A: That’s to your own preference. But some brand do suck.
Q: How extreme are you? Trying to run a 980X at 4.5 under air or just trying to get a mid OC on
your i3?
A: Knowing your need will help to know if you need to step to the Water Cooling level. Also, don’t buy a 90$ cooler if you want to get a extra 500Mhz on a CPU.
Q: If you worry about noise, you should consider a cooler with removable fan
A: Removable fan will also help if the stock one dies. Cooler do come very often with low quality fan to reduce price.
Q: Also consider to get some extra fan. Most of the time the stock one sucks.
A: Same as the above. Extra fan are also needed it you want to go for a Push/pull config.
Q: Do you have a preference on the orientation of the CPU cooler? North/south, East/West. Note
that many cooler only work North/South with AMD. The best orientation for airflow is East/West due to case airflow orientation and location of the Video card.
A: Some case will be better with North/South, some cooler won’t fit in a way or another. It’s important to know so you can make sure your cooler will fit and give you the best result
Q: What mother board am I using
A: ? Yes that DO matter. Some MOBO like the EVGA classified have a huge cooler on the NB that can interfere with some cooler.
Q: Is my ram ( if using tall ram )going to interfere with the cooler or the fan?
A: It can happen. Most of the time the fan will be in the way, there is a easy fix for that, Get the fan up a bit. If the retention kit can’t hold it like that, use Ziptie.
Q: Should I use the stock TIM?
A: This is a personal preference. Most of the good cooler from brand like Noctua, Prolimatech etc, come with decent TIM but I still say get a tube of AS-5 or MX-2 while ordering the cooler so you will have a spare if you need to reseat the thing.
Ok let’s talk of the hardware.
At the very first, you need a CPU and a motherboard ( yeah I am serious )
Then, the mounting hardware. Most of the actual cooler will include the following.
- A backplate ( some will come with 1 by socket, other work with every socket.
- The retention screw bracket
- Some screw and nuts
- Fan retention bracket ( usually for 2 fan )
- Some TIM
- Some cooler come with a screw driver or some tools.
For the backplate. This piece of steel go behind the motherboard. She help reducing twisting pressure on the motherboard for heavy cooler. Also, prevent to break the clipping hole while putting to much weight around them. On this picture from a CoolerMaster Hyper 212 plus. You can see everything. Note on the back plate there is black film on the 4 corner. They prevent contact from the backplate ( metal to PCB ) to the board. Some back plate have a complete cover. DO NOT REMOVE THEM! It always happen and that simply short everything and kill the hardware. On this picture you also see the AMD side that is completely covered.
Finally, it’s time of being serious. Installing the hardware!
The first step is getting the motherboard out of the case. Many case have a hole behind the CPU on the MOBO tray but mounting the cooler while the case is up is not ideal and can lead to drop it and break something.
For this part I can’t say a lot. I have to refer you to the cooler reference info.
What this info never talk about is the tim. There is 2 type of base for the cooler, here they are. Full plated base or heat pipe direct contact one. For the full plated one, the amount of TIM you have to apply is the size of a little peas. This is far enough. With the pressure on the cooler it’s going to spread. The direct heat pipe are a bit different. There is many way to do it. They need a bit more paste since some will fell into the hole between base and heat pipe. The trick is to put 2 tiny line of tim like on this picture. Thank to Benchmark reviews.com for the picture.
Many people will ask, how tight I have to push the screw. They have to be really tight but no to much. The best hint is to run them to them maximum and release them by a lap. There is also a way to make it easy to screw. The X. Going clock wise, there is 4 screw, 1-2-3-4 if you do 1-3-2-4 it will be easier to screw them. At first just do few turn, then when all the screw are in their hole and hold in place you can screw them all the way down.
Now that it’s done, make sure everything is in place and the cooler is firm. Some cooler can have a little twist. That’s ok it’s just the way they are made.
After that, it’s time to put everything in the case. Note that at this point the fan are not on the cooler but you can always put them before if it’s easier to you.
Finally, that the board is back in place with the cooler and the fan are installed. It’s time to plug the fan! While using a single fan you can plug them directly into the CPU fan header. But if you use dual fan config I would strongly suggest to get a fan controller. So you have both fan running at the same speed, reducing noise caused by air turbulence, and the fan wont push the other causing long term damage to the bearing. It can also reduce vibration. Note that most of the CPU fan header are 4 pin. If your fan use 3 pin it’s ok it will work without issue.
Then it’s time to power the computer and everything should work if every was plugged in like it should!!
How to :
Clean your CPU and old cooler base?
While removing the stock cooler or an older aftermarket heatsink, you will see that the base and the CPU are all dirty with TIM. Unfortunatly, she is kind of stuck on the part. You need to put new TIM to have good contact between your CPU and the Cooler. So, how to get rid of the old TIM? There is 2 easy ways to do it. Both only takes few seconds. 1 free 1 around 10-15$.
My favorite way is to use some Isopropyl alchool 70%, Q-tips and nose tissue. At first, sink the Q-tips inside the alchool then just pass it on the CPU or the cooler to make sure the old TIM is all wet. You can start to remove it at this point. After the Q-tips is all dirty, simply use a kleenex to finish the job ( you may want to use a wood teeth cleaner to clean the side ). If some resist, put some isopropyl on your Kleenex and do it again.
The second one is a pre-mix cleaning solution and shine called arctic clean. Apply 1 or 2 drop on the cpu, rob with a Kleenex, apply 1 drop of bottle 2 and shine and it's done.
*This is a BETA version of the guide. I will update it time to time adding new step, correcting hold one and answering your question.
Martin_metal_88

Colenzo :Coolermaster ATCS 840 | Gigabyte's EP55-UD5 | Intel Core I7 860 @ 3.8Ghz | 4GB G.skill Trident 1600 | MSI GTX460 1GB HAWK Twin frozr | WD 640 black + WD 1TB green + WD 1TB Blue | Pionner DVR-216 | Silverstone Strider Plus 850W | Coolermaster Hyper 212 plus in push pull fan config |
Ask for more!
Labels:
- Labels:
-
Overclocking
-
Tuning
-
Tweaking
18,204 Views
5 REPLIES 5
Options
- Mark as New
- Bookmark
- Subscribe
- Mute
- Subscribe to RSS Feed
- Permalink
11-14-2010 04:51 PM
Thx Otto. After many years in the computer world I know that many people can't install in a perfect way a CPU cooler. Sometime can elad to some damage. My goal is to get this guide as complete as possible and also maybe add different mounting hardware subguide over time to prevent these mistake to happen.
Martin_metal_88
Colenzo :Coolermaster ATCS 840 | Gigabyte's EP55-UD5 | Intel Core I7 860 @ 3.8Ghz | 4GB G.skill Trident 1600 | MSI GTX460 1GB HAWK Twin frozr | WD 640 black + WD 1TB green + WD 1TB Blue | Pionner DVR-216 | Silverstone Strider Plus 850W | Coolermaster Hyper 212 plus in push pull fan config |
Ask for more!
Options
- Mark as New
- Bookmark
- Subscribe
- Mute
- Subscribe to RSS Feed
- Permalink
11-15-2010 10:56 AM
Added new step in the guide :
How to clean your CPU.
How to clean your CPU.
Martin_metal_88
Colenzo :Coolermaster ATCS 840 | Gigabyte's EP55-UD5 | Intel Core I7 860 @ 3.8Ghz | 4GB G.skill Trident 1600 | MSI GTX460 1GB HAWK Twin frozr | WD 640 black + WD 1TB green + WD 1TB Blue | Pionner DVR-216 | Silverstone Strider Plus 850W | Coolermaster Hyper 212 plus in push pull fan config |
Ask for more!
Colenzo :Coolermaster ATCS 840 | Gigabyte's EP55-UD5 | Intel Core I7 860 @ 3.8Ghz | 4GB G.skill Trident 1600 | MSI GTX460 1GB HAWK Twin frozr | WD 640 black + WD 1TB green + WD 1TB Blue | Pionner DVR-216 | Silverstone Strider Plus 850W | Coolermaster Hyper 212 plus in push pull fan config |
Ask for more!
Retired
Not applicable
Options
- Mark as New
- Bookmark
- Subscribe
- Mute
- Subscribe to RSS Feed
- Permalink
11-15-2010 04:24 PM
NICE, any info on the difference between copper and aluminum materials? there are direct heat pipe, heatpipe to base plate, copper to aluminum transitions, and why some are cheaper or expensive. There are so many thermal technologies out there, anyone care to chime in on their knowledge of coolers? maybe how heatpipes, vapor chamber, and other coolers work?
Options
- Mark as New
- Bookmark
- Subscribe
- Mute
- Subscribe to RSS Feed
- Permalink
11-15-2010 05:23 PM
Brian@ASUS wrote:
NICE, any info on the difference between copper and aluminum materials? there are direct heat pipe, heatpipe to base plate, copper to aluminum transitions, and why some are cheaper or expensive. There are so many thermal technologies out there, anyone care to chime in on their knowledge of coolers? maybe how heatpipes, vapor chamber, and other coolers work?
I wont spoil anything now brian but I am working on more regarding this. You can PM me if you want to know more about it. I hope to get this guide as complete as I can before Xmas. This one was only a begining 😉
Martin_metal_88
Colenzo :Coolermaster ATCS 840 | Gigabyte's EP55-UD5 | Intel Core I7 860 @ 3.8Ghz | 4GB G.skill Trident 1600 | MSI GTX460 1GB HAWK Twin frozr | WD 640 black + WD 1TB green + WD 1TB Blue | Pionner DVR-216 | Silverstone Strider Plus 850W | Coolermaster Hyper 212 plus in push pull fan config |
Ask for more!
Colenzo :Coolermaster ATCS 840 | Gigabyte's EP55-UD5 | Intel Core I7 860 @ 3.8Ghz | 4GB G.skill Trident 1600 | MSI GTX460 1GB HAWK Twin frozr | WD 640 black + WD 1TB green + WD 1TB Blue | Pionner DVR-216 | Silverstone Strider Plus 850W | Coolermaster Hyper 212 plus in push pull fan config |
Ask for more!
Related Content
- On Becoming a Technician. in Hardware & Build Advice
- Asus x99 XMP and possibility of OC help - Part2 in Overclocking & Tweaking
- ROG Strix LC RTX 3090Ti OC Edition Overclocking Overview in Push the Limits
- Ordered GPU....but received only cooler! in Promotions & General Discussions
- New x570-e build problems in Hardware & Build Advice
