Turn on suggestions
Auto-suggest helps you quickly narrow down your search results by suggesting possible matches as you type.
Showing results for
- Republic of Gamers Forum
- Laptops & Desktops
- ROG Gaming Notebooks
- How-To: G60VX Massive Performance Boost
Options
- Subscribe to RSS Feed
- Mark Topic as New
- Mark Topic as Read
- Float this Topic for Current User
- Bookmark
- Subscribe
- Mute
- Printer Friendly Page
How-To: G60VX Massive Performance Boost
Options
- Mark as New
- Bookmark
- Subscribe
- Mute
- Subscribe to RSS Feed
- Permalink
01-03-2012
03:23 PM
- last edited on
03-06-2024
10:21 PM
by
![]() ROGBot
ROGBot
How to breathe new life into your G60VX (Or other G-series, if you substitute in your own processor info)
I installed Crysis 2 a while back, and noticed that it ran slowly (20-30fps) and after a few minutes of gameplay, even though the framerate would not drop significantly, it would develop this lag issue where it would play smoothly for a few seconds, then go into Matrix-style slow-motion "bullet-time" for about 2 seconds, then run smooth for about 3-5 seconds, then repeat over and over. Not really a jerky stuttering, just that weird intermittent slowdown.
Then I realized Crysis Warhead was doing it too, and even Left 4 Dead 2 when set at high settings. This never used to be a problem! For awhile, I thought my G60, like the two sh!tty cheap HP DV9000's I'd owned before, had simply overheated itself too many times and was dying on me, and almost swore off nVidia GPU's for good. But after extensive research and a few relatively simple actions, I'm now playing Crysis 2 and Deus Ex: Human Revolution both on mostly high settings with no slowdowns and much better framerates! DX:HR actually plays better than the Crysis titles, which is odd seeing how awesome it looks and how much newer it is.
If you, like me, have a G60VX and want to play the new games, but can't afford to fork out $1,000-1,500 for a new rig right this minute (or you just like your G60), read the following instruction, perform the steps, and rejoice:
[For reference, I have a Best-Buy model G60VX-RBBX05]
_______________________________________________________________________________________________________
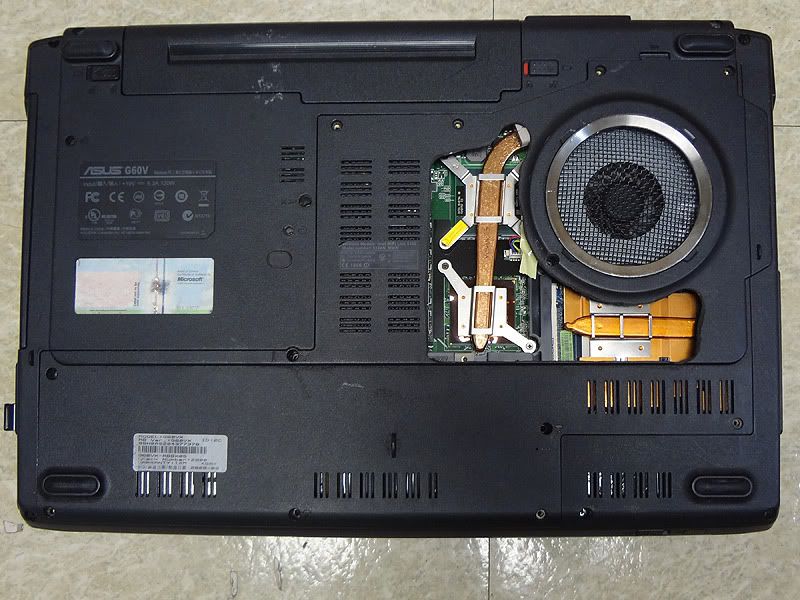
[1]. Remove your back cover. See where the CPU and GPU are? With the long copper heat-sink? On the black plastic back cover, right where that heat sink is, drill many holes with a power drill (REMOVE THE COVER FIRST; obviously don't do this with the cover still on the laptop unless you want to drill holes in your motherboard). See here:
http://imageshack.us/f/256/20111029179.jpg/
_______________________________________________________________________________________________________
[2]. You know that round fake "vent" thing on the back/bottom of our laptops with the silver ring around it? Drink a Monster Energy and get creative with a soldering iron (or jigsaw if you have one) and melt/cut out that whole black plastic "fake vent" area inside the silver ring, then glue in a piece of black screen for protection (I used a small wire speaker-cover grill from an old 3" box speaker lying around the house). Like this:
http://media.photobucket.com/image/asus%20g60%20heat%20cooling%20mod%20drill/bennyg/28012011.jpg
And the video how-to that I used for guidance: http://www.youtube.com/watch?v=nrckIUGBbwE
*While you've got the cover off, of course you'll want to do the classic "blow-out-your-heat-sink/vents" routine, making sure there is no dust buildup in there or on the fan blades. Try compressed air for the vents and Q-Tips for the fan-blades.
_______________________________________________________________________________________________________
[3]. Buy a massive cooler pad. And I actually mean a brand-name Thermaltake Massive23 LX cooler pad. I have one, and with the above-mentioned cooling mods, even my new CPU at 3.06GHz doesn't ever exceed 49 degrees Celsius (even on extended play sessions of Deus Ex: HR at mostly full settings at native resolution with 16x Antisotropic Filtering and FXAA on high). It runs and stays between 33-59fps. The CPU idles at about 29-34 degrees Celsius. I monitor the temps with both CoreTemp and CPUID/CPU-Z. The giant fan just constantly blows air into all the new ventilation ports on the bottom of the laptop, directly onto the nearly-exposed CPU and GPU. I would hazard a guess of something like 300-500% more fresh airflow than the measly enclosed factory ventilation system and tiny fan could ever offer. Buy the Massive23 LX on Amazon for a paltry 28 bucks here:
http://www.amazon.com/Thermaltake-Massive23-Notebook-Oversized-CLN0015/dp/B003ZUXXWO/ref=sr_1_1?ie=U...
_______________________________________________________________________________________________________
[4]. While you're at it, if you can swing $158 for a new processor, the fastest dual-core CPU you can buy for the G60VX (if your mobo can support a quad-core, all the more power to you; mine can't because the mobo in the G60VX-RBBX05 doesn't support them) is the Core2 Extreme at 3.06GHZ, and you can easily overclock it to 3.2GHz (12x multiplier) using ThrottleStop without even increasing the core voltage or having increased heat output. I just bought mine about 2 weeks ago, popped it in, and didn't even have to upgrade the BIOS; it just started right up. Massive performance improvement, and no overheating. The X9100 far outperforms the stock P7350 or P7450; see benchmarks here:
http://www.cpubenchmark.net/cpu_lookup.php?cpu=Intel+Core2+Extreme+X9100+%40+3.06GHz
Shirley's CPU (shirleyfu1117 on eBay) is a well-known and reliable seller as well, just google the words "shirley cpu reliable" and you'll find several other forum posts vouching for this guy.
http://www.ebay.com/itm/ws/eBayISAPI.dll?ViewItem&item=260903510063&viewitem=&sspagename=ADME%3AL%3A...
The new CPU bumped my Windows Experience Index from 5.7 to 6.7 in the CPU category, I believe. Quite a jump, on a scale that only goes to 7.9.
[And before anyone points it out: Yes, I know that particular CPU is the C0-Stepping model; you can buy the E0-Stepping model from the same seller for about $188 if you are hell-bent on trying to overclock to like 4GHz or some madness like that]
Make sure and use a good thermal paste; I used Arctic MX-2, also from eBay for $8 (seller called gigworld).
*One more thing; using nVidia System Tools, a good stable overclock speed for your GTX 260M GPU that I've found is 600/900/1350, each one up-clocked by 100MHz from the stock 500/799/1250. This is only a slight bump up, but increases the speed a bit without causing artifacts, glitches, or any random crashes from OC'ing (the Crysis series and DX:HR love to crash if you're overclocked). Coupled with the new CPU, you'll get performance far beyond what a G60 was ever originally built to offer.
You can do all of this in one afternoon (aside from waiting 3 days for the cooling pad and CPU/thermal compound to arrive in the mail of course).
_______________________________________________________________________________________________________
[5]. Finally, as so many others have done, partition off an 80GB chunk of your hard drive and install a fresh, vanilla copy of Windows 7 Home Premium: A raw install with no bloatware. Use Panda Cloud antivirus (since it uses almost NO processor muscle, offloading all its work to remote cloud-computer clusters instead of eating up all your performance to do it on-board like Norton does). This will be your "Gamer" boot partition. Don't use the internet on this partition at all in order to avoid viruses or adware or any other pesky crap, and don't install ANYTHING except:
-Essential drivers
-Windows Updates
-Steam (or your game sources/servers of choice)
-CPU/GPU monitoring apps
-Overclocking app
-Games
My Gamer partition runs far, far better than my factory load, having no bloatware, no stupid resource-hungry Norton, and no excess processes to eat up memory and processor cycles.
I thought for sure that my tired, overheated old G60VX was twitching in its death throes, but lo and behold, these cooling mods, software mods, and processor upgrade put it right back in the game for another year or two as a solid performer, before I inevitably upgrade to an i7-based model. And all for less than about $200! The G60 series is a hardy one indeed; Two and a half years later, I'm still glad I bought one... By far the best laptop I've owned as of yet (I'll never buy a Hewlett Crappard again; Asus FTW).
Well thanks for reading; I know a lot of this has been stated before, but never in one single consolidated walkthrough; it took me weeks of scouring the internet to compile all this info before proceeding with this big scary modding project, where so many things can go wrong when you combine laptops with power tools, overclocking, and a wide choice of aftermarket CPU upgrades.
I hope this How-To has helped streamline it for anyone else ambitious enough to have a go at it.
Also, most of this (mainly the cooling mod parts and Shirley's CPU upgrade) might apply to G7x and/or G5x series as well, maybe some other models.
Any input/suggestions/feedback is welcome, please point out anything I missed here... I always want to make my system faster!
I installed Crysis 2 a while back, and noticed that it ran slowly (20-30fps) and after a few minutes of gameplay, even though the framerate would not drop significantly, it would develop this lag issue where it would play smoothly for a few seconds, then go into Matrix-style slow-motion "bullet-time" for about 2 seconds, then run smooth for about 3-5 seconds, then repeat over and over. Not really a jerky stuttering, just that weird intermittent slowdown.
Then I realized Crysis Warhead was doing it too, and even Left 4 Dead 2 when set at high settings. This never used to be a problem! For awhile, I thought my G60, like the two sh!tty cheap HP DV9000's I'd owned before, had simply overheated itself too many times and was dying on me, and almost swore off nVidia GPU's for good. But after extensive research and a few relatively simple actions, I'm now playing Crysis 2 and Deus Ex: Human Revolution both on mostly high settings with no slowdowns and much better framerates! DX:HR actually plays better than the Crysis titles, which is odd seeing how awesome it looks and how much newer it is.
If you, like me, have a G60VX and want to play the new games, but can't afford to fork out $1,000-1,500 for a new rig right this minute (or you just like your G60), read the following instruction, perform the steps, and rejoice:
[For reference, I have a Best-Buy model G60VX-RBBX05]
_______________________________________________________________________________________________________
[1]. Remove your back cover. See where the CPU and GPU are? With the long copper heat-sink? On the black plastic back cover, right where that heat sink is, drill many holes with a power drill (REMOVE THE COVER FIRST; obviously don't do this with the cover still on the laptop unless you want to drill holes in your motherboard). See here:
http://imageshack.us/f/256/20111029179.jpg/
_______________________________________________________________________________________________________
[2]. You know that round fake "vent" thing on the back/bottom of our laptops with the silver ring around it? Drink a Monster Energy and get creative with a soldering iron (or jigsaw if you have one) and melt/cut out that whole black plastic "fake vent" area inside the silver ring, then glue in a piece of black screen for protection (I used a small wire speaker-cover grill from an old 3" box speaker lying around the house). Like this:
http://media.photobucket.com/image/asus%20g60%20heat%20cooling%20mod%20drill/bennyg/28012011.jpg
And the video how-to that I used for guidance: http://www.youtube.com/watch?v=nrckIUGBbwE
*While you've got the cover off, of course you'll want to do the classic "blow-out-your-heat-sink/vents" routine, making sure there is no dust buildup in there or on the fan blades. Try compressed air for the vents and Q-Tips for the fan-blades.
_______________________________________________________________________________________________________
[3]. Buy a massive cooler pad. And I actually mean a brand-name Thermaltake Massive23 LX cooler pad. I have one, and with the above-mentioned cooling mods, even my new CPU at 3.06GHz doesn't ever exceed 49 degrees Celsius (even on extended play sessions of Deus Ex: HR at mostly full settings at native resolution with 16x Antisotropic Filtering and FXAA on high). It runs and stays between 33-59fps. The CPU idles at about 29-34 degrees Celsius. I monitor the temps with both CoreTemp and CPUID/CPU-Z. The giant fan just constantly blows air into all the new ventilation ports on the bottom of the laptop, directly onto the nearly-exposed CPU and GPU. I would hazard a guess of something like 300-500% more fresh airflow than the measly enclosed factory ventilation system and tiny fan could ever offer. Buy the Massive23 LX on Amazon for a paltry 28 bucks here:
http://www.amazon.com/Thermaltake-Massive23-Notebook-Oversized-CLN0015/dp/B003ZUXXWO/ref=sr_1_1?ie=U...
_______________________________________________________________________________________________________
[4]. While you're at it, if you can swing $158 for a new processor, the fastest dual-core CPU you can buy for the G60VX (if your mobo can support a quad-core, all the more power to you; mine can't because the mobo in the G60VX-RBBX05 doesn't support them) is the Core2 Extreme at 3.06GHZ, and you can easily overclock it to 3.2GHz (12x multiplier) using ThrottleStop without even increasing the core voltage or having increased heat output. I just bought mine about 2 weeks ago, popped it in, and didn't even have to upgrade the BIOS; it just started right up. Massive performance improvement, and no overheating. The X9100 far outperforms the stock P7350 or P7450; see benchmarks here:
http://www.cpubenchmark.net/cpu_lookup.php?cpu=Intel+Core2+Extreme+X9100+%40+3.06GHz
Shirley's CPU (shirleyfu1117 on eBay) is a well-known and reliable seller as well, just google the words "shirley cpu reliable" and you'll find several other forum posts vouching for this guy.
http://www.ebay.com/itm/ws/eBayISAPI.dll?ViewItem&item=260903510063&viewitem=&sspagename=ADME%3AL%3A...
The new CPU bumped my Windows Experience Index from 5.7 to 6.7 in the CPU category, I believe. Quite a jump, on a scale that only goes to 7.9.
[And before anyone points it out: Yes, I know that particular CPU is the C0-Stepping model; you can buy the E0-Stepping model from the same seller for about $188 if you are hell-bent on trying to overclock to like 4GHz or some madness like that]
Make sure and use a good thermal paste; I used Arctic MX-2, also from eBay for $8 (seller called gigworld).
*One more thing; using nVidia System Tools, a good stable overclock speed for your GTX 260M GPU that I've found is 600/900/1350, each one up-clocked by 100MHz from the stock 500/799/1250. This is only a slight bump up, but increases the speed a bit without causing artifacts, glitches, or any random crashes from OC'ing (the Crysis series and DX:HR love to crash if you're overclocked). Coupled with the new CPU, you'll get performance far beyond what a G60 was ever originally built to offer.
You can do all of this in one afternoon (aside from waiting 3 days for the cooling pad and CPU/thermal compound to arrive in the mail of course).
_______________________________________________________________________________________________________
[5]. Finally, as so many others have done, partition off an 80GB chunk of your hard drive and install a fresh, vanilla copy of Windows 7 Home Premium: A raw install with no bloatware. Use Panda Cloud antivirus (since it uses almost NO processor muscle, offloading all its work to remote cloud-computer clusters instead of eating up all your performance to do it on-board like Norton does). This will be your "Gamer" boot partition. Don't use the internet on this partition at all in order to avoid viruses or adware or any other pesky crap, and don't install ANYTHING except:
-Essential drivers
-Windows Updates
-Steam (or your game sources/servers of choice)
-CPU/GPU monitoring apps
-Overclocking app
-Games
My Gamer partition runs far, far better than my factory load, having no bloatware, no stupid resource-hungry Norton, and no excess processes to eat up memory and processor cycles.
I thought for sure that my tired, overheated old G60VX was twitching in its death throes, but lo and behold, these cooling mods, software mods, and processor upgrade put it right back in the game for another year or two as a solid performer, before I inevitably upgrade to an i7-based model. And all for less than about $200! The G60 series is a hardy one indeed; Two and a half years later, I'm still glad I bought one... By far the best laptop I've owned as of yet (I'll never buy a Hewlett Crappard again; Asus FTW).
Well thanks for reading; I know a lot of this has been stated before, but never in one single consolidated walkthrough; it took me weeks of scouring the internet to compile all this info before proceeding with this big scary modding project, where so many things can go wrong when you combine laptops with power tools, overclocking, and a wide choice of aftermarket CPU upgrades.
I hope this How-To has helped streamline it for anyone else ambitious enough to have a go at it.
Also, most of this (mainly the cooling mod parts and Shirley's CPU upgrade) might apply to G7x and/or G5x series as well, maybe some other models.
Any input/suggestions/feedback is welcome, please point out anything I missed here... I always want to make my system faster!
ASUS ROG G60VX - Modded: G60VX Performance Boost/Cooling Mod
Currently gaming on a budget desktop: Core i5 3570K/8GB GSKILL RAM/EVGA 1GB SuperSuperClocked GeForce 650 TI/Dell 23" 1080p... Planning on nabbing a G75 ASAP...
[/HR]
Currently gaming on a budget desktop: Core i5 3570K/8GB GSKILL RAM/EVGA 1GB SuperSuperClocked GeForce 650 TI/Dell 23" 1080p... Planning on nabbing a G75 ASAP...
[/HR]
Labels:
- Labels:
-
Strix Laptops
-
Strix Notebooks
76,458 Views
22 REPLIES 22
Options
- Mark as New
- Bookmark
- Subscribe
- Mute
- Subscribe to RSS Feed
- Permalink
01-03-2012 05:07 PM
+1 Nice Job, @OtherSyde Folks are always looking for a comprehensive guide to improve system performance.
G74SX-A1 - stock hardware - BIOS 202 - 2nd Monitor VISIO VF551XVT
Options
- Mark as New
- Bookmark
- Subscribe
- Mute
- Subscribe to RSS Feed
- Permalink
02-05-2012 12:31 AM
OK, as an update, I got sick of the drilled holes, and took it one step further; should have just done this in the first place, it's more effective and looks better than a bunch of holes drilled in the bottom of your laptop.
So, I went to the home/office section of my local department store and bought a little tiny wastebasket for its mesh (you can get these at most Staples, Wal-Marts, or online for like $3).

I used a some metal cutters (probably extreme overkill for plastic, yes) to cut out the area of the bottom cover with all the holes in it, and then a dremel (these aren't too expensive nowadays either) to smooth and shape the inner edges. This is not hard; It's honestly the first time I've ever used a dremel, and it was easy.

And here's a shot of my G60, showing that it exposes the CPU, GPU, and whatever the hell that other heat-sink thing is on the far right to the open air...
Next I used various wire cutters to pare away the top and bottom of the mesh cylinder, then cut it up the side and stretch it out. I laid it out flat and trimmed it to size.


Finally, I secured the mesh with some Gel Control Loctite Superglue, and let it set.

And for my finished Vent Mod, You can see that the GPU and CPU are clearly exposed for my laptop cooling pad to blow air on them, while the black mesh protects them from contact with unwanted outside objects, such as in bookbags, etc.

So, I went to the home/office section of my local department store and bought a little tiny wastebasket for its mesh (you can get these at most Staples, Wal-Marts, or online for like $3).
I used a some metal cutters (probably extreme overkill for plastic, yes) to cut out the area of the bottom cover with all the holes in it, and then a dremel (these aren't too expensive nowadays either) to smooth and shape the inner edges. This is not hard; It's honestly the first time I've ever used a dremel, and it was easy.
And here's a shot of my G60, showing that it exposes the CPU, GPU, and whatever the hell that other heat-sink thing is on the far right to the open air...
Next I used various wire cutters to pare away the top and bottom of the mesh cylinder, then cut it up the side and stretch it out. I laid it out flat and trimmed it to size.
Finally, I secured the mesh with some Gel Control Loctite Superglue, and let it set.
And for my finished Vent Mod, You can see that the GPU and CPU are clearly exposed for my laptop cooling pad to blow air on them, while the black mesh protects them from contact with unwanted outside objects, such as in bookbags, etc.
ASUS ROG G60VX - Modded: G60VX Performance Boost/Cooling Mod
Currently gaming on a budget desktop: Core i5 3570K/8GB GSKILL RAM/EVGA 1GB SuperSuperClocked GeForce 650 TI/Dell 23" 1080p... Planning on nabbing a G75 ASAP...
[/HR]
Currently gaming on a budget desktop: Core i5 3570K/8GB GSKILL RAM/EVGA 1GB SuperSuperClocked GeForce 650 TI/Dell 23" 1080p... Planning on nabbing a G75 ASAP...
[/HR]
Options
- Mark as New
- Bookmark
- Subscribe
- Mute
- Subscribe to RSS Feed
- Permalink
02-06-2012 10:26 AM
I'll also point out that part of the reason why it may have started to overheat is the paste between the GPU and heat sink may have started to crust up. I repasted my brothers old Alienware and it went from crashing after 30 seconds to working perfectly.
A bus station is where a bus stops. A train station is where a train stops. On my desk, I have a work station…
Options
- Mark as New
- Bookmark
- Subscribe
- Mute
- Subscribe to RSS Feed
- Permalink
02-06-2012 11:28 AM
xeromist wrote:
I'll also point out that part of the reason why it may have started to overheat is the paste between the GPU and heat sink may have started to crust up. I repasted my brothers old Alienware and it went from crashing after 30 seconds to working perfectly.
"Crust up!" Great description.....:)
You make a good point. Laptops tend to crust up faster than desktops, in my experience. I recently re-pasted the CPU/GPU in a one year old Asus N73, and I was actually pretty shocked at how dry the OEM paste had already become, and this isn't even a gaming machine or one that runs high-demand apps. (I'm surprised I wasn't having overheating issues...)
If a machine is well-maintained so its cooling system can operate as designed, that should be sufficient for the vast majority of users. On the other hand, I do love the creativity of this mod!
Options
- Mark as New
- Bookmark
- Subscribe
- Mute
- Subscribe to RSS Feed
- Permalink
02-10-2012 05:09 PM
BrodyBoy wrote:
"Crust up!" Great description.....:)
You make a good point. Laptops tend to crust up faster than desktops, in my experience. I recently re-pasted the CPU/GPU in a one year old Asus N73, and I was actually pretty shocked at how dry the OEM paste had already become, and this isn't even a gaming machine or one that runs high-demand apps. (I'm surprised I wasn't having overheating issues...)
If a machine is well-maintained so its cooling system can operate as designed, that should be sufficient for the vast majority of users. On the other hand, I do love the creativity of this mod!
Yeah, I really went overboard for this mod, but I wanted to try and bring my aging two-year old gaming rig back into the game by pushing it to its absolute limits and avoiding heat issues. It's working great so far; I've moved on to some Steam games like XOTIC and Sanctum, both of which I easily max out on settings with no slowdown at all and framerates steadily over 60fps.
Also, I did address the crusty paste issue in my write-up:
"Make sure and use a good thermal paste; I used Arctic MX-2, also from eBay for $8 (seller called gigworld)."
Can't say if it helped significantly or not since I upgraded the CPU at the same time, but that old paste on there was char-broiled from years of high heat and krustier that a yellow cartoon clown, so I imagine replacing it was an important step.
ASUS ROG G60VX - Modded: G60VX Performance Boost/Cooling Mod
Currently gaming on a budget desktop: Core i5 3570K/8GB GSKILL RAM/EVGA 1GB SuperSuperClocked GeForce 650 TI/Dell 23" 1080p... Planning on nabbing a G75 ASAP...
[/HR]
Currently gaming on a budget desktop: Core i5 3570K/8GB GSKILL RAM/EVGA 1GB SuperSuperClocked GeForce 650 TI/Dell 23" 1080p... Planning on nabbing a G75 ASAP...
[/HR]
Options
- Mark as New
- Bookmark
- Subscribe
- Mute
- Subscribe to RSS Feed
- Permalink
03-03-2012 02:24 PM
Great thread. I found this info after doing a search on how to improve the cooling in my G60vx. Can't wait to implement all these upgrades (though the CPU upgrade might have to wait a bit). Thanks for the great information.
Options
- Mark as New
- Bookmark
- Subscribe
- Mute
- Subscribe to RSS Feed
- Permalink
03-07-2012 09:56 PM
yeah. alot of the g50/51 users have been doing this mod for some time. i used a 3" hole saw, a speaker grill, and some jbweld to do mine.
a repaste job will do you wonders. i used IC Diamond and got phenomenal results out of it.
a repaste job will do you wonders. i used IC Diamond and got phenomenal results out of it.
__________________________________________________________________
dstrakele wrote:
I just blow the flames out and keep playin'....
Options
- Mark as New
- Bookmark
- Subscribe
- Mute
- Subscribe to RSS Feed
- Permalink
07-06-2012 01:50 PM
holy crap, that looks like fun..... now i want a G60 so i can do this, lolz.
but yeah, im a big fan of repasting, plus the factory paste is not always done right/generously/or with good enough paste. Doing a paste job yourself with some decent thermal paste will provide peace of mind that you did it right, and in my case, for my G73 and G74, reduce temps by ~7-10degreesC.
but yeah, im a big fan of repasting, plus the factory paste is not always done right/generously/or with good enough paste. Doing a paste job yourself with some decent thermal paste will provide peace of mind that you did it right, and in my case, for my G73 and G74, reduce temps by ~7-10degreesC.
ROG Notebooks: G75VW, G74SX, & G73JH And a gaming rig.
Options
- Mark as New
- Bookmark
- Subscribe
- Mute
- Subscribe to RSS Feed
- Permalink
07-30-2012 06:00 PM
I must say that I am glad that ASUS got the cooling done right on the G53SX. Mine runs very cool ~55 C GPU at load...without a cooler. On the cooler it is not much better, since the air intake is on the top of the notebook--great work ASUS! 🙂
I must say, @OtherSyde, you did an excellent job on that mod. The thing on the far-right is the GPU, the other ones are CPU (upper) and northbridge (lower). You can tell the GPU by the MXM slot that it plugs into.
I must say, @OtherSyde, you did an excellent job on that mod. The thing on the far-right is the GPU, the other ones are CPU (upper) and northbridge (lower). You can tell the GPU by the MXM slot that it plugs into.
I am disturbed because I cannot break my system...found out there were others trying to cope! We have a support group on here, if your system will not break, please join!
http://rog.asus.com/forum/group.php?groupid=16
We now have 178 people whose systems will not break! Yippee! 🙂
LINUX Users, we have a group!
http://rog.asus.com/forum/group.php?groupid=23
http://rog.asus.com/forum/group.php?groupid=16
We now have 178 people whose systems will not break! Yippee! 🙂
LINUX Users, we have a group!
http://rog.asus.com/forum/group.php?groupid=23
Related Content
- Micro stutters fix ! Real or Fake ? in ROG Strix Series
- CPU refusing to be fully utilized in most games. in TUF / ASUS Gaming Notebooks
- Asus rog gl703gs - Armoury issues in ROG Strix Series
- ROG Strix G15 G513RM Armory Crate Stuck in Extreme Power Saving Mode in ROG Strix Series
- Asus Tuf Gaming F15 I5-11400H RTX3050 (FX506HC) Crashing Games in TUF / ASUS Gaming Notebooks
