The best HDR settings for ROG Nebula HDR Displays

HDR, or High Dynamic Range, brings punchier images, more vivid colors, and more detailed highlights to games and movies, allowing for a more lifelike image than ever before. To make your HDR content shine, ROG created the Nebula HDR Display: a new breed of Mini LED display for gaming laptops that provides stunning picture quality you can take on the go. If you want to make the most of HDR on your new ROG laptop, however, you’ll need to tweak a few settings — and we’re here to help you dial it all in.
How HDR works in modern games
Standard dynamic range — the content you’ve viewed on broadcast television, DVDs, and video game consoles for years — uses a standard that dates back to the 1990s. But modern panel technology has come a long way since then, so the HDR standard was created to take advantage of these improvements — including stunning contrast, high peak brightness, and a wider gamut of colors.
You’ve probably heard display enthusiasts or marketers talk about brightness in particular — how a display is capable of 600, or 1,000, or even 1,500 nits. That’s much brighter than the displays of yore, but we need to clear up a misconception: this isn’t just about making your games brighter. In fact, outside of a few specific scenes designed to be eye-searing for dramatic effect, most HDR content won’t look that much brighter than the SDR content you’re used to.

Instead, that extra brightness is used to make certain highlights feel punchy, or to raise the color volume so certain objects appear more vivid. In addition, this extra brightness allows highlights to be more detailed: where the bright noonday sun might have looked like a big white blob in SDR, that same sun will have an aura of golden rays that fade into a white-hot center, jumping off the screen as if you were looking through a window to the real world. That’s the kind of benefit HDR truly provides.
But not every HDR display is the same. One display may be able to get brighter than another, and games will look best if the game knows the capabilities of your display. If your display is only capable of 500 nits of brightness and the game is pushing a 1,000-nit signal, for example, that sun may still look more washed out than it should. Or, if your display is capable of more than the game is outputting, the image may not look as punchy as possible. (Note that the screenshots in this article will not show the true capabilities of HDR, as like most web content, they are in SDR. You have to see it in-game on an HDR display to truly experience it.)
To get the best HDR setup, you need to tell Windows — and your games — your display's specs, meaning you’ll need to go through HDR calibration for each title. Trust me: it’s worth a few moments of your time for that bright, vivid picture you’ll get in the end.
The best HDR settings in Windows 11
To start, you’ll need to enable HDR in Windows’ picture settings, and tweak all the knobs accordingly. To do so, open the Settings app and head to Display > HDR. Flip the “Use HDR” switch to On. I also recommend enabling Auto HDR, which allows Windows to add HDR to games that weren’t originally built with the tech in mind. That’s awesome if you’re playing some of your classic favorites — you’ll see them in a whole new light.
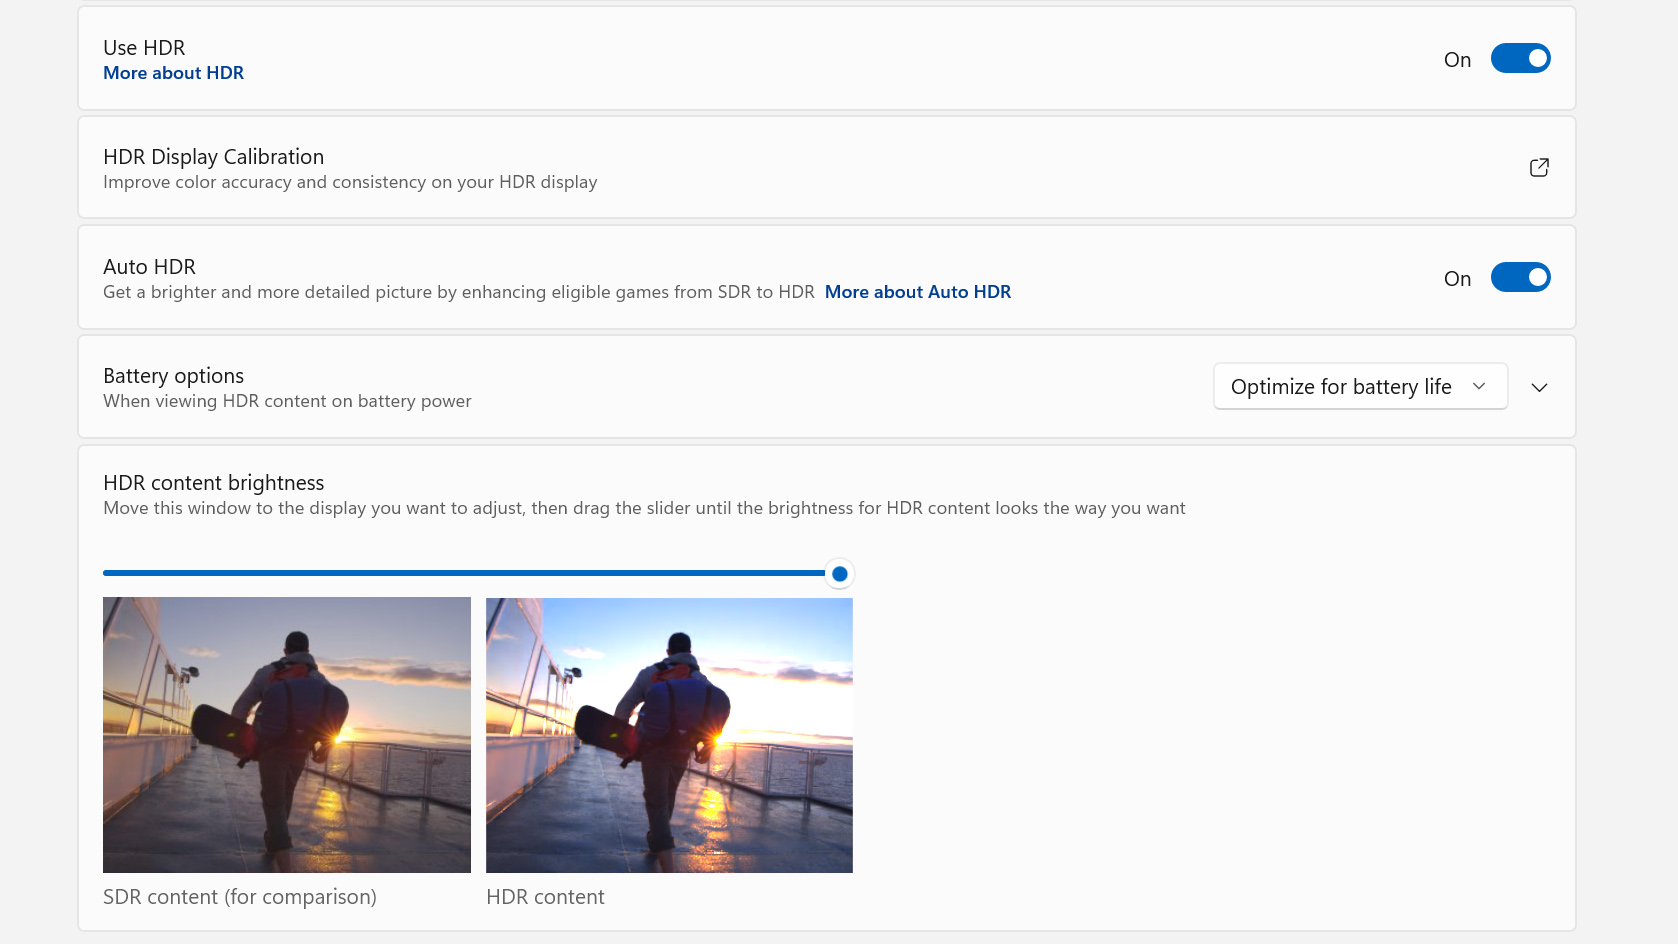
There are two other things you’ll want to look at here. Desktop machines have a slider at the bottom of this window entitled “SDR Content Brightness,” and you've probably heard people recommend setting it low (like 5 or 10) to prevent SDR content from being eye-searingly bright. But don't! On ROG laptops with a Nebula HDR Display, look a little closer and you’ll see this slider is called “HDR Content Brightness.” As its name suggests, on a Nebula HDR Display, this slider changes the brightness of HDR content instead. You’ll actually want to leave at its max setting for best results.
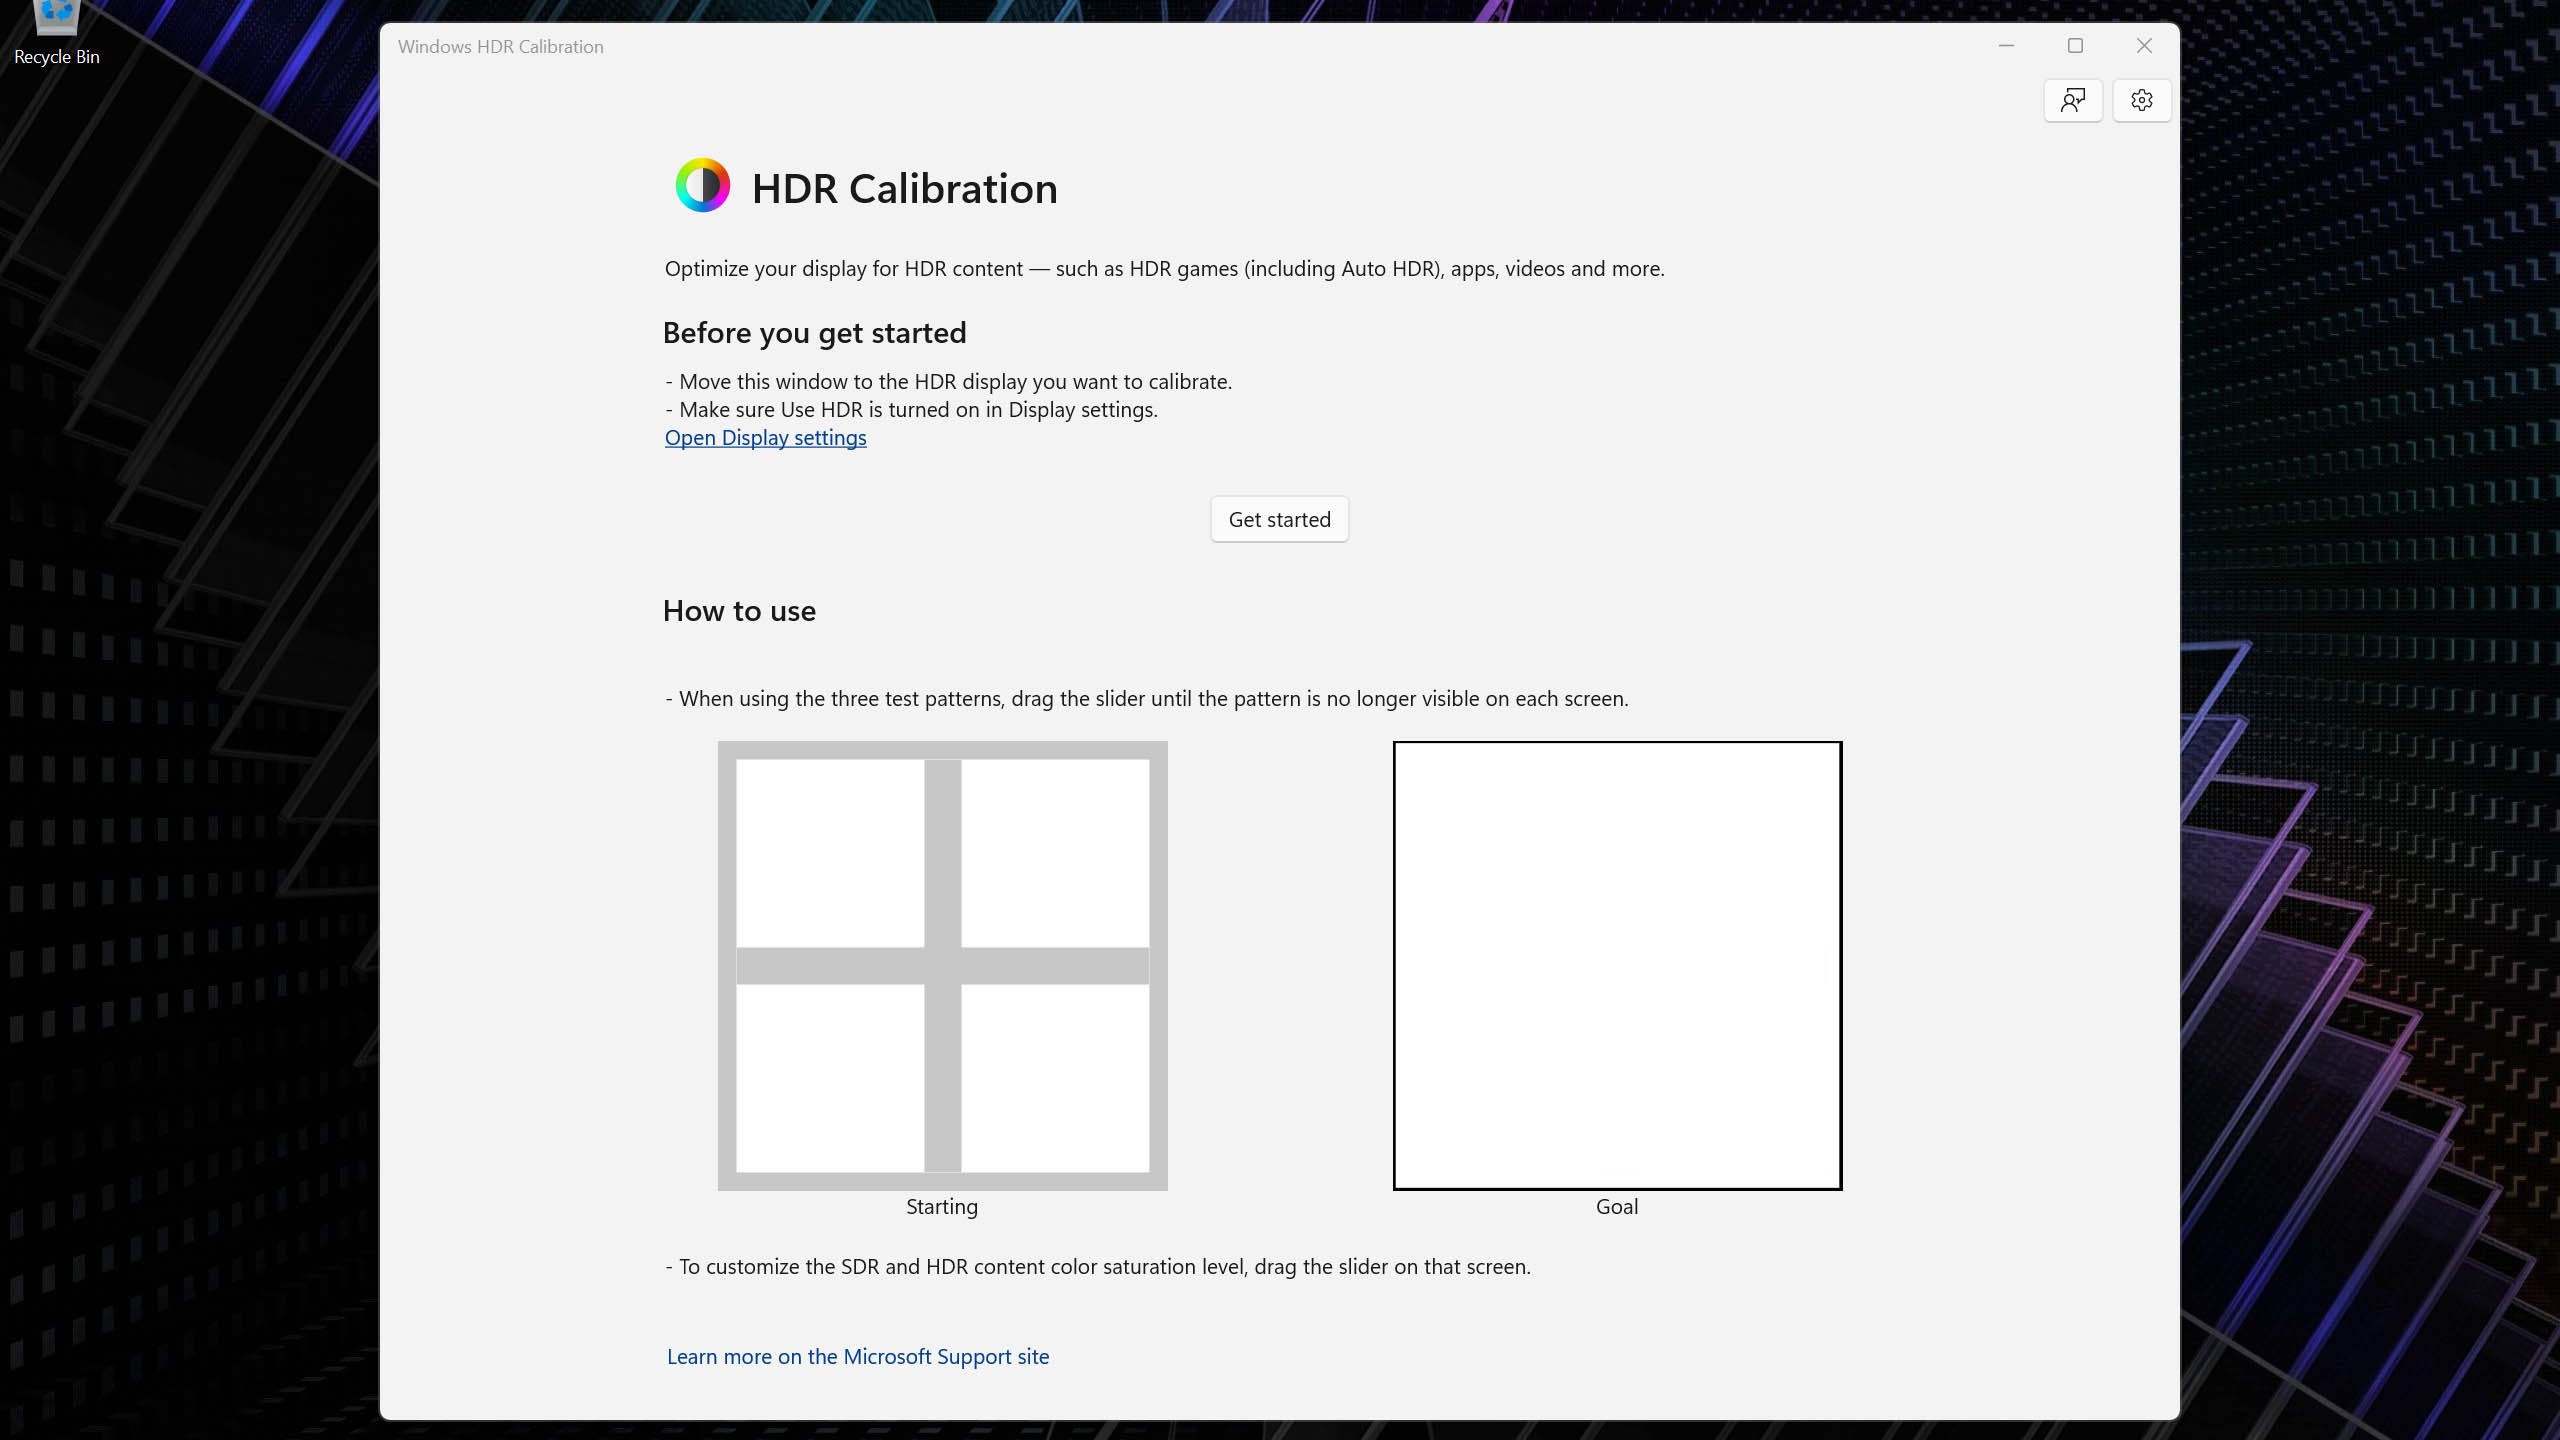
Next, click HDR Display Calibration. This will navigate you to an app in the Microsoft Store called Windows HDR Calibration. Developed by Microsoft themselves, this app will let you tell Windows what level of brightness your display is capable of, so it can display content the way it was meant to be seen.
After downloading the app, launch Windows HDR Calibration from the Start menu and click Get Started. Each screen will show a box with a grey window in it. Move the slider until the grey window just disappears, and is the same color as the background. For most Nebula HDR displays, the black box should be set to 0. The ideal settings for the white boxes will vary from device to device — the 2023 Zephyrus M16 and Strix SCAR 16, for example, are capable of around 1100 nits, so the slider should end up near that value. The 2023 Zephyrus G14, on the other hand, will be closer to 600. (It won't be exact, as brightness output can fluctuate from second to second, but it should be in that general vicinity when the grey lines disappear.)
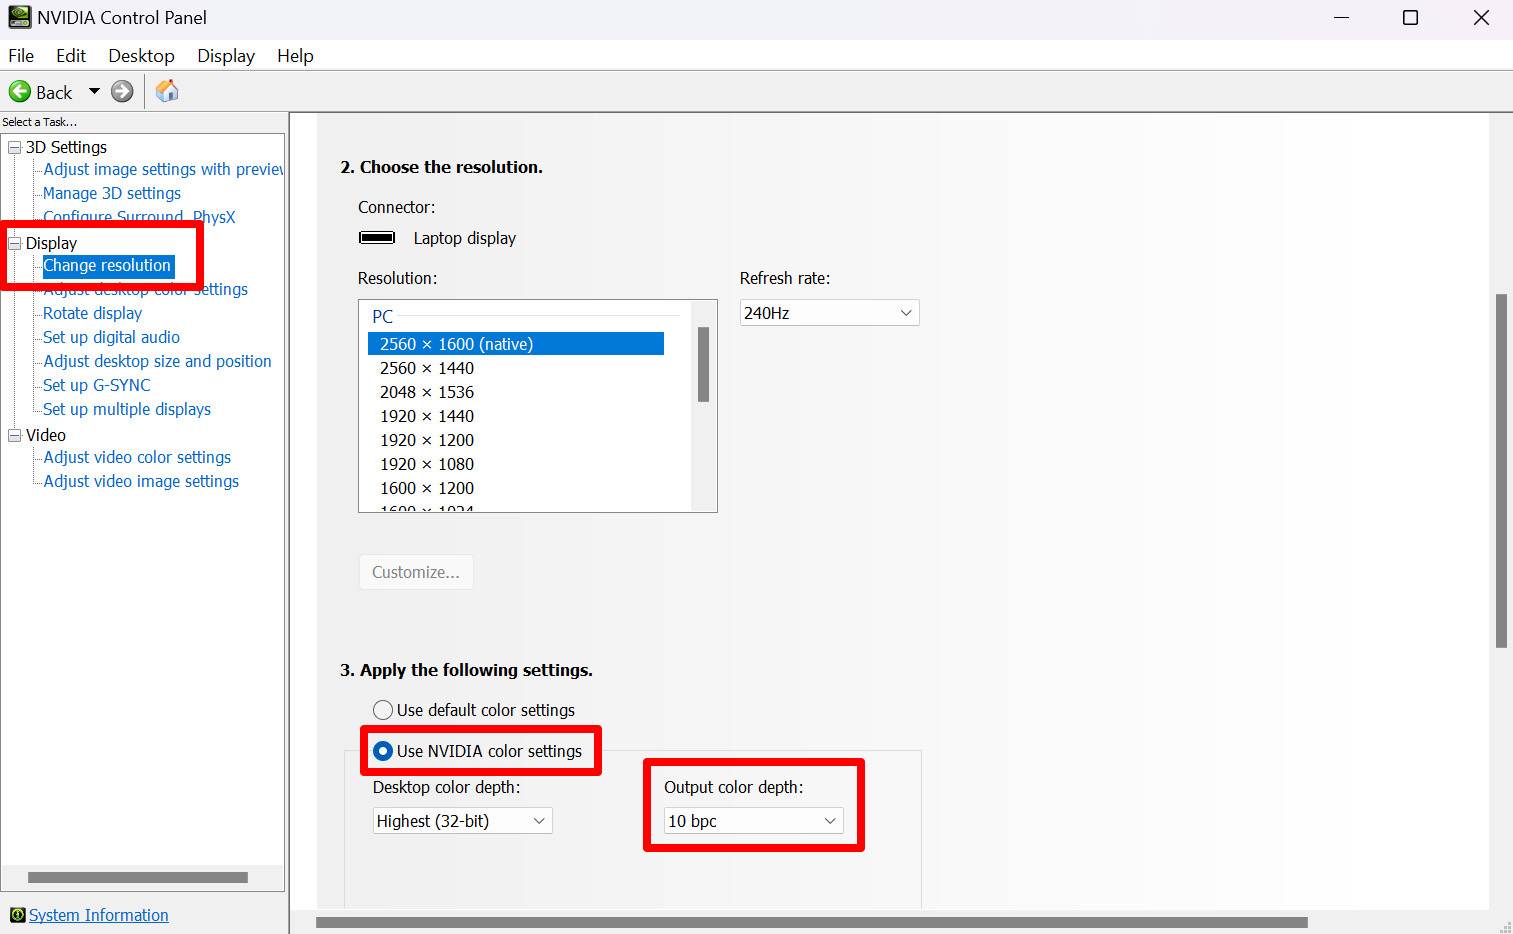
Once you finish the HDR calibration, you should be all finished with Windows’ settings. But there's one more thing you'll want to tweak: open the NVIDIA Control Panel, click the Change Resolution tab in the left sidebar, and select Use NVIDIA Color Settings at the bottom of this pane. Change the Output Color Depth to 10 bpc to get 10-bit color in HDR.
Now, all your system settings are set for the optimal HDR experience. You can leave your display in HDR mode, or you can manually toggle it on before you play an HDR game by revisiting this settings window or by pressing Win+Alt+B at any time.
The ideal HDR brightness settings in games
Windows’ system settings will affect some applications, but many games also have their own built-in HDR settings as well, and you’ll need to tweak these accordingly for best results. So when you launch an HDR-capable game for the first time, head into the options menu and look for the HDR setting — it’ll either be under Video settings or Graphics settings, depending on the game. Find the HDR calibration option and select it.
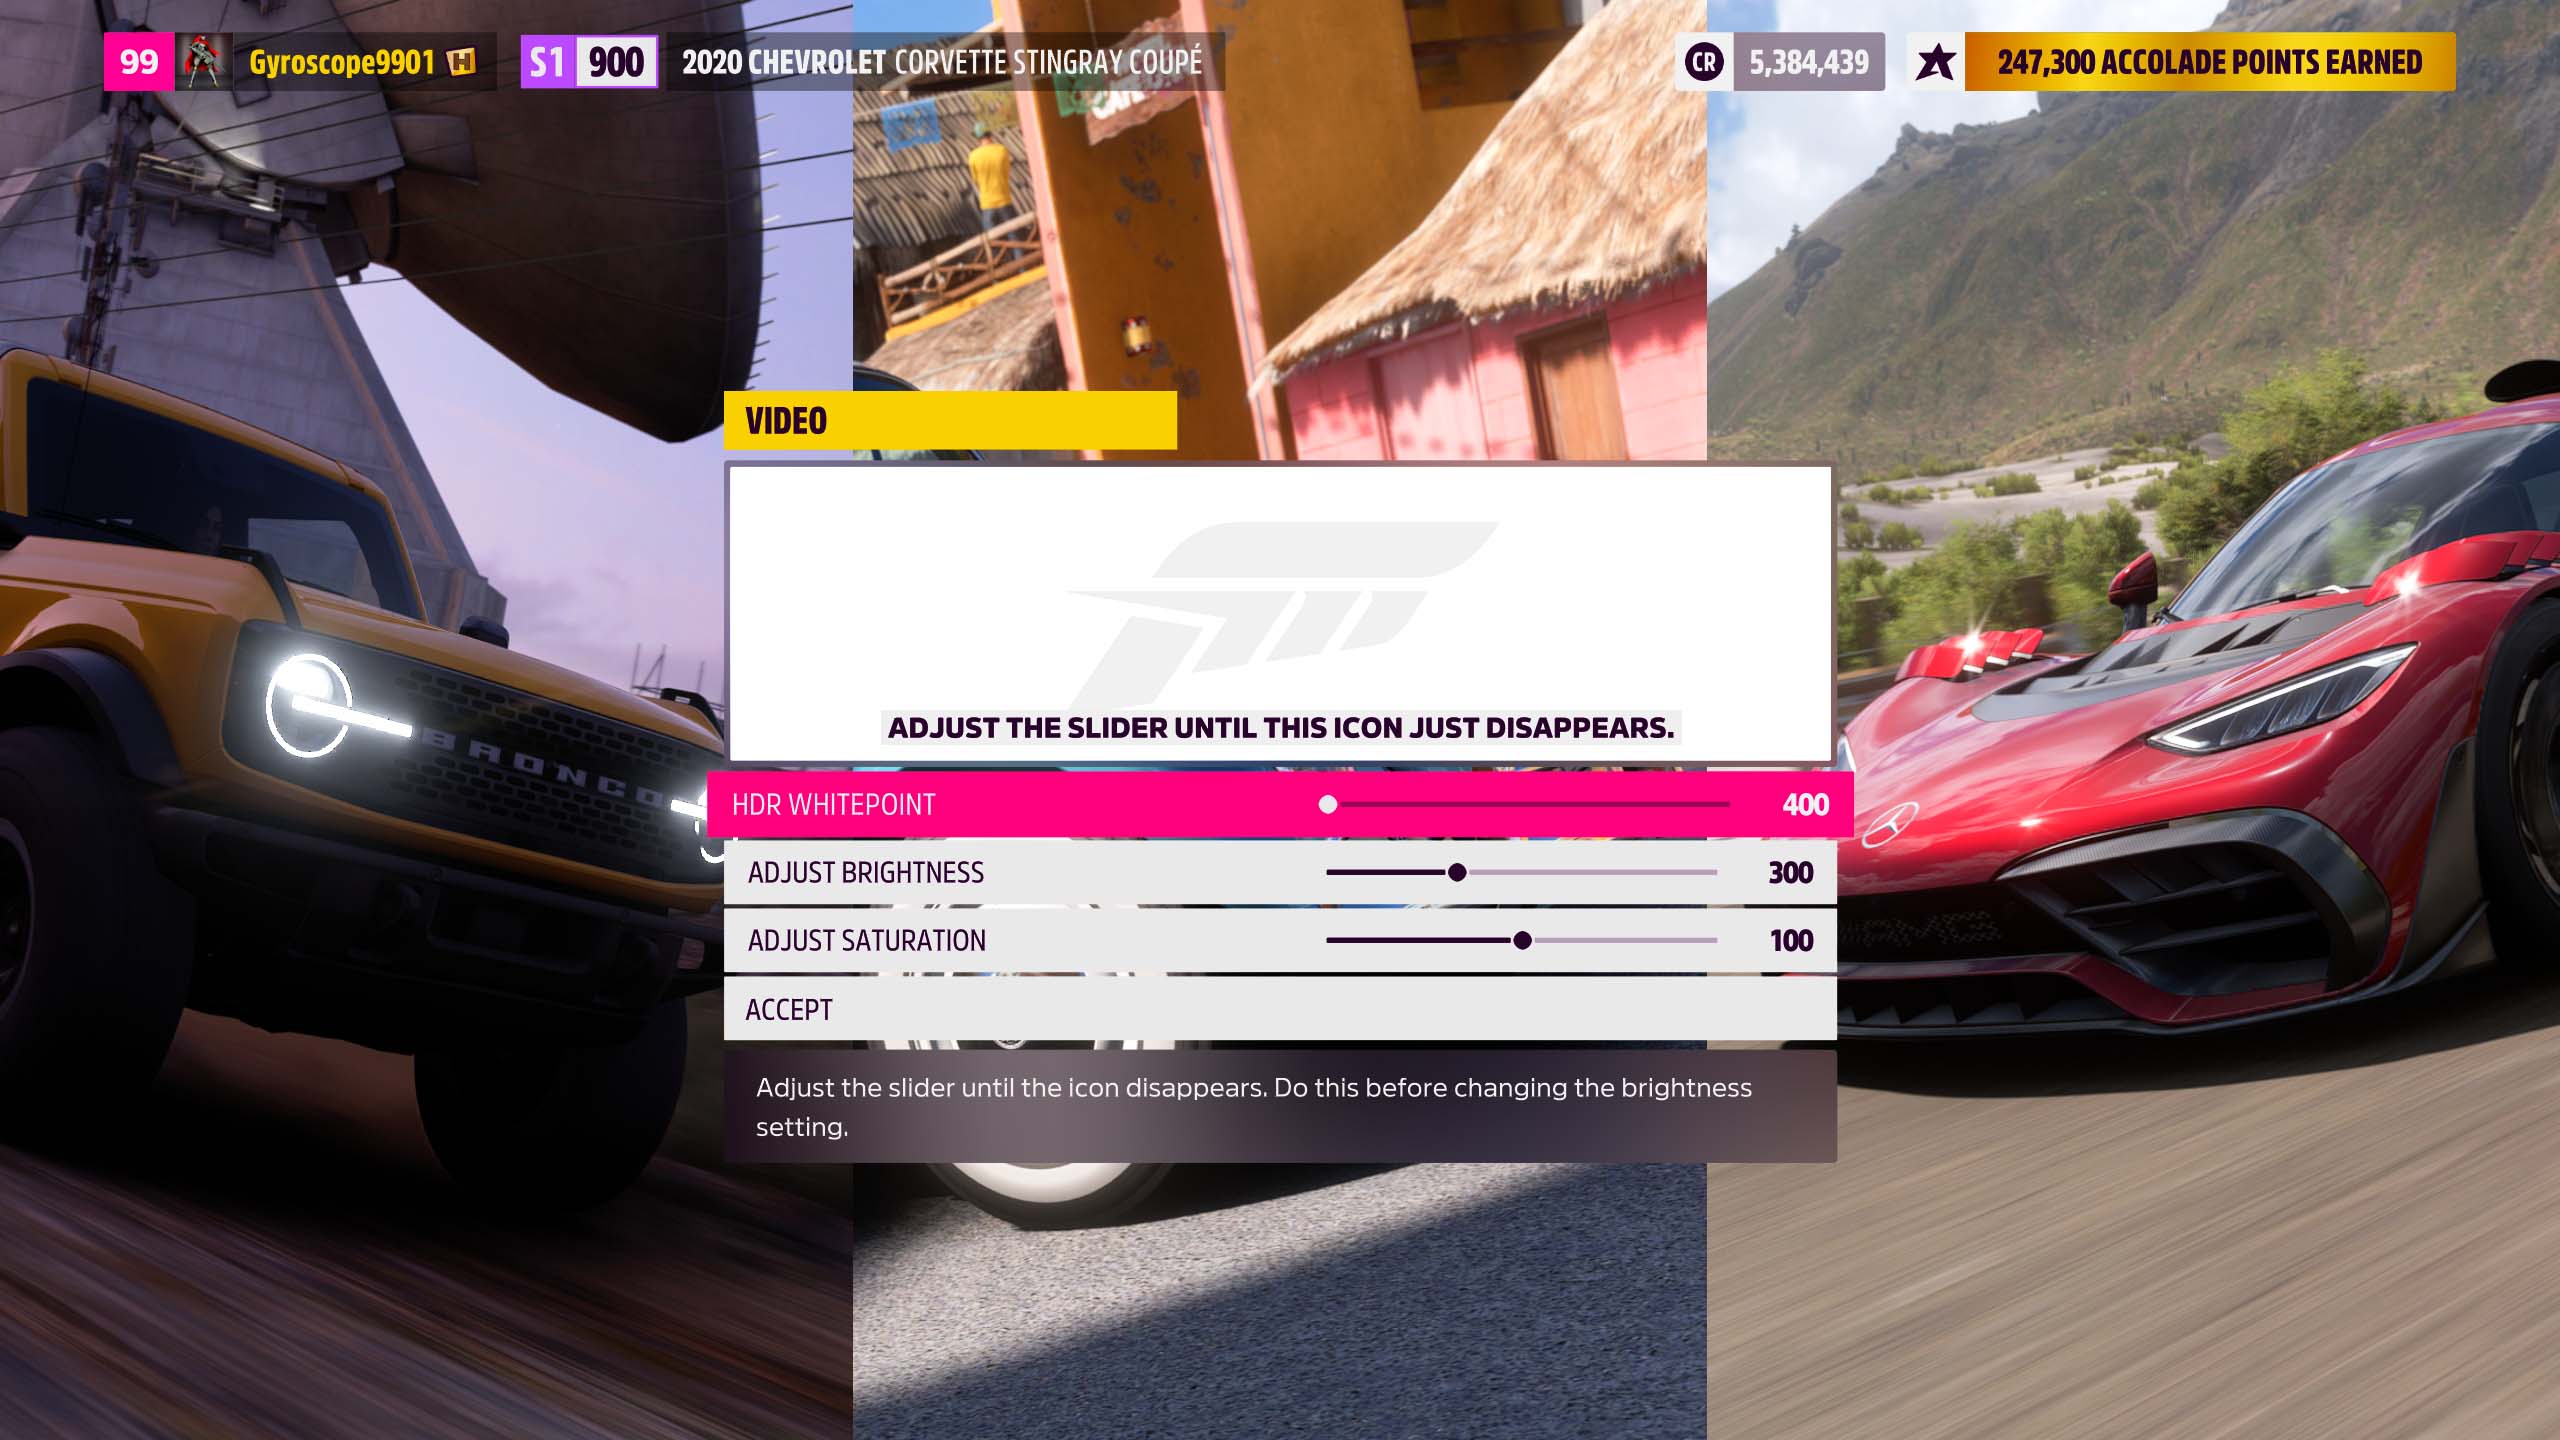
Every game is a bit different, but in most cases, it’ll be a similar set-the-slider-until-the-logo-disappears affair. Some games, like Forza Horizon 5, will use a nit value for their whitepoint slider, helping you double-check the right value for your display. Others may use a different gauge — but as long as that logo disappears, you should be good to go. If there are settings other than white point and black point, you can set them to your taste.
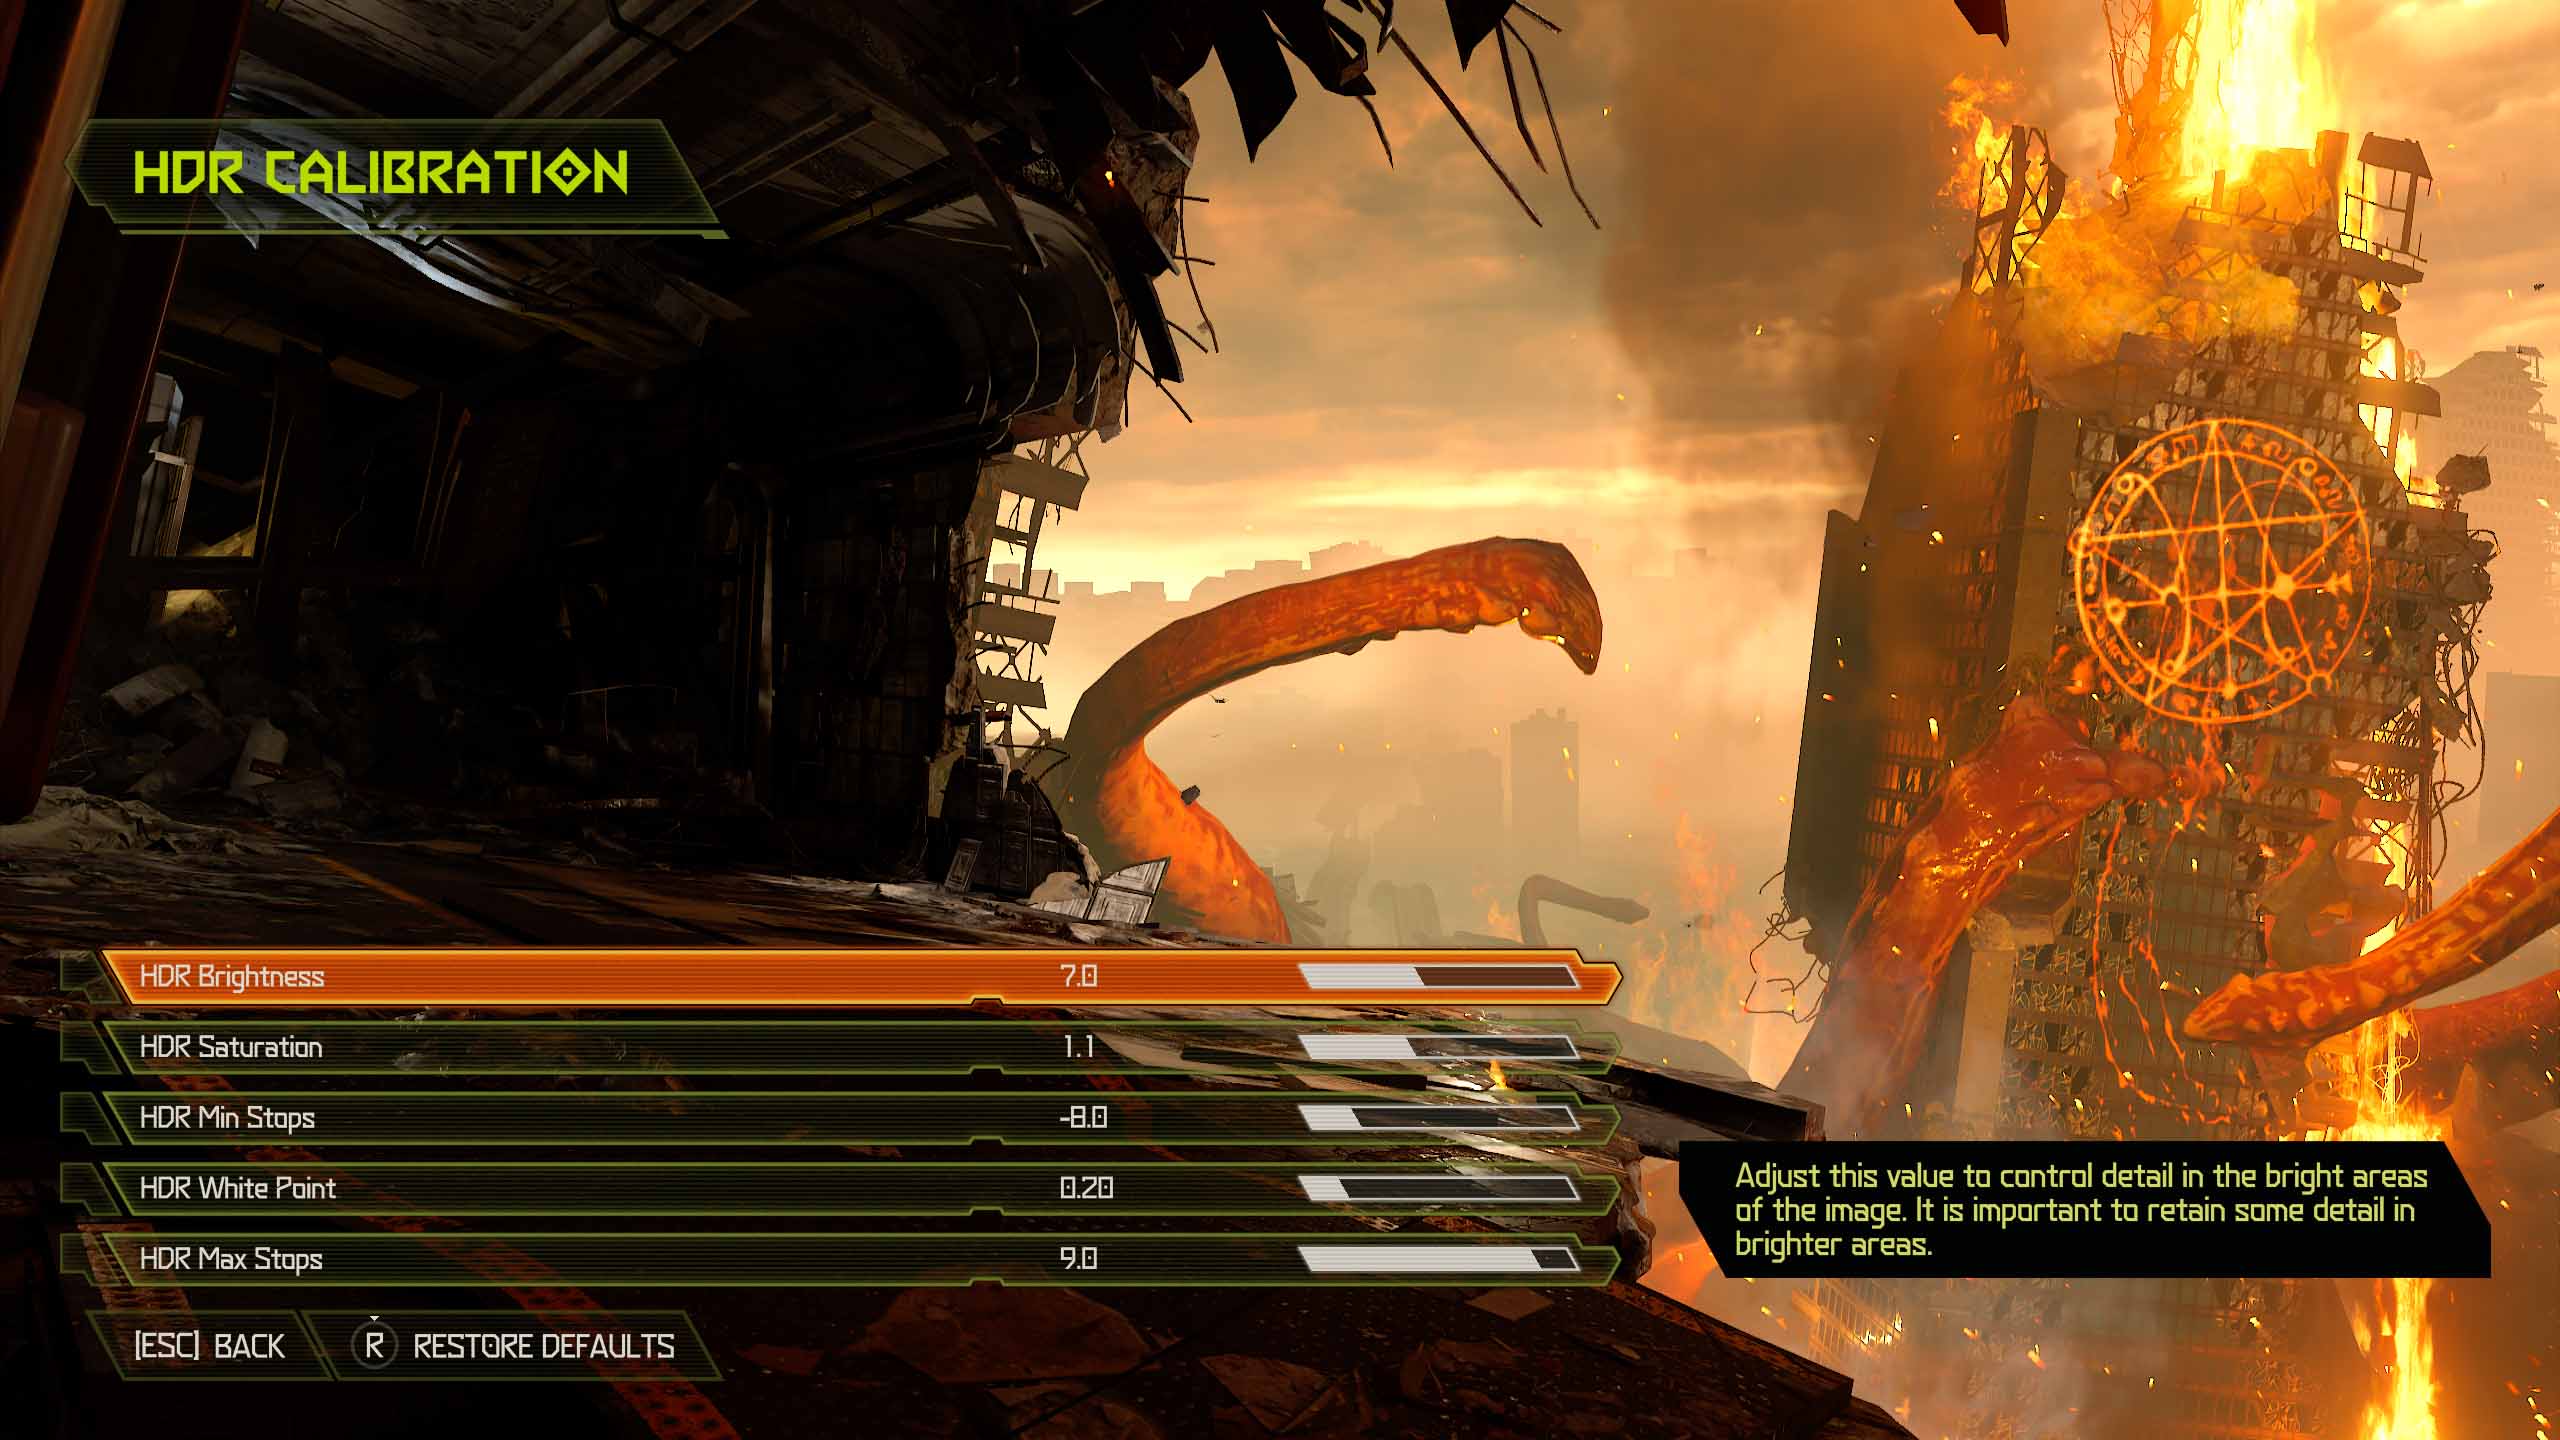
In fact, some games may have a number of extra sliders, giving you more room to play with the image. Doom Eternal, for example, offers Brightness, Saturation, White Point, and dynamic range sliders to let you truly customize the look of the game.
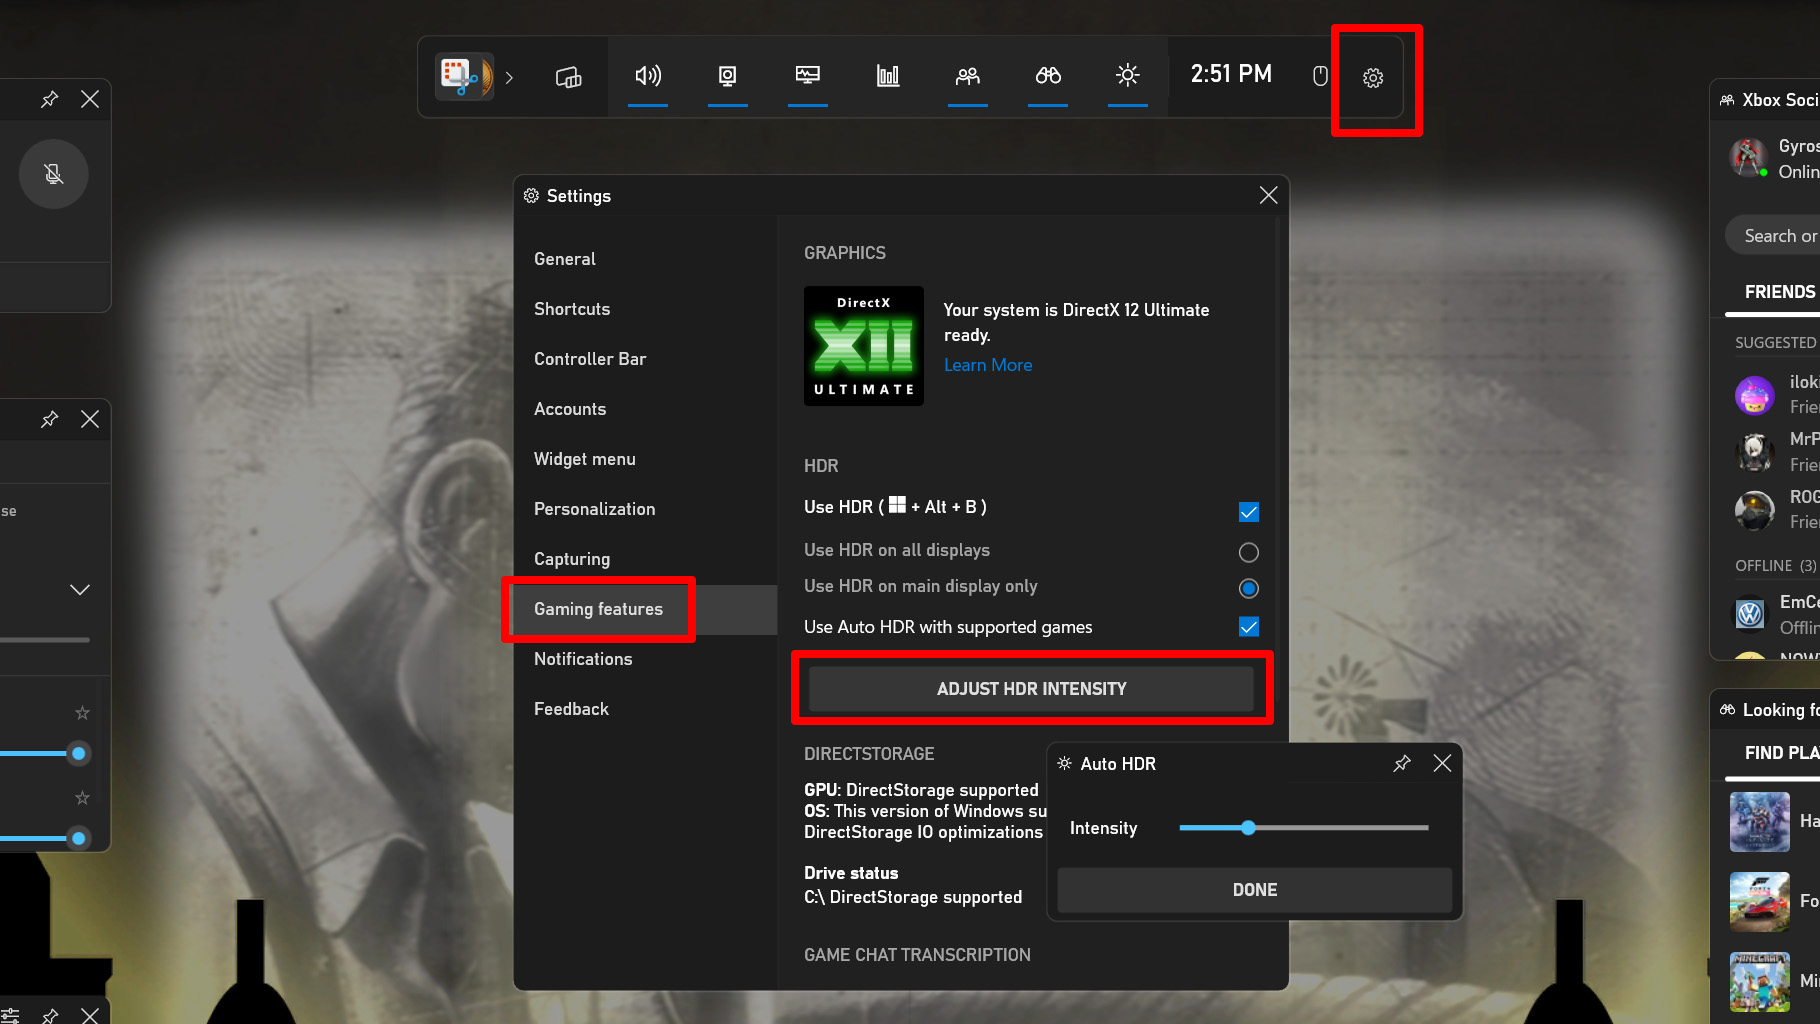
If your game doesn’t have HDR built-in but you see a notification that Windows’ Auto HDR settings have kicked in, you can press Win+G on your keyboard to bring up the Game Bar for a bit of customization. Click the Settings cog, navigate to Gaming Features, and click Adjust HDR Intensity to turn the brightness up or down in that specific game. You can repeat this process for other Auto HDR games and Windows will remember your settings for each.
That’s it! After you do this the first time, it’ll become second nature, and you’ll only need a few seconds in a new game’s menu to optimize it for your display. Then you can hop right into the story and get sucked into a new world like you’ve never seen it before, all courtesy of Nebula HDR.