Life at 300Hz: Optimize your games to take advantage of high refresh rates
We introduced the world’s first gaming laptops with 300Hz displays at IFA Berlin 2019, pairing an unprecedented panel refresh rate with the high-end GeForce RTX graphics processors needed to take advantage of it. Our 300Hz gaming laptops are aimed at esports gamers—especially pros who compete at a level where every millisecond matters. In that world, preempting the enemy is all about reaction time, and getting new information on screen before anyone else conveys a big tactical advantage.
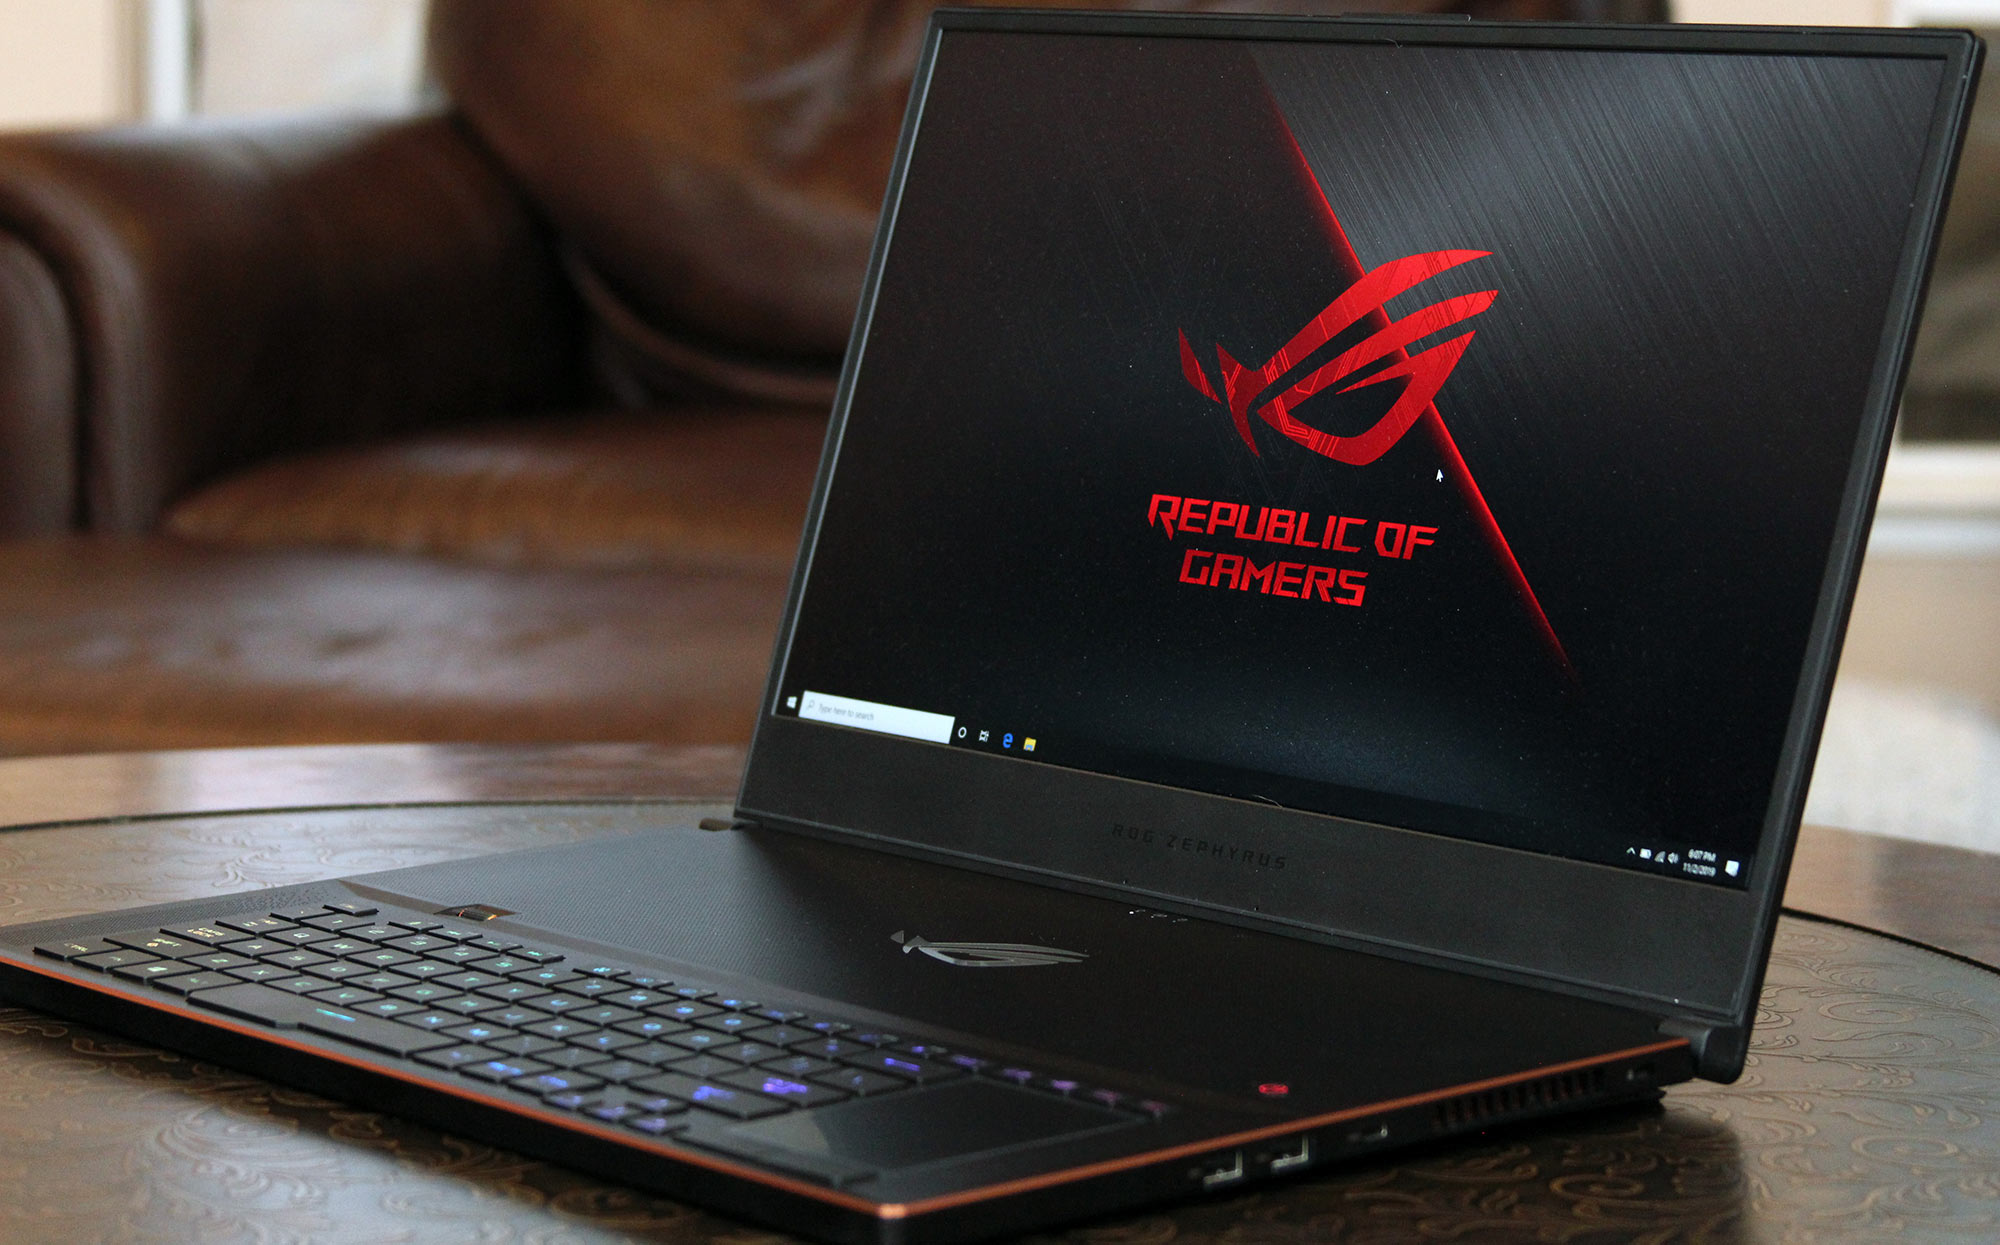
A 300Hz refresh rate updates 25% faster than the 240Hz LCDs popular with competitive gamers. And the ability to draw a new frame every 3.33ms nicely matches our display’s 3ms pixel response time, keeping motion blur to an absolute minimum.
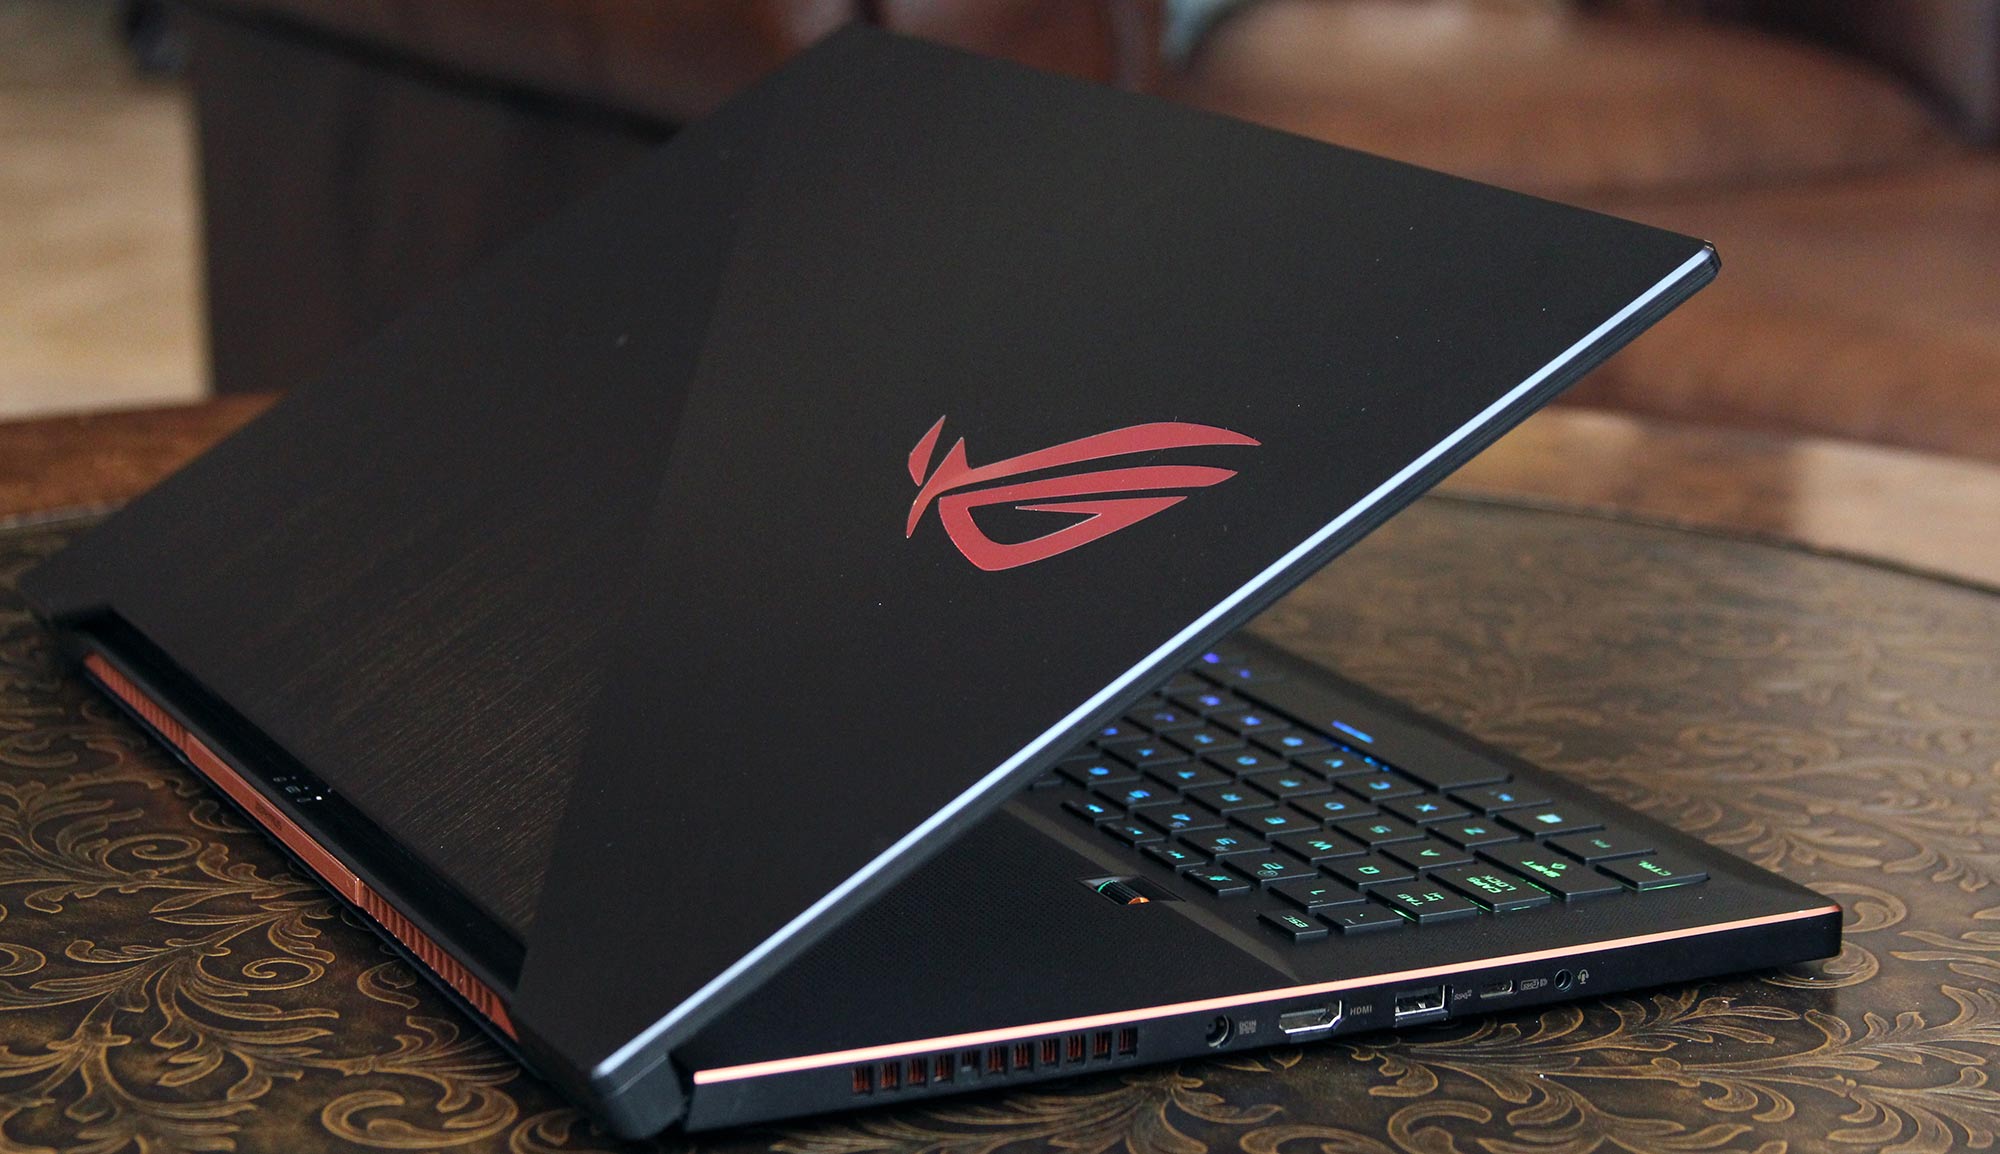
So how do you benefit from a 300Hz refresh rate? You start by tuning your games. Depending on your PC’s specs, that’s easier said than done. Fortunately, the ROG Zephyrus S GX701 is loaded with high-end hardware able to muscle through the top esports titles. To prove it, I grabbed a special 300Hz version of the GX701 with a six-core, 12-thread Intel Core i7-9750H processor, 32GB of DDR4-2666 memory, 1TB of solid-state storage, and NVIDIA’s flagship GeForce RTX 2080 GPU with 8GB of GDDR6 inside.
This version of the GX701 sacrifices nothing for its upgraded display. A factory calibration and Pantone Validated status maintain the laptop’s exceptional color reproduction, while the same 6.9mm bezels around the display translate to an 81% screen-to-body ratio. It’s the spitting image of its predecessor except for the faster panel.
To showcase what the screen can do, we installed four esports games—Counter-Strike: Global Offensive, Overwatch, Rainbow Six Siege, and Rocket League. I then explored how to configure them for optimal performance, and I graphed their frame rates to show where a 300Hz display can get more information in front of you than a 144Hz or even 240Hz LCD.
Getting the best performance possible from CS:GO
By no means is Counter-Strike: Global Offensive a new or modern title. It was launched back in 2012 as a successor to Counter-Strike: Source, which debuted eight years prior. Both games employ the venerable Source engine, so their graphics are understandably dated. But because Valve continues publishing updates (most recently in 2018 when it released the Danger Zone battle royale mode), CS:GO remains one of the most-played games on Steam. Of course, it probably helps that the same patch made CS:GO free-to-play. Gamers of every skill level can grab Counter-Strike and practice for competition in tournaments that run on an almost daily basis (with real prize money).
Easy access to a title enjoyed by millions means any little advantage you can secure goes a long way in improving your chances at survival. CS:GO already runs at triple-digit frame rates on many modern GPUs. When you pair cutting-edge hardware with the latest 144Hz and 240Hz panels, in-game action shows up on-screen milliseconds faster, allowing you to react before the enemy gets a shot off.
The newest version of the Zephyrus S GX701 and its 300Hz panel give you an opportunity to squeeze out even faster reaction times, so long as you get CS:GO running at high-enough frame rates. We’re here to show you how.
Step 1: Make sure you’re running at full speed
By design, laptops must balance performance and battery life, particularly on the road. But when you’re plugged into a wall outlet and gunning for maximum performance, power-saving features are far less desirable. That’s why we’re going to keep the Zephyrus S GX701 running at its peak clock rates.
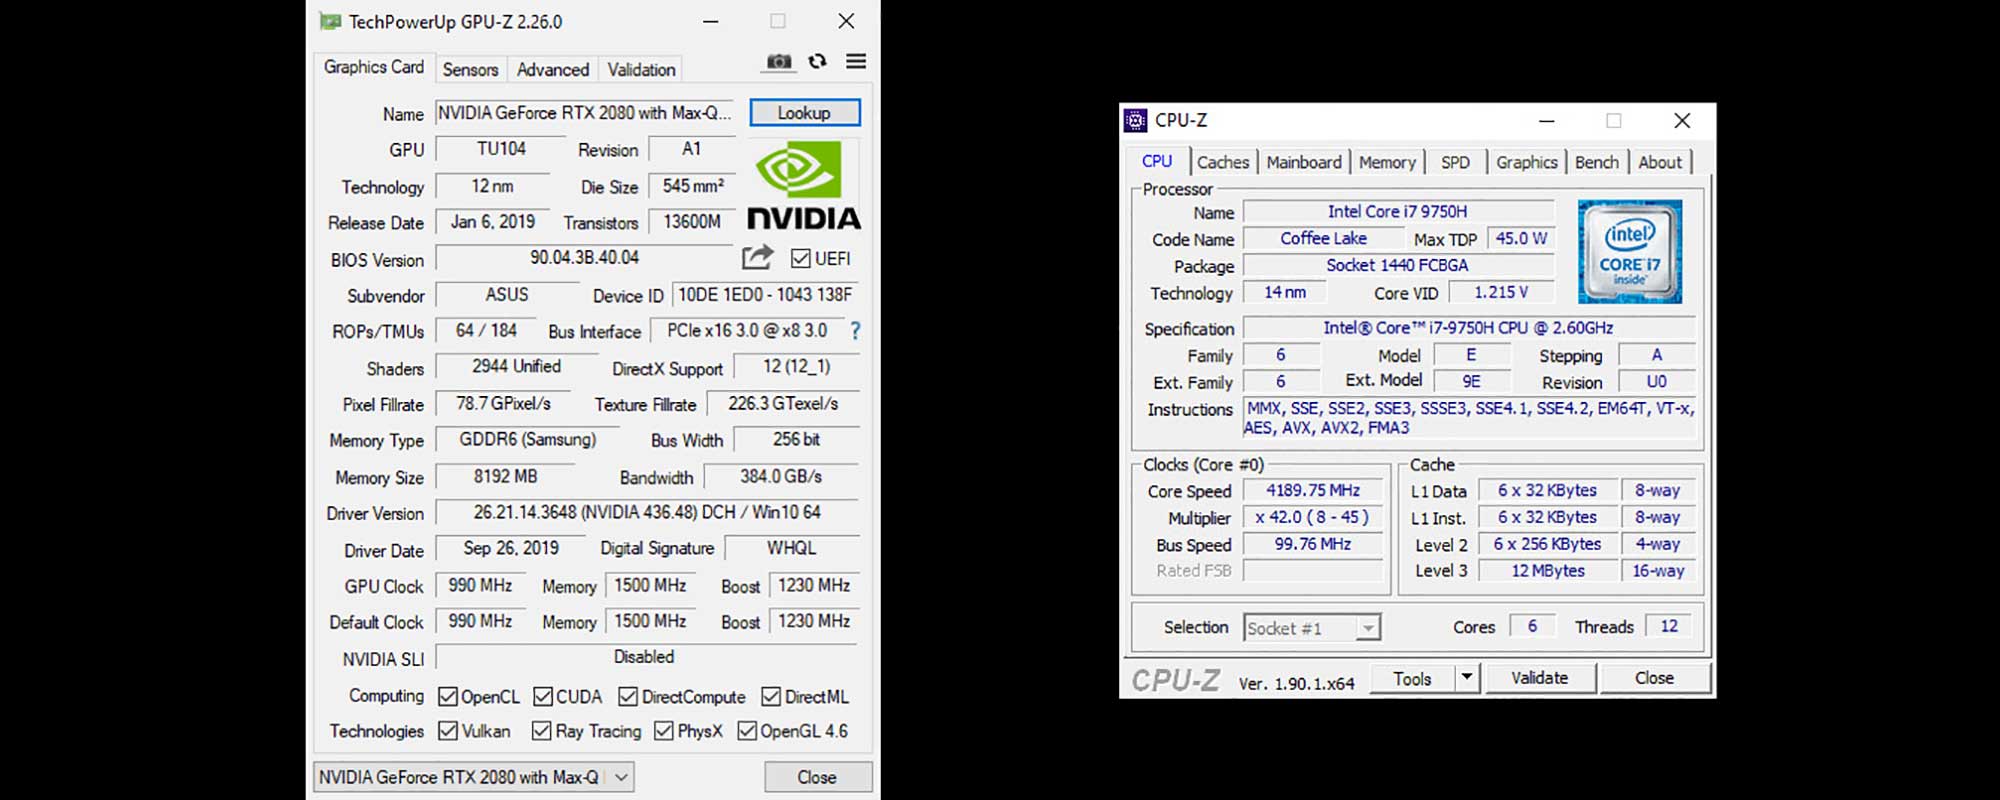
In Windows 10, click the Start button, open Settings, select the System menu, and choose “Power & sleep” in the left-hand pane. On the right-hand side, click the link for “Additional power settings.” If you don’t see the High performance plan by default, choose “Show additional plans” to make it appear. On our Zephyrus S GX701 sample, this kept our Core i7-9750H running in excess of 4GHz, while our GeForce RTX 2080 held a steady 990MHz.
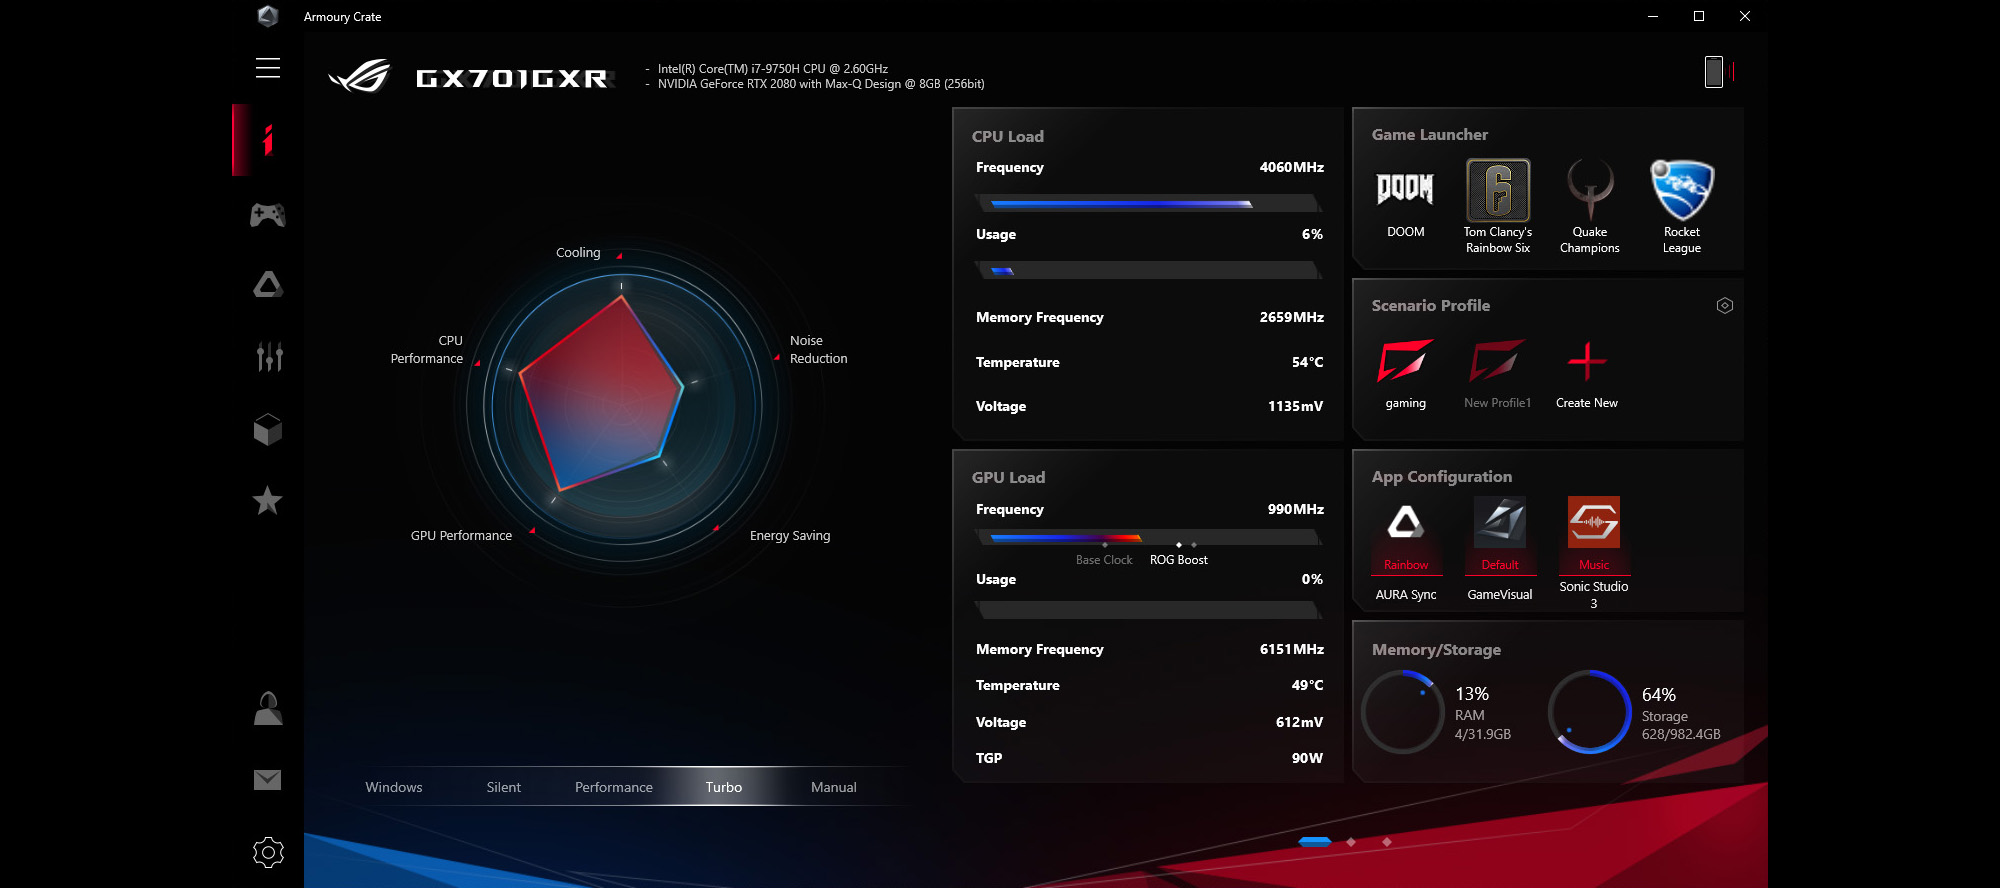
But wait—there's more gaming power on tap if you want it, thanks to the headroom offered by ROG Boost. Just jump into Armoury Crate and switch over to the Turbo profile. At that setting, the GX701 can push graphics frequencies as high as 1,230MHz thanks to a GPU power budget as high as 100W. Just be mindful of the fact that your system’s fans will spin up to compensate for the extra heat the GPU will produce in this mode.
Step 2: Time for a graphics tune-up
It’s a diagnostic recommendation as old as “try restarting Windows,” but installing the latest graphics drivers for your GPU is always a good idea. We like to uninstall old drivers first using the Windows control panel before running Display Driver Uninstaller in safe mode to remove any leftover remnants. Once that’s all done, you can apply the newest drivers from AMD or NVIDIA after rebooting.
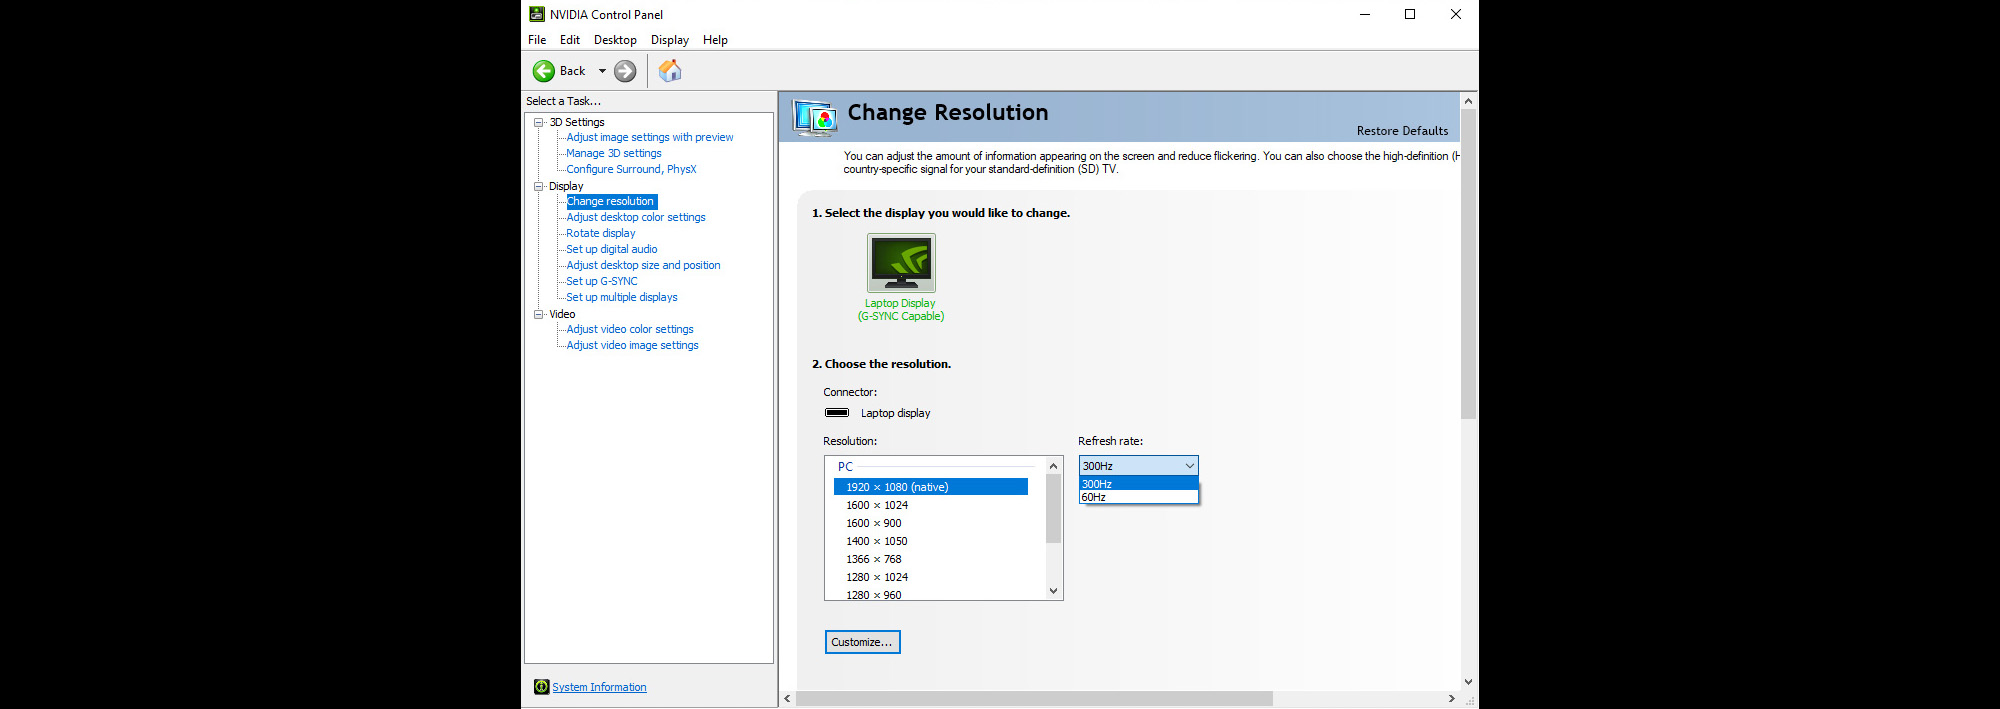
Next, verify that your display is running at its highest (native) refresh rate. On the Zephyrus S GX701, that means right-clicking on the desktop, opening the NVIDIA Control Panel, and clicking “Change resolution” on the left-hand “Select a Task” pane. Sure enough, our sample was already set to 1920x1080 and 300Hz.
Achieving the highest possible frame rates means tweaking some of the GPU’s global 3D settings, too—in this case, in the NVIDIA Control Panel. The following chart, taken from Chicken Killer’s CS:GO guide, should serve as a handy reference if you’re using an NVIDIA GPU like our GeForce RTX 2080.
| Setting | Max FPS Setting | Max Competitive Advantage Setting |
|---|---|---|
| Ambient occlusion | Off | Off |
| Anisotropic filtering | Off | Off |
| Antialiasing - FXAA | Off | Off |
| Antialiasing - Gamma correction | Off | Off |
| Antialiasing - Mode | Off | Application-controlled |
| Antialiasing - Setting | Off | Application-controlled |
| Antialiasing - Transparency | Off | Multisample |
| CUDA - GPUs | All | All |
| Maximum pre-rendered frames | Use 3 if experiencing low FPS, otherwise use 1 | 1 |
| Power management mode | Prefer maximum performance | Prefer maximum performance |
| Shader cache | On or off, test both | On or off, test both |
| Texture filtering - Anisotropic sample optimization | On | On |
| Texture filtering - Negative LOD bias | Clamp | Clamp |
| Texture filtering - Quality | High performance | High performance |
| Texture filtering - Trilinear optimization | On | On |
| Threaded optimization | On | On |
| Triple buffering | Off | Off |
| Vertical sync | Off | Off |
Step 3: Getting CS:GO ready for action
The same guide recommends several launch options that can be set by right-clicking on Counter-Strike: Global Offensive in your Steam library and selecting Properties. Click the “Set Launch Options” box and paste the following string:
-novid -nojoy -noaafonts
The -novid switch isn't directly related to increasing frame rates, but it conveniently skips the Valve animation when CS:GO starts up. Adding -nojoy removes joystick support, though certain threads on the /r/GlobalOffensive subreddit suggest this no longer has an effect. The benefit of -noaafonts is also up for debate. We suggest experimenting with these tweaks to gauge whether they’re necessary. A high-end GPU like our GeForce RTX 2080 doesn’t need low-level tweaking to render more than 300 frames per second.
It took some charting of our performance results to notice that our CS:GO benchmarks averaged in the 200 FPS range with a hard cap at 300 FPS. To change that, we launched the game, opened its Game Settings menu, and checked the box for Enable Developer Console (~). We pressed the tilde key to open the console and typed fps_max 500 to raise the ceiling. After confirming higher frame rates, we set about optimizing graphics quality.
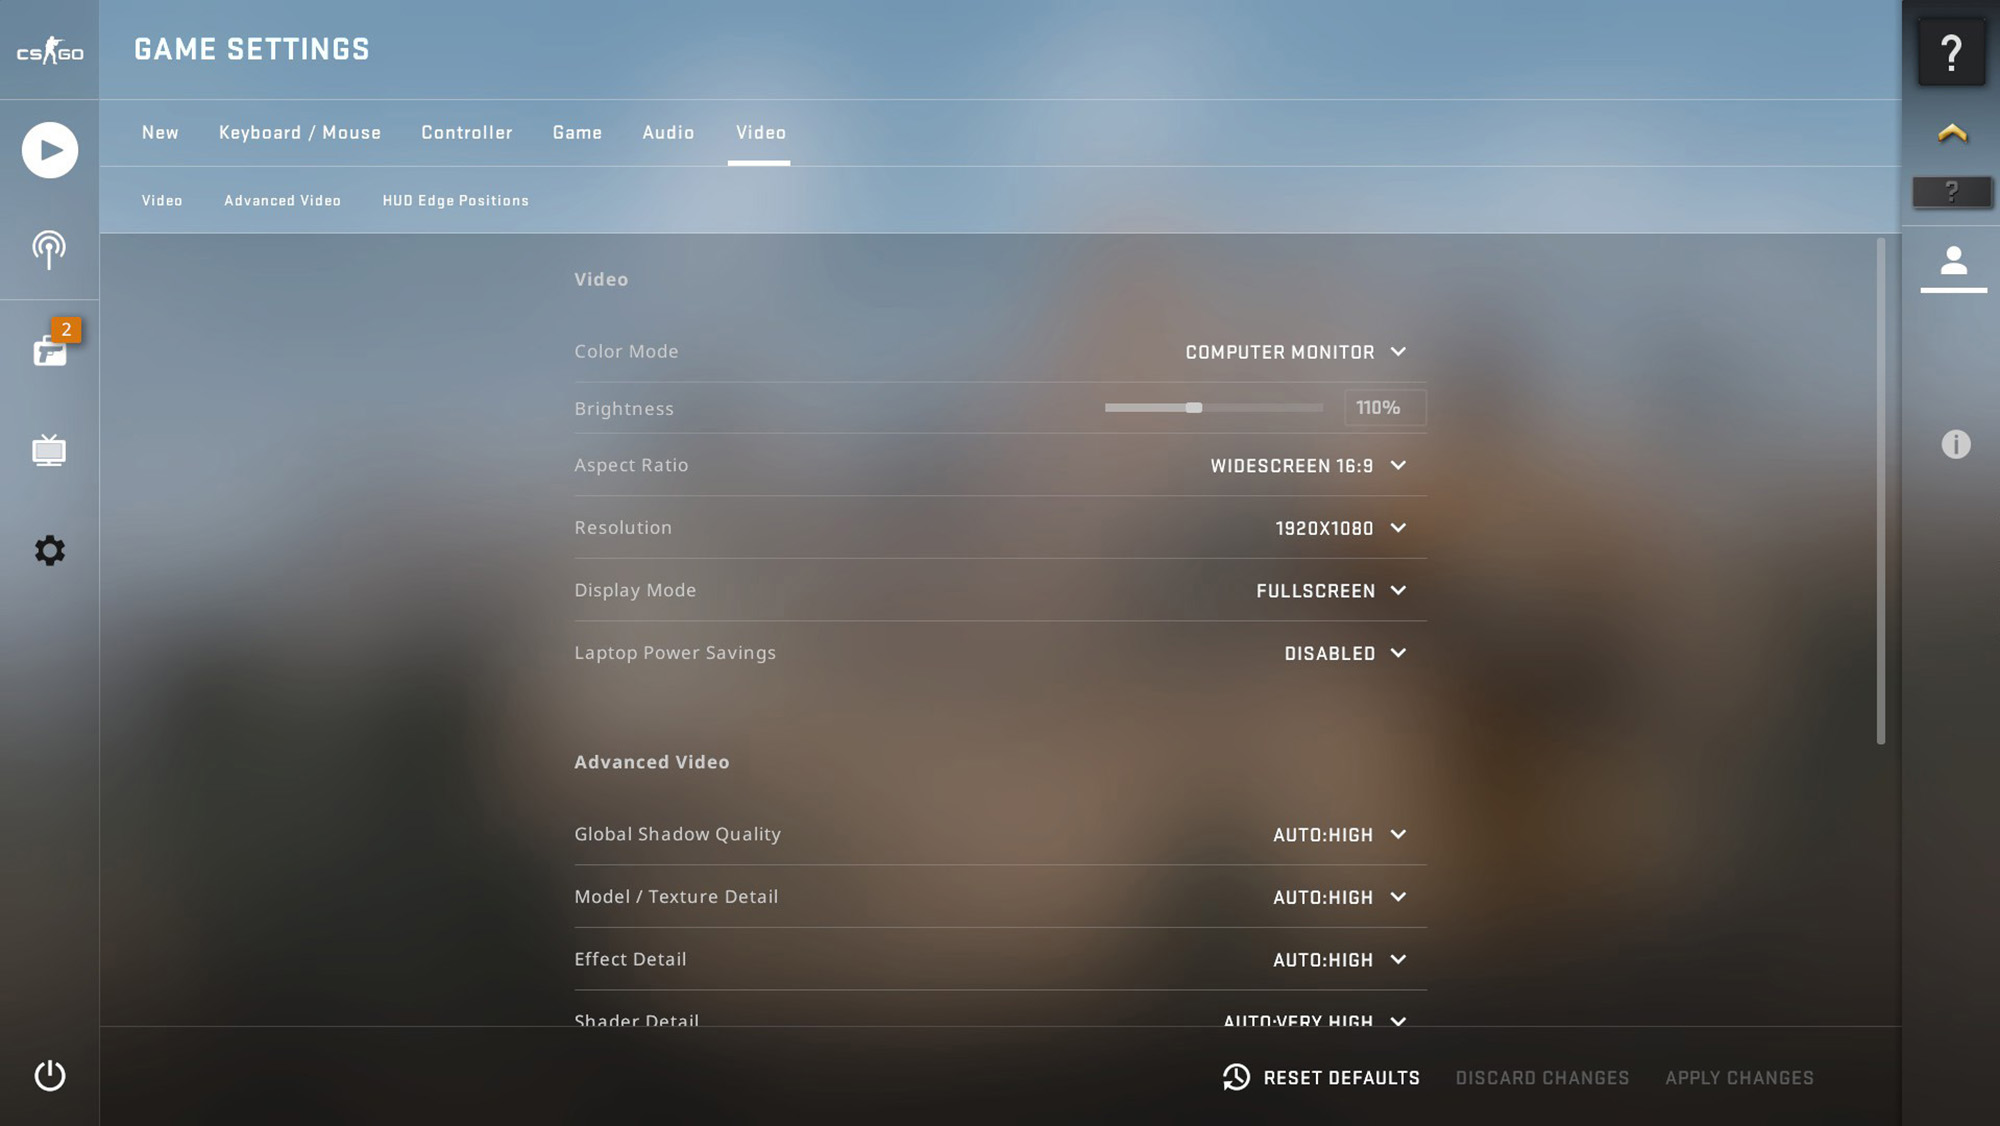
Counter-Strike offers lots of display, quality, and audio settings. When we started characterizing the game’s performance, we turned all of its details down, assuming that’s what it’d take to reach our target frame rate. But we were underestimating the platform’s potential. By the time we were done adjusting, we recorded an average frame rate of 355 FPS at 1920x1080 using High (or better) quality settings.
| Video Options - Counter-Strike: Global Offensive | |
| Color Mode | Computer Monitor |
| Brightness | 110% |
| Aspect Ratio | Widescreen 16:9 |
| Resolution | 1920x1080 |
| Display Mode | Fullscreen |
| Laptop Power Savings | Disabled |
| Advanced Video Options | |
| Global Shadow Quality | High |
| Model/Texture Detail | High |
| Effect Detail | High |
| Shader Detail | Very High |
| Multicore Rendering | Enabled |
| Multisampling Anti-Aliasing Mode | None |
| FXAA Anti-Aliasing | Disabled |
| Texture Filtering Mode | Trilinear |
| Wait for Vertical Sync | Disabled |
| Motion Blur | Disabled |
Competitive gamers don’t always want to use the most realistic options. Some settings become a disadvantage when points matter more than eye candy. For example, enabling Motion Blur affects fast crosshair movements, so you want to leave it turned off. Switching Global Shadow Quality to Low gets rid of scope blur and other distracting effects, but at the expense of shadow render distance. And enabling anti-aliasing may help resolve small details, albeit at a greater performance cost.
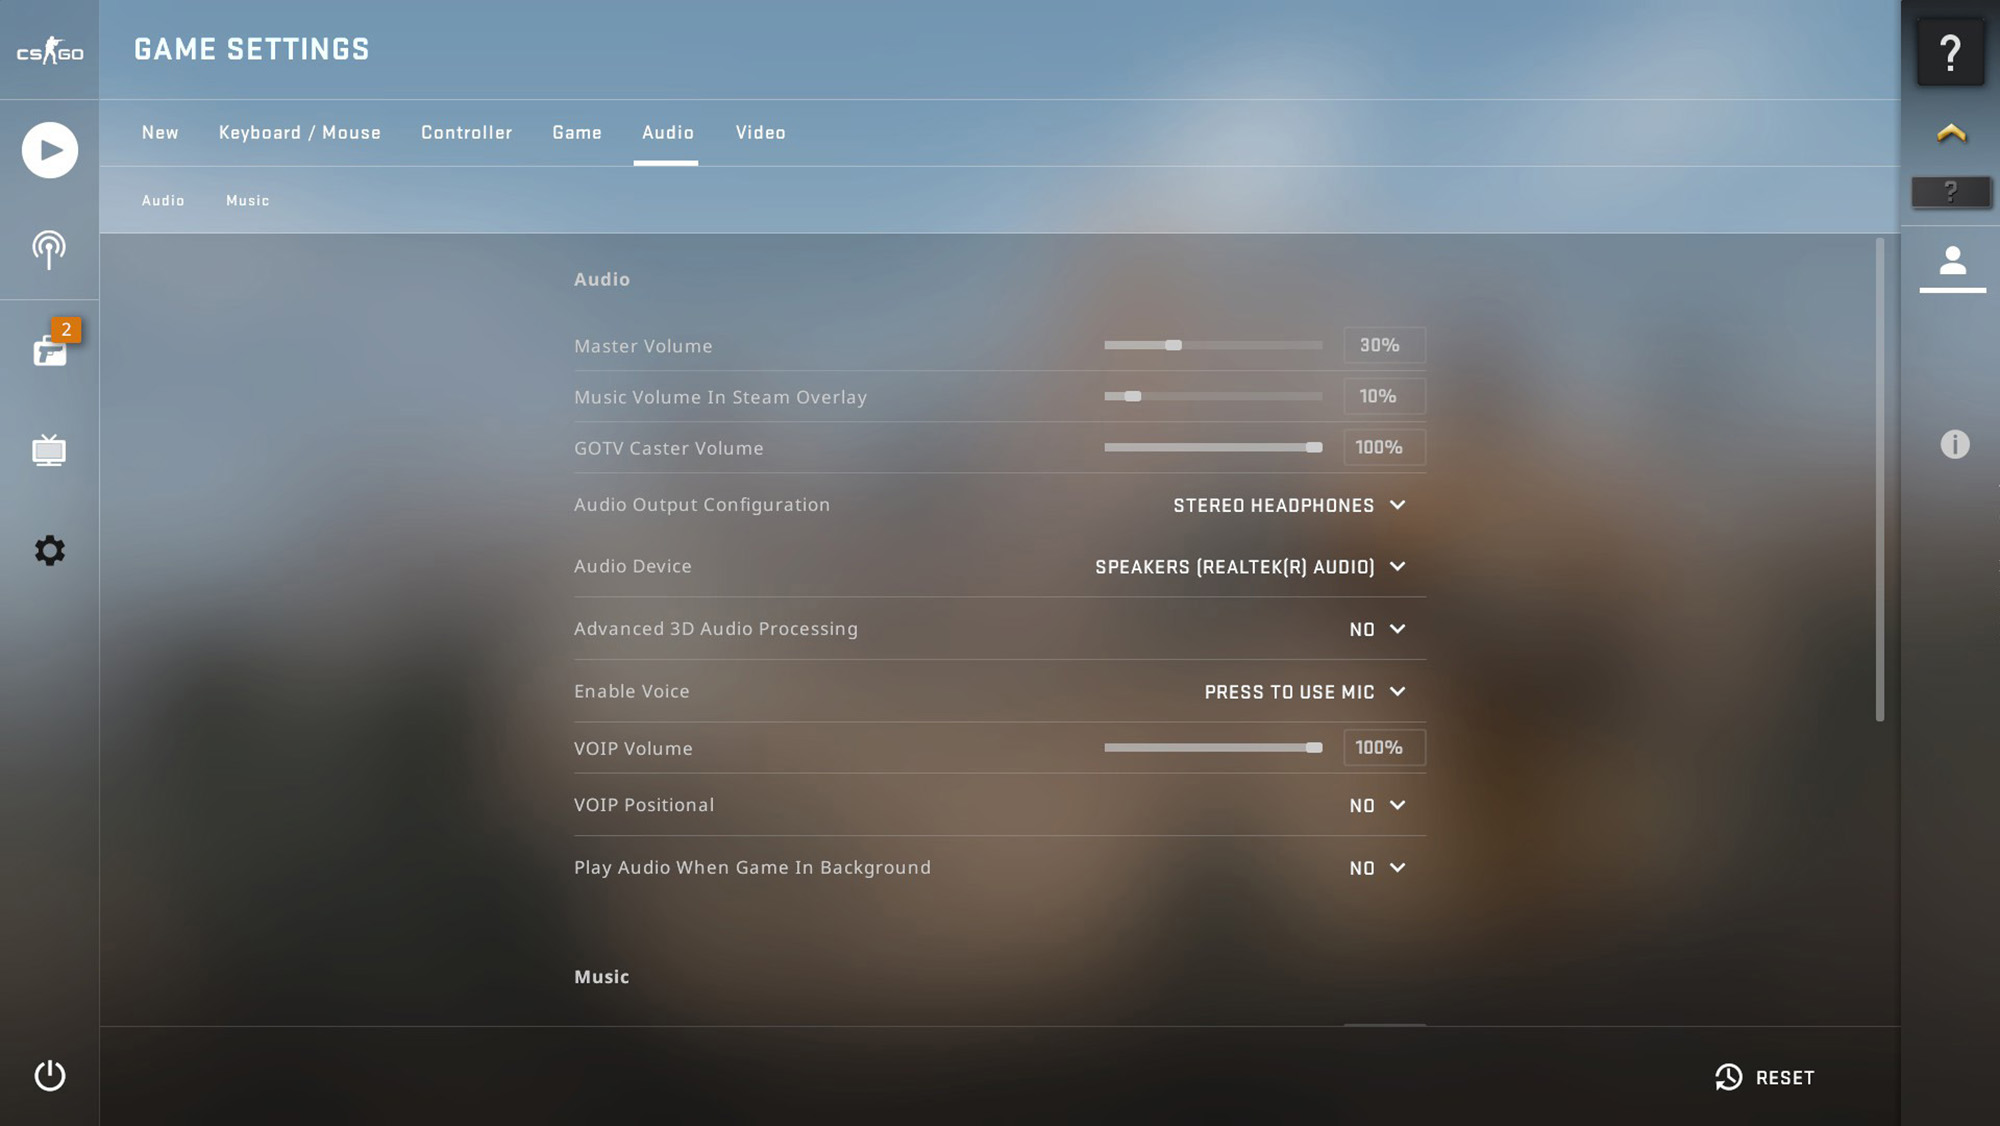
Now tab over to the Audio settings. Disable any of the music settings you find extraneous and make sure your Audio Device is set correctly. Stereo Headphones is the right choice for most aspiring competitive gamers. There’s an Advanced 3D Audio Processing option you may want to toy with, too. Some seasoned veterans swear it helps them pinpoint enemies in 3D space, while others prefer turning it off.
Step 4: It’s time to look at the data
Ultimately, we were able to dial in aggressive settings and still get the full benefit of our Zephyrus S GX701’s 300Hz panel at its native 1920x1080.
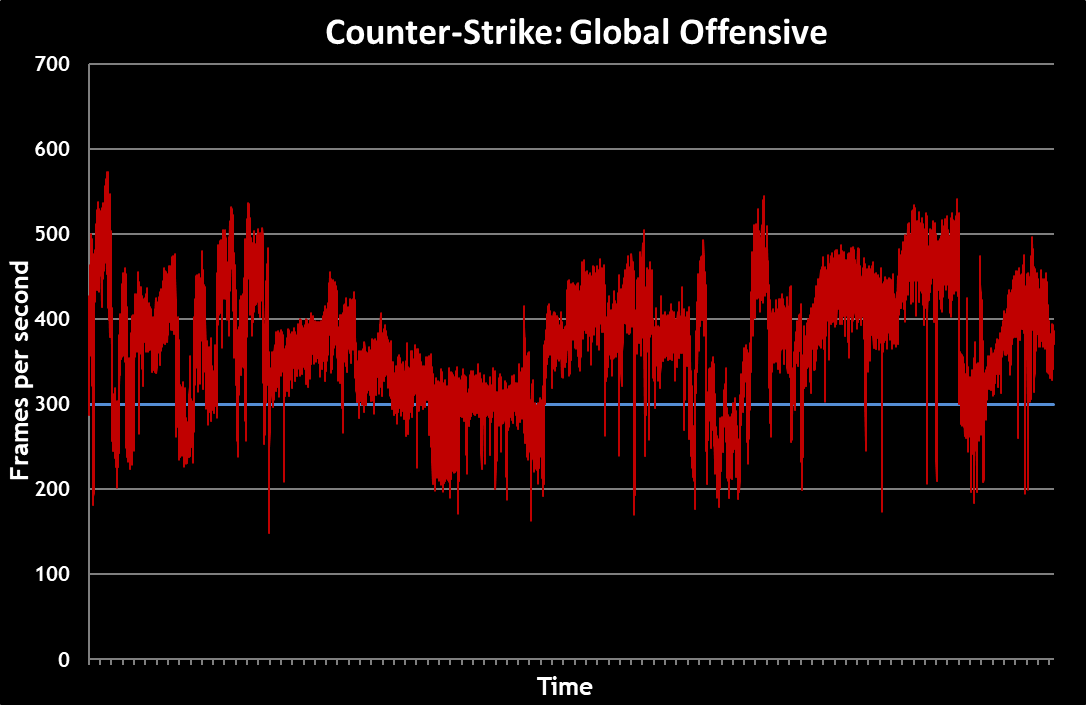
A handful of dips below 200 FPS and spikes in excess of 500 FPS put most of our game time in the 300-400 FPS range. Over 60 seconds of recording, that added up to more than 21,000 data points.
What’s the significance of those crazy frame rates in the context of a competitive first-person shooter? It’s all about smoothness and responsiveness. The easiest way to “feel” the effect of a 300Hz panel is to swap back and forth between its native refresh rate and 60Hz, the other setting available when you open NVIDIA’s Control Panel on our Zephyrus S GX701.
The 300Hz display fed by 300+ frames per second is silky-smooth. Running, strafing, jumping, spinning—it doesn’t matter. Every animation is crisp. There is no blur. There are no stutters or tearing artifacts as multiple frames show up in a single refresh. And there is no perceivable input lag.
Operate the same display at 60Hz with v-sync disabled, though, and CS:GO suddenly feels broken, even with NVIDIA’s GeForce RTX 2080 pumping more than 300 FPS through the graphics pipeline. Refreshing 20% as fast as the panel’s native rate just kills the perception of smoothness, even though the Zephyrus’ frame rate doesn’t change. It’s akin to gaming on a high-latency broadband connection, where characters skip around the screen with noticeable chop in their movement.
We’re adaptable creatures, so that sub-optimal experience becomes normal if it’s all you’re used to seeing. However, swapping back and forth between 300Hz and 60Hz is downright jarring, regardless of whether you consider yourself a professional or casual gamer. No wonder the first 144Hz panels were so popular. Stepping up to 240Hz is good for a 66% speed-up over those early 144Hz displays, and our 300Hz LCDs take the improvement to another level.
In CS:GO especially, the combination of a Core i7-9750H and GeForce RTX 2080 leaves plenty of headroom for applying anti-aliasing or anisotropic filtering. Our results are also good news for owners of Strix SCAR III and Zephyrus S GX502 notebooks with a GeForce RTX 2070 GPU. Both models have enough graphics horsepower to break the same 300 FPS barrier, particularly as you start relaxing some of the quality settings.
Getting the best performance possible from Overwatch
Overwatch is a much newer game than CS:GO. It debuted back in 2016 on the PC and has lots of granular graphics options for enthusiasts to adjust. But Overwatch also has to run well on the PlayStation 4, Xbox One, and Nintendo Switch. Blizzard’s proprietary game engine handles scaling from the Switch’s NVIDIA Tegra SoC to our GeForce RTX 2080 with aplomb, giving us plenty of room to optimize for a 300Hz refresh rate.
Steps 1 and 2: once again, with feeling
Prepping for a positive experience in Overwatch isn’t much different from what we did to ready our Zephyrus S GX701 for CS:GO. Again, you’ll want to configure your laptop for maximum performance. Disable power-saving features that add latency as they throttle clock rates and put certain pieces of silicon to sleep. We used the Armoury Crate application, which is mapped to the ROG logo key above our sample’s trackpad, and specified the Turbo profile.
Next, we double-checked that NVIDIA hadn’t released new drivers for our GeForce RTX 2080, verified that our monitor settings were still set to 1920x1080 and 300Hz, and made sure that the options under Manage 3D settings in NVIDIA Control Panel were unchanged.
Easy enough, right? It’s time to get Overwatch ready for some incredibly smooth frame rates.
Step 3: Tuning Overwatch for maximum performance
Anticipating that a newer game would be more demanding, and consequently run at lower frame rates than CS:GO, we started probing performance in Overwatch with its Graphics Quality preset at Low. We expanded the Advanced menu and manually specified a 100% Render Scale. We also changed the Limit FPS drop-down menu to Custom and set its Frame Rate Cap slider to 300. All those changes required restarting Overwatch, so we closed the game completely for this next step.
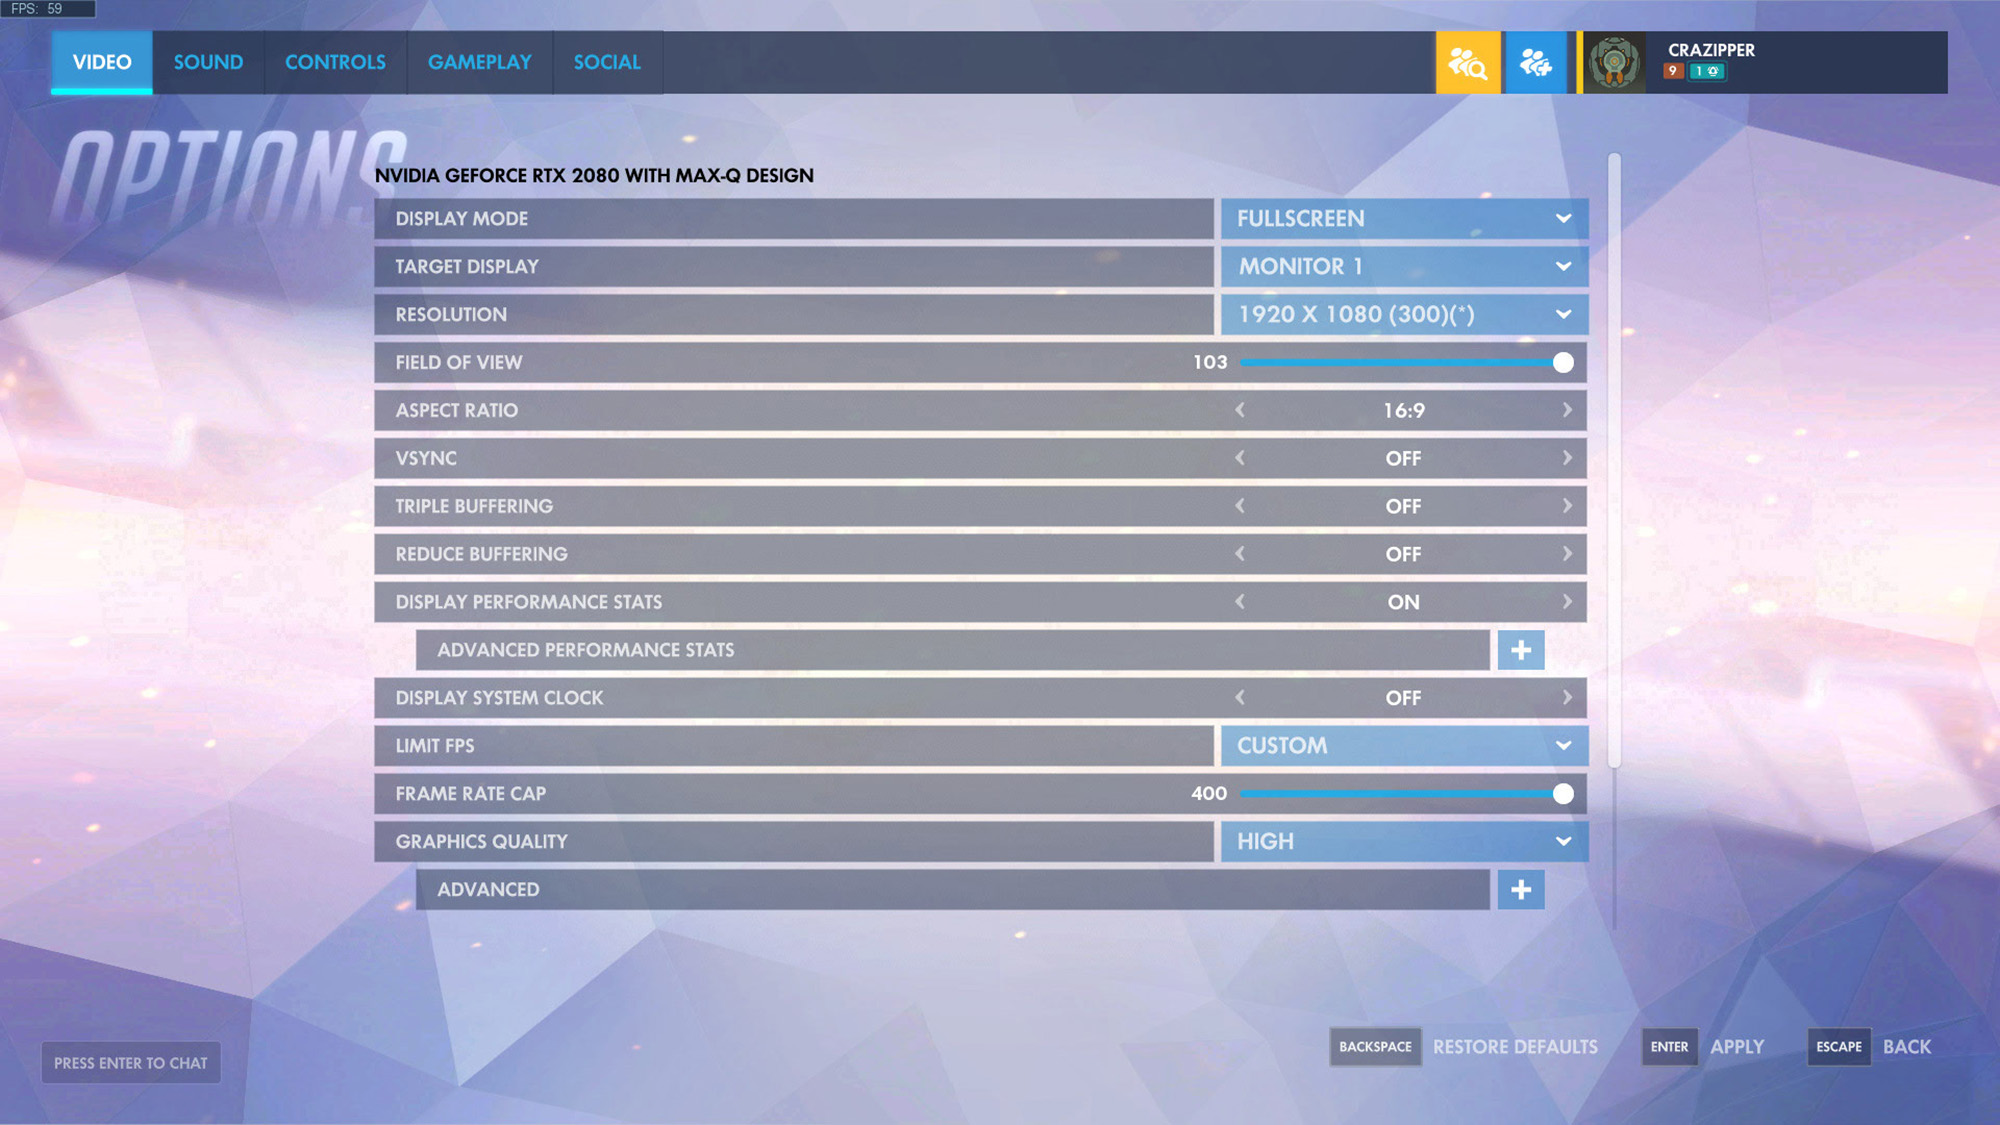
Obviously, a 300 FPS ceiling isn’t ideal for going above and beyond the GX701’s 300Hz refresh rate. And that cap is as high as the game goes by default. But if you navigate over to your Documents\Overwatch\Settings\ folder and open the Settings_v0.ini file using Notepad, you’ll see a [Render.13] header. Paste FrameRateCap = "400" under that header. Or, if FrameRateCap already exists, change its value to 400. Beware, though: every time you open the Video pane in Overwatch’s Options menu, you’ll have to reset that FrameRateCap flag, else it’ll revert to 300. Save the file, close it, and start Overwatch back up again.
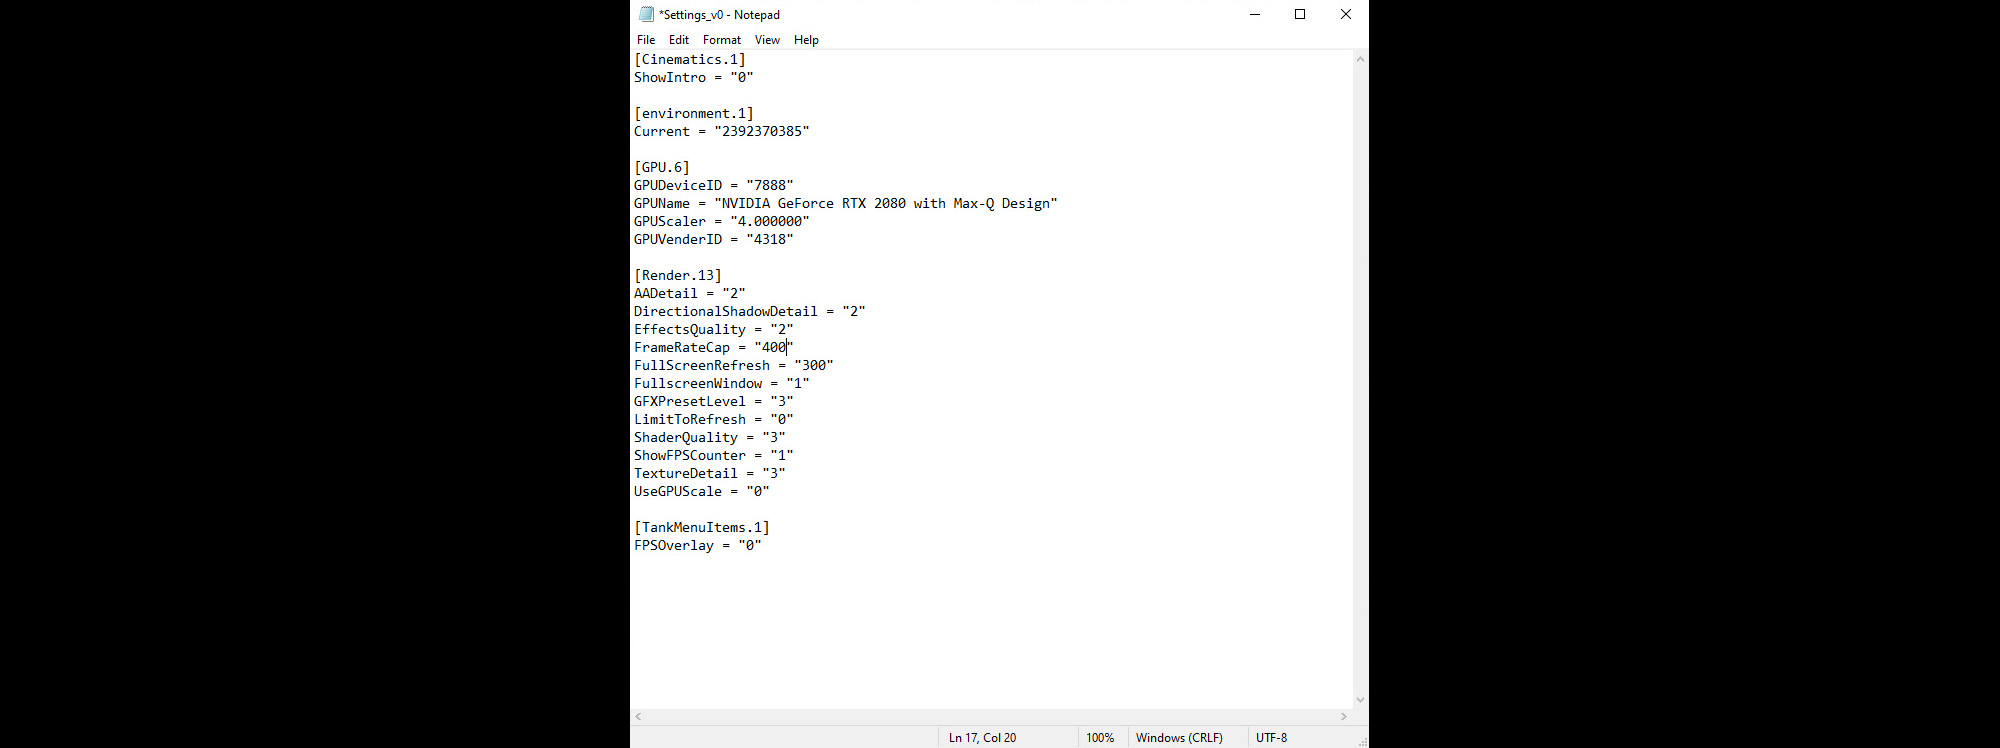
In the case of our Zephyrus S GX701, one test run after another returned frame rates pegged at 400 FPS, so we knew we had room to dial in better-looking details. And since the Medium-quality global preset gave us the same 400 FPS, we pushed the Graphics Quality drop-down to High. An average of 333 FPS was great for what we wanted to see, though it’d be perfectly understandable if you wanted to stay with Medium for higher performance.
| Video Options - Overwatch | |
| Display Mode | Fullscreen |
| Target Display | Monitor 1 |
| Resolution | 1920x1080 (300) |
| Field of View | 103 |
| Aspect Ratio | 16:9 |
| Vsync | Off |
| Triple Buffering | Off |
| Reduce Buffering | Off |
| Display Performance Stats | On |
| Display System Clock | Off |
| Limit FPS | Custom |
| Frame Rate Cap | 400 |
| Graphics Quality | High |
| Advanced | |
| Render Scale | 100% |
| Texture Quality | High |
| Texture Filtering Quality | High - 4x |
| Local Fog Detail | High |
| Dynamic Reflections | Low |
| Shadow Detail | Medium |
| Model Detail | Medium |
| Effects Detail | Medium |
| Lighting Quality | High |
| Antialias Quality | Medium - SMAA Low |
| Refraction Quality | High |
| Screenshot Quality | 1x Resolution |
| Local Reflections | On |
| Ambient Occlusion | On |
Step 4: Another round with the data
As with CS:GO, the frame rates you see in Overwatch depend heavily on whether you’re running around indoors or outdoors. The 60-second sequence we charted involved a mix of city streets, courtyards, and storefronts, with varying numbers of enemies and allies battling each other
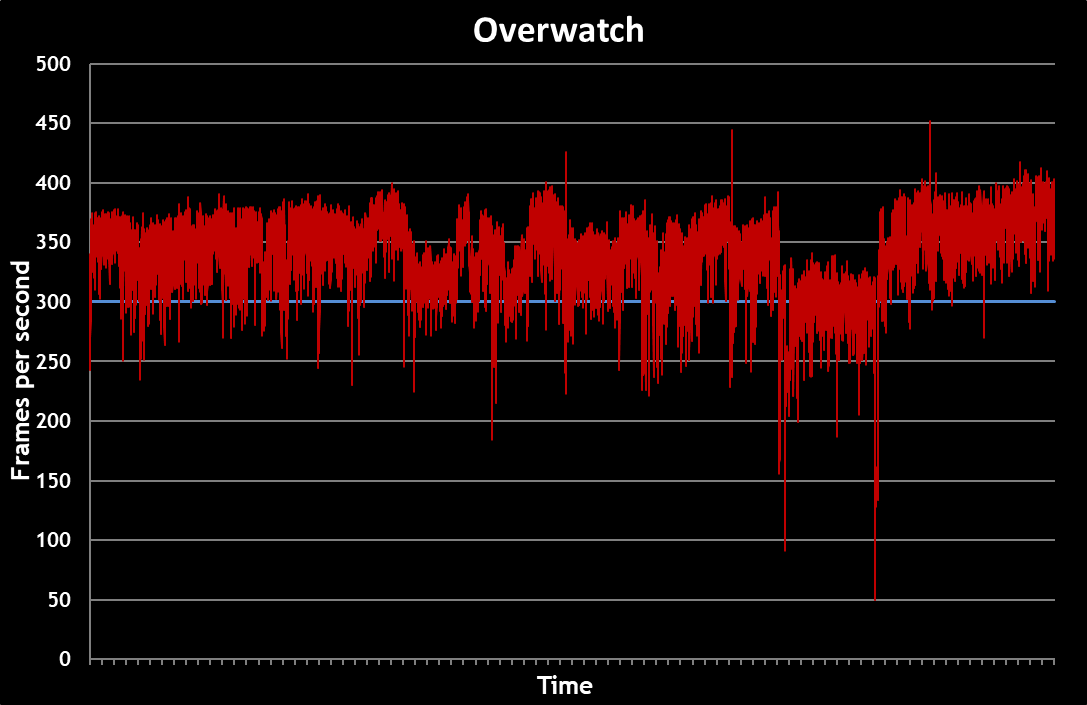
Averaging 333 FPS is no minor feat at one of this game’s most demanding detail levels. Those instantaneous blips below 100 FPS late in my test run didn't even register during the match. I ran around and enjoyed the most fluid motion I've ever seen in this game, thanks to the Zephyrus S GX701’s flagship graphics processor and bleeding-edge 300Hz panel.
Switching over to a 60Hz refresh rate was far less satisfying. Overwatch’s bright colors and cartoony design make screen tearing unbearable at such a high frame rate, almost forcing you to use v-sync. But even turning v-sync on doesn’t make Overwatch look smooth at 60Hz. Tearing is less problematic (though not altogether solved), and the game’s input lag doesn’t get noticeably worse with the feature enabled. But there’s just no way to compensate for cutting the refresh rate by 80%. A 60Hz panel simply cannot get new information on-screen fast enough to rival the smoothness of a 144Hz or 240Hz display, never mind our new 300Hz flagship.
Getting the best performance possible from Tom Clancy’s Rainbow Six Siege
CS:GO and Overwatch are fast-paced first-person shooters, but Rainbow Six Siege is more tactical in nature. That means gamers are encouraged to strategize with each other using their headsets. Long-term support from Ubisoft keeps Rainbow Six Siege fresh. The company releases four new operations per year that include maps, playable characters, and equipment.
The development team is clearly doing something right. Rainbow Six Siege is one of the most-played games on Steam right now. Moreover, the ESL’s Rainbow Six Pro League attracts teams from all over the world, competing for hundreds of thousands of dollars in prize money each season. With that kind of cash on the line, it’d behoove you to get maximum performance from your PC.
Steps 1 and 2: Stick to the fundamentals
The same principles that got us ready to play CS:GO and Overwatch guide our Rainbow Six Siege configuration. We want the highest frame rates possible, so we turn off any software-based features that might cause our hardware to throttle. Again, set Windows to use its High performance power plan, or open the Armoury Crate utility and click the Turbo profile.
Maximizing CPU clock rates is especially important because Rainbow Six Siege’s AnvilNext 2.0 game engine is optimized for multi-core CPUs. In fact, the developer posted a blog about high CPU usage and how to address it. In our case, we want to leave v-sync disabled to keep Rainbow Six running as fast as possible, so it’s more than likely that Rainbow Six Siege will become CPU-bound Pegging the Core i7-9750H’s six cores at frequencies above 4GHz helps minimize bottlenecks that’d otherwise prevent NVIDIA’s GeForce RTX 2080 from realizing its potential.
Once more, we checked for new graphics drivers, verified that our panel was set to 1920x1080 and 300Hz, and gave NVIDIA’s Control Panel options a once-over. A couple of Reddit threads recommended changing “Maximum pre-rendered frames” to 1, so we made a small adjustment there.
Step 3: Tuning Rainbow Six Siege for maximum performance
Ubisoft’s aforementioned blog post suggested editing the gamesettings.ini file to enforce a frame rate limiter, preventing 100% CPU usage. The idea was that capping Rainbow Six Siege’s FPS would keep the game engine from leaning so hard on compute resources, freeing the CPU and GPU for other background tasks. We don’t want that, though. Rather, we want to be sure there are no constraints. We want the highest frame rates possible, allowing the Zephyrus S GX701’s ultra-fast GPU and 300Hz display to work as fast as they’re able.
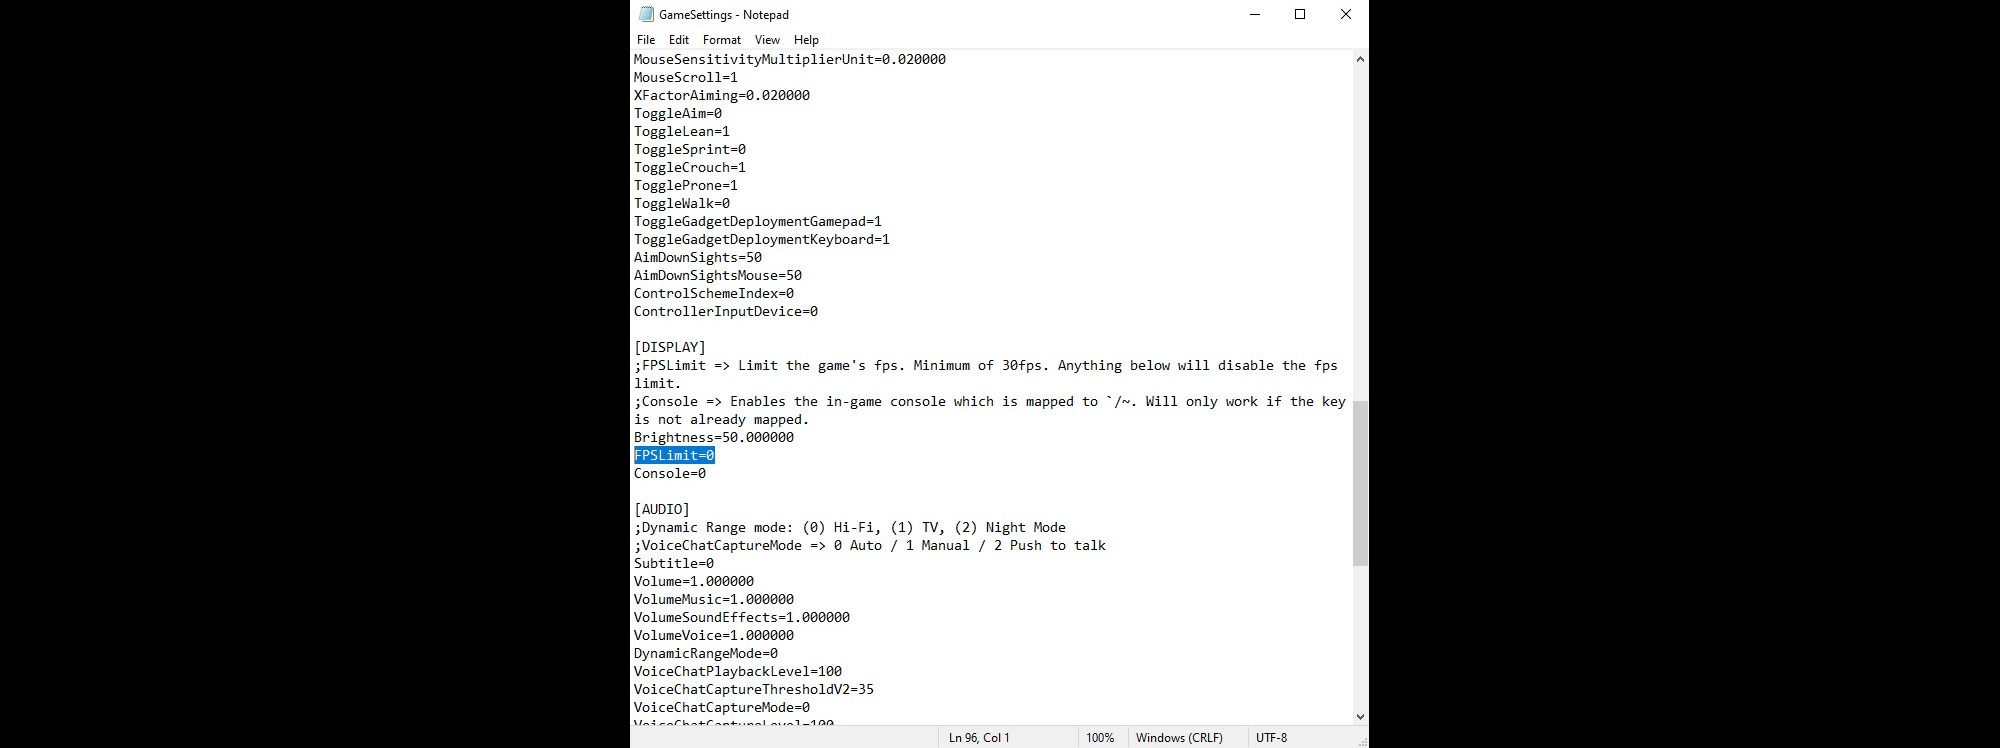
Instead of imposing a frame rate cap, let’s tell the game not to limit performance at all. After you’ve started Rainbow Six Siege at least once, open your Documents\My Games\Rainbow Six – Siege\{ID number}\ folder and double-click GameSettings.ini. Scroll down to the [DISPLAY] header and make sure FPSLimit is set to 0. Save the file and launch Rainbow Six Siege.
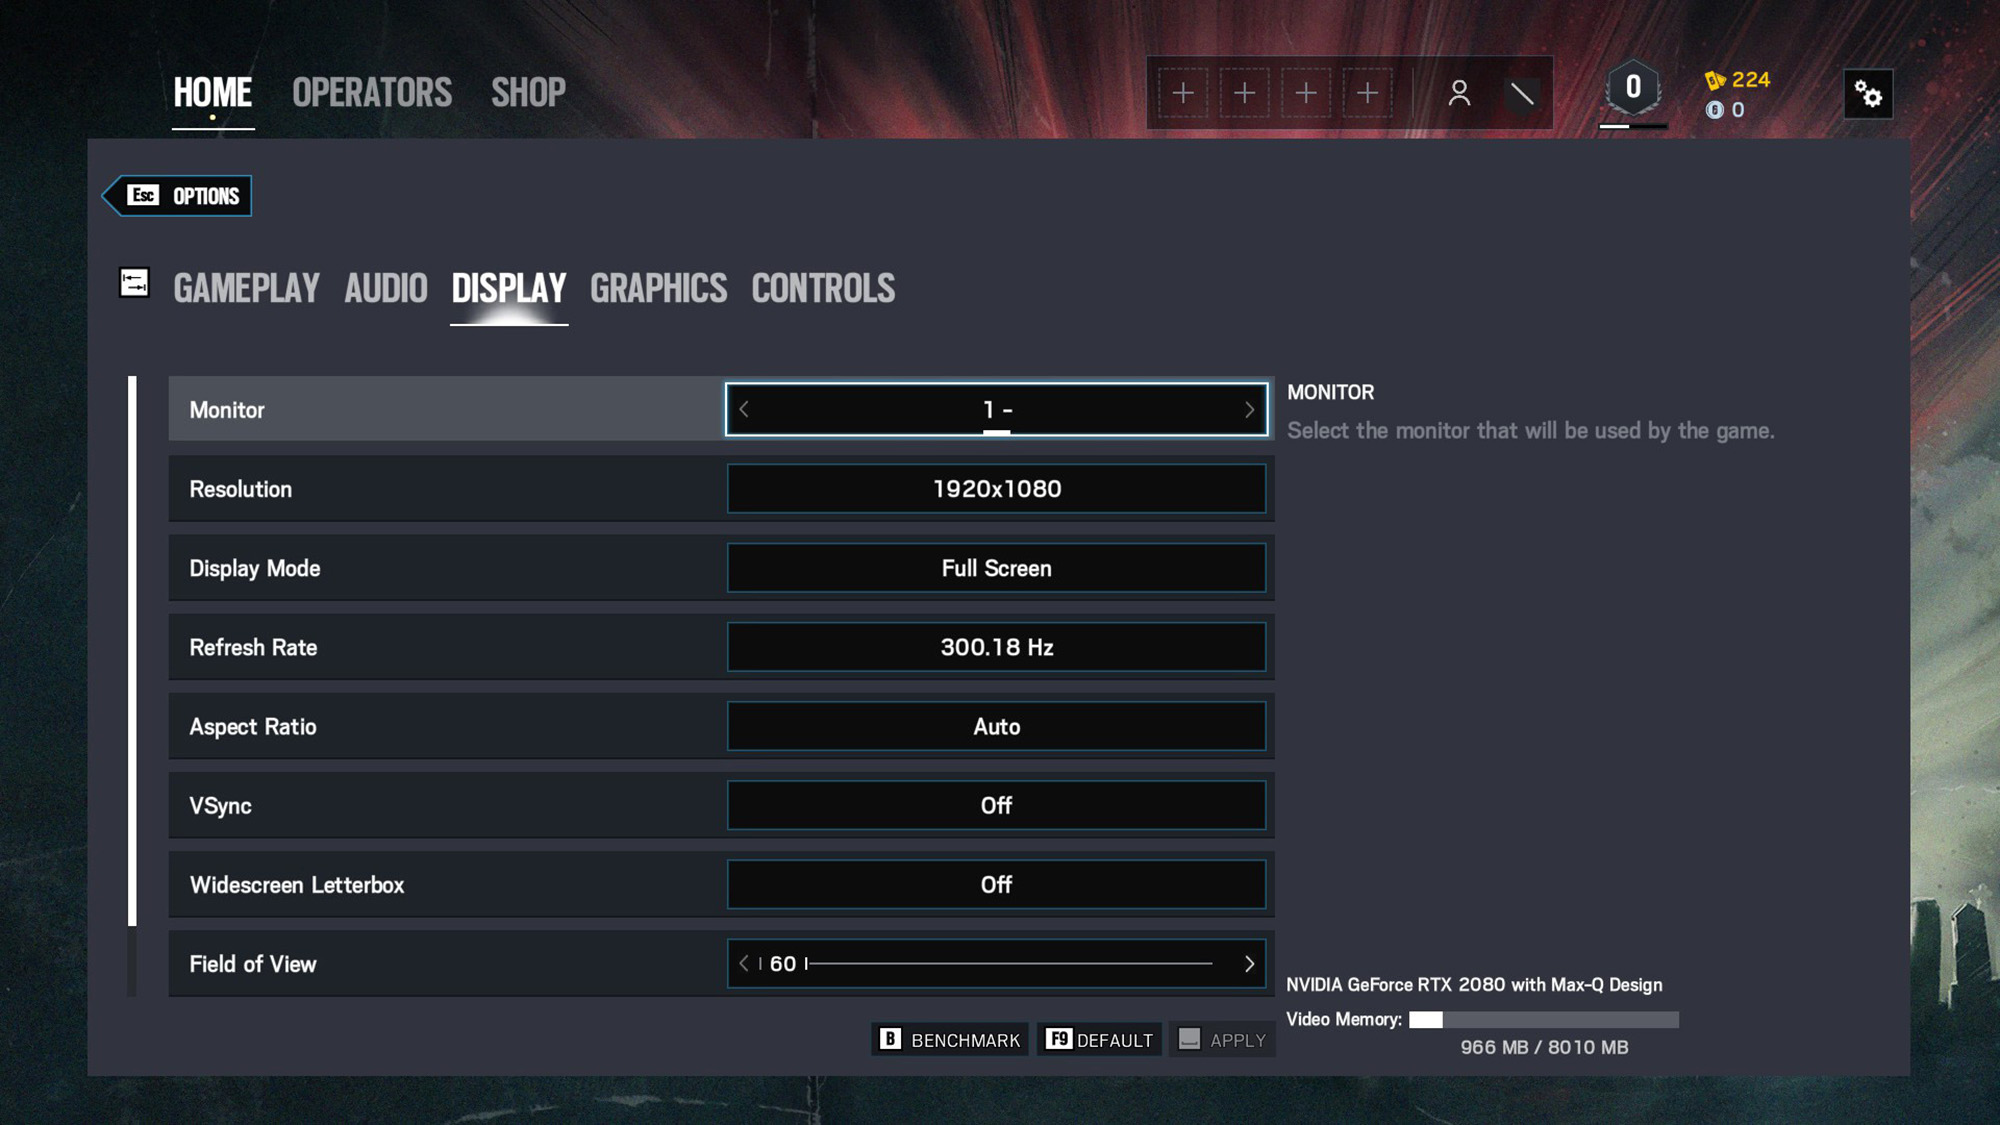
Open the Options menu in the upper right-hand corner. Tab over to the Display menu and review its defaults. You may have to specify your panel’s refresh rate and disable VSync. There is a built-in benchmark that’s accessible through the Display menu, which did seem to mirror in-game performance. However, our test runs come from real gameplay.
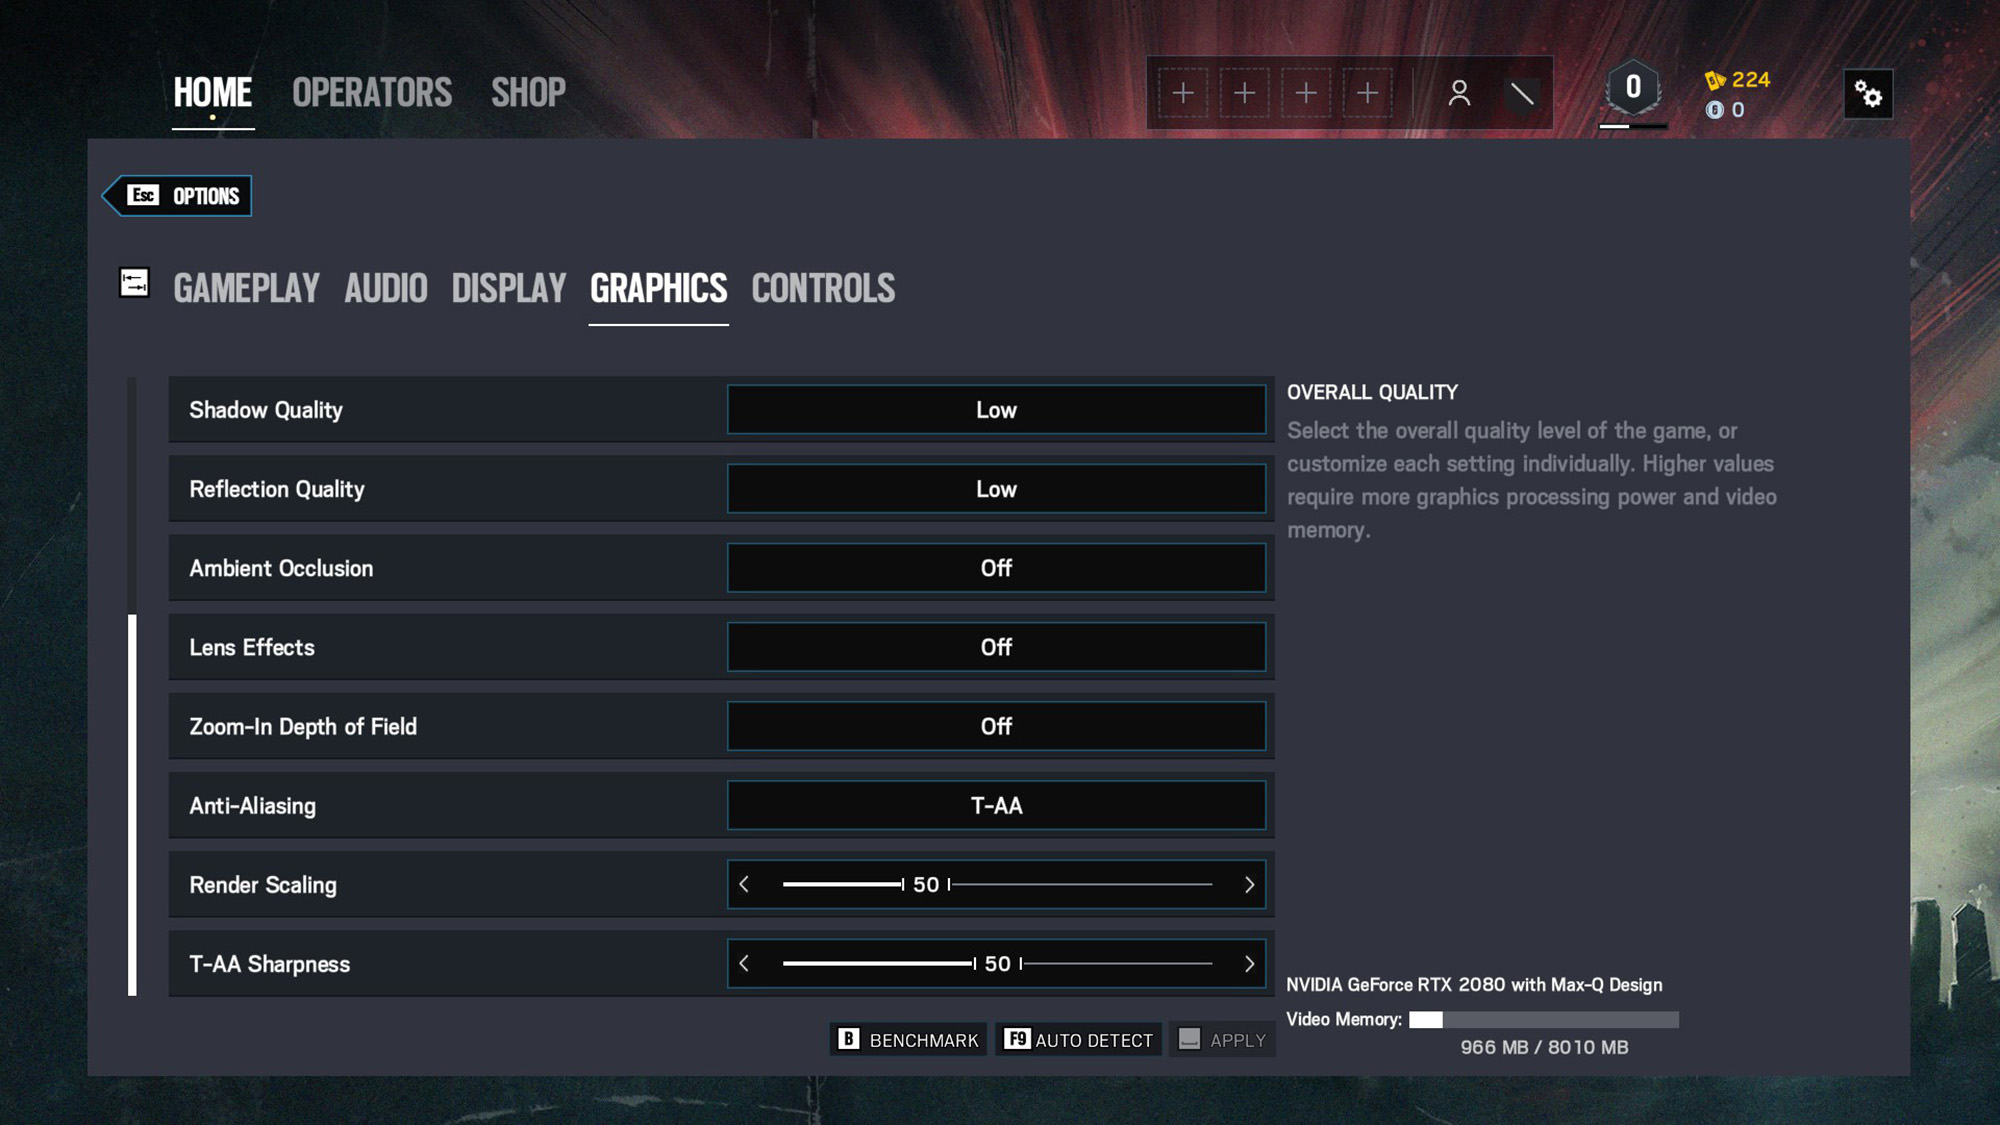
Now jump over to the Graphics menu. Because Rainbow Six Siege does run at lower frame rates than CS:GO or Overwatch, we set the Overall Quality slider to Low and left it there. Fortunately, even those baseline settings look remarkably good.
| Display Options - Rainbow Six Siege | |
|---|---|
| Monitor | 1 |
| Resolution | 1920x1080 |
| Display Mode | Full Screen |
| Refresh Rate | 300.18 Hz |
| Aspect Ratio | Auto |
| Vsync | Off |
| Widescreen Letterbox | Off |
| Field of View | 60 |
| Graphics Options | |
| Overall Quality | Low |
| Texture Quality | Low |
| Texture Filtering | Linear |
| LOD Quality | Low |
| Shading Quality | Low |
| Shadow Quality | Low |
| Reflection Quality | Low |
| Ambient Occlusion | Off |
| Lens Effects | Off |
| Zoom-In Depth of Field | Off |
| Antialiasting | T-AA |
| Render Scaling | 50 |
| T-AA Sharpness | 50 |
Step 4: Data tells all
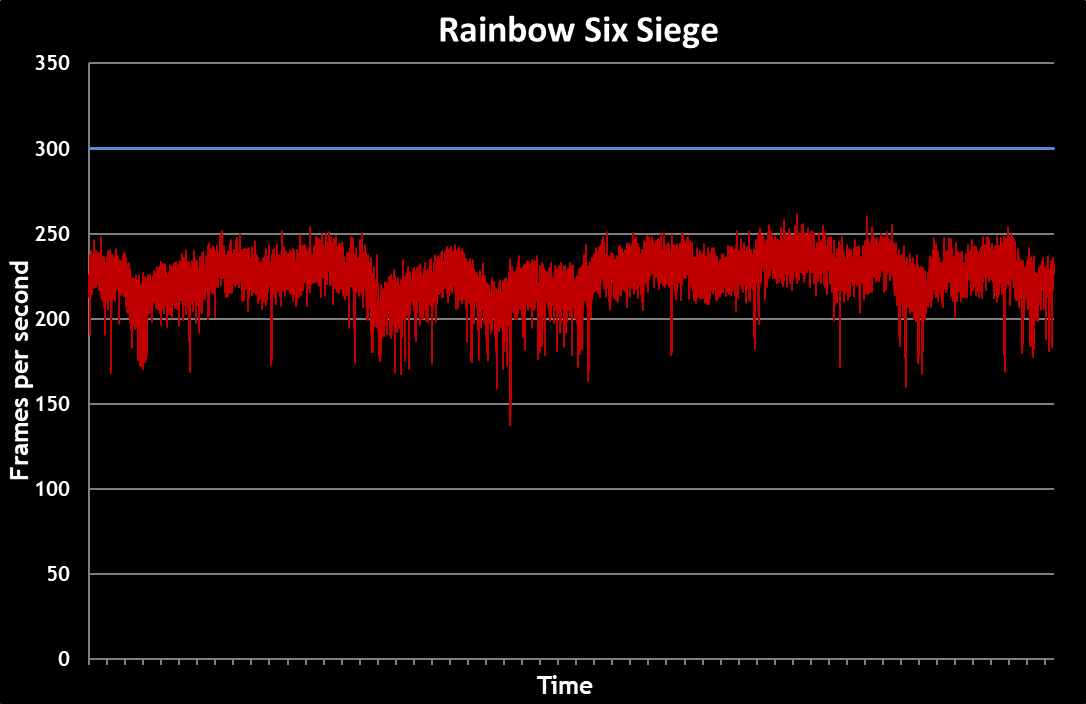
The performance range we observed through our 60-second benchmark was relatively narrow. That’s good news for fans of consistency. Dips down to about 140 FPS were still super-smooth, while spikes above 250 FPS exceeded what most high-end LCDs can display. Only our GX701’s 300Hz display can keep up.
Subjectively, tactical games like Rainbow Six Siege put a lot of pressure on a gamer’s reaction time. Breaching doors and turning corners happens without a single hitch or stutter with an average frame rate above 220 FPS. But then your eyes must adapt to whatever’s happening in the room. Is there an enemy hiding behind a desk? Is there a friendly you need to avoid shooting? In either case, a six-core CPU, flagship graphics processor, and 300Hz panel offer as much advantage as you can legally get in competitive play.
In comparison, setting the display back to 60Hz becomes a big impediment. So many frames are rendered for each refresh that screen tearing is quite palpable. The effect is distracting enough to negatively affect performance. I fared quantifiably worse in Rainbow Six Siege with a 60Hz refresh rate, even in the game’s AI-driven Scenarios. It took longer for me to adjust after running into a room with one or two baddies ready for an ambush. By the time everything came into focus, I was getting hit with multiple shots before I could neutralize the threat. Over the course of an entire mission, those handfuls of health turned into a higher rate of failure compared to my attempts with a 300Hz refresh.
This game’s tactical nature shows that it doesn’t matter if you’re running and gunning or creeping around terrorist-infested condominiums—high frame rates and a fast refresh are complementary components of a balanced graphics subsystem. Professionals gain a leg up on the competition thanks to unmatched fluidity, while casual gamers are treated to an experience that’s simply more enjoyable.
Getting the best performance possible from Rocket League
Although it takes time to perfect the mechanics of vehicular soccer, the genre has a devoted following. Tens of thousands of gamers keep Rocket League among the top titles on Steam, while regular tournaments encourage excellence with high-dollar prizes.
As with any other competitive game, high frame rates and a responsive display become real advantages against players on slower systems fighting through choppy animation. The hardware in our Zephyrus S GX701 pushes this game to its limit—well beyond what a 240Hz panel can display—for the smoothest experience available.
Straight to step 3: Get to the good stuff
There’s no reason to rehash the first couple of steps we took in the last couple games we've examined. Your PC should already be optimized by now. If it’s not, jump back to our Counter-Strike: Global Offensive walk-through where we discuss disabling power-saving features, tuning clock rates, updating drivers, and configuring graphics options.
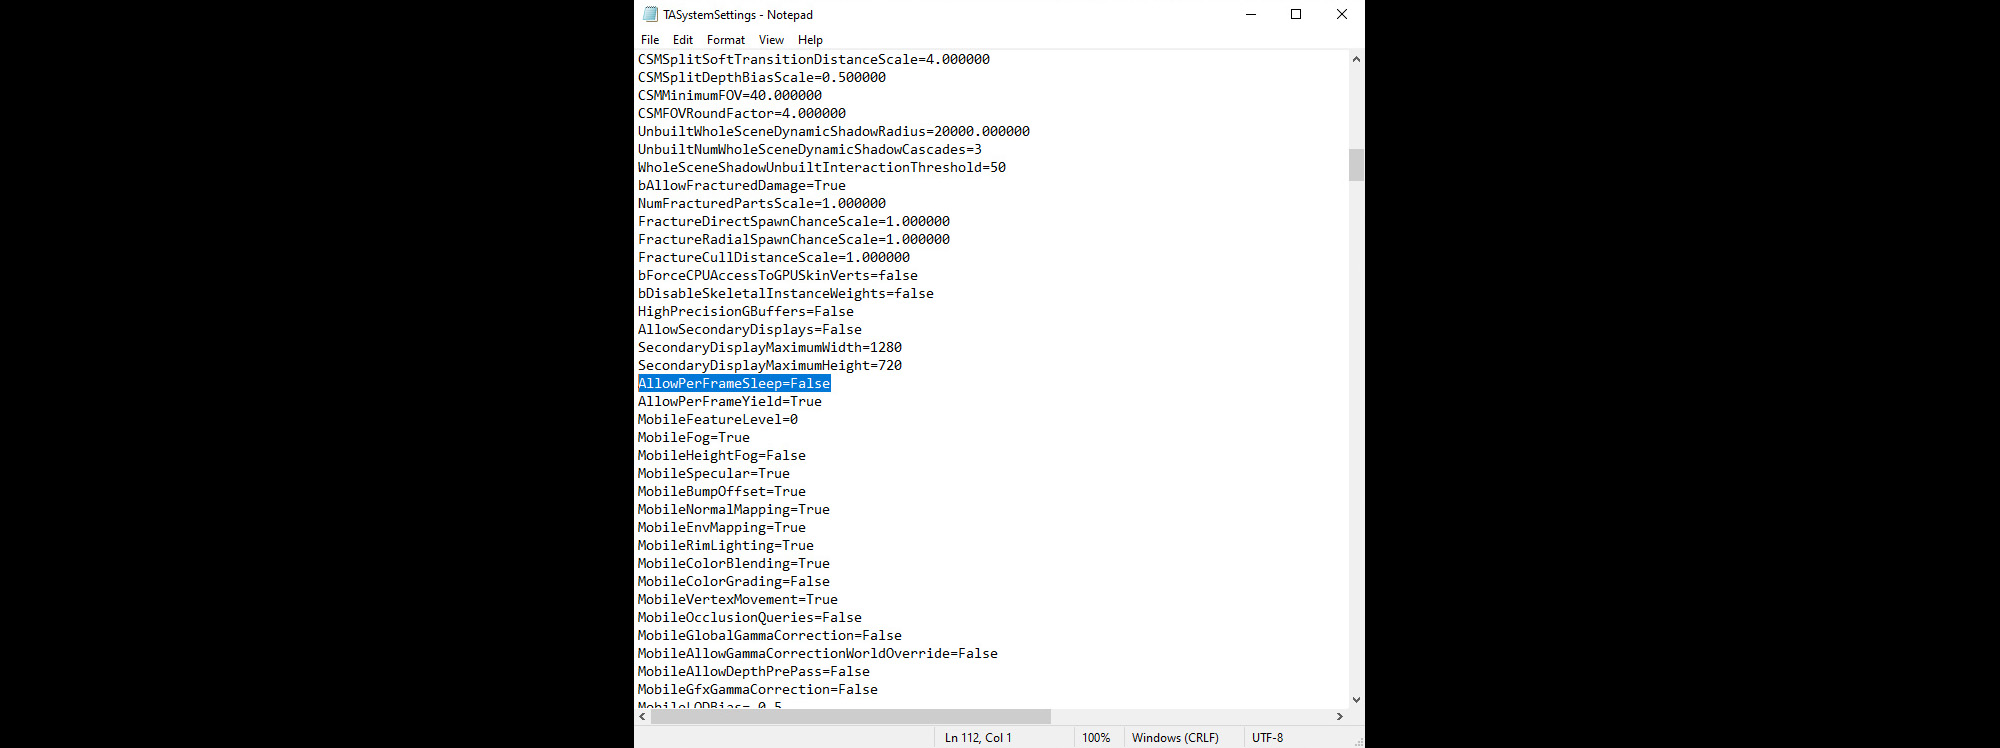
Once you’ve handled the housekeeping, open your Documents\My Games\Rocket League\TAGame\Config\ folder and double-click the TASystemSettings.ini file. Scroll down until you find AllowPerFrameSleep and make sure it’s set to =False. This uncaps the game’s frame rate.
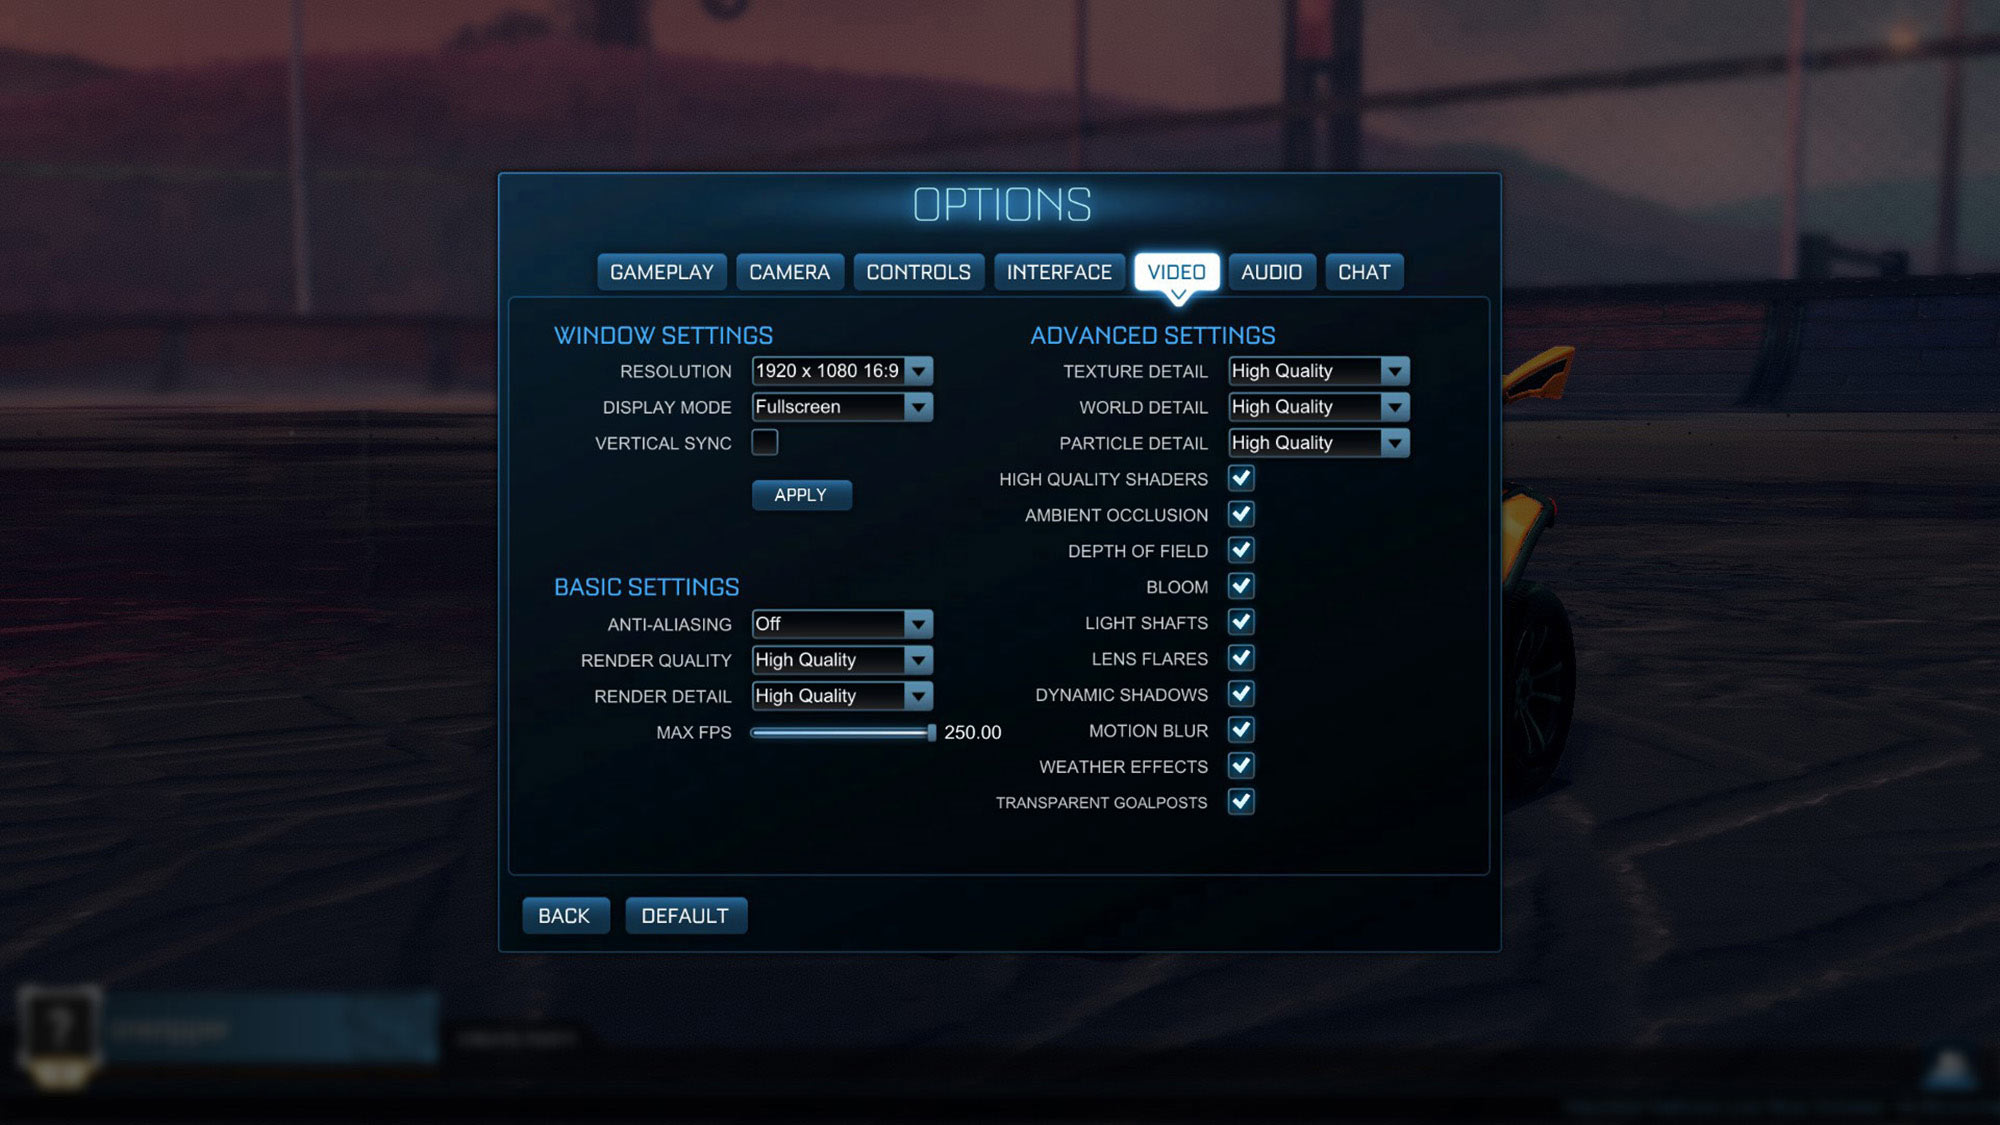
Next, fire up Rocket League and open the game’s Options menu. Make sure you’re running at your display’s native resolution in Fullscreen mode with Vertical Sync turned off. Under Basic Settings, set Render Quality and Render Detail to High. This is an Unreal Engine 3-based game, so it should serve up fast frame rates, even with a better-looking quality present in place.
| Windows Settings - Rocket League | |
| Resolution | 1920x1080 |
| Display Mode | Fullscreen |
| Vertical Sync | Unchecked |
| Basic Settings | |
| Anti-aliasing | Off |
| Render Quality | High Quality |
| Render Detail | High Quality |
| Max FPS | 250.00 |
| Advanced Settings | |
| Texture Detail | High Quality |
| World Detail | High Quality |
| Particle Detail | High Quality |
| High Quality Shaders | ✓ |
| Ambient Occlusion | ✓ |
| Depth of Field | ✓ |
| Bloom | ✓ |
| Light Shafts | ✓ |
| Lens Flares | ✓ |
| Dynamic Shadows | ✓ |
| Motion Blur | ✓ |
Step 4: Scoring a goal with high-end hardware
An average frame rate right around 250 FPS suggests that Rocket League is abiding by the game’s cap. However, charting out performance over time reveals a much more dynamic situation.
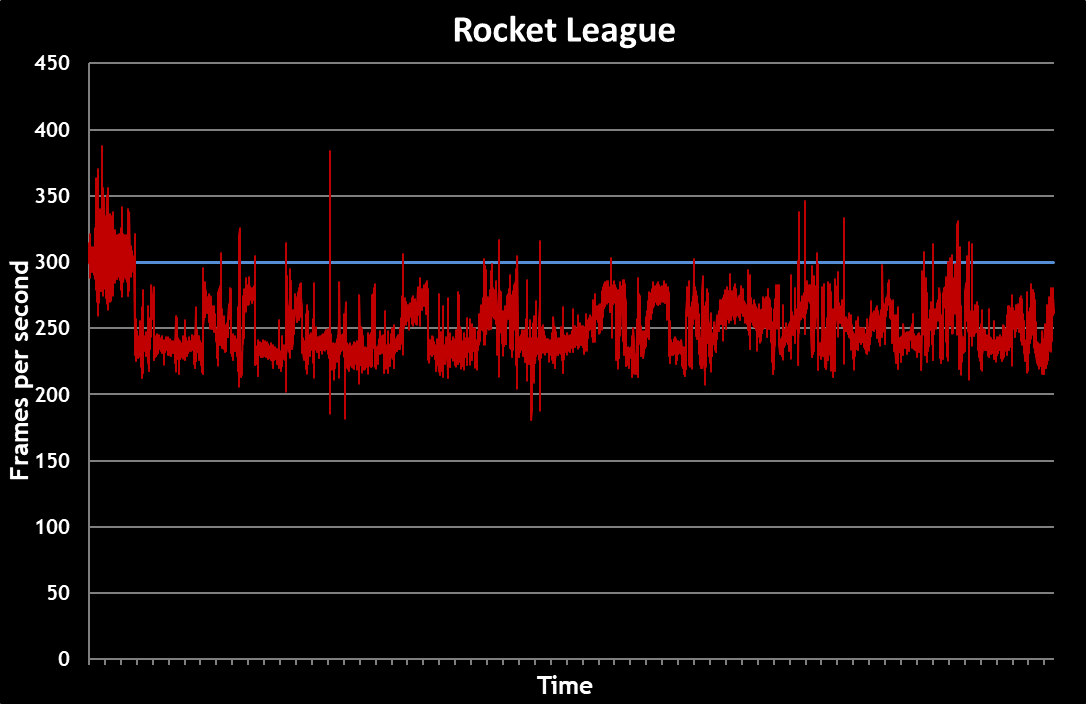
Rocket League drops to 180 FPS at its very lowest. If you’re using a 144Hz screen, it’ll refresh at a slower rate than the GeForce RTX 2080 GPU’s minimum performance level. At the top end, spikes above 350 FPS ensure that our 300Hz panel is being used to its potential. Dial back Rocket League's settings a bit from the High presets we used, and you'll experience an average frame rate closer to 300 FPS or more.
Even with the test settings we chose, the benefit of those screaming frame rates is most apparent as you spin the camera and maneuver around the ball. A 300Hz panel with snappy pixel response keeps the animation—particularly the stands of each stadium you play in—especially fluid and clear. It’s easy to track where you are on the field when fast-moving objects stay crisp.
At 60Hz, that’s not the case. Flip a 180 to catch up with a ball that flew past, and the background gets blurry, even with the GeForce RTX 2080 rendering at hundreds of frames per second. It’s truly disorienting. The high-refresh display eliminates this artifact.
Given that satisfying range of performance and the capable platform we’re testing, competitive Rocket League players can help themselves to the smoothest experience possible on our ROG Zephyrus S GX701 as they flick their cameras around to survey the field before getting into position or jumping for a block.
Arm yourself with the tools to succeed
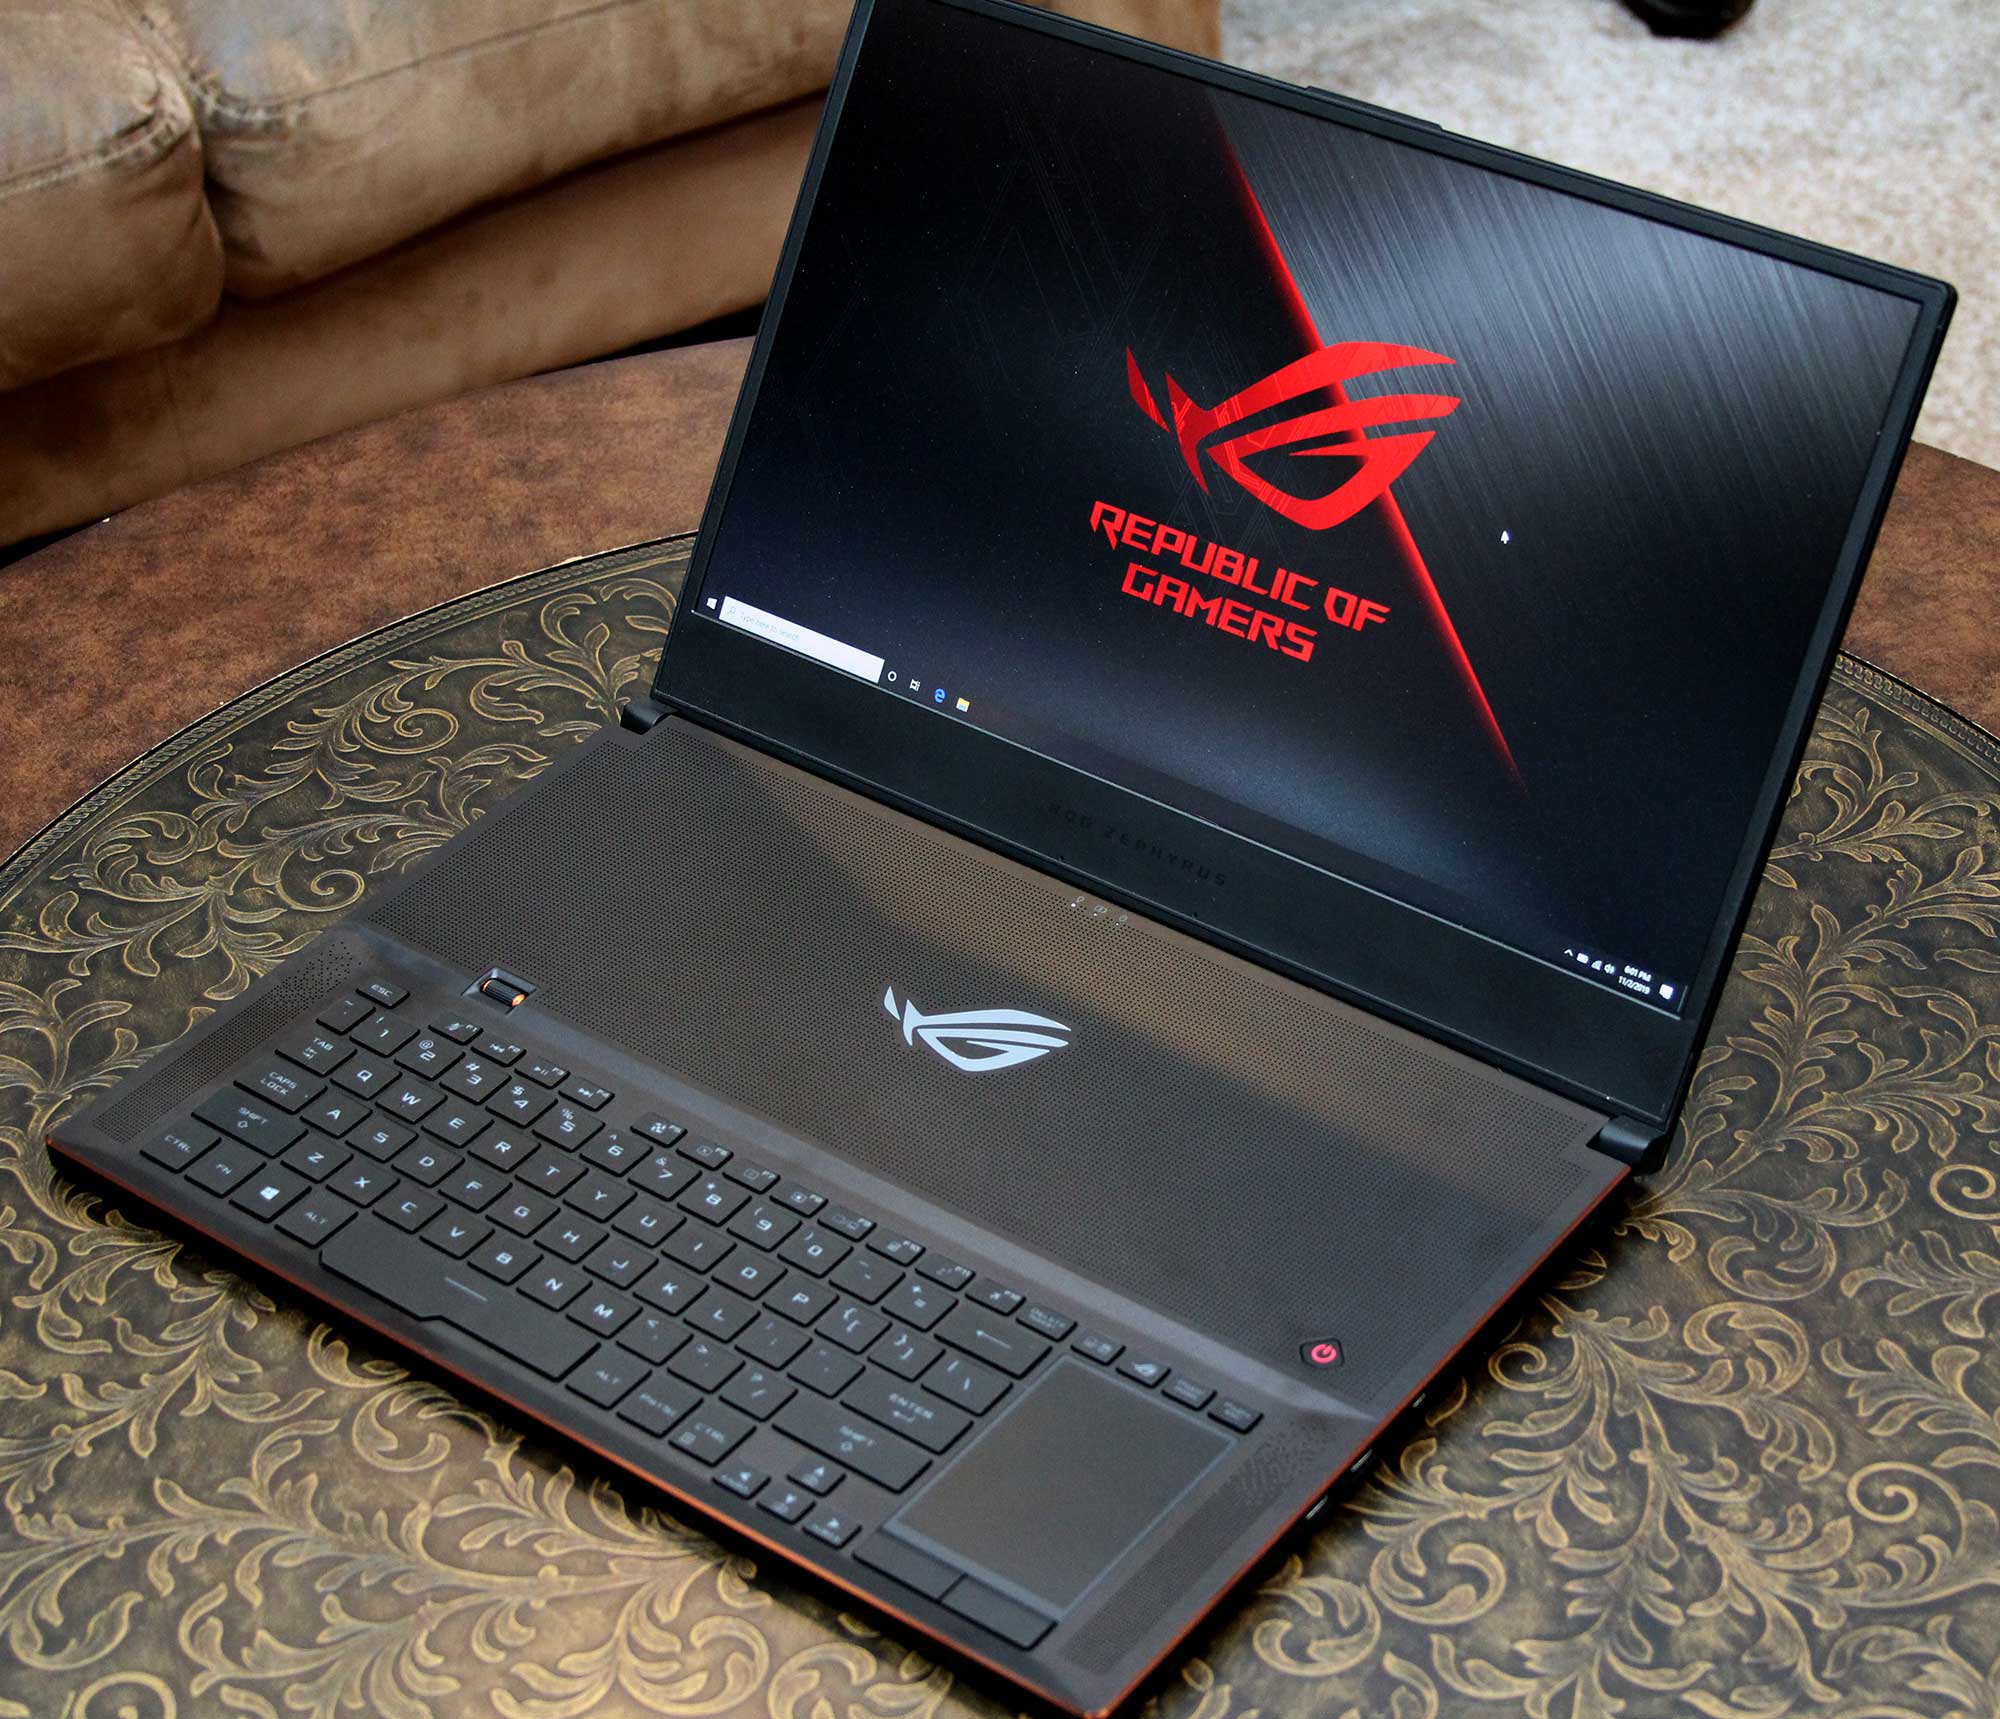
The world’s first display with a 300Hz refresh rate can update 25% faster than the 240Hz panels many competitive gamers use. The key to getting the most out of this blazingly fast panel is feeding it with enough frames per second to keep the on-screen action fresh. That’s not a problem for our Zephyrus S GX701 laptop. The version we tested features a Core i7-9750H CPU, 32GB of DDR4 RAM, and an NVIDIA GeForce RTX 2080, outclassing most high-end desktop PCs. In the top esports games, across a range of genres, the GX701 proved that it has what it takes to take advantage of the 300Hz LCD. Just be sure to tune your games properly to achieve the frame rates necessary to use that display to its fullest.
My experience with the 300Hz GX701 convinced me that it gets no better for esports professionals on the move. This is top-of-the-line gear, the likes of which you’d expect to see at tournaments with lots of money on the line. But you don’t have to be ranked on a ladder to enjoy the benefits of expertly-balanced hardware tuned for high performance. Although the Zephyrus S GX701 won’t turn you into a pro overnight, gaming on one is sure to help you reach your highest potential.
Ready to get the jump on the competition with one of the fastest gaming displays around? You can get a 300Hz GX701 of your own in the United States for $3,299.99 on Amazon.
by Paul Cross
Penulis
Popular Post
3 Cara Meningkatkan FPS di ROG Ally dengan FSR 3 dan AFMF

Video ROG Travel Ke-2 Ajak Gamer Berpetualang Lewat Pengalaman yang Lebih Seru
3 Laptop ROG Terbaik untuk Main Game, Laptop Mana yang Punya Performa Paling Kencang?
The complete list of GeForce GPU power specifications for 2024 ROG and TUF Gaming laptops
MEmu Play and ROG bring PC power to Android gaming
Artikel Terbaru

3 Cara Meningkatkan FPS di ROG Ally dengan FSR 3 dan AFMF
Boost your FPS on the ROG Ally with new FSR3 and AFMF 2 frame generation tech from AMD.
27 Panduan Setting Call of Duty untuk ROG Ally dan Ally X agar Main Lebih Lancar
Our optimized graphics settings will help you balance fidelity and framerate in the latest Call of Duty games on the ROG Ally.

4 Cara Bertahan Hidup di Frostpunk 2, Dunia yang Dingin Membeku!
Frostpunk 2 is a bold sequel that pushes the franchise into uncharted, exciting territory.
5 Perbedaan Laptop dan PC Gaming, Mana yang Lebih Bagus untuk Main Game?
Understand the key differences between gaming laptop vs desktop, such as portability and performance, and decide which is better for your gaming needs.
Helldivers 2 on the ROG Ally: performance guide & best settings
Our optimized graphics settings will help you balance fidelity and framerate in Helldivers 2 on the ROG Ally.

7 Setting Black Myth Wukong Terbaik untuk ROG Ally dan Ally X demi Performa Maksimal
Our optimized graphics settings will help you balance fidelity and framerate in Black Myth Wukong on the ROG Ally and ROG Ally X.