How to upgrade the SSD and reinstall Windows on your ROG Ally, ROG Xbox Ally, or ROG Xbox Ally X
The ROG Ally, ROG Ally X, ROG Xbox Ally, and ROG Xbox Ally X let you bring your games with you anywhere you go. But if you have a particularly massive library and like to jump around from game to game, you might want to upgrade your storage. While a microSD card can take you far, the Ally’s SSD storage is also upgradeable, so you can swap in a new drive on your own. Here’s how.
Step one: gather your parts
To swap your SSD, you’ll need a couple things:
- A size 0 Phillips head screwdriver
- A guitar pick or other piece of thin plastic
Of course, you’ll also need an SSD. The original ROG Ally is compatible with compact 2230 M.2 NVMe drives, which you can get in 1TB or 2TB sizes at your favorite e-tailer or brick-and-mortar PC hardware store. If you have an ROG Ally X, ROG Xbox Ally, or ROG Xbox Ally X, you can use a 2280 M.2 NVMe drive instead, like the WD_BLACK SN7100X NVMe SSD for ROG Xbox Ally, available in capacities up to 4TB.
Note that we’ll be reinstalling Windows from scratch in this guide, and is the method we recommend for installing a new SSD. If you want to keep all your existing data, you can use an external SSD enclosure to clone your current drive to the new one, but we won’t detail those steps here. There are plenty of drive cloning guides around the web if this is the route you choose to take.
Step two: open your Ally

Before you get to work, discharge your battery to 25% or below and remove any microSD cards that might be in the slot.
Once you’ve done so, it’s time to see what’s inside. We’ve included photos below using the new ROG Xbox Ally, but the process should be similar for all four Ally models, except where otherwise noted.
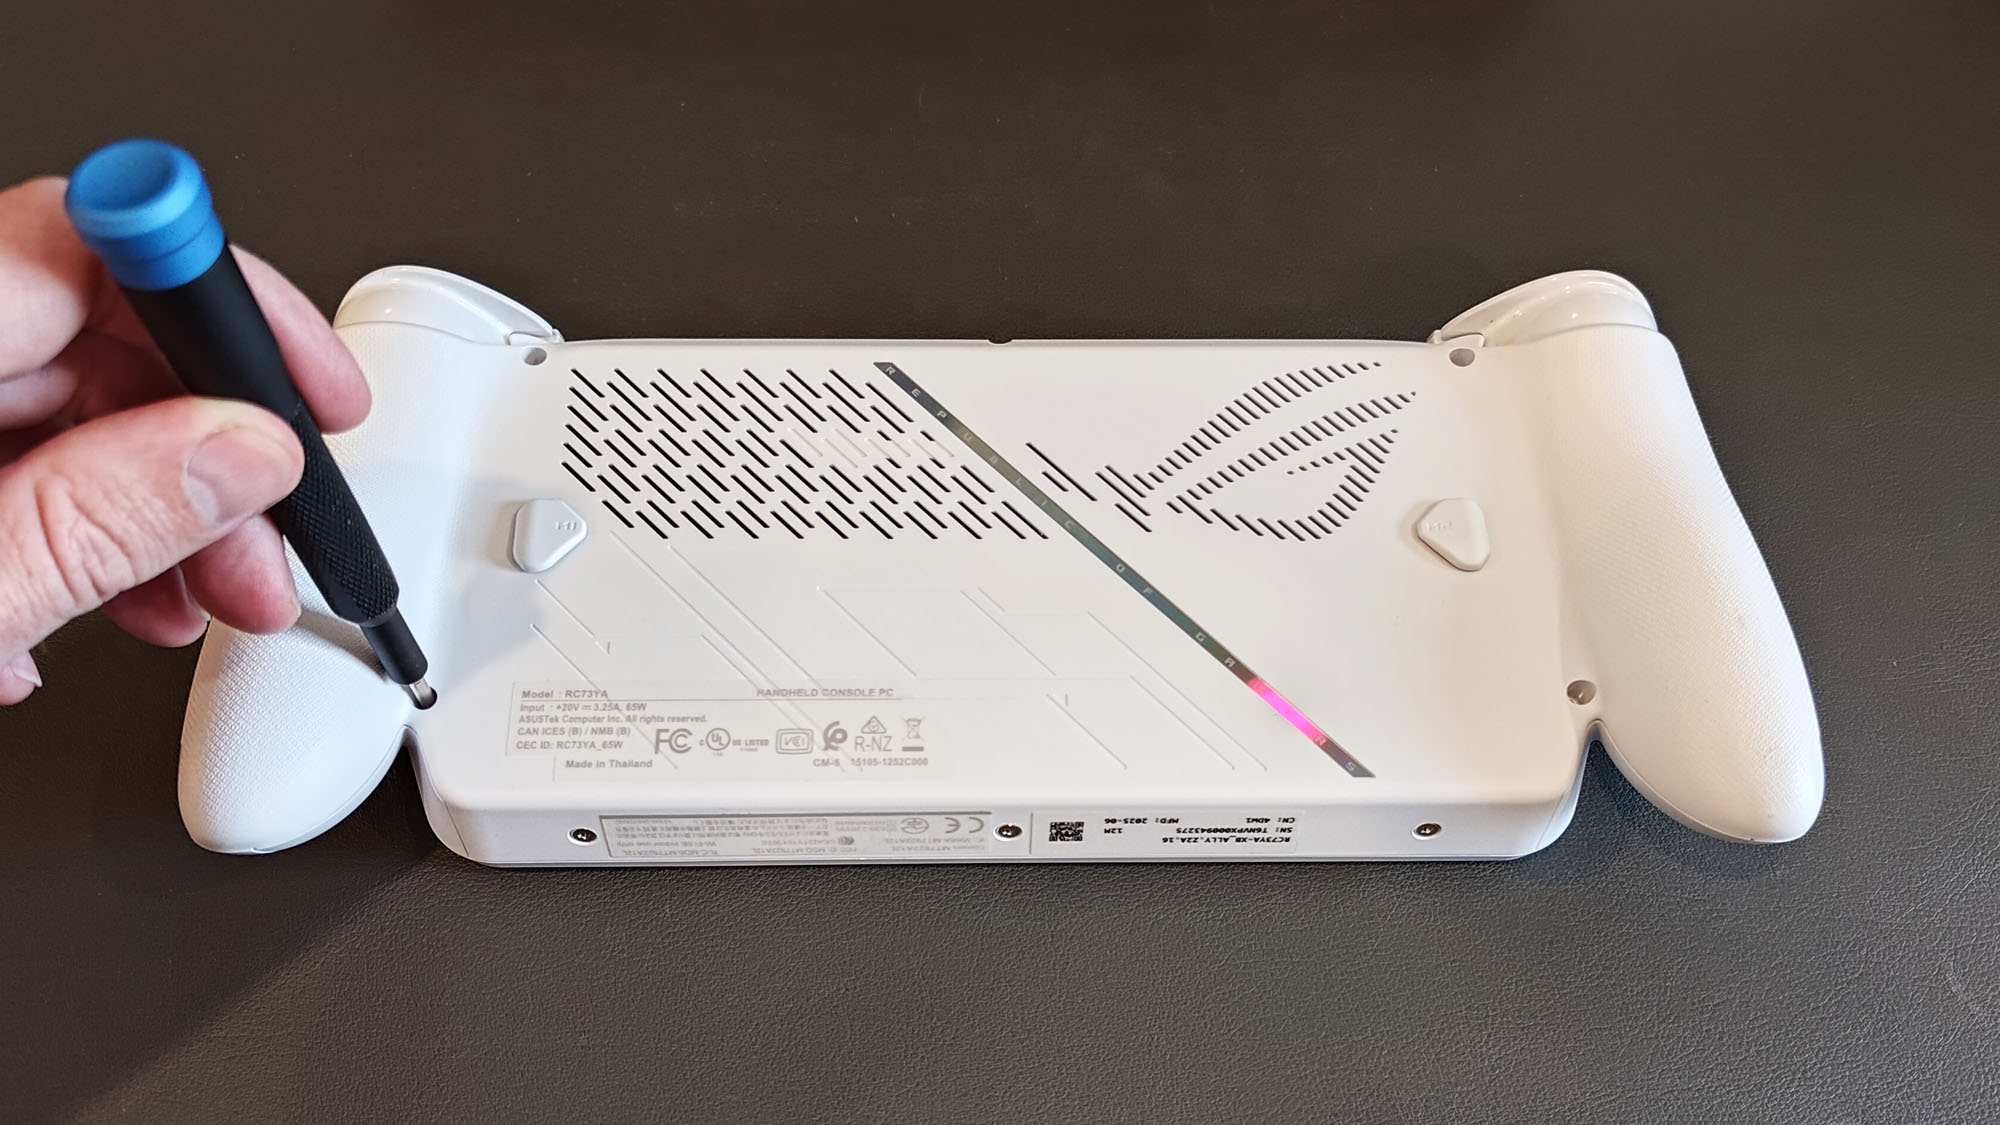
Place your Ally face down on a soft surface and grab your small screwdriver. Undo all of the screws along the back panel. The ROG Ally and ROG Ally X will have six screws, while the ROG Xbox Ally and ROG Xbox Ally X will have five screws on the back and three short screws along the bottom. Place them in a small bowl or tray so you don’t lose them.
Note that one of the screws won’t come out all the way — this captive Pop-open screw helps lift the bottom cover off the case. Once it’s loose, you should be able to remove the bottom panel and the screw will stay attached to it.
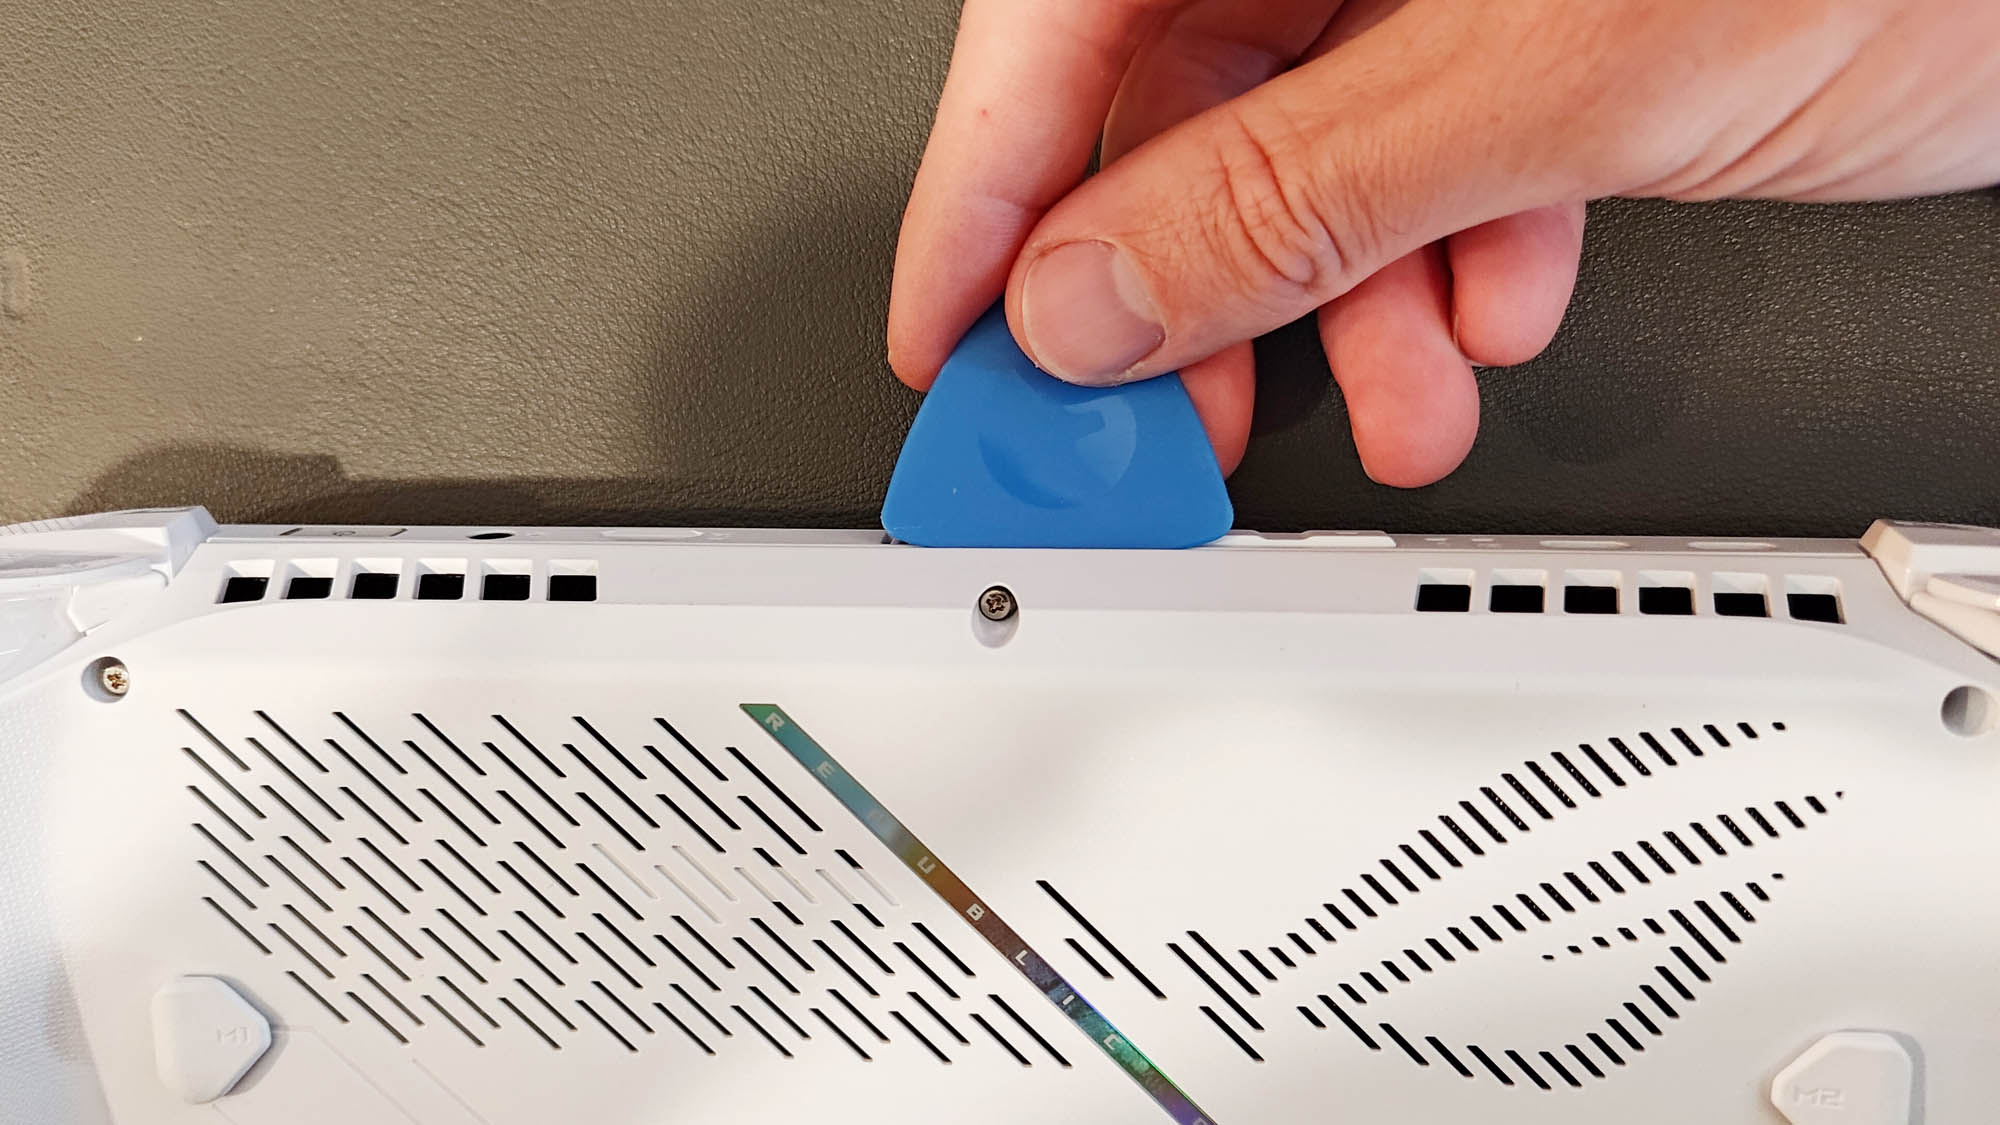
If the bottom panel doesn’t pop open all the way with that last screw, you can use your guitar pick to undo the clips holding the case together. Insert your guitar pick in between the two panels and slide it along the length of the case to undo the clips.
Once the clips are all undone, carefully lift the cover off. The ROG Ally X, ROG Xbox Ally, and ROG Xbox Ally X all have a ribbon cable that connects the motherboard to the back panel, which can tear if you pull the panel away too quickly. (The original ROG Ally will not have this cable.)
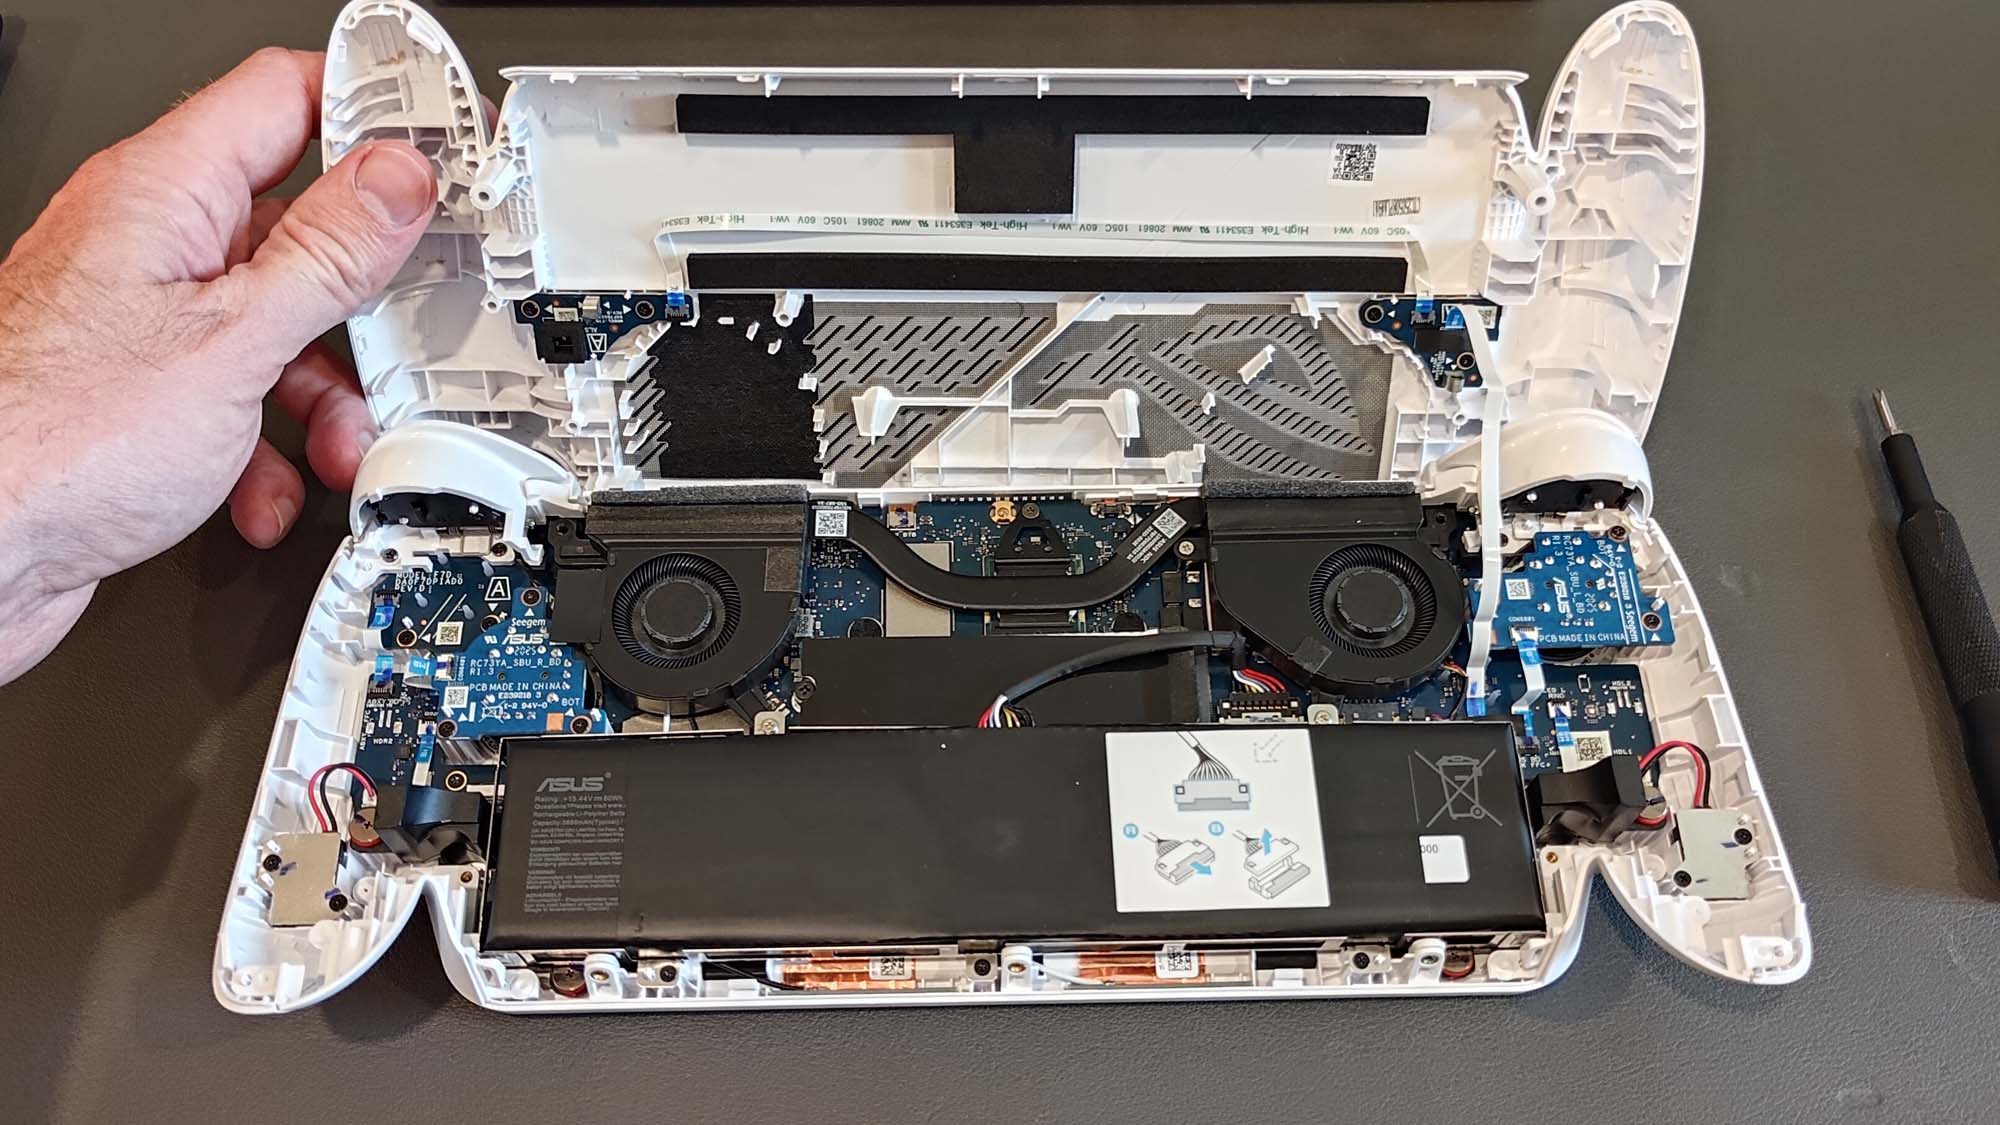
You can leave this ribbon cable plugged in with the back panel next to the unit while you work; just take care not to damage it.
Step three: Disconnect the battery and replace the SSD
Next, you’ll want to disconnect the battery for safety and then swap in your new SSD. This step varies slightly between the different models of ROG Ally, so follow the steps for your specific model below.
ROG Ally (RC71)
Lift up the black flap between the fans and, using a spudger, pry tool, or even your guitar pick, slide the metal retaining clip back, then pull the battery connector upward and out of its socket.
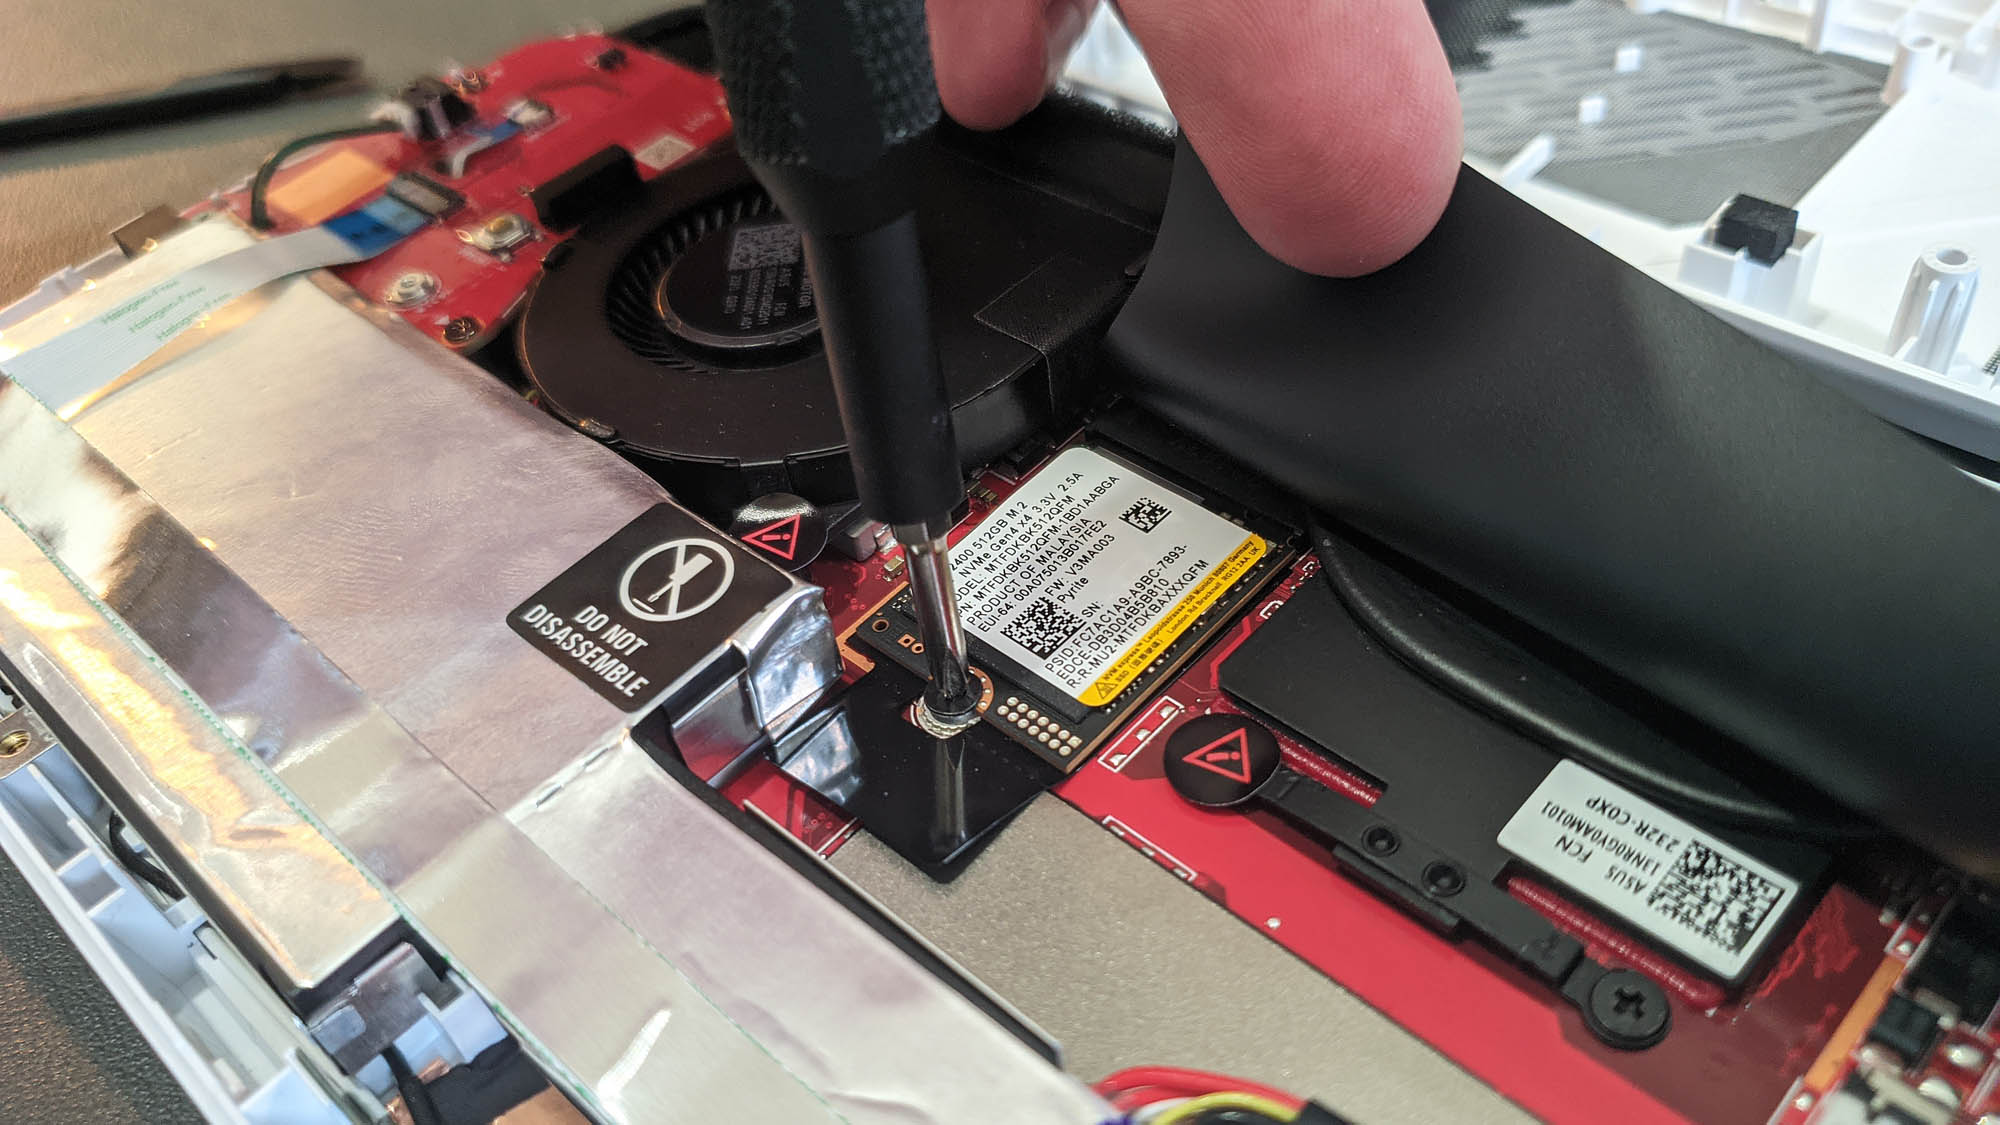
Also underneath the black flap, you'll find the SSD. Remove the screw holding the drive in place, gently slide the SSD out, and slide your new SSD in. You can then secure it using the same screw.
ROG Ally X (RC72)
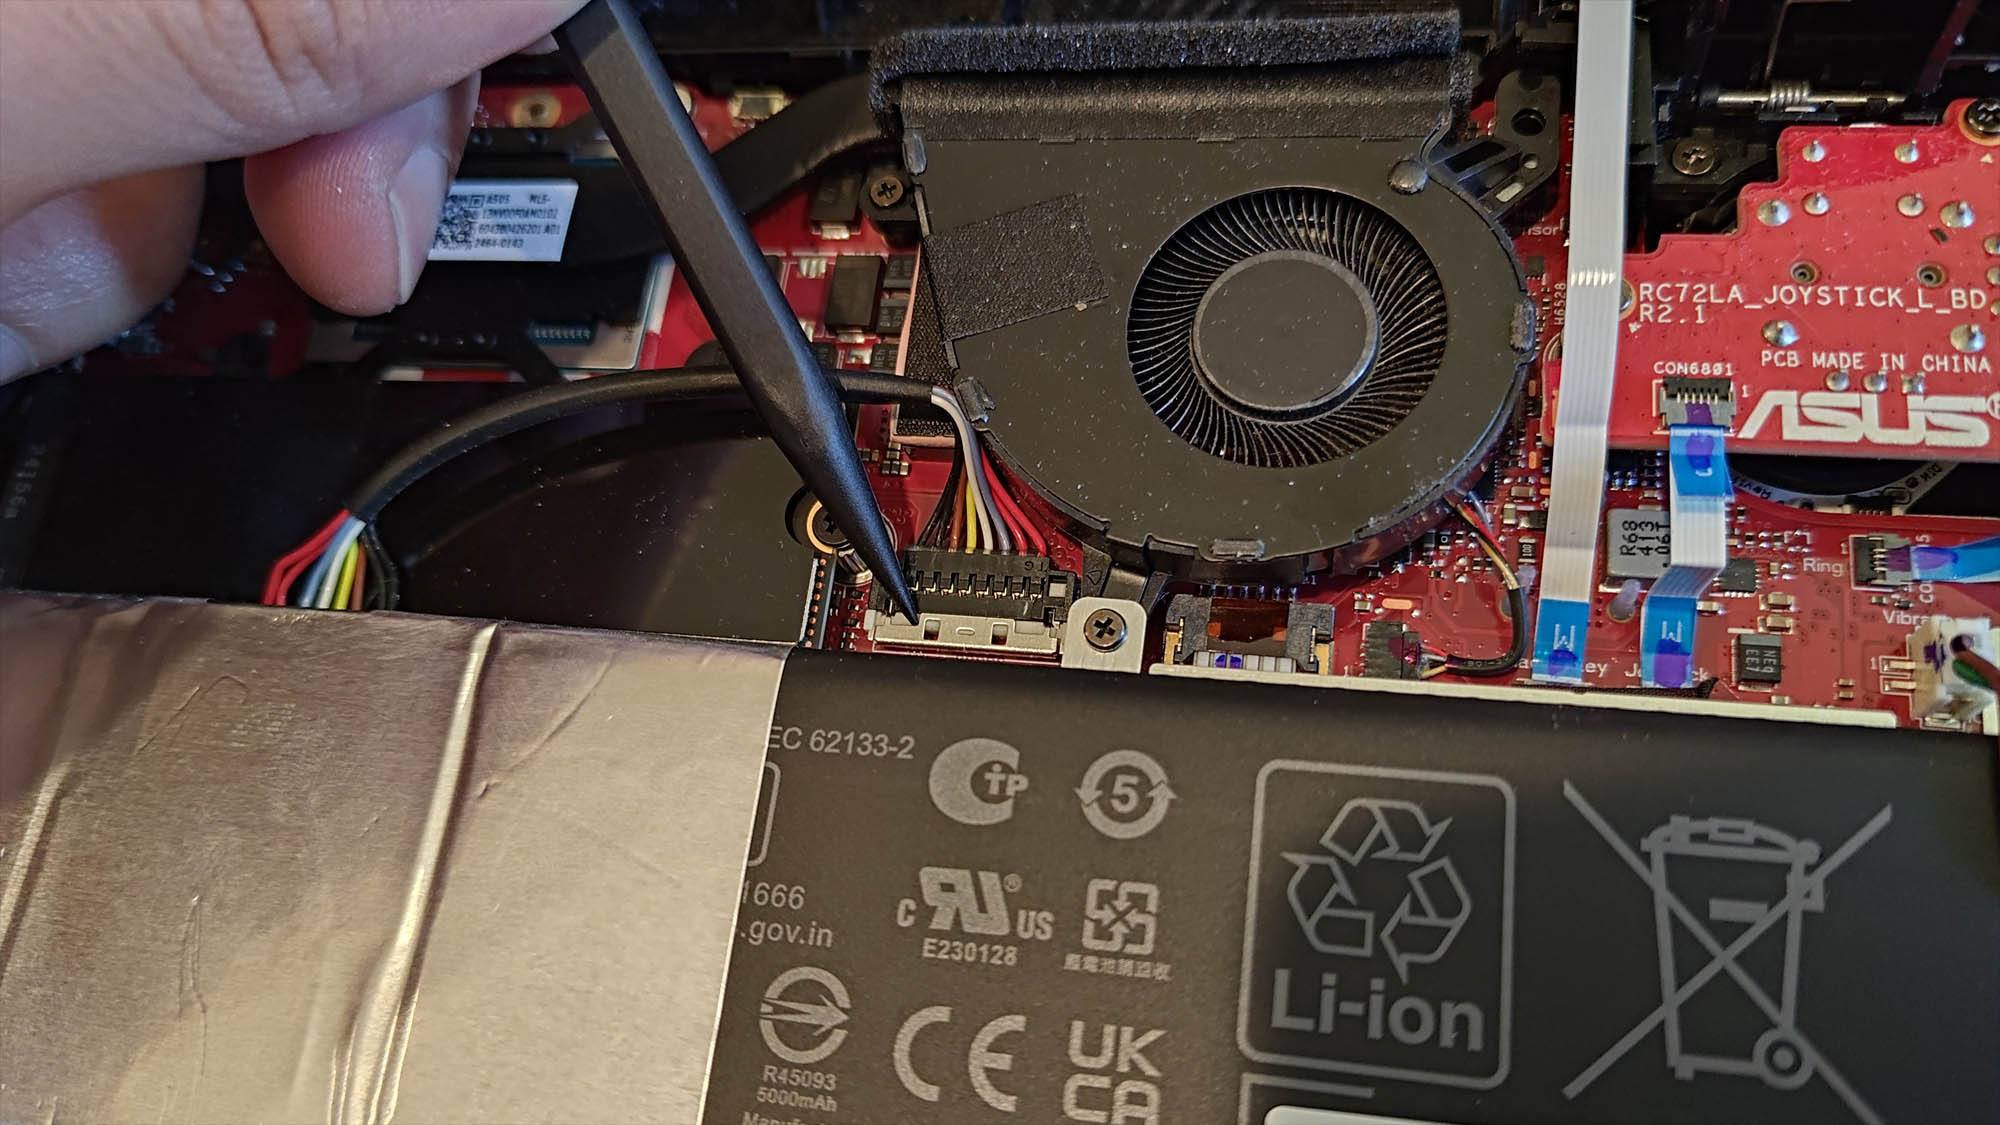
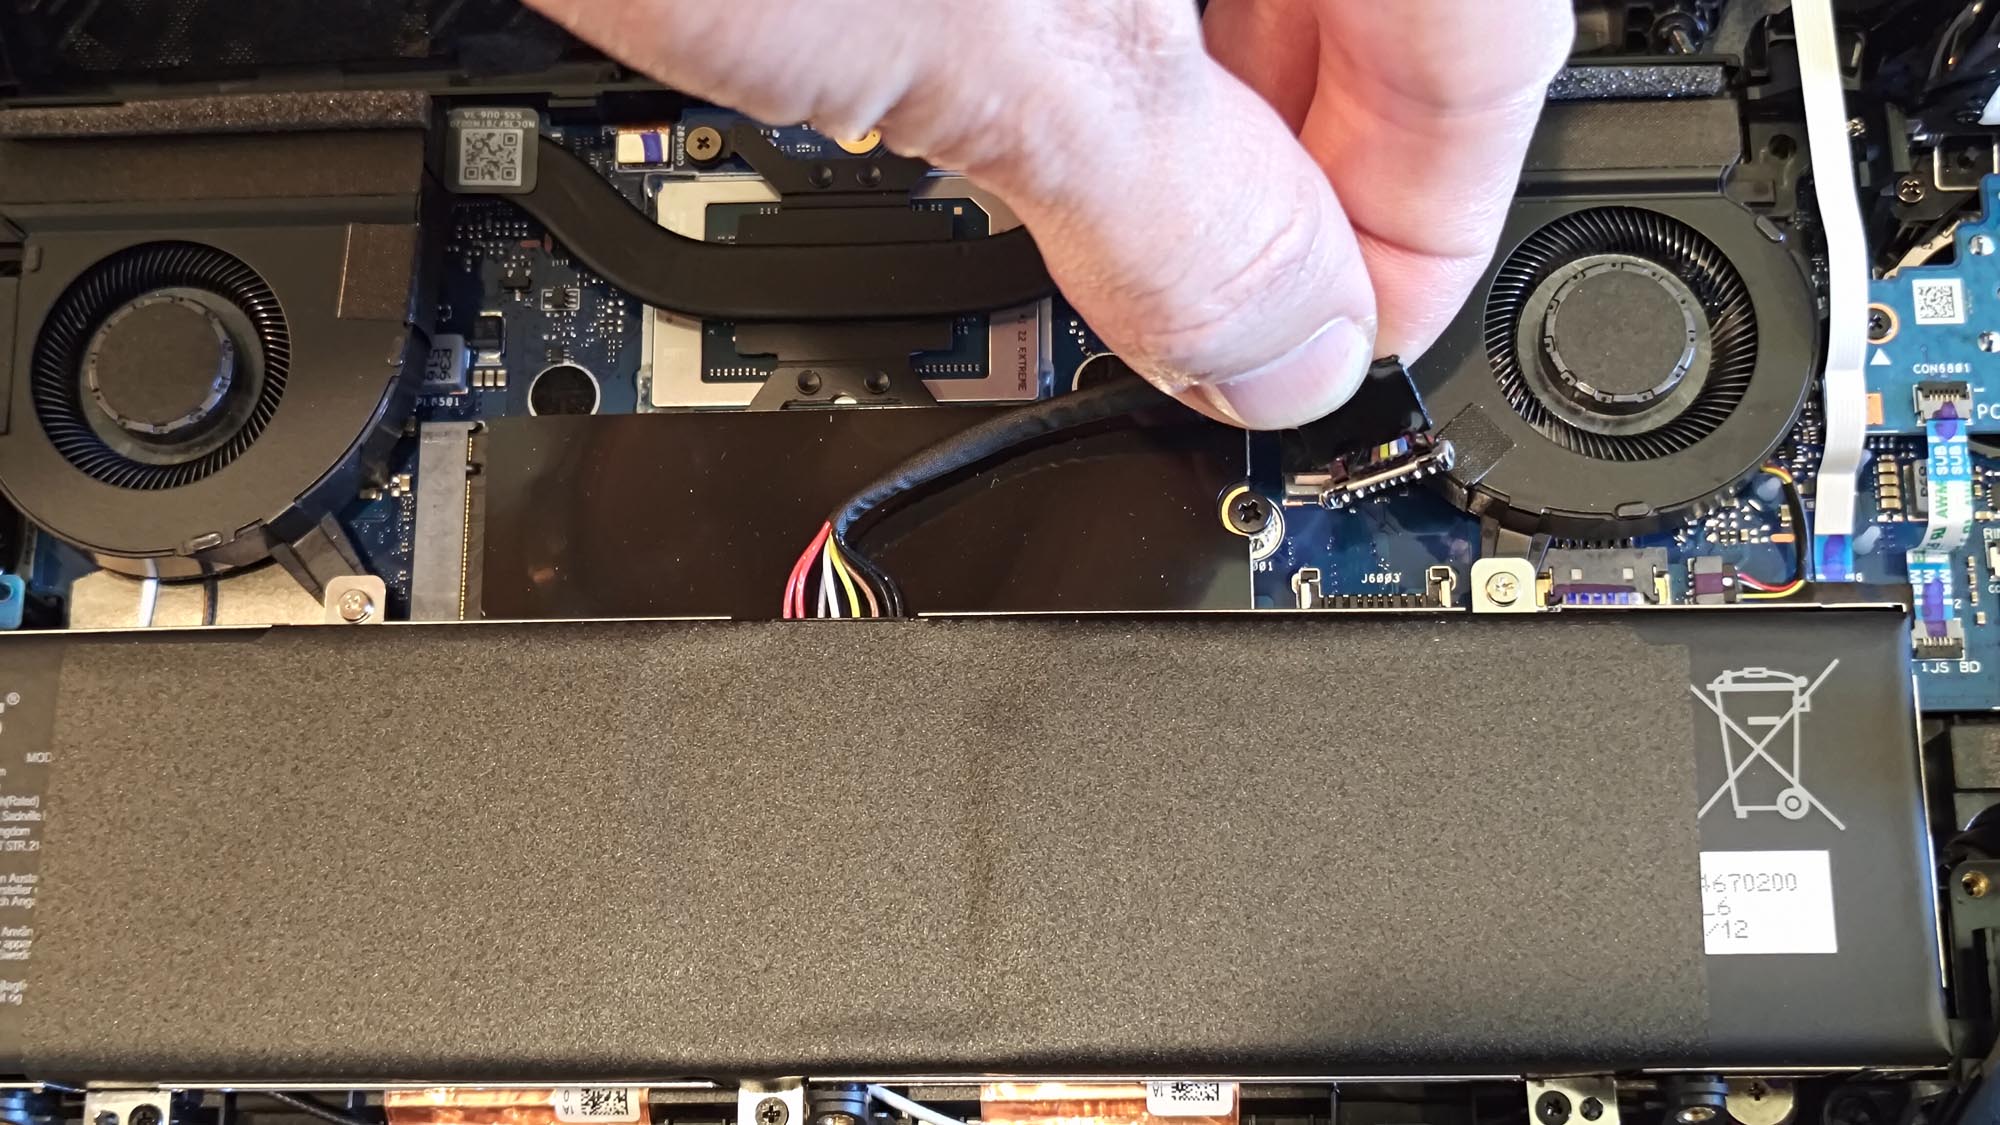
Under the right fan, you'll see the battery connector. Using a spudger, pry tool, or even your guitar pick, slide the metal retaining clip back, then pull the battery connector upward and out of its socket.
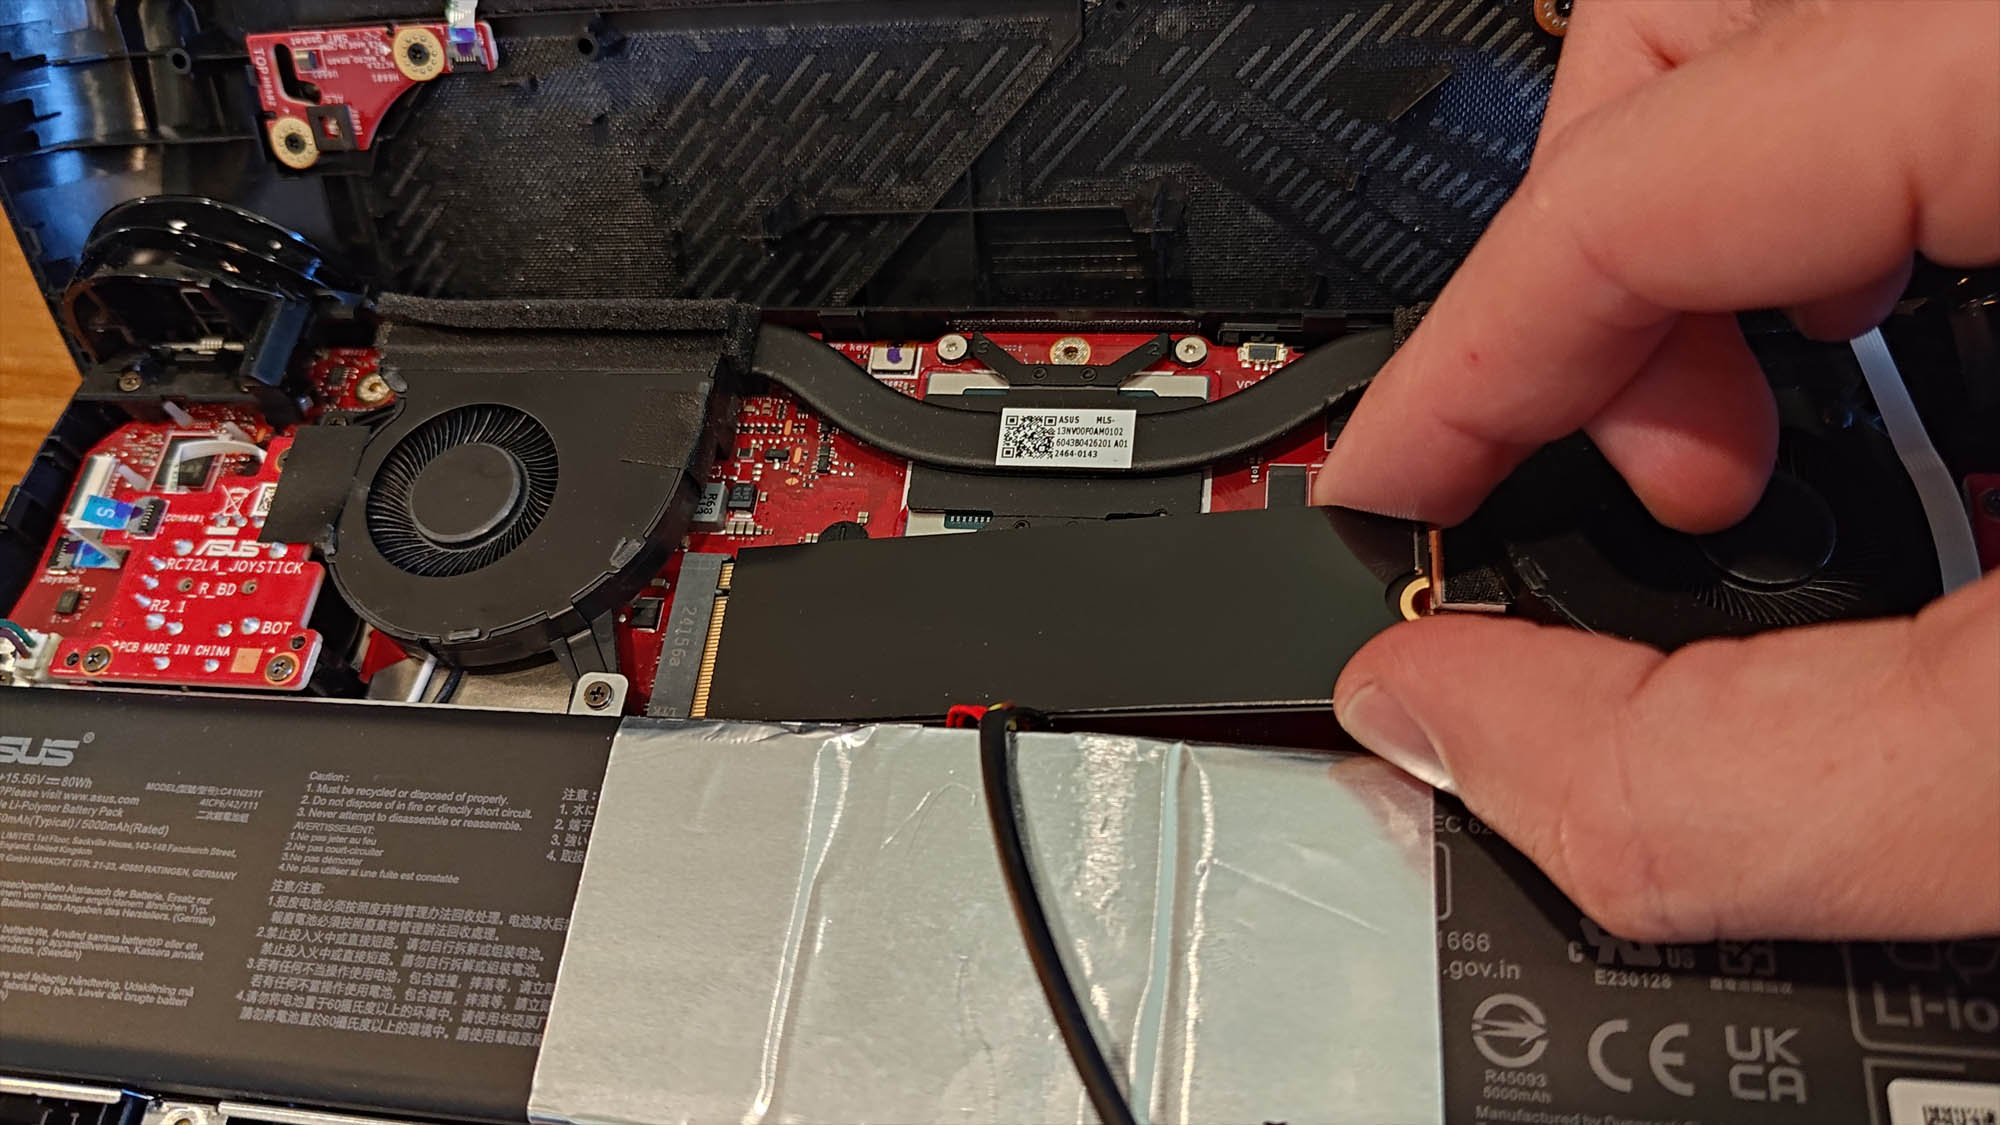
The SSD lies just above the battery, underneath a black shield. Unscrew the screw holding the drive in place, gently slide the SSD out, and slide your new SSD into the M.2 slot. You can then secure it using the same screw.
ROG Xbox Ally (RC73YA)
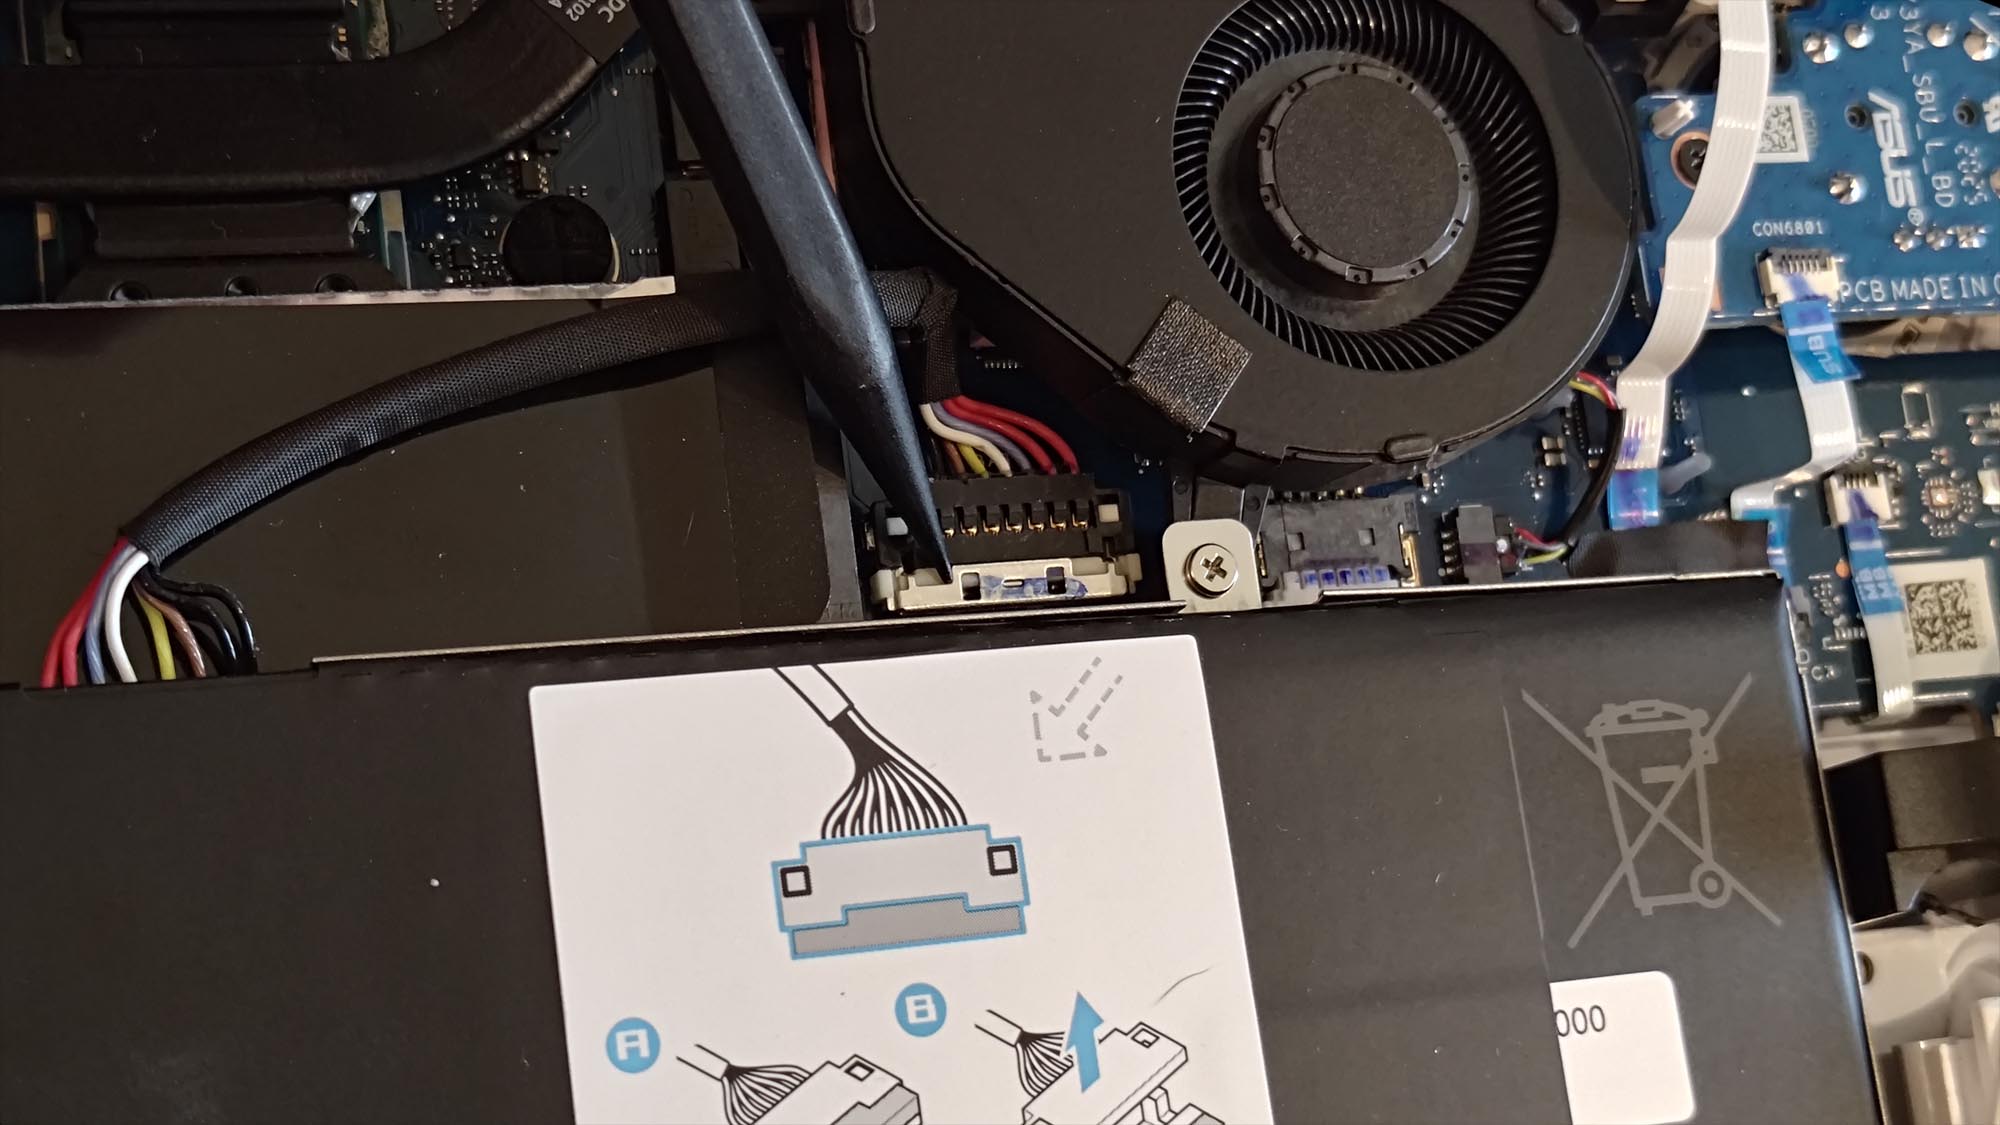
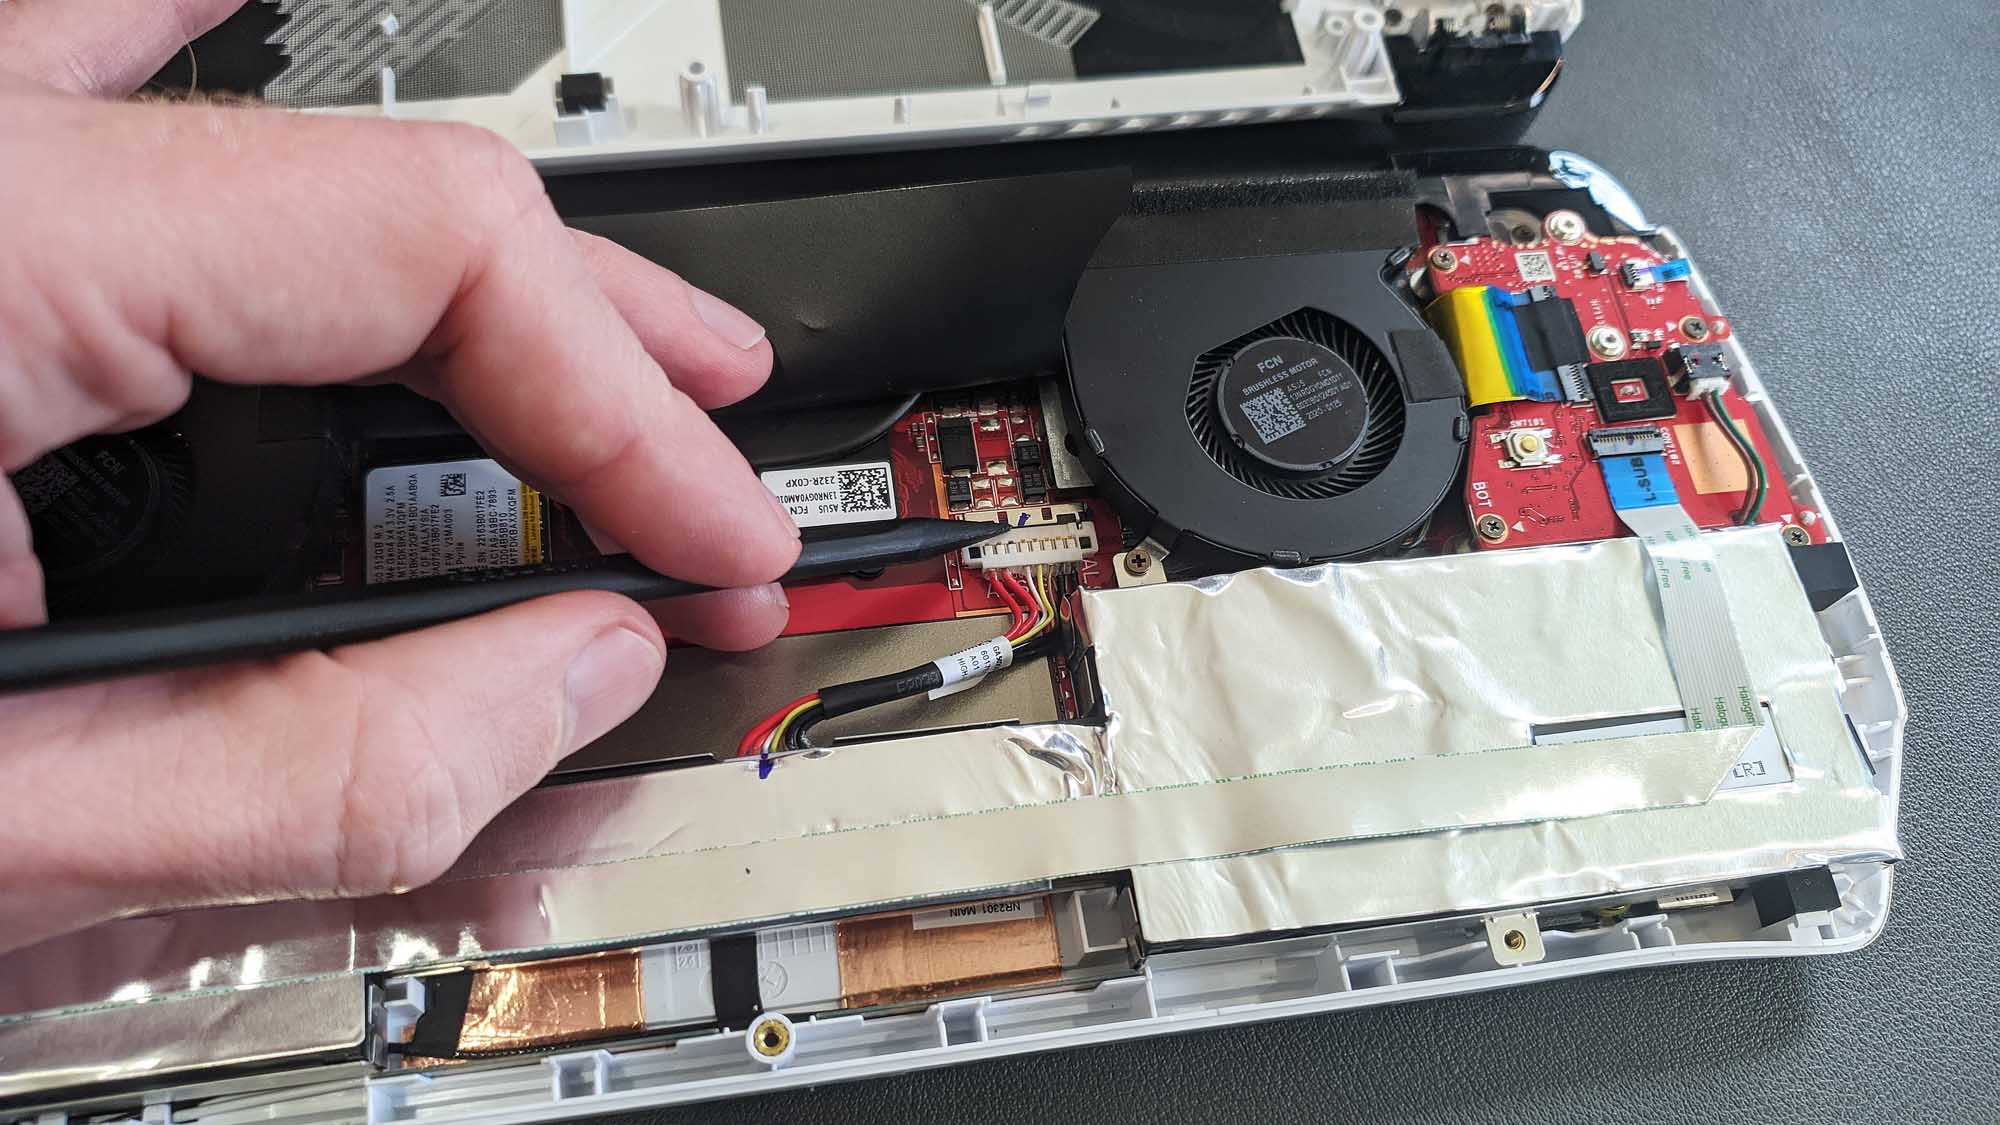
Under the right fan, you'll see the battery connector. Using a spudger, pry tool, or even your guitar pick, slide the metal retaining clip back, then pull the battery connector upward and out of its socket.
Some models of ROG Xbox Ally require you to remove the battery before the SSD can be swapped. Unscrew the five screws surrounding the battery and carefully remove it from the chassis. Then, unscrew the screw holding the SSD in place.
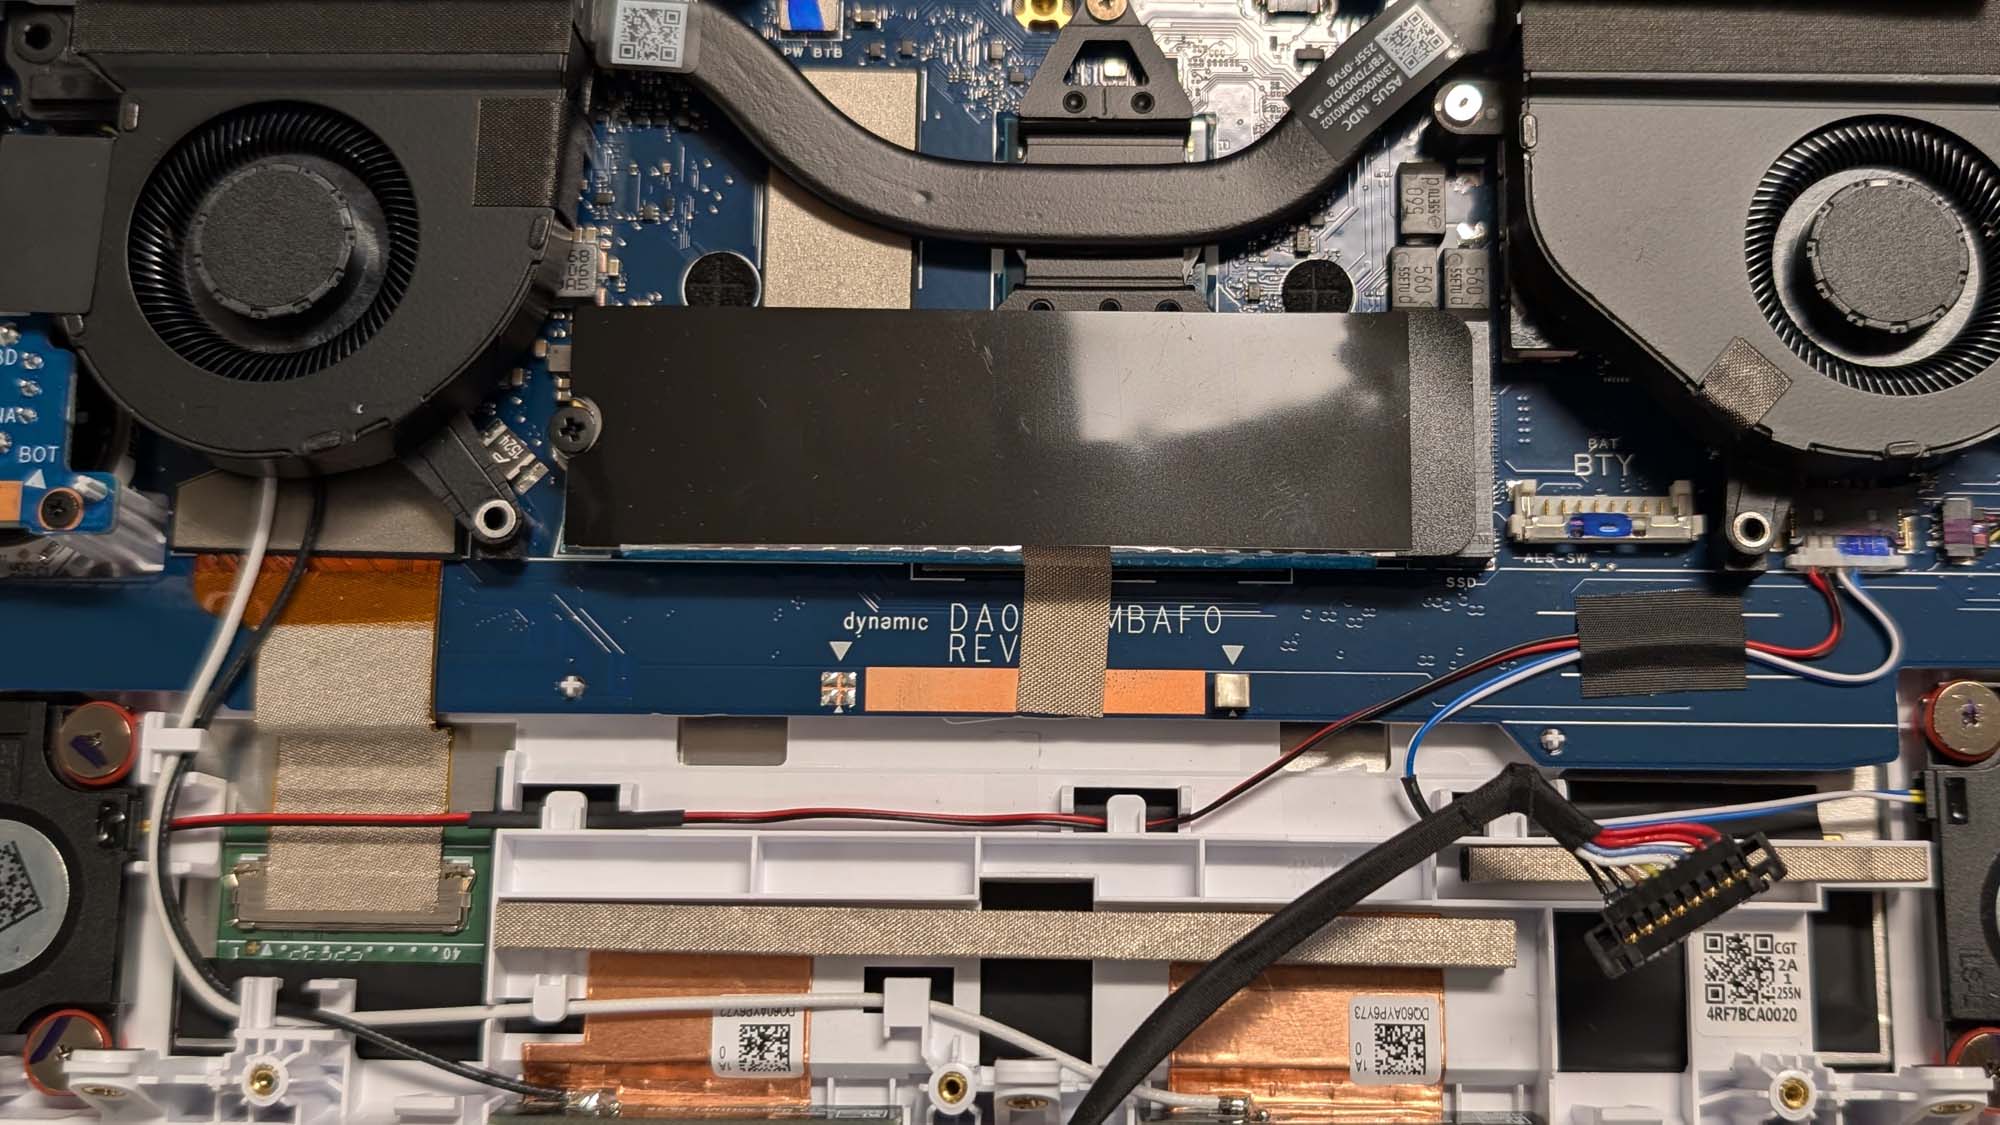
You'll find a small strip of conductive fabric stuck to both the motherboard and the SSD. Carefully peel this up and remove the SSD from its slot. You can discard this tape after replacing your SSD. Once your drive is screwed into place, you can screw the battery back in to its section of the chassis.
ROG Xbox Ally X (RC73XA)
Under the right fan, you'll see the battery connector. There is no metal retaining clip on this model, so you can just pull the battery connector straight upward and out of its socket.
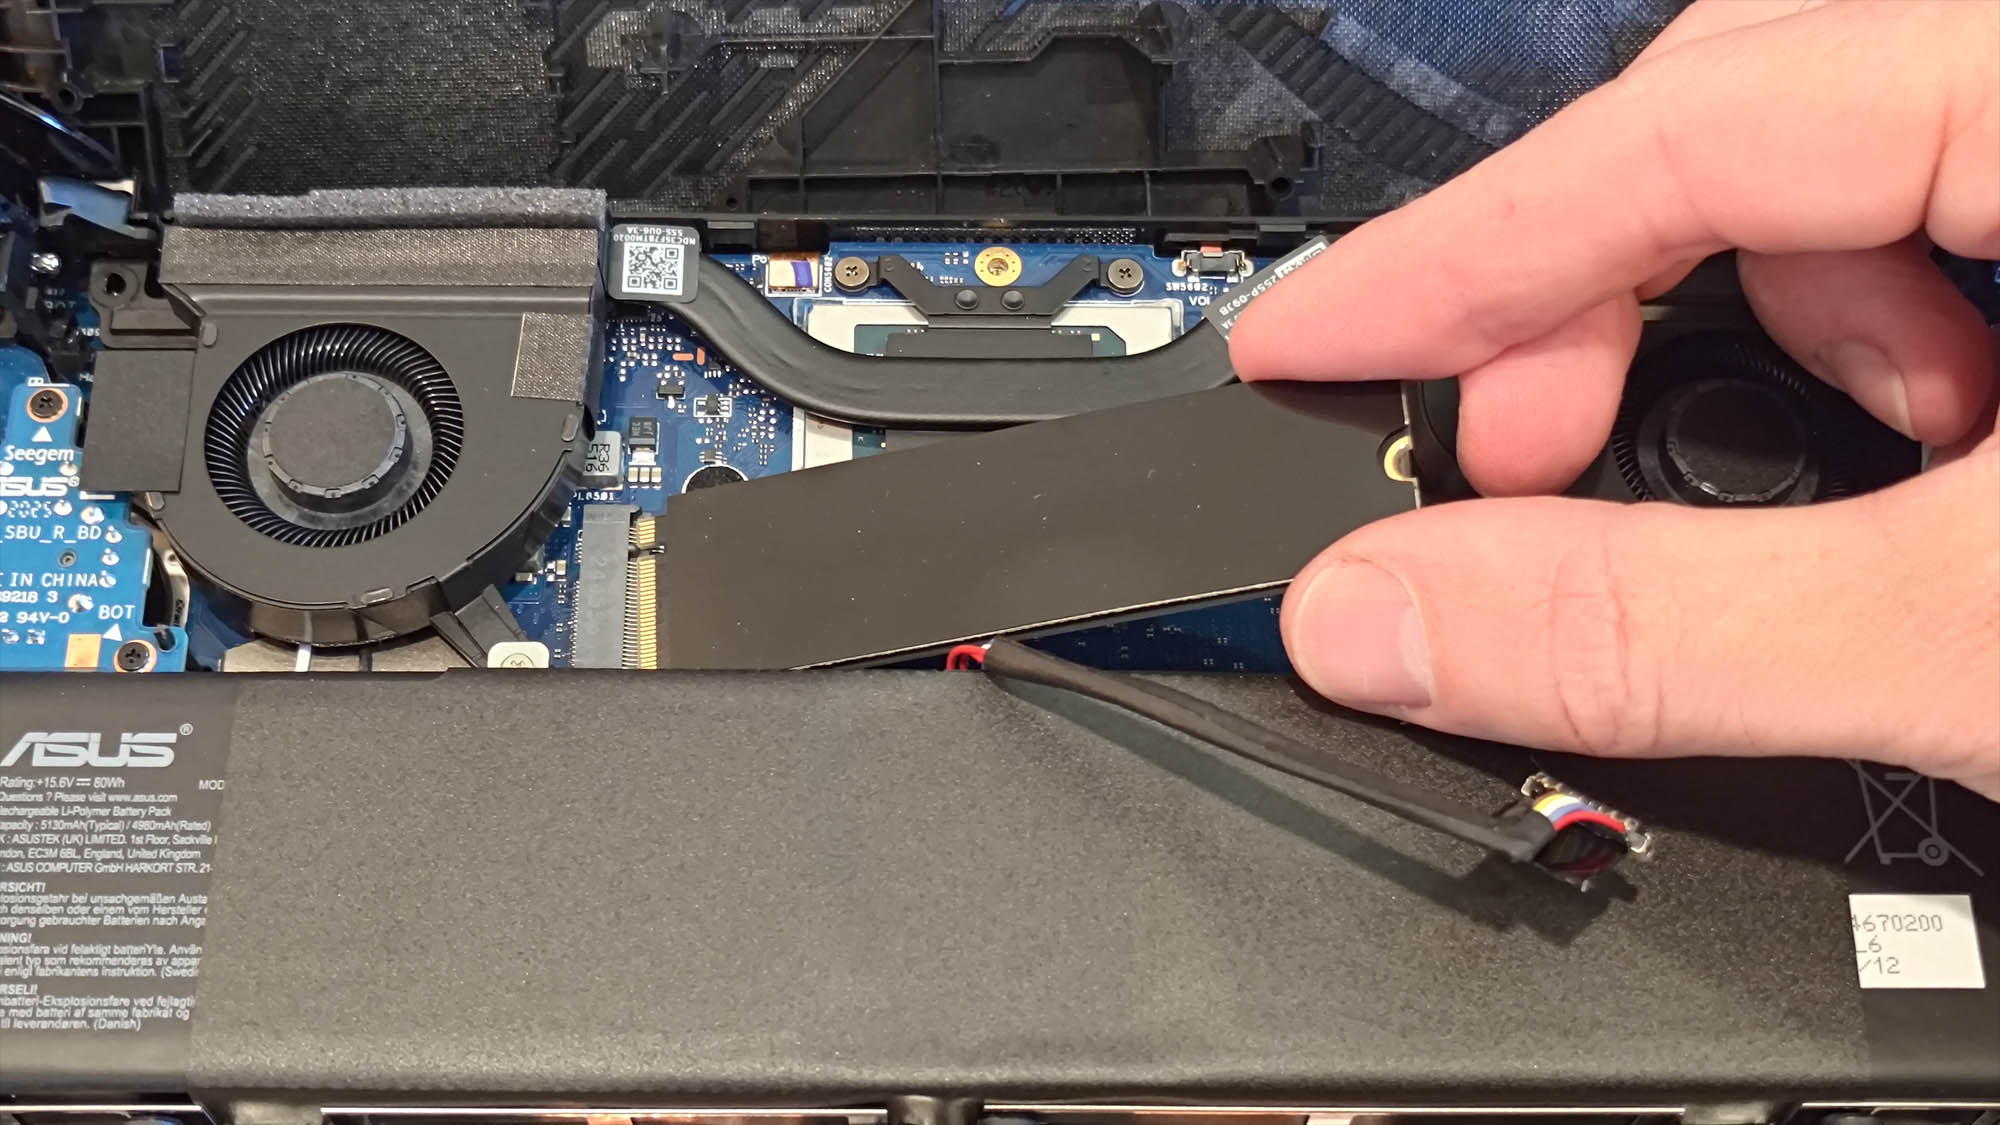
The SSD lies just above the battery, underneath a black shield. Unscrew the screw holding the drive in place, gently slide the SSD out, and slide your new SSD into the M.2 slot. You can then secure it using the same screw.
Step four: reinstall Windows with ASUS Cloud Recovery
When you’re done replacing the SSD, plug the battery connector back in and close the device up, ensuring all the clips snap back into place and all the screws are screwed back in.
With the device closed back up, remove any SD cards and plug your Ally into the wall using the included 65W charger. Then, hold the volume down button and press the power button to turn the device on. It should boot into the BIOS menu.
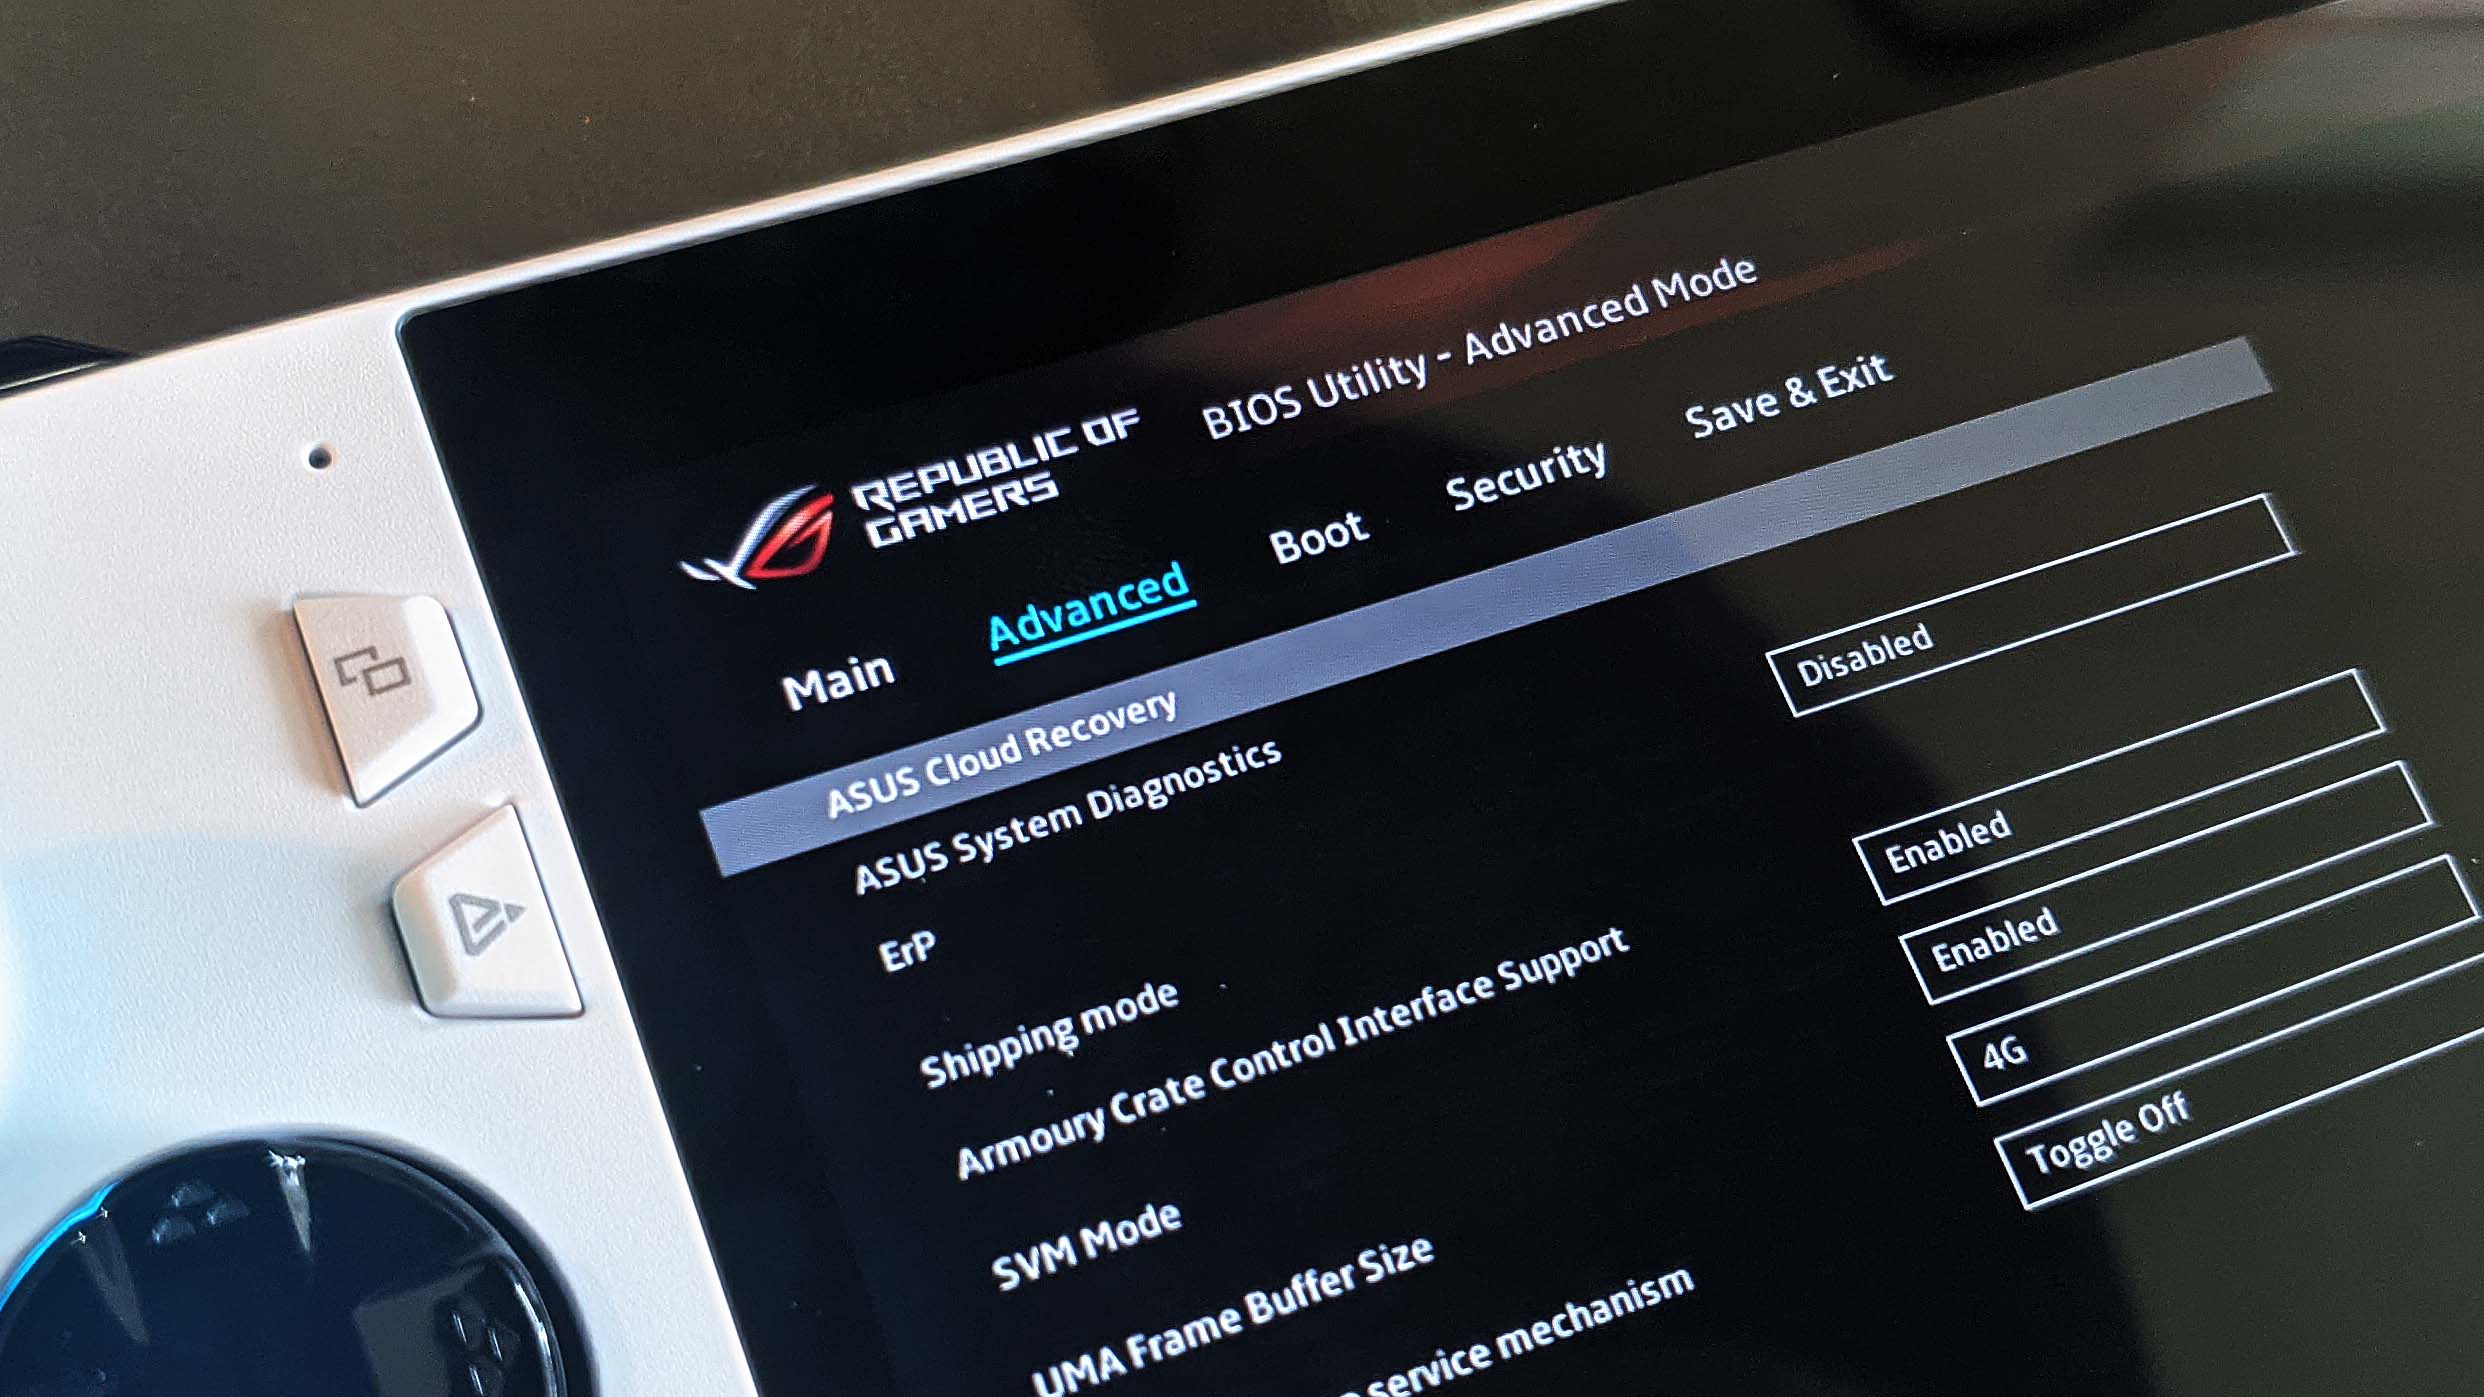
Press the Y button to exit EZ mode, then navigate to the Advanced tab. Select ASUS Cloud Recovery and press A to begin the process. You’ll have to connect to Wi-Fi to begin the download, and it may take some time, rebooting multiple times during the process.
Let your Ally download and install the image, and when it’s done, you’ll be able to set up your Ally as if it were a brand new device — with even more space for all those games. For more tips and tricks, check out our full guide to the ROG Ally. And if you haven’t picked up your ROG Ally yet, you can grab it from Best Buy at the links below.
| Model | Type | Where to Buy (US) | Where to Buy (CA) |
|---|---|---|---|
| ROG Xbox Ally | Handheld PC | ASUS Microsoft Best Buy |
ASUS Microsoft Best Buy |
| ROG Xbox Ally X | Handheld PC | ASUS Microsoft Best Buy |
ASUS Microsoft Best Buy |
| ROG Ally X | Handheld PC | ASUS Best Buy |
ASUS Best Buy |
| ROG Ally (Ryzen Z1 Extreme) | Handheld PC | ASUS Best Buy |
ASUS Best Buy Newegg Amazon |
Author
Popular Posts

Prepare for Tandem OLED splendor with these new ROG gaming monitors

How to adjust your laptop's P-Cores and E-Cores for better performance and battery life

How to Cleanly Uninstall and Reinstall Armoury Crate

How to upgrade the SSD and reinstall Windows on your ROG Ally, ROG Xbox Ally, or ROG Xbox Ally X
ASUS GPU Tweak III: The ultimate tool for advanced GPU tuning
LATEST ARTICLES

Level up your calls: ROG gear and tips to dominate Discord and Zoom alike
ROG headsets, laptops, and software give you the technology you need to effortlessly dominate virtual work meetings and gaming voice chats.

ROG Xbox Ally vs Gaming Laptop: which portable gaming device is right for you?
Both the ROG Xbox Ally and ROG gaming laptops have a lot to offer gamers, depending on what they're looking for.

Which ROG Xbox Ally to give the gamer in your life this holiday
The powerful, portable ROG Xbox Ally is the perfect gift for any gamer who wants to take their favorite games everywhere they go.
The best accessories to supercharge your ROG Xbox Ally
Here’s the must-have gear that’ll catapult your ROG Xbox Ally gaming to the next level.
15 tips & shortcuts to set up and optimize your ROG Ally or ROG Xbox Ally
So you’ve finally unboxed your brand new ROG Ally, and you're itching to get your game on. Here's what to do first.

How to boost gaming performance on the ROG Ally or ROG Xbox Ally
The ROG Ally is a true Full HD handheld ready to make your games look better than ever. Here's how to maximize its performance.