How to adjust your laptop's P-Cores and E-Cores for better performance and battery life

Intel’s 12th and 13th generation processors have revolutionized the modern CPU landscape. These new processors utilize an innovative architecture that mixes CPU cores of different sizes — larger, more powerful “Performance-cores” handle heavy tasks with ease, while smaller “Efficient-cores” take on lighter tasks while consuming less energy. Your system will dynamically allocate tasks to these cores as it sees fit, offering excellent performance and power consumption along the way. But you might want to roll up your sleeves and try tweaking the core layout yourself by disabling specific cores. Now, you can use the Armoury Crate app to do just that.
On ROG laptops with 13th gen Intel processors, we allow you to disable some of your CPU’s cores, which will affect how the CPU behaves under certain workloads. For example, the ROG Flow Z13 houses an Intel® Core™ i9-13900H with 6 Performance-cores and 8 Efficient-cores. These 14 combined cores will handle multi-threaded workloads and heavy multitasking like a champ. But certain tasks may be better served with a different core layout.
In our testing, for example, we found that disabling some of the Z13’s cores leads to longer battery life. Our best results were with 2 Performance-cores enabled and no Efficient-cores. With fewer cores enabled, the system doesn’t have to use as much power, so the battery was able to last longer in both the Modern Office and Gaming benchmarks of PCMark 10.
Disabling cores obviously comes at the cost of overall CPU performance, and it’s rare that you’ll want to go all the way down to only two Performance-cores. But disabling some cores can also improve performance in certain scenarios.
We tested a number of different configurations and found that with two Performance Cores and all Efficient-cores disabled, the remaining four Performance-cores were able to boost to higher clock speeds, leading to higher performance in certain sitautions. Again, if we look at PCMark 10’s Modern Office test, we found four Performance cores were faster in the App Start-Up, Web Browsing, Spreadsheet, and Writing tests. That said, other tests — like Video Conferencing, Photo Editing, Rendering and Visualization, and Video Editing — performed better with the full might of the CPU, so the configuration you choose may depend on the task at hand.
This setting can also improve performance in some games. In our testing we found the Final Fantasy XV benchmark performed about 3% better with only four Performance-cores enabled, while Shadow of the Tomb Raider achieved 3.5% higher framerates with this configuration in CPU-bound scenarios. Counter-Strike: Global Offensive, on the other hand, saw minimal performance changes between our different configurations, so your mileage may vary from game to game — though remember, these configurations also improved efficiency, so even if the performance jump is small, you may be able to game longer on battery too, which is a win-win.
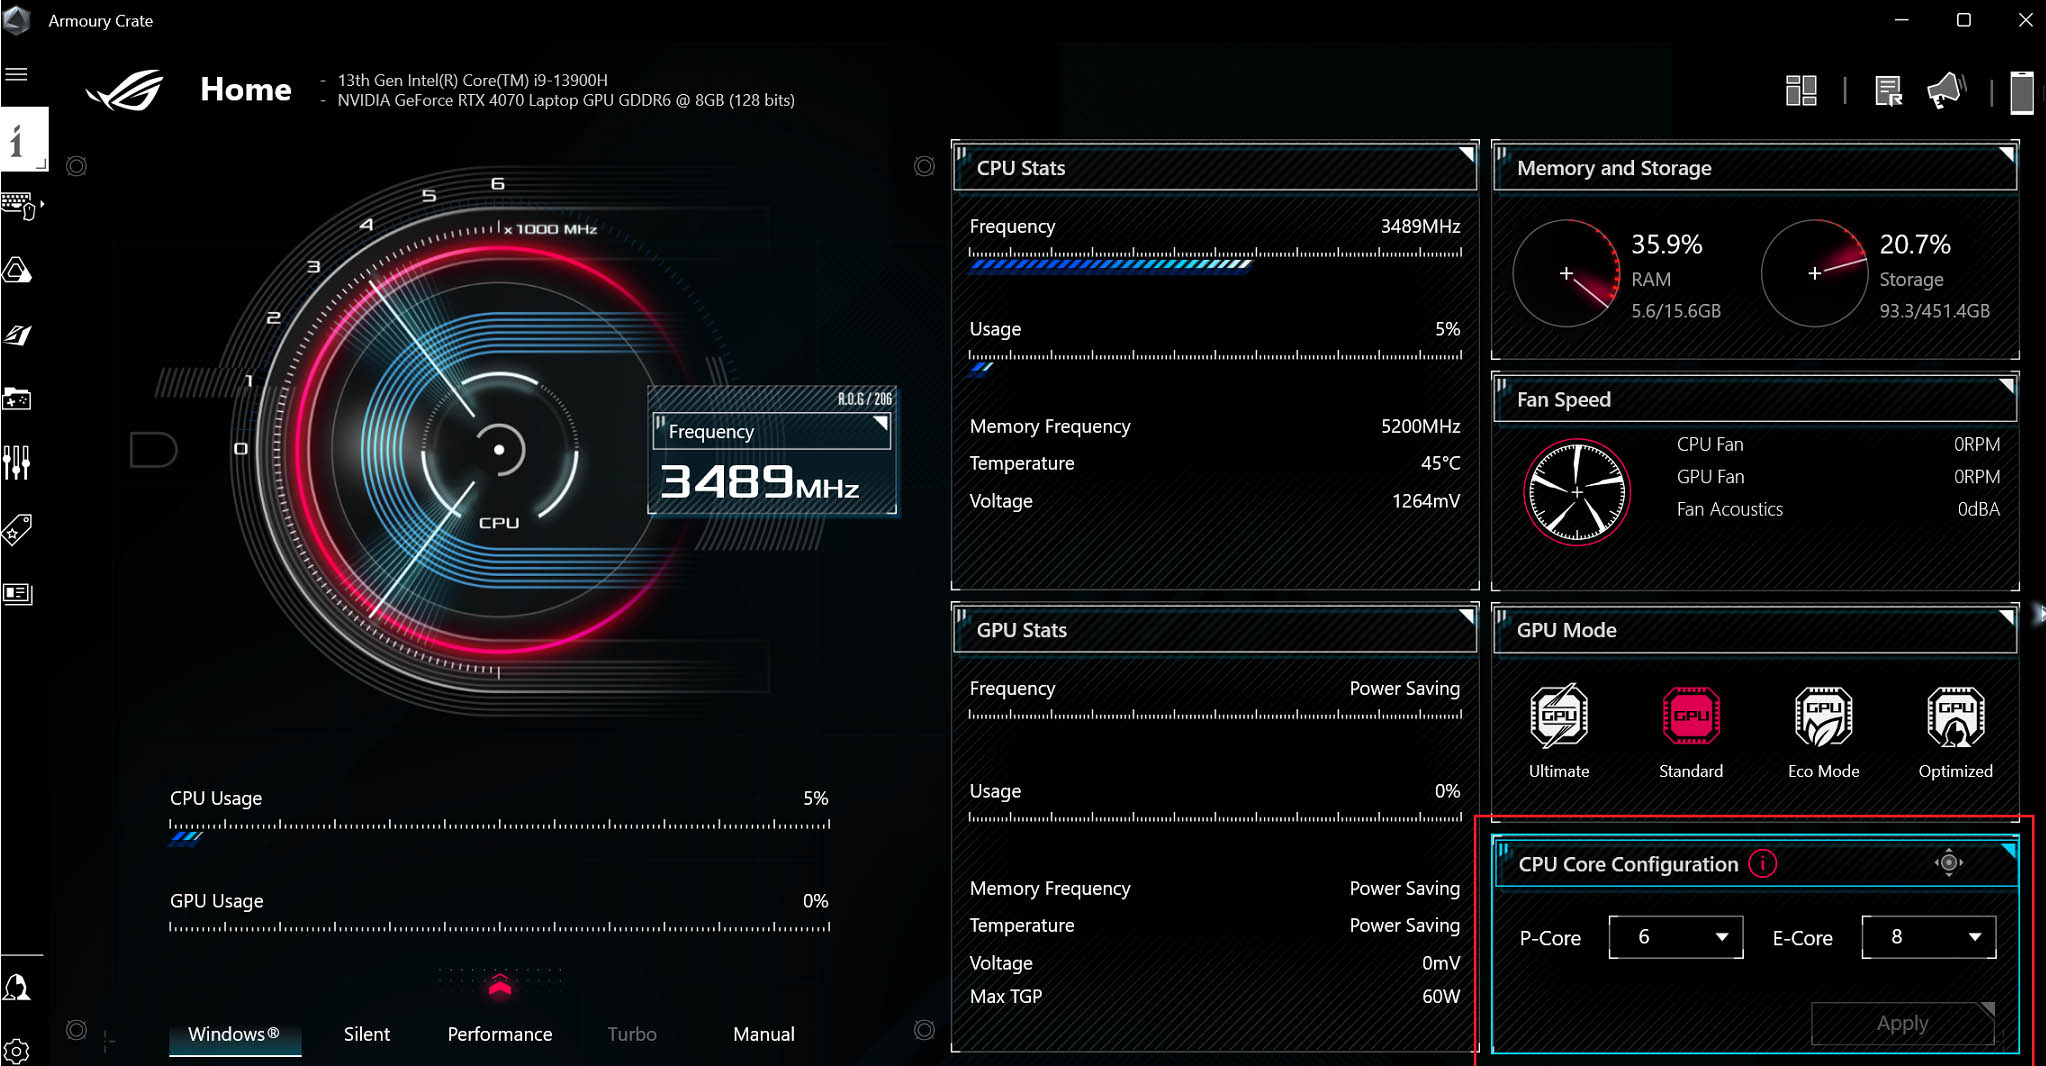
We highly recommend experimenting with this setting yourself, using your favorite game titles. First, make sure your system’s BIOS and Armoury Crate are both up to date. Then, open Armoury Crate and find the CPU Core Configuration option on the home page (as shown in the image above). Select the number of P-Cores and E-Cores you’d like to use, reboot your PC, and run the game or task in question. You may find that better performance and battery life is only a few clicks away.
Autor
Popular Post

How to boost gaming performance on the ROG Ally

ROG Elite - program nagród już dostępny w Polsce! Zgarniaj unikalne prezenty od Republiki

How to overclock your graphics card with GPU Tweak III

15 tips & shortcuts to set up and optimize your ROG Ally

How to Install Games to an SD Card on the ROG Ally
Najnowsze Artykuły

How fast should my internet be for gaming? How to reduce lag and optimize online multiplayer
Find the optimal internet speed for gaming and get tips to reduce lag, lower ping, and enhance your online gaming experience with wired and wireless setups.

The best ROG gaming laptops for college students in 2024
No matter which university or major you choose this fall, ROG has the right gaming machine for your campus life.

How to overclock your graphics card with GPU Tweak III
Learn how to overclock your graphics card safely using ASUS GPU Tweak III. Here are the essential steps, tools, and tips you need for maximum performance.

How to build a dream setup with your gaming laptop
Transform your gaming laptop into the ultimate battlestation with ROG.

How to customize the ROG Ally's gyro settings for superior motion control
Unlock next-level control by tweaking the ROG Ally's gyro settings for ultra-precise aiming.

FSR vs RSR vs RIS: Using the ROG Ally's upscaling and sharpening features
Unlock optimal gaming with the ROG Ally: Learn about how and when to use FSR, RSR, and RIS technologies for superior performance and image quality.