15 tips & shortcuts to set up and optimize your ROG Ally or ROG Xbox Ally
So you’ve finally got your hands on an ROG Ally, ROG Xbox Ally, or ROG Xbox Ally X, and you're itching to get your game on. For the best possible experience, there are a few things you should do first — and a few tips you should know to get the peak performance out of your device. Here’s how to set up, optimize, and shortcut your way through your new handheld.
Update Armoury Crate, drivers, and more
Before you get to gaming, it’s a good idea to update all the software on your device. This will not only bring you the latest features, but will ensure the best possible stability and performance.
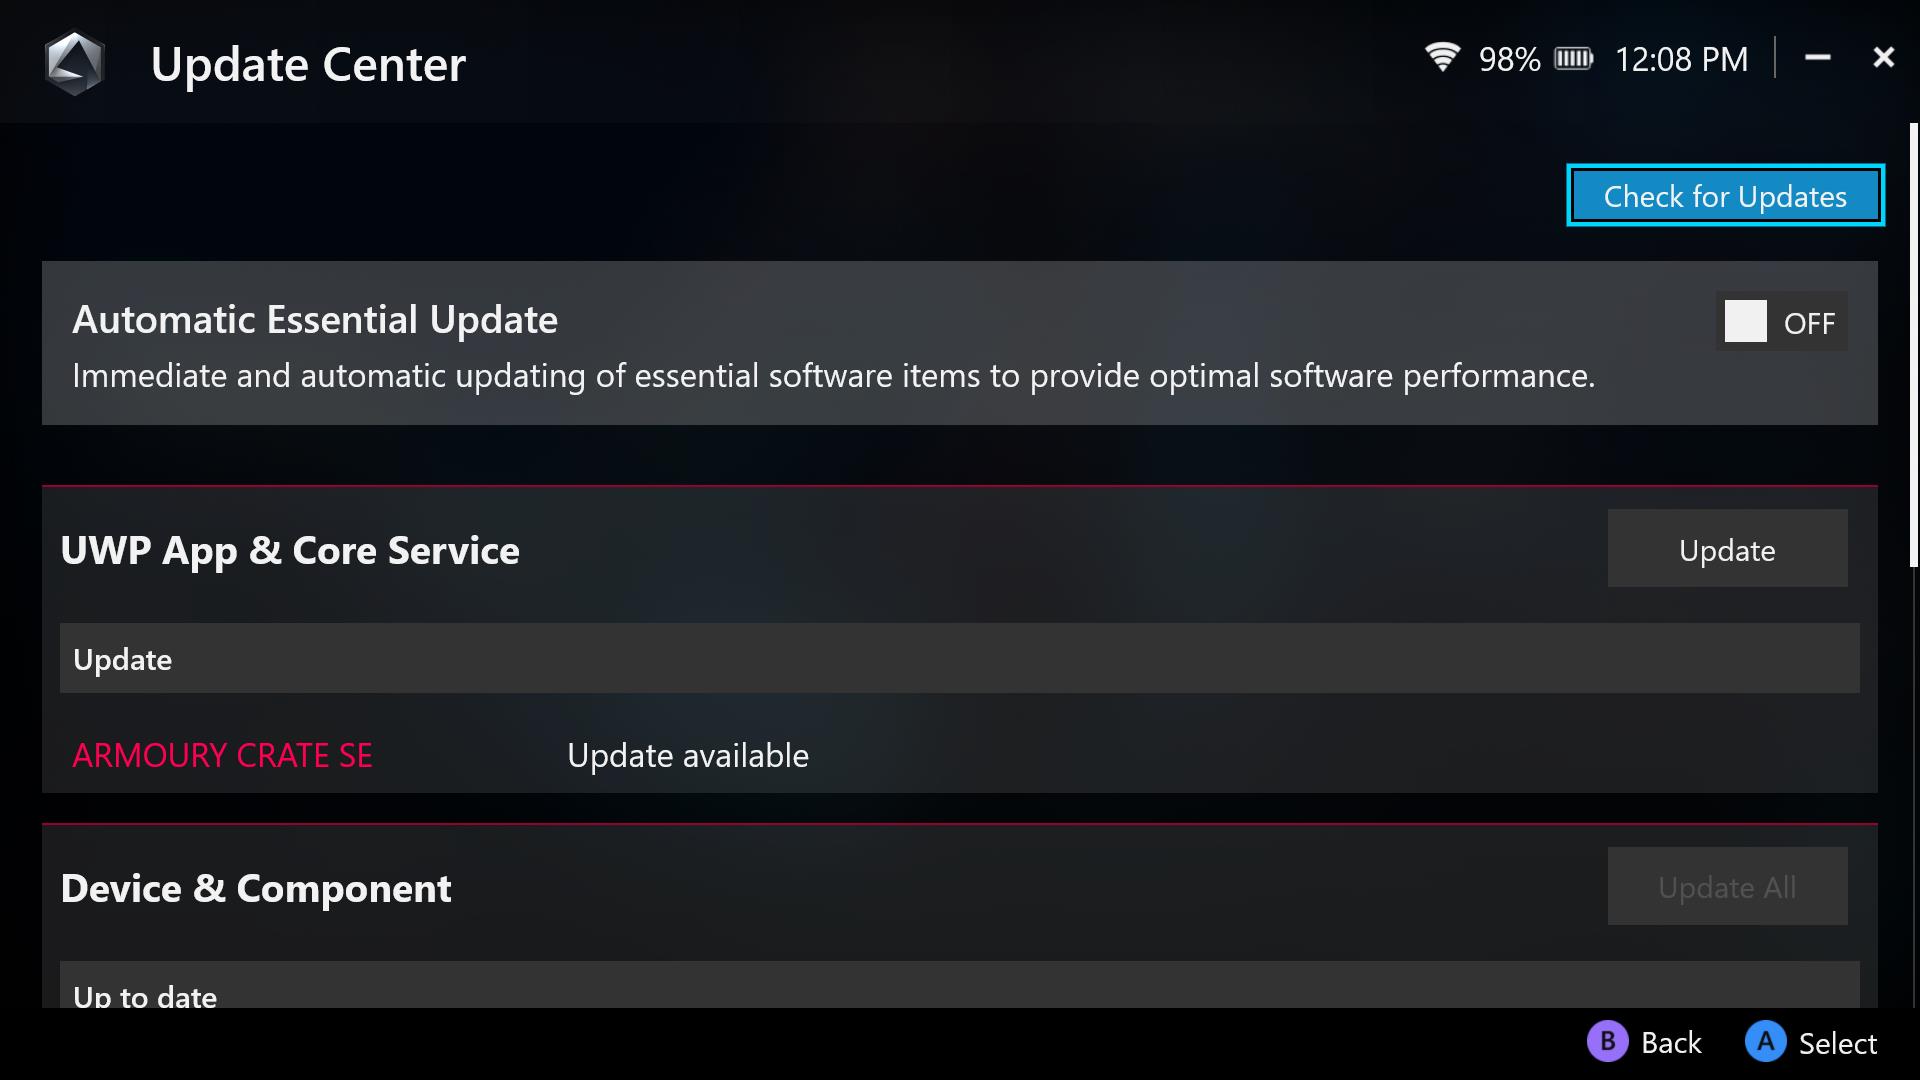
Most of your important updates will come through the Ally’s Armoury Crate Special Edition software. On the ROG Xbox Ally, you can open it by pressing the Armoury Crate button on the left side of the device and tapping “Open Armoury Crate SE.” From the Settings tab open the Update Center. Update everything available in this list. You can set these updates to run automatically in the future, or check back here occasionally for new additions.
Windows, Xbox, and other core apps will also update themselves automatically or notify you when important updates are available.
Install your games
The ROG Ally and ROG Xbox Ally handhelds feature a large library of compatible games so you can get right into the action.
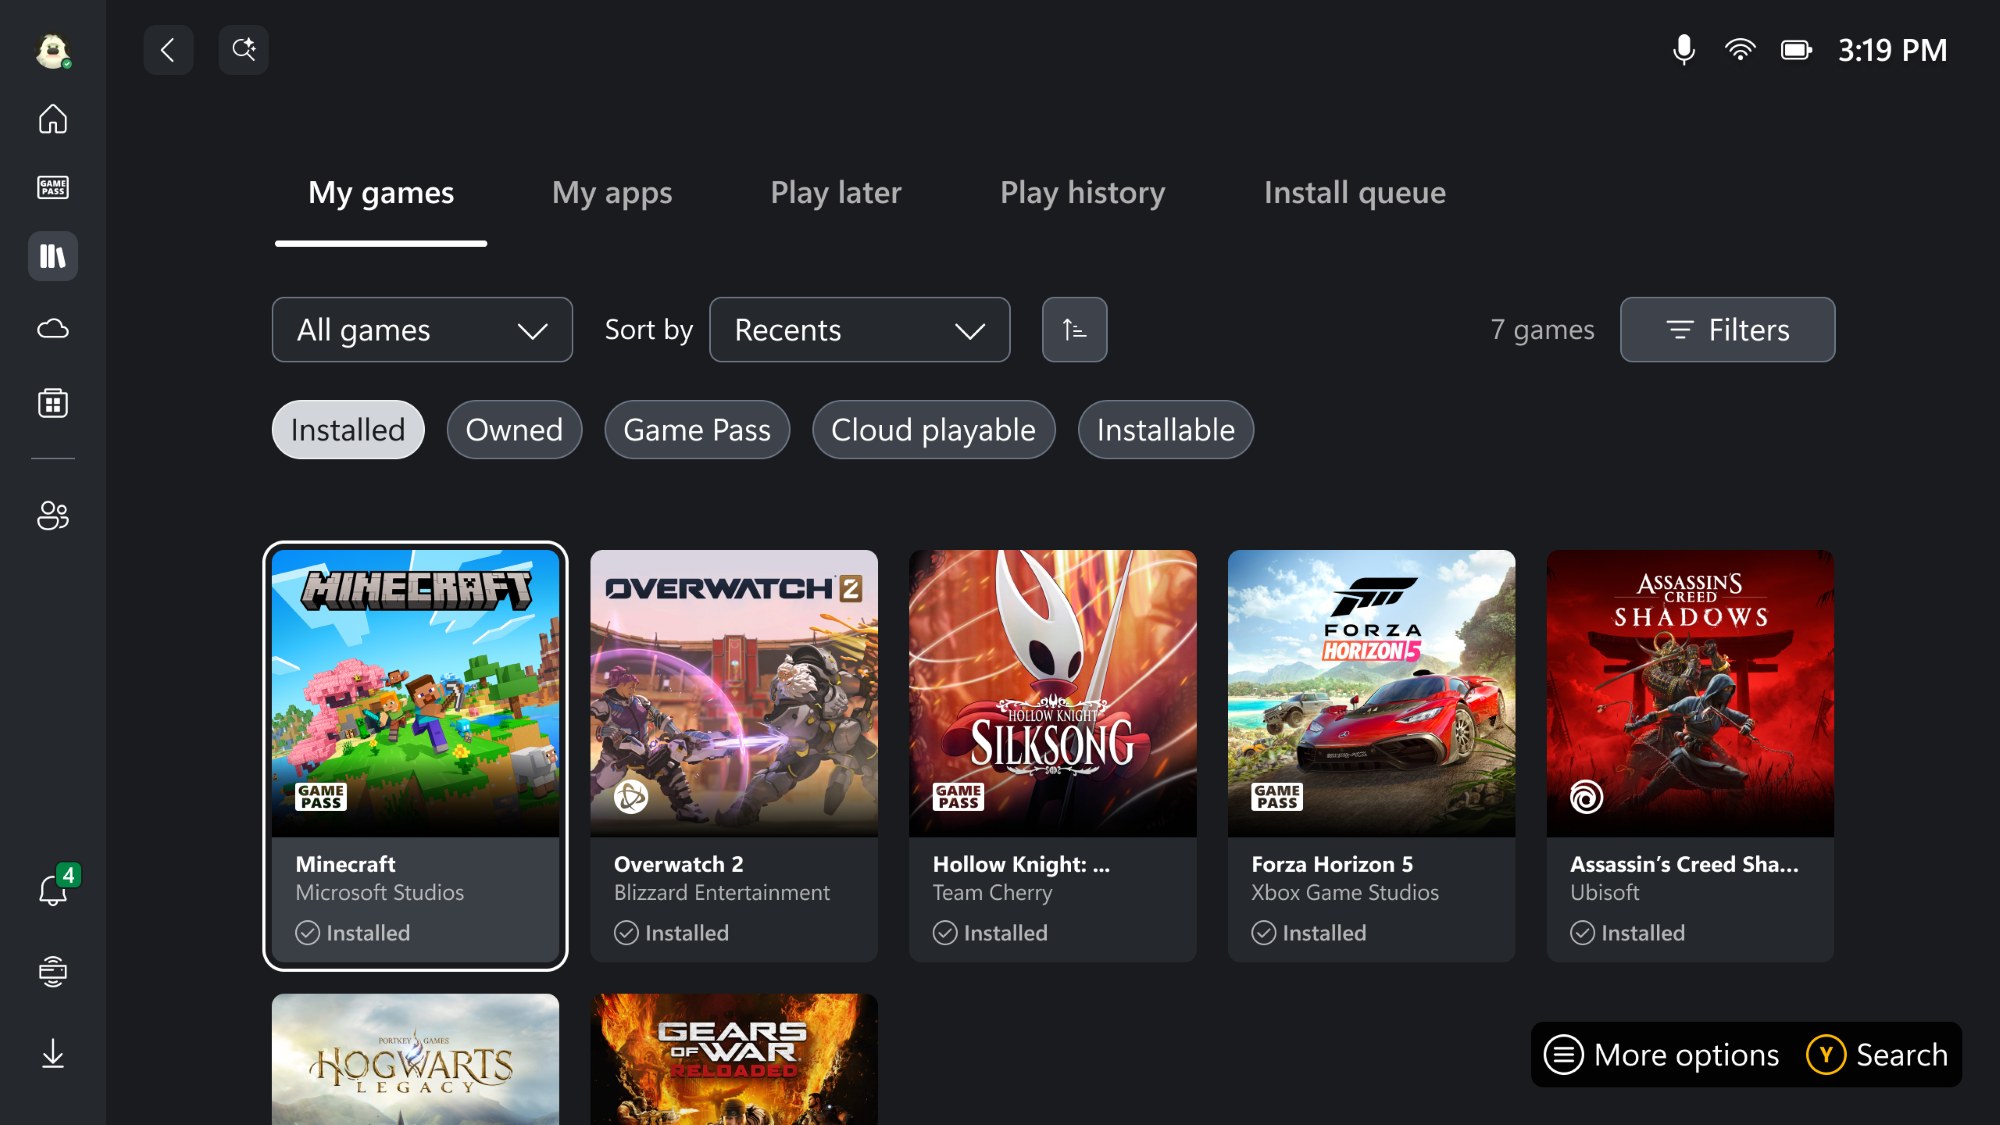
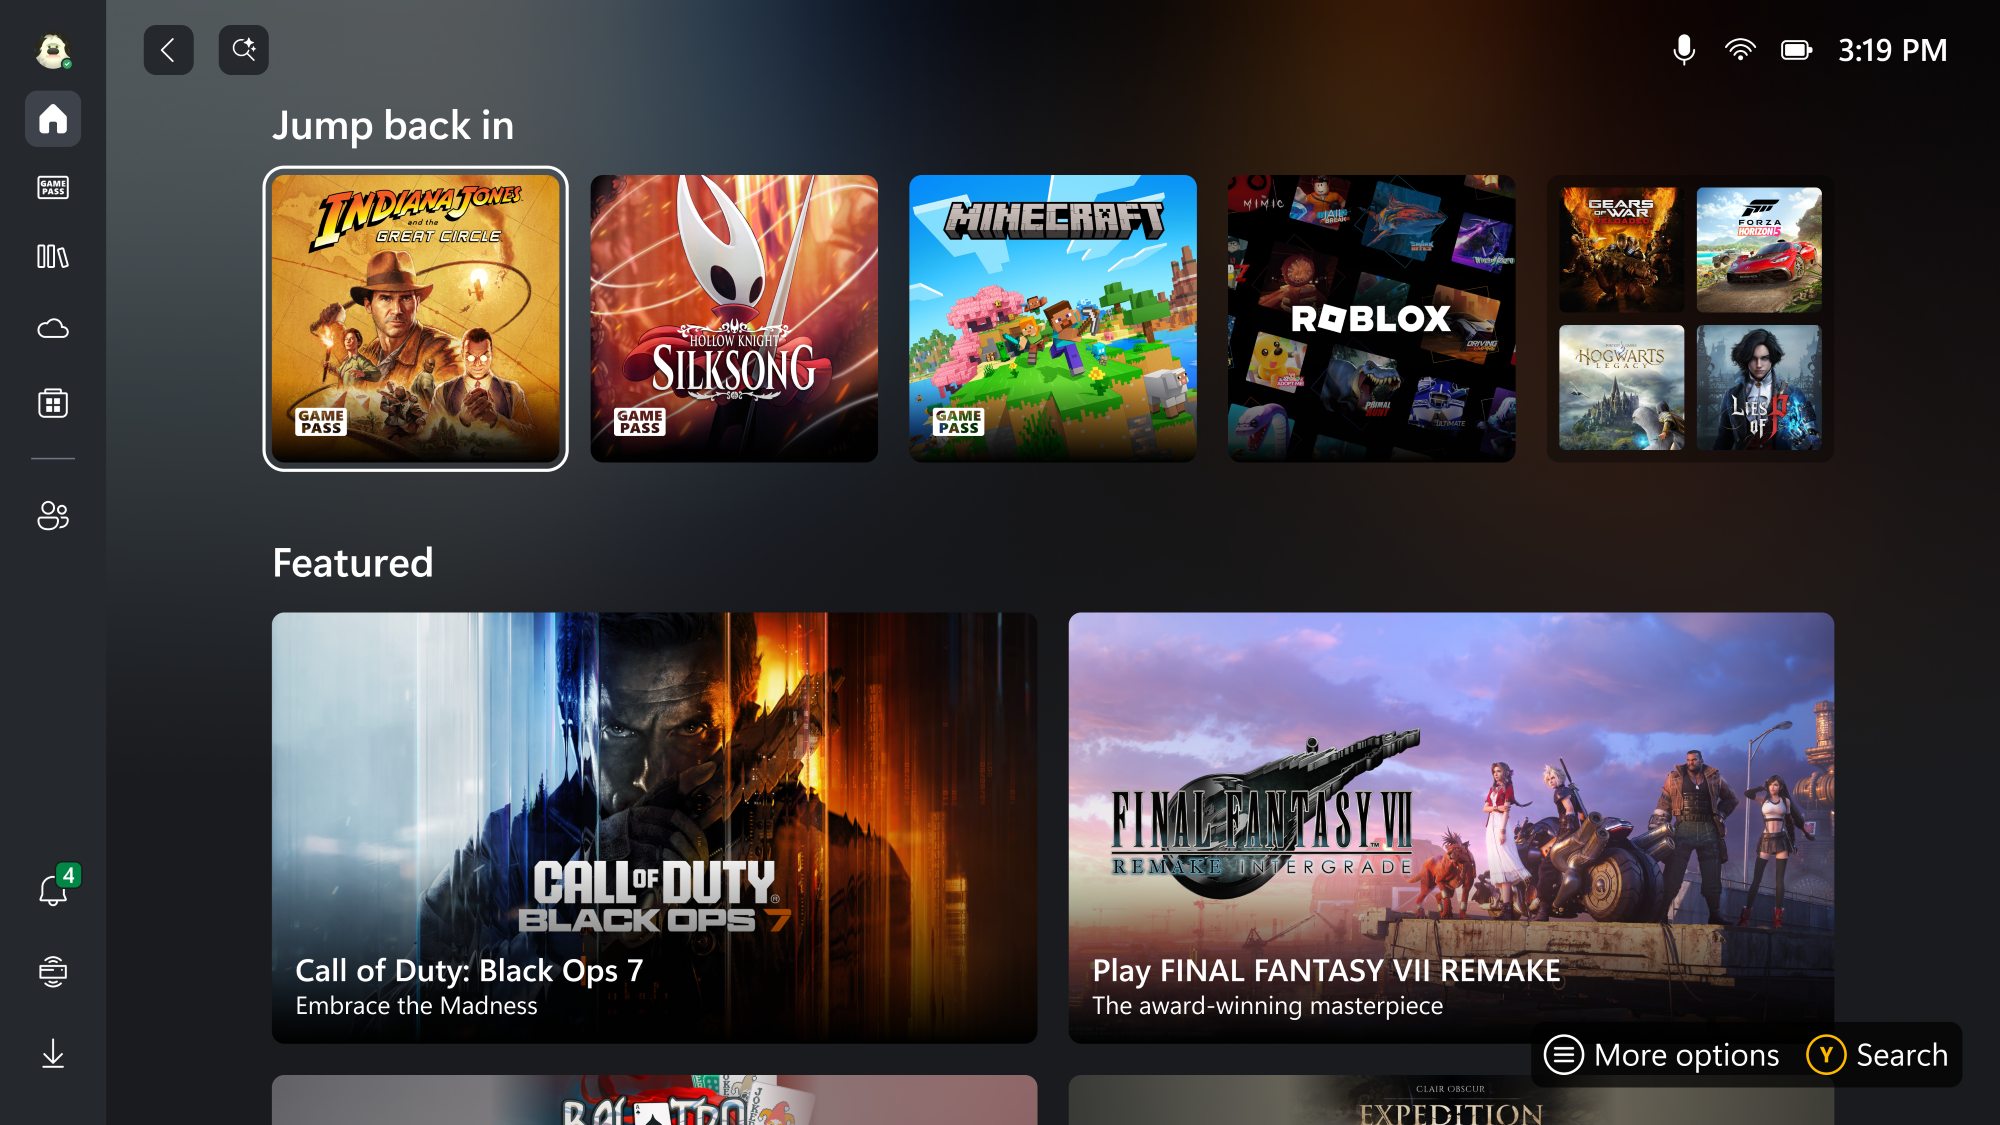
You can get started right out of the gate from the Xbox app. Since all ROG Ally handhelds come with three months of Game Pass for free, you can start browsing hundreds of games right then and there. (If you aren’t sure where to start, check out our favorite games for the ROG Ally, many of which are on Game Pass or are free to play.) If own the PC version of a game or the game supports Xbox Play Anywhere, you can install it locally to your device, while games that aren’t part of the Play Anywhere program can be streamed from the cloud or played remotely from your Xbox console.
The Xbox app will let you know which games are optimized for handheld play as well – just look for the “Handheld Optimized” badge on any given game. That badge ensures the game is ready to go right out of the box with default controller inputs, readable text, and other optimizations. If you see “Mostly Compatible,” that means it’ll run well, but may require a few in-game settings tweaks for an optimal experience on handhelds. You’ll also see Windows Performance Fit indicator on store pages -- “Should play great on this device” means you can expect an average of 60 FPS or more, while “Should play well on this device” denotes a 30 FPS experience.
If you’ve purchased games from other PC storefronts in the past, you can also install other launchers just as you would on any other Windows machine. From Armoury Crate's Game Library, press the right trigger to scroll over to the Game Platforms tab for quick access to the most popular game stores. Once downloaded and installed, you’ll be able to browse those stores just like you would on a Windows PC – just swipe up from the bottom of the screen to switch between the apps you have open.
Once you’ve installed a few games, they’ll show up in your Xbox aggregated library and in Armoury Crate’s library tab – so you can launch them from either location. To launch a game, just select it and press the A button.
You can also add other apps or games to Armoury Crate’s library manually by pressing the Add button. (If your app or game isn't in the list that appears, press RB or LB to browse to an EXE file on your computer.) Armoury Crate has a ton of different view and sort options as well – check out our complete guide to customizing Armoury Crate for more tips, and to stock up on even more games, check out our full guide to saving money on PC games too.
Set your operating mode (or create a manual mode)
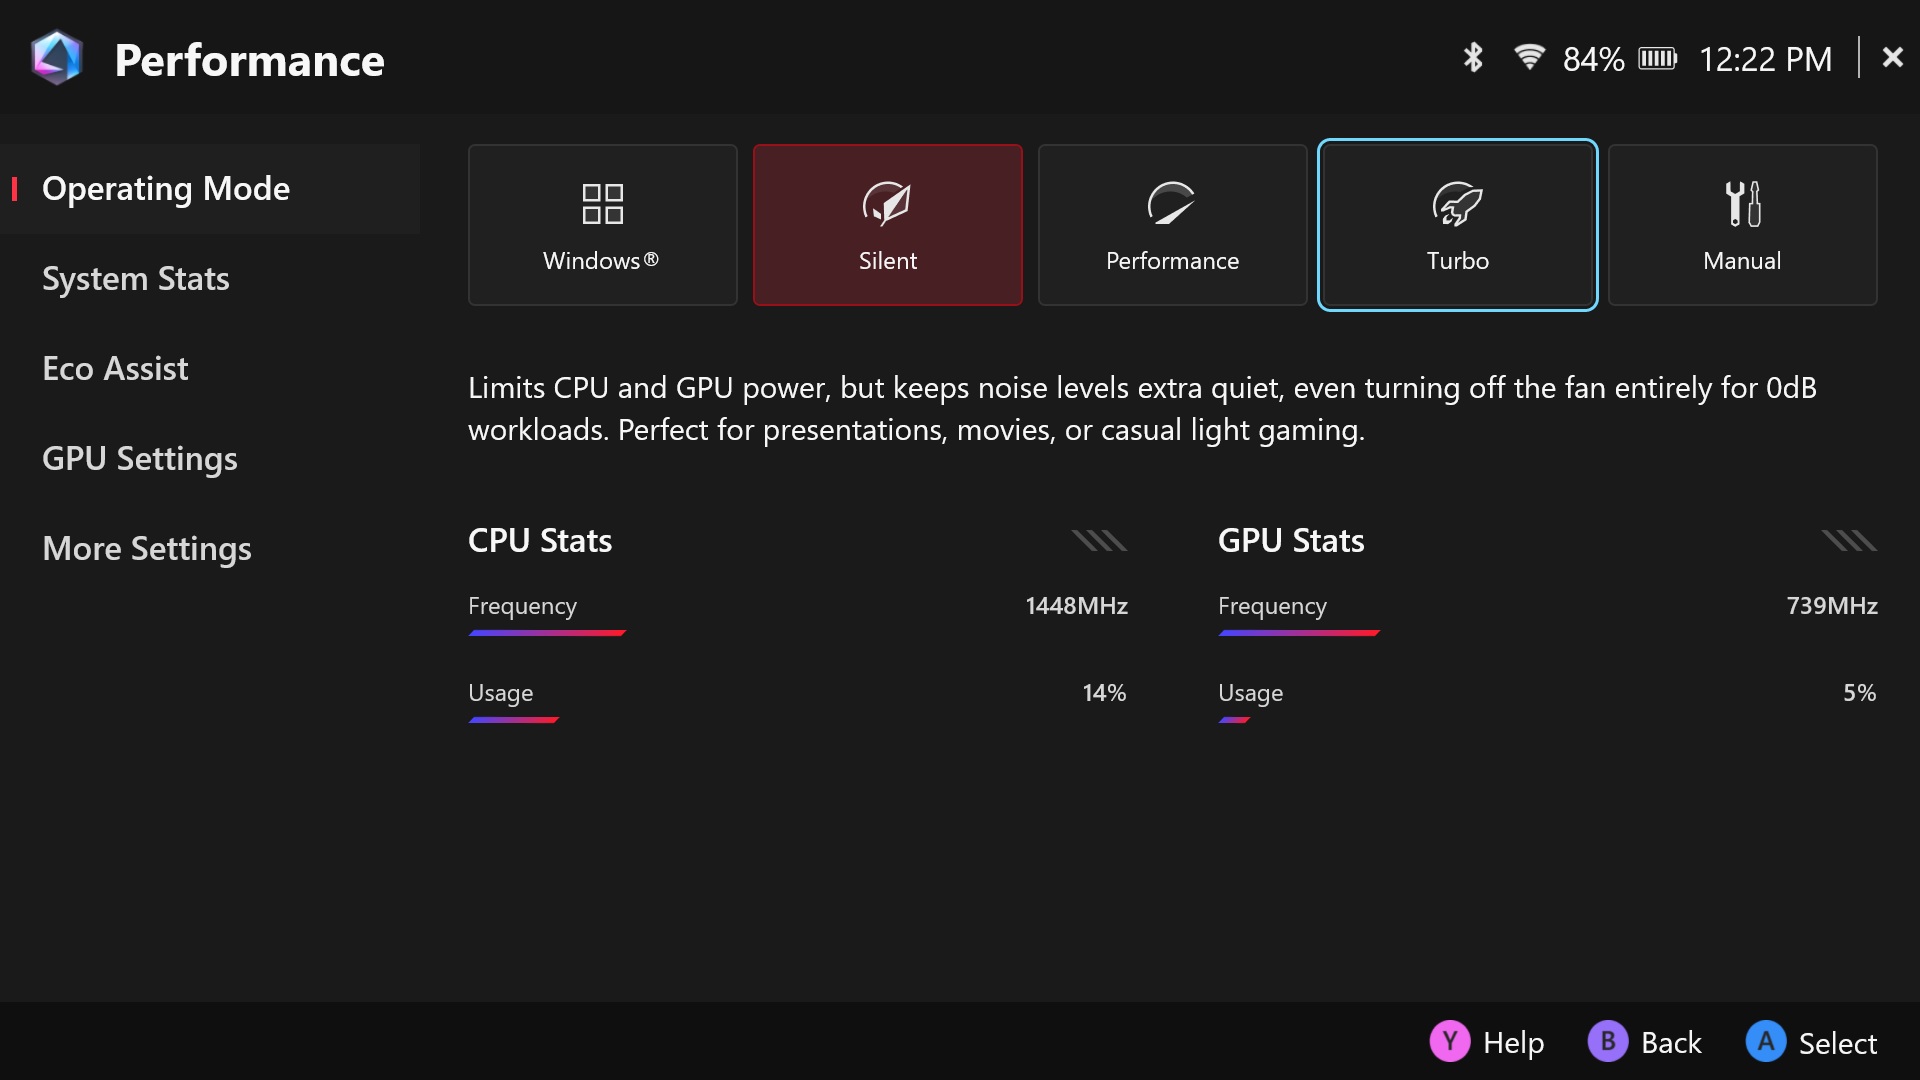
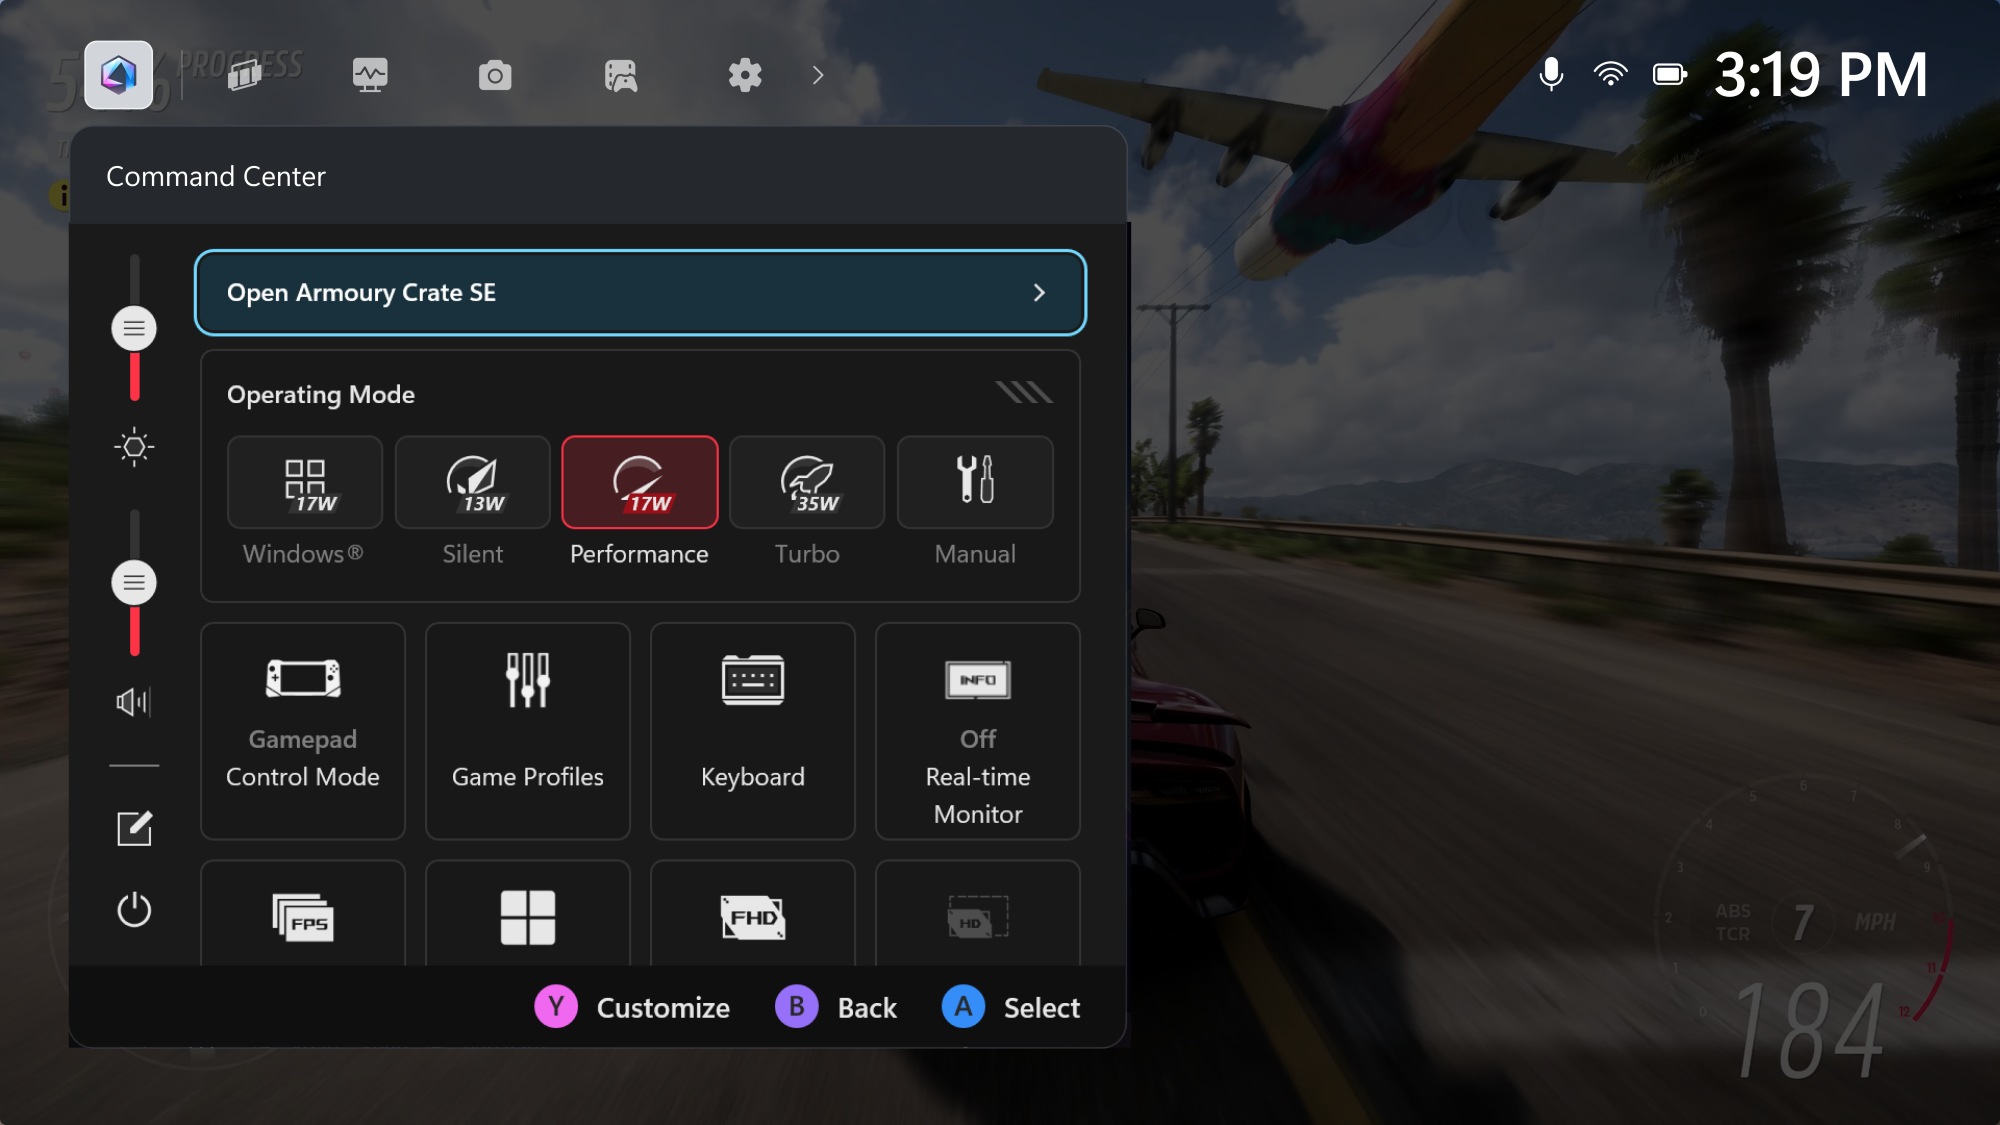
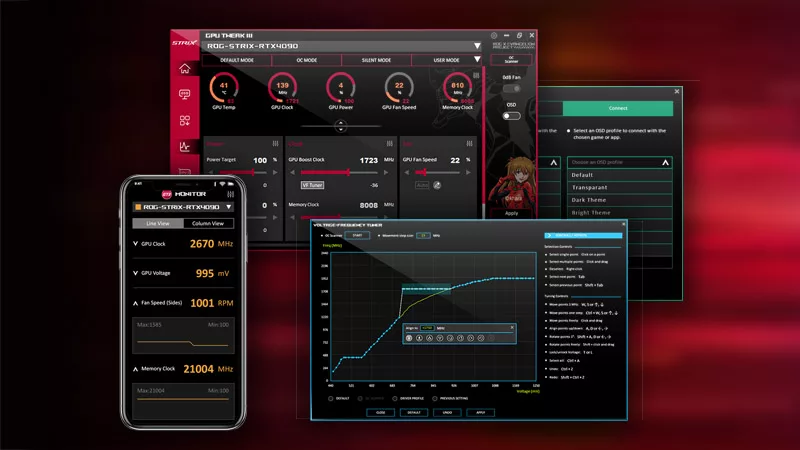
Armoury Crate puts you in control of your Ally's performance, battery life, and fan speed through preconfigured operating modes. To see them, tap the button with the hexagonal icon to the left of the screen. This will open the Command Center, which has a number of quick settings you can toggle.
Silent, Performance, and Turbo each allocate different levels of power to the hardware for a quieter or more performant experience. Silent mode operates at lower wattage for quiet, more battery-friendly gameplay at the cost of some performance. Performance mode operates in more of a middle ground for a balance between performance and battery life, while Turbo mode cranks the power all the way up to for maximum framerates (with a bit of an extra boost when you’re plugged in to the wall on certain models). If you'd prefer to take the reins for yourself, you can create a custom Manual operating mode that lets you fine-tune the wattage and fan curve for your preferred balance of performance, battery life, and fan noise.
While you're here, you may want to check out some of the other performance-related settings available—like the Ally's VRAM allocation in GPU Settings, which can allow you to use higher resolution textures in some games. You can also disable CPU boosting under the Eco Assist tab if you'd like to experiment with allocating more of the system's power to the GPU, which can help improve performance or power efficiency in certain scenarios.
For more ways to crank up the framerate, check out our full guide to boosting performance on the ROG Ally, as well as our guide to boosting the Ally’s battery life.
Customize quick settings in the Command Center
While you’re in the Command Center, you may also be interested in adding or customizing the functions that appear in this quick menu. Everyone’s gaming needs are different, and by customizing this menu, you can remove the features you don’t use and add in the ones you do.
For example, the Command Center allows you to:
- Quickly change the screens’ brightness using the slider on the left of the Command Center
- Change Operating Modes (Silent, Performance, and Turbo) if you want to get more performance or battery life from the current game
- Change Control Modes (Auto, Gamepad, or Desktop) which can be helpful if a certain game isn’t automatically detecting the controller
- Bring up a real-time monitor to see your CPU usage, GPU usage, FPS, and battery level in-game
- Limit your FPS for battery savings or a more consistent framerate
- Switch between GameVisual color profiles
- Toggle the RGB lighting, Airplane Mode, or microphone
- Enable AMD Radeon Super Resolution or AMD Fluid Motion Frames for higher framerates
- Take a quick screenshot or video recording
- ...and more!
To change which of these options appear, open the Command Center and press Y to open the customization menu. You can then select different options to move, replace, or delete them.
Create your own button shortcuts
When you play a game with built-in controller support, everything should just work out of the box — you’ll see Xbox-style button prompts as you play, with all the default button mappings in tow. You’ll also be able to use the M1 and M2 buttons on the back of the device for certain macros – holding one of those buttons and pressing A, for example, will take a screenshot.
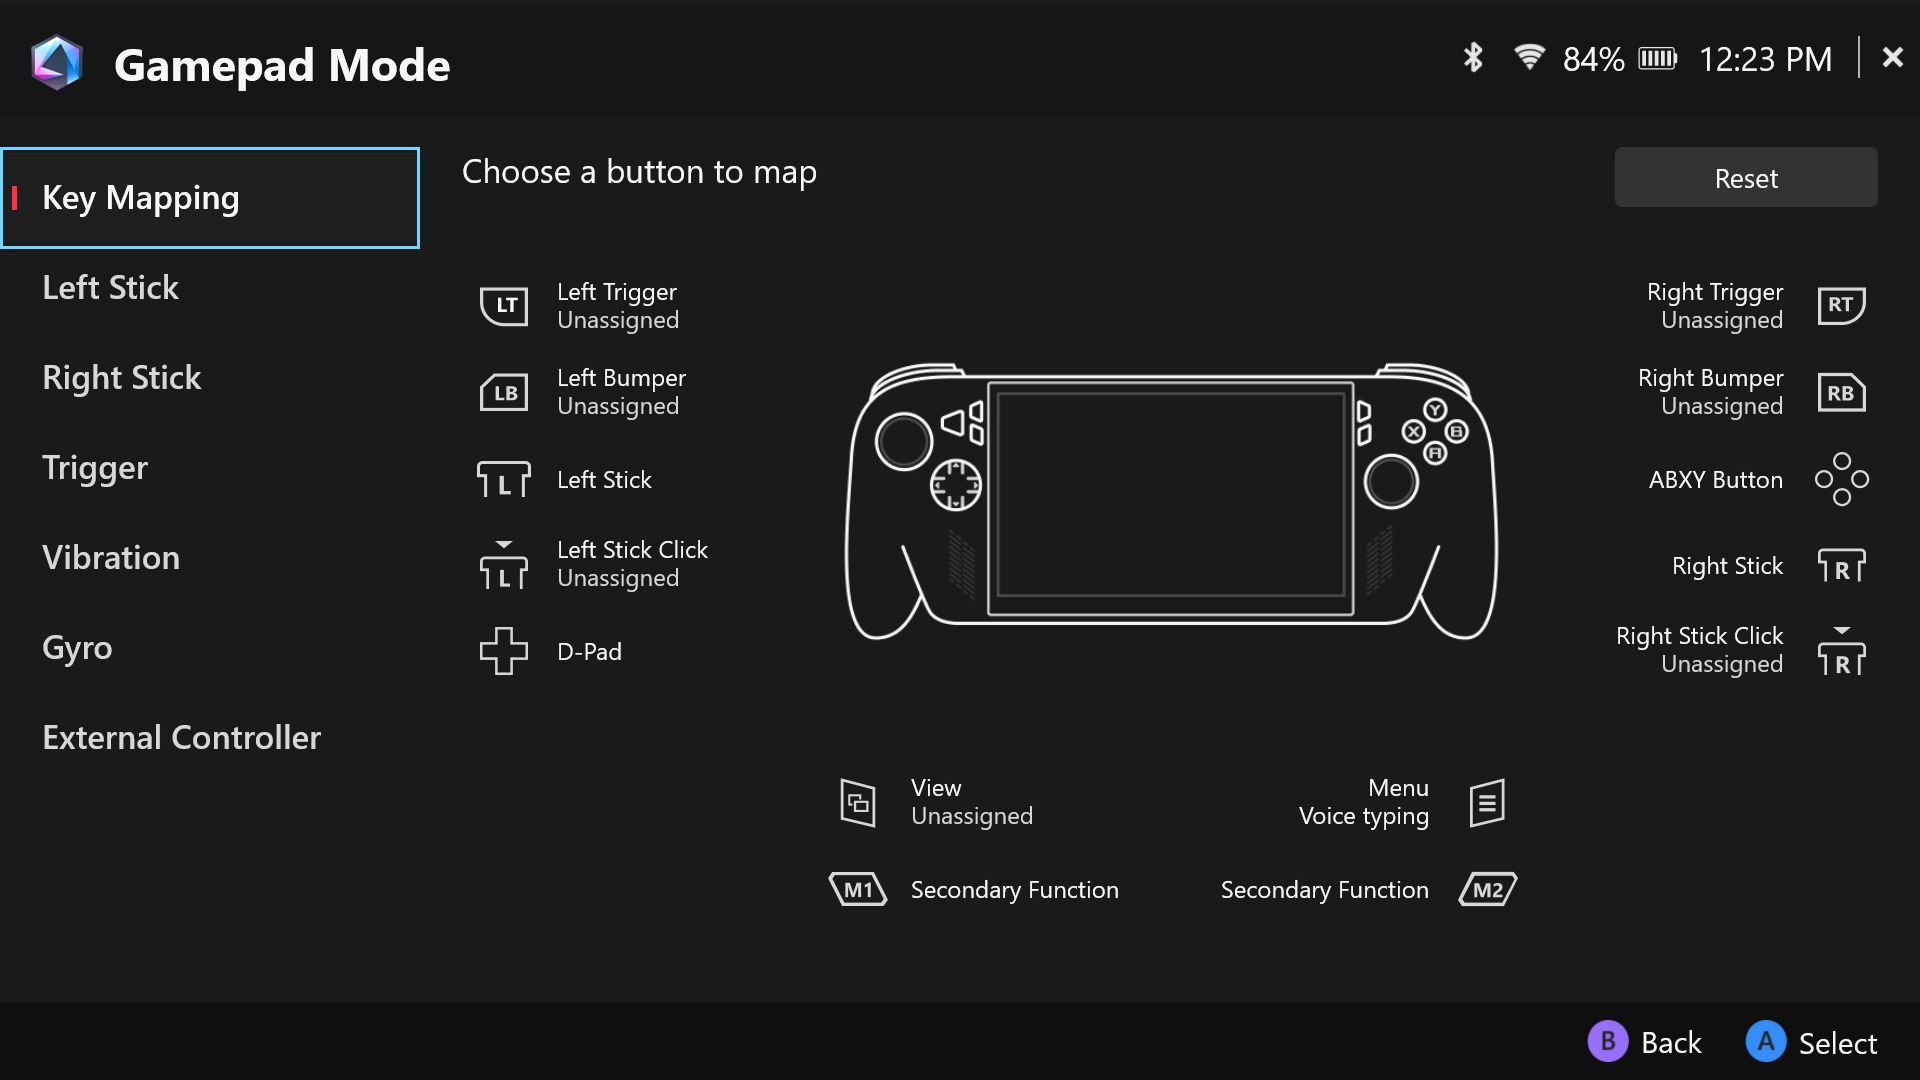
To start, open the Command Center and set the Control Mode to Auto before configuring buttons. Then, in Armoury Crate, head to the Settings tab, select the Configure option under Control Mode, and choose which scenario you want to remap buttons for (Gamepad Mode for supported games, or Desktop Mode for navigating Windows and games that don’t support controllers). Select the button you want to change, and you can remap it to another button, invoke a custom action, or give it a secondary function that happens when you press it in conjunction with the macro buttons on the back of the device.
If you want to remap buttons for a specific game only, you can highlight the in Armoury Crate’s Game Library and press X to create a Game Profile. From there you can choose an operating mode for it to automatically use, customize the game’s button mappings, or even enable a number of other performance features (like AMD Fluid Motion frames, which smooths out motion as described in this guide). Check out our full guide to button remapping and game profiles for a more detailed guide on everything you can do with this feature.
Customize the triggers, joysticks, vibration, and gyro control
While you’re in the button remapping window, you can also customize a few other aspects of the controller: notably the sensitivity of the triggers and sticks, and the strength of its haptic feedback. You can also enable gyroscope control for more precise aiming in first-person shooters.
First, it's a good idea to calibrate your sticks and triggers to make sure you're getting the ideal range out of both. To do so, head to Armoury Crate's Settings and select the Calibrate option. Calibrate the left stick, right stick, left trigger, and right trigger according to the on-screen instructions.
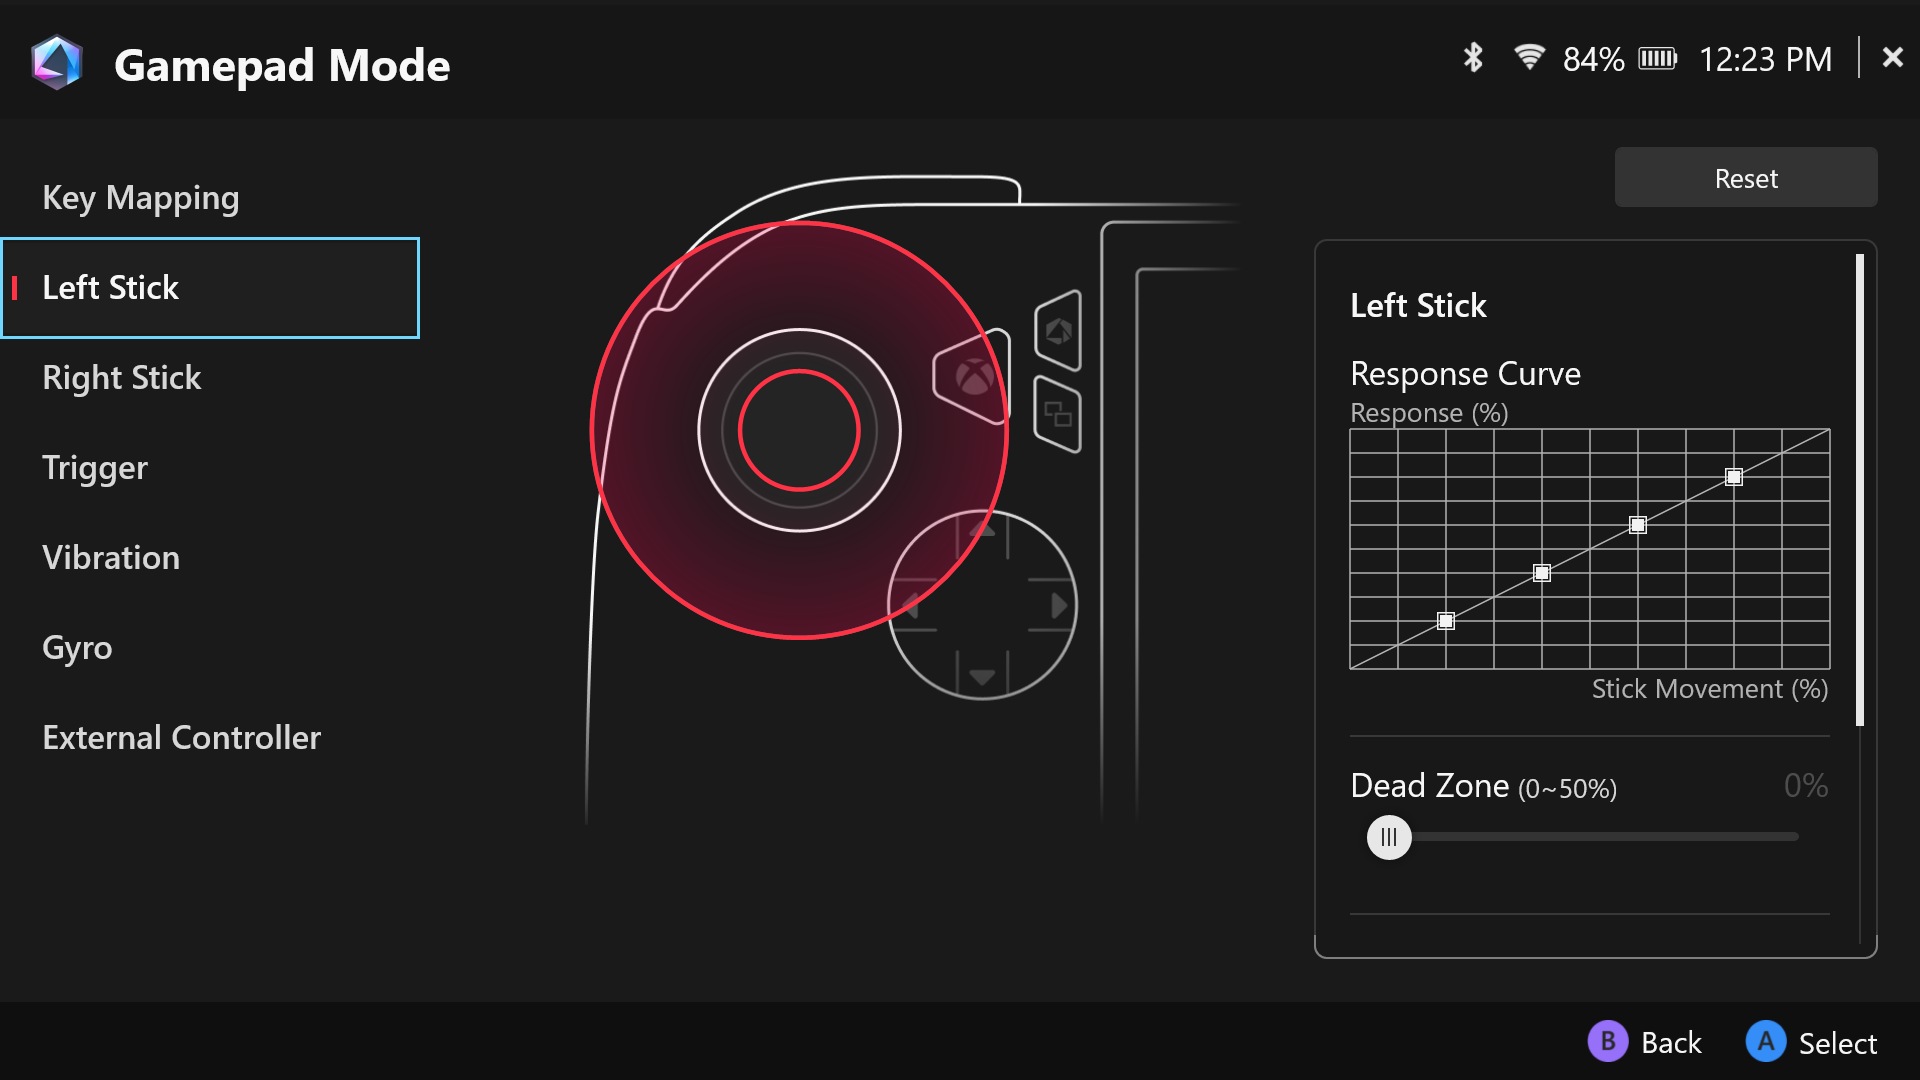
Then, to further customize, head back to Armoury Crate’s Control Mode configuration or bring up the Game Profile of the game you want to customize. Select the Left or Right Stick to adjust the dead zone, outer threshold, or to increase the sensitivity with the anti-deadzone slider. Advanced users can also adjust the stick's sensitivity curve if you want a more precise feel to the stick. Select Trigger in the sidebar to set the sensitivity of the analog triggers, and check the Mirror Triggers box if you want them to have the same sensitivity level. The Vibration tab lets you set the vibration intensity, if you’d like a quieter or less intense experience in-game.
Some users like using the Ally's built-in gyroscope for more precise movements in some games. To enable this, select the Gyro tab, change the Gyro behavior to act as a mouse, left stick, or right stick depending on the game you're playing. (For example, to have the gyroscope aim in first-person shooters, you'd have it act as the right stick.) You can then adjust the sensitivity and dead zone, customize the Gyro Enable button (so it's only active when, say, you hold down the left trigger), and adjust other settings to your liking. Check out our full gyro settings guide for more detail.
Tweak your game settings
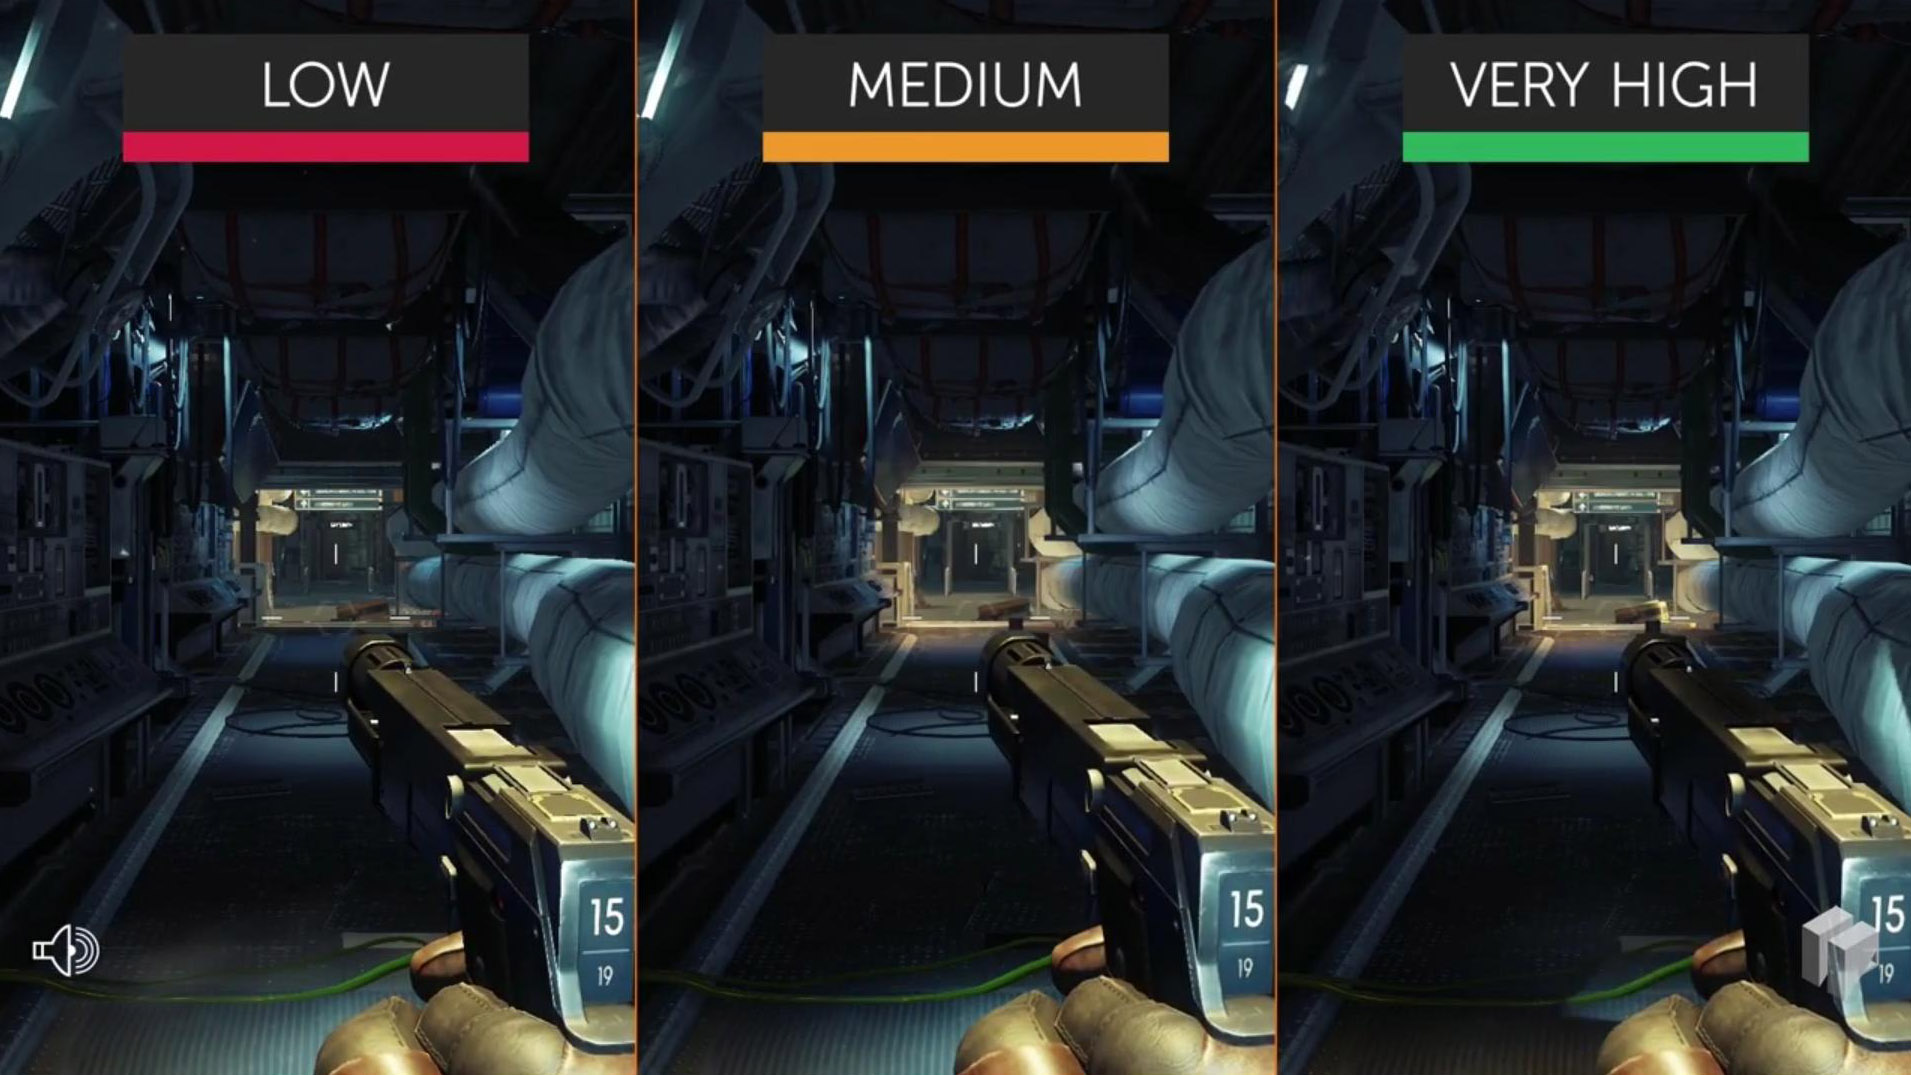 Image source: Gamesplanet
Many games will run great the first time you run them. But some people like to really min-max their graphics and performance, and that’s the beauty of Windows gaming – you can get as granular as you want.
If you want to customize the balance of visual fidelity and performance in a given game, head into the game’s graphics settings and play around with the options. Some settings can have a big visual impact without affecting performance, and vice-versa, while others can affect both visuals and performance, so you’ll need to decide which ones are most important. If you want a good starting place for your tweaks, we have a number of performance guides for games on the ROG Ally, complete with what we think are the best settings for smooth, beautiful gameplay, as well as a video guide on tweaking the settings yourself. Use them to build your own configuration tailored to your preferences! You can also check out our guide to AMD's FSR, RSR, and RIS technologies here, as well as FSR 3 Frame Generation and AMD Fluid Motion Frames here, which are excellent tools when balancing performance with image quality.
Take quick screenshots and recordings
Whether you want to share a screenshot of your new Expedition 33 fashions or record your competition footage for studying later, we’ve got you covered on the Ally.
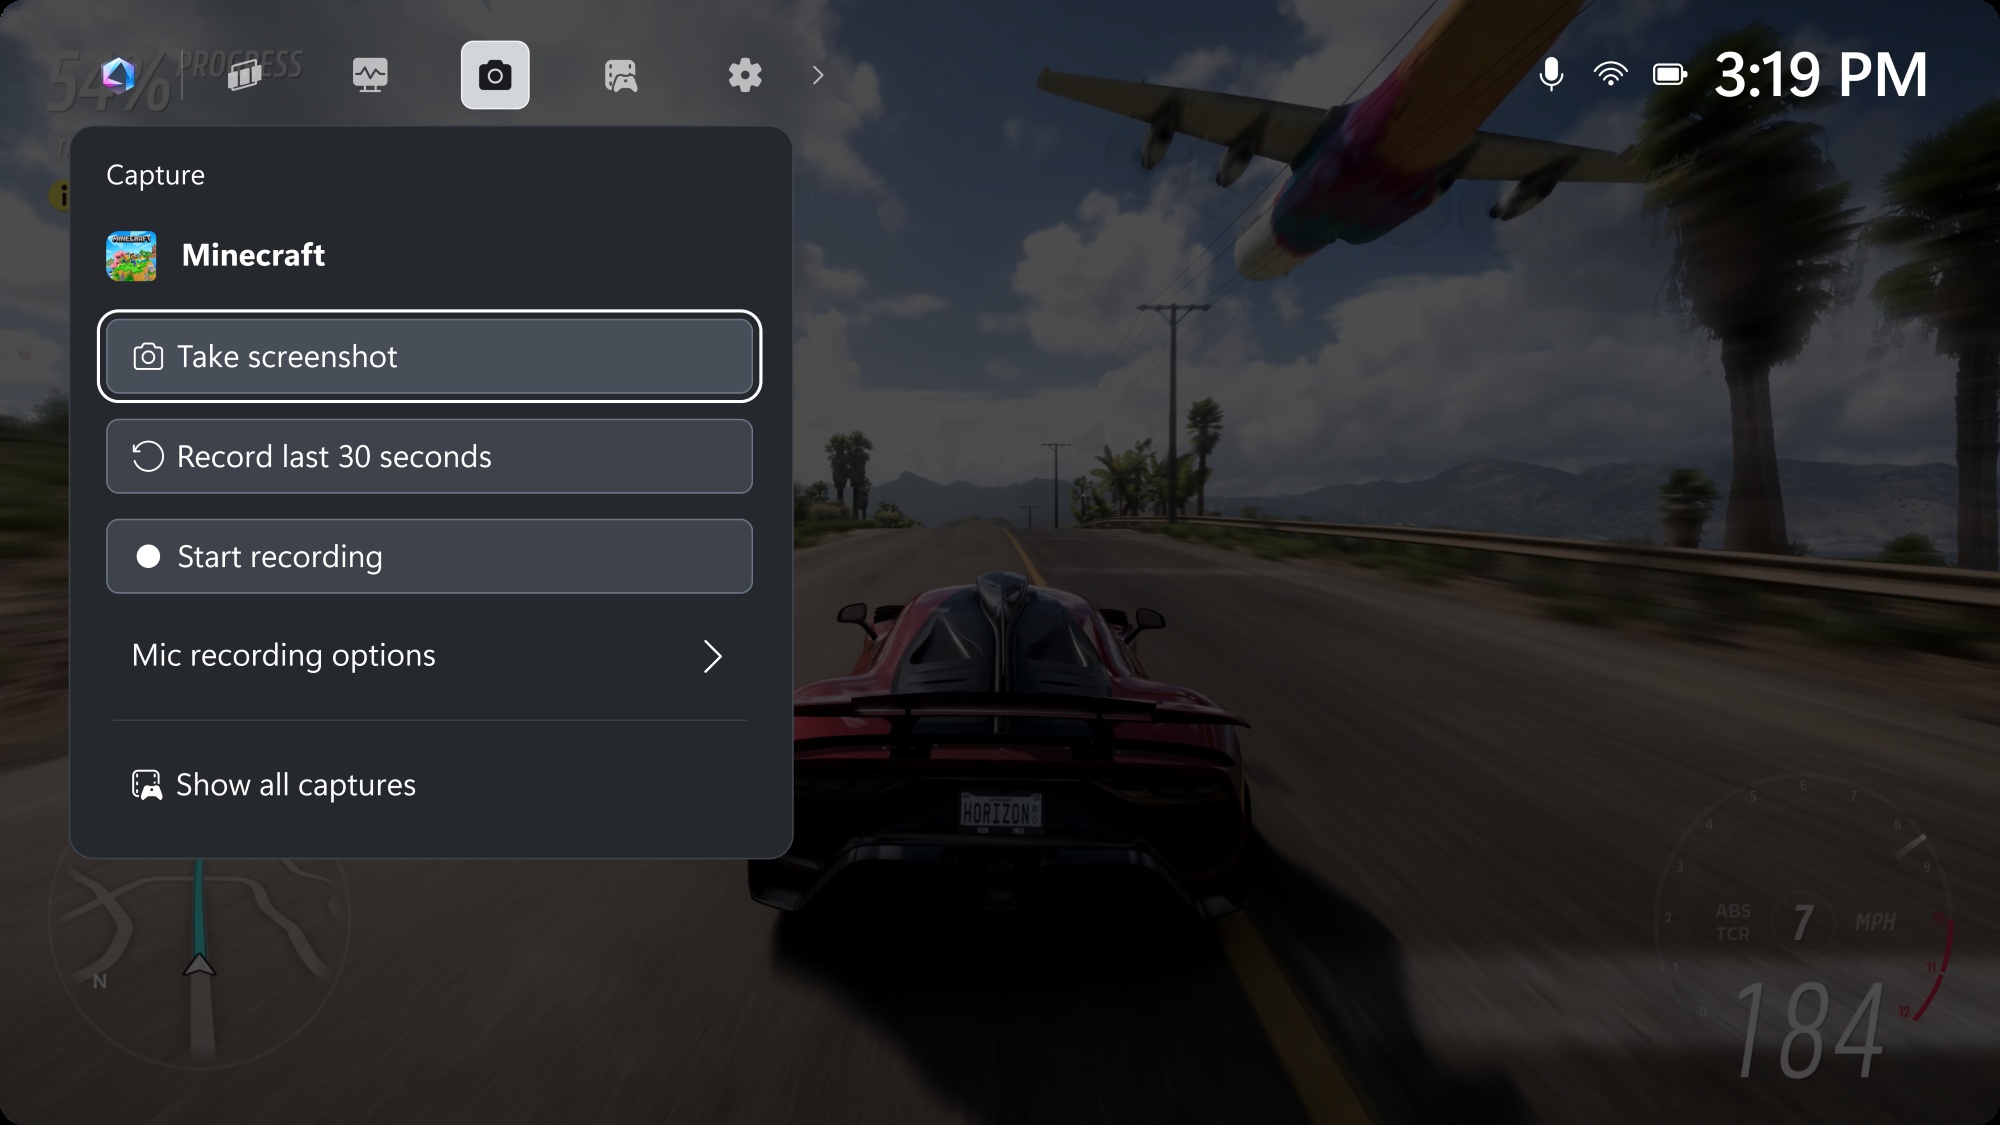
To take a screenshot in-game, you can press the Xbox button, head to the Capture tab, and tap the Take Screenshot or Start Recording button. You can even grab the last 30 seconds if something really cool just happened.
Alternatively, you can hold the M1 or M2 buttons on the back of the Ally and tap the A button. To start recording footage, hold M1 or M2 and press Y. If you’ve remapped the M1 or M2 buttons, you can also access the Screenshot and Recording functions from the Command Center while you’re in-game, though you’ll have to add them using the instructions earlier in this article.
You’ll be able to view and share these screenshots and videos by choosing See My Captures in the Capture tab of the Game Bar, or by going to Armoury Crate’s Media Gallery, under the Content tab. They’re also stored in Windows under C:\Users\[youruser]\Videos\Capture if you prefer to use the Windows desktop. For more tips on using the Media Gallery, check out our full guide to taking screenshots and recording footage on the Ally.
Enter the Windows Desktop
You can do a whole lot on the ROG Ally without ever visiting the Windows Desktop. But at its core, the Ally is a PC running Windows 11, which means you have the power to do anything you could do on a gaming PC. Want to mod your games into oblivion? You can make it happen. Want to install other apps like Spotify and Discord? It’s easy. Just enter the traditional Windows 11 desktop experience and browse the file system and Start menu the way you’re used to.
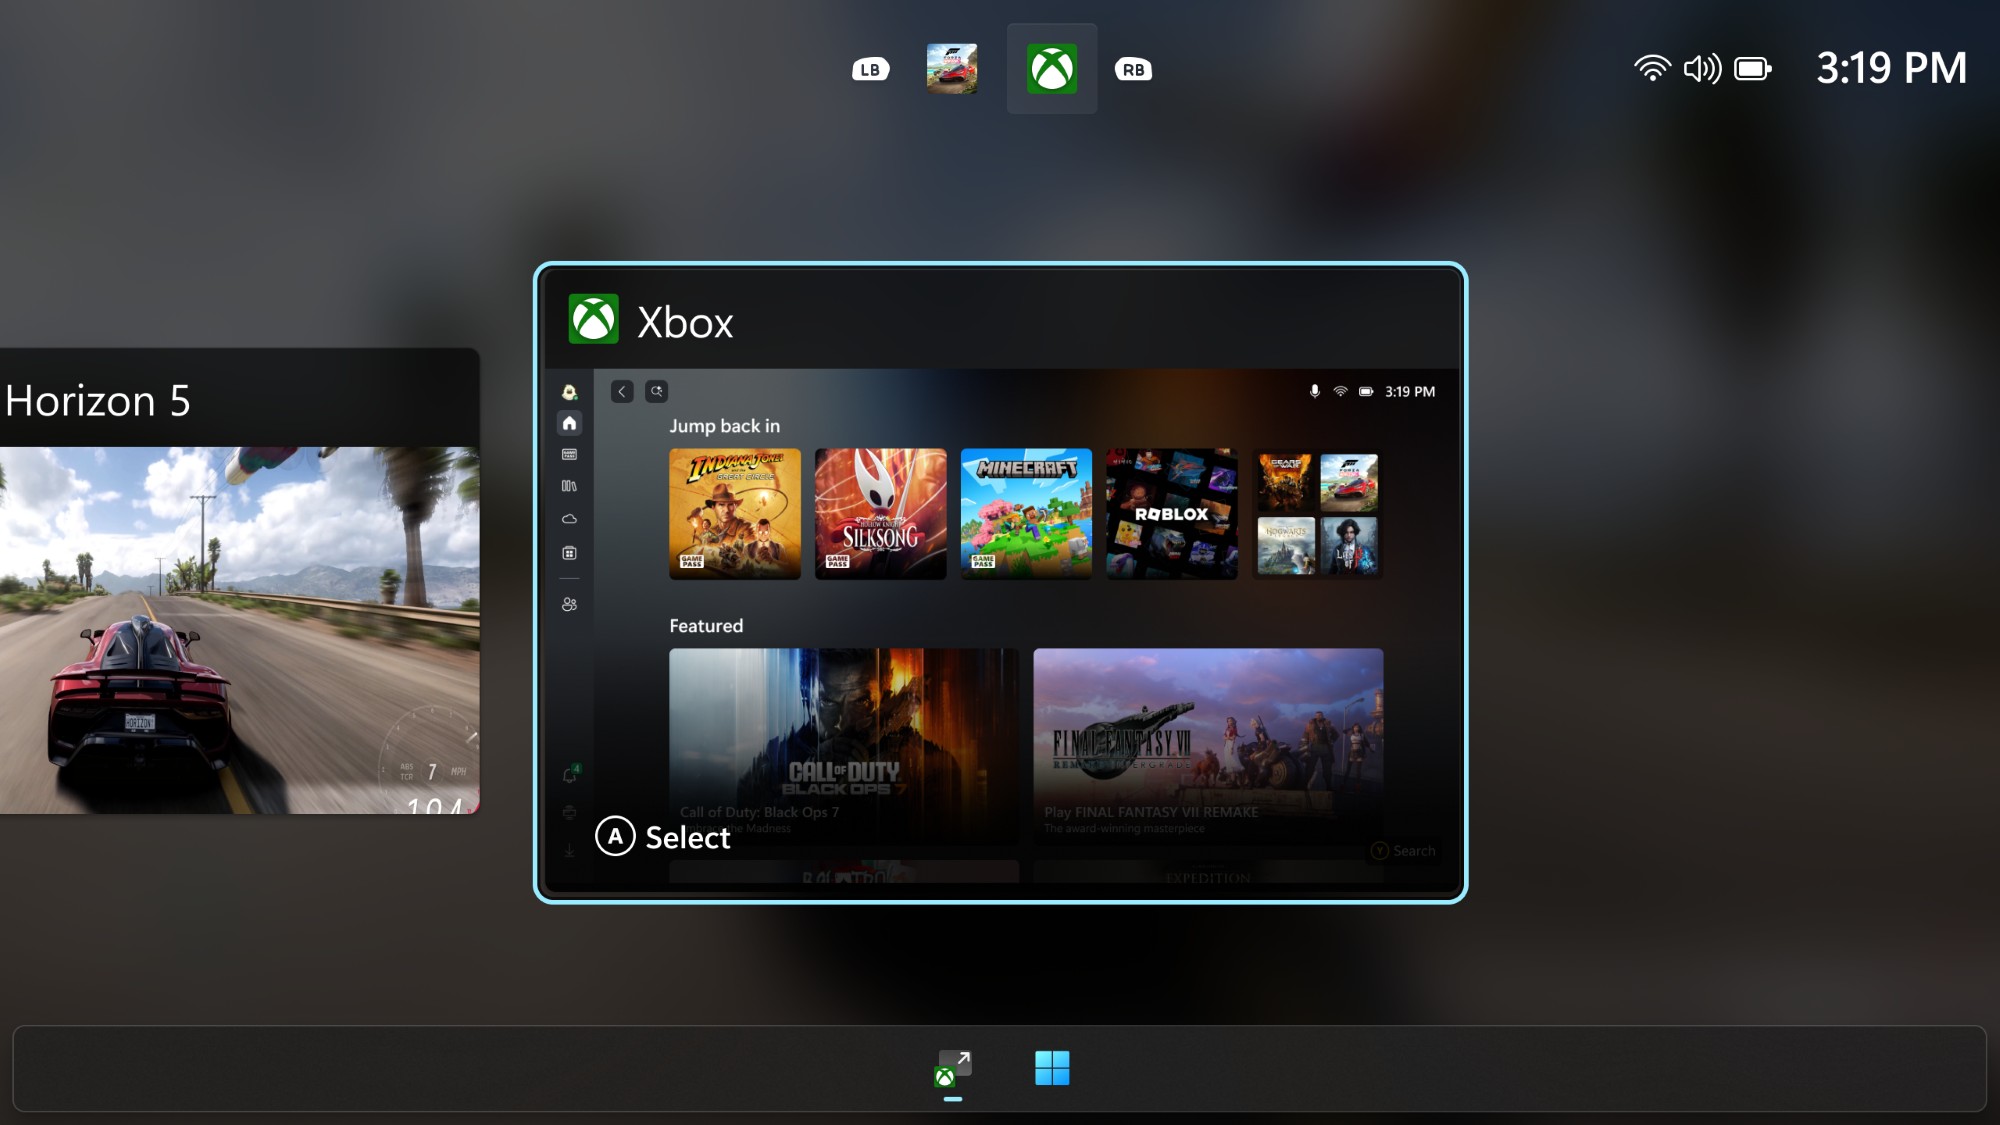
To do so, swipe up from the bottom of the screen to bring up the task switcher. Along the bottom, you’ll see a button labeled Windows Desktop. Tap that, and your Ally will immediately enter the full-fledged Windows experience in your hands, ready for whatever tasks you throw at it.
Set up the fingerprint sensor
While navigating the device is fairly simple, you don’t want to type in your password or PIN every time you turn on the Ally — those are precious seconds you could spend gaming instead. That’s why we built a fingerprint sensor into the Ally’s power button, so you can instantly log in and start playing.
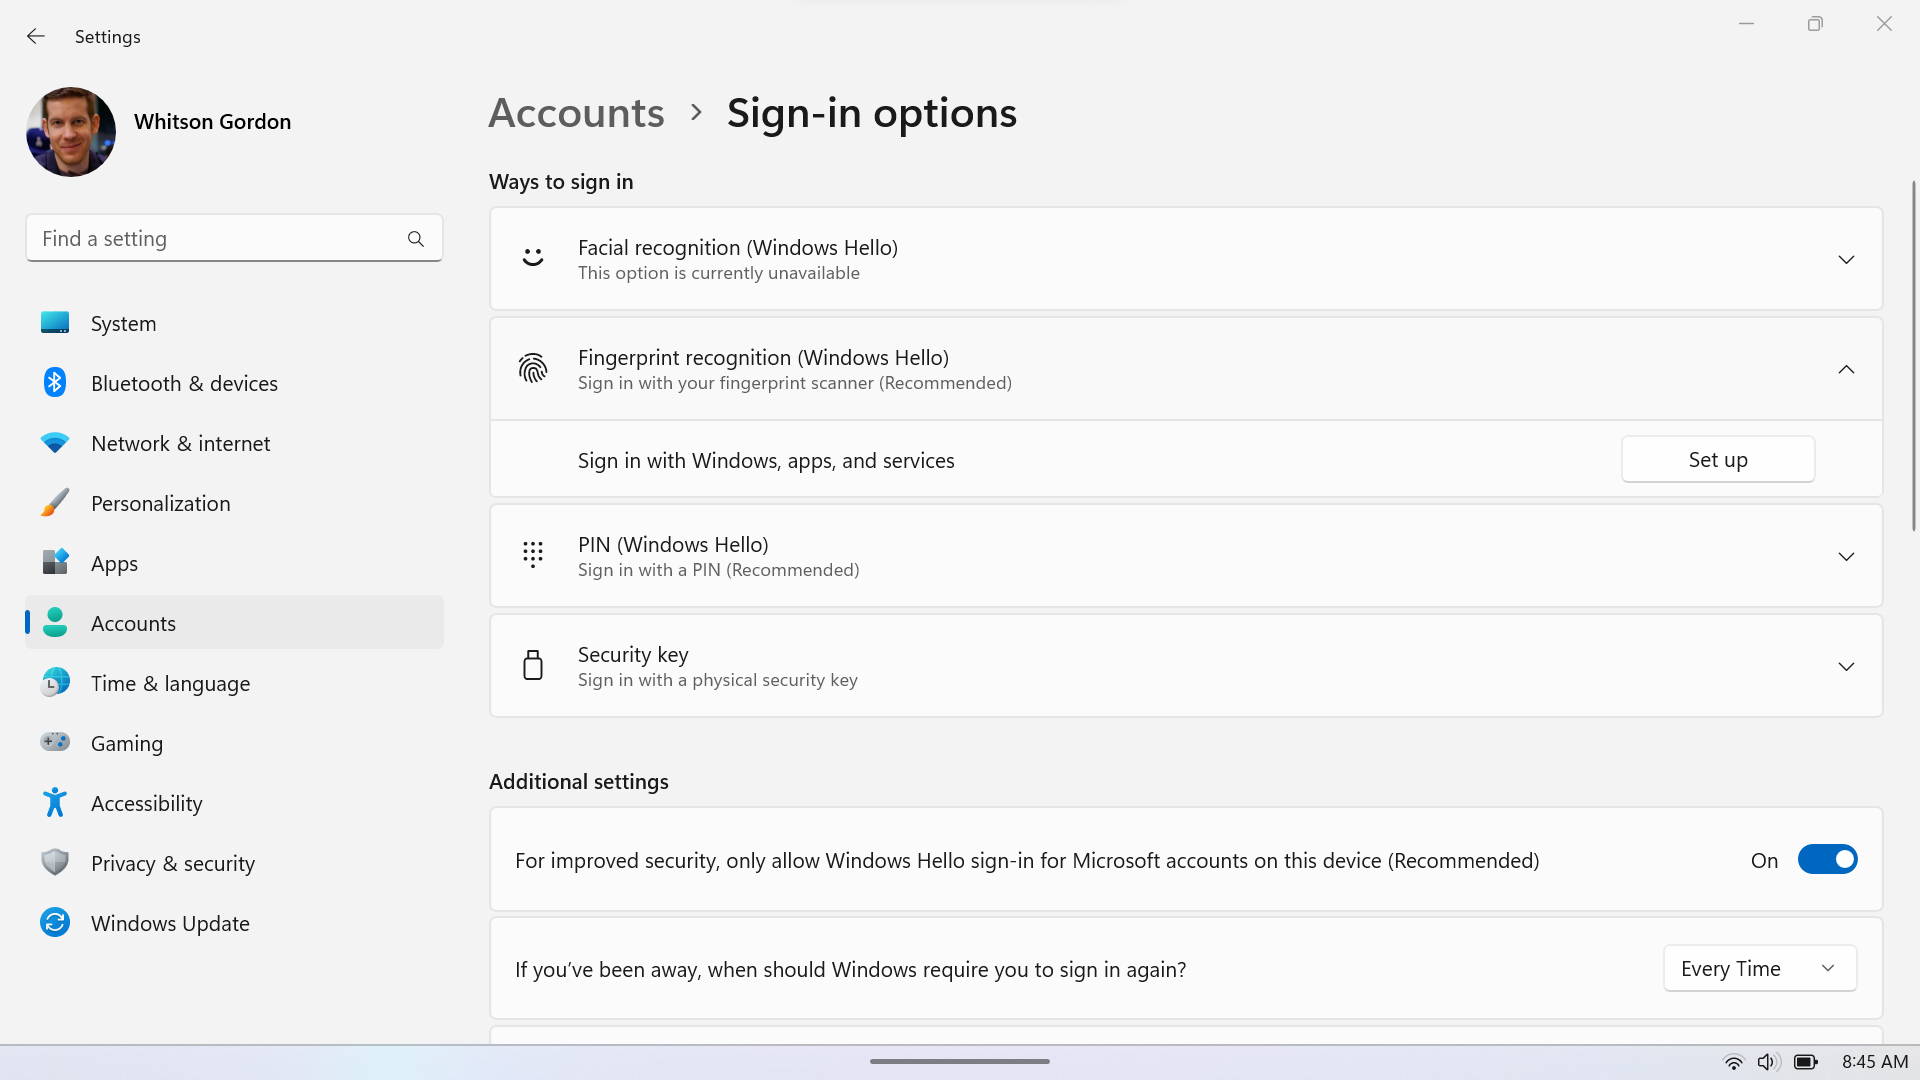
You'll get the option to do this during setup, but in case you skipped it: open Windows’ Settings app and head to Accounts > Sign-In Options > Fingerprint Recognition (Windows Hello). Click the Set Up button and follow the on-screen prompts to register one or more fingers. Then, when you restart the device or wake it from sleep, just rest your finger on the power button to log in.
Play your games offline
The ROG Ally and ROG Xbox Ally are perfect for road trips and plane rides, but before you head off into the unknown, you’ll want to make sure your games are ready for offline play. While not every game is playable offline (some multiplayer games would make little sense without an internet connection), many are – and different game stores have different ways of handling this scenario.
Xbox allows you to launch many games on your handheld offline as long as you’ve played them recently, but you can also designate one of your PCs with more permanent offline gaming permissions. Open the Microsoft Store app, click your profile picture in the upper right corner, and head to Settings. Turn Offline Permissions on. You’ll need to launch the game in question once before you can play it offline, but once you’ve done so, you’re good to go.
Other launchers have their own methods for dealing with offline play. Check out our full guide to playing games offline on the ROG Ally for more information on the most popular stores.
Add more storage for your games
If you have a bursting library of games and can’t narrow down what you want to play first, we made it easy to add more storage to the Ally – in fact, there are two ways to do so.
On the top of your device is a microSD card slot. Just insert any microSD card like the SanDisk microSD card for the ROG Xbox Ally – available in 512GB up to 2TB – and you’ll be able to install games to it through your launcher of choice.
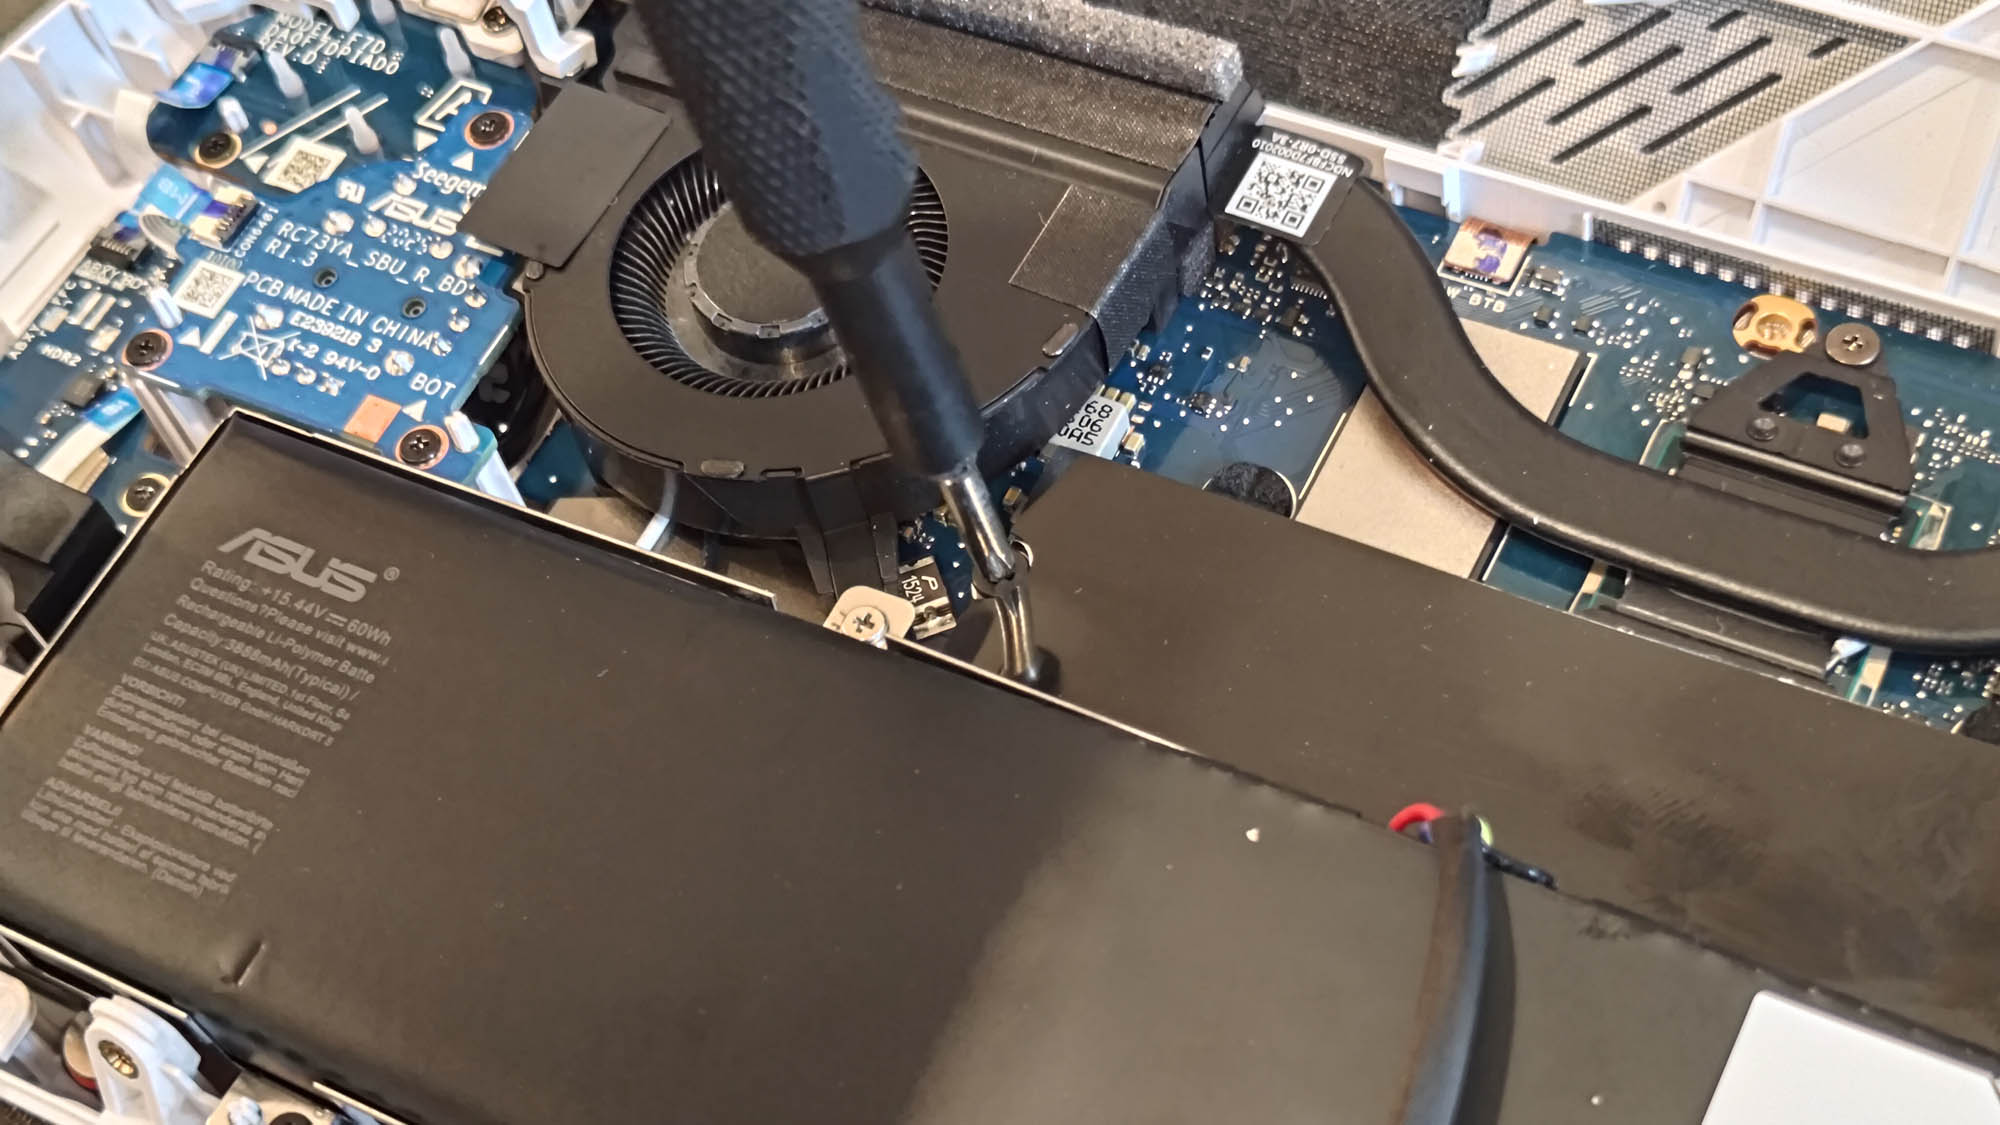
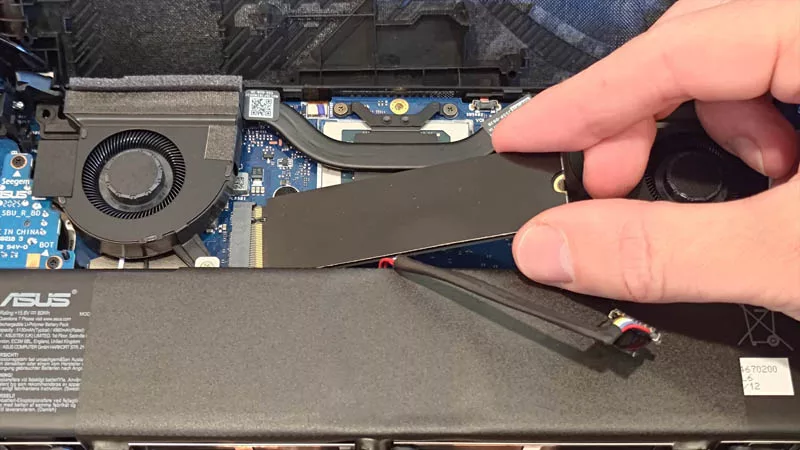
Alternatively, to consolidate all your storage onto one ultra-fast drive, you can also open up the Ally and replace the SSD with an entirely new drive, like the WD_Black SN7100X NVMe SSD for the ROG Xbox Ally, available in sizes up to 4TB. This process is a bit more involved, but the faster speeds and simpler storage layout make it well worth it, so check out our guide to upgrading the Ally’s SSD for the full rundown.
Personalize your immersive audio with Dolby Atmos
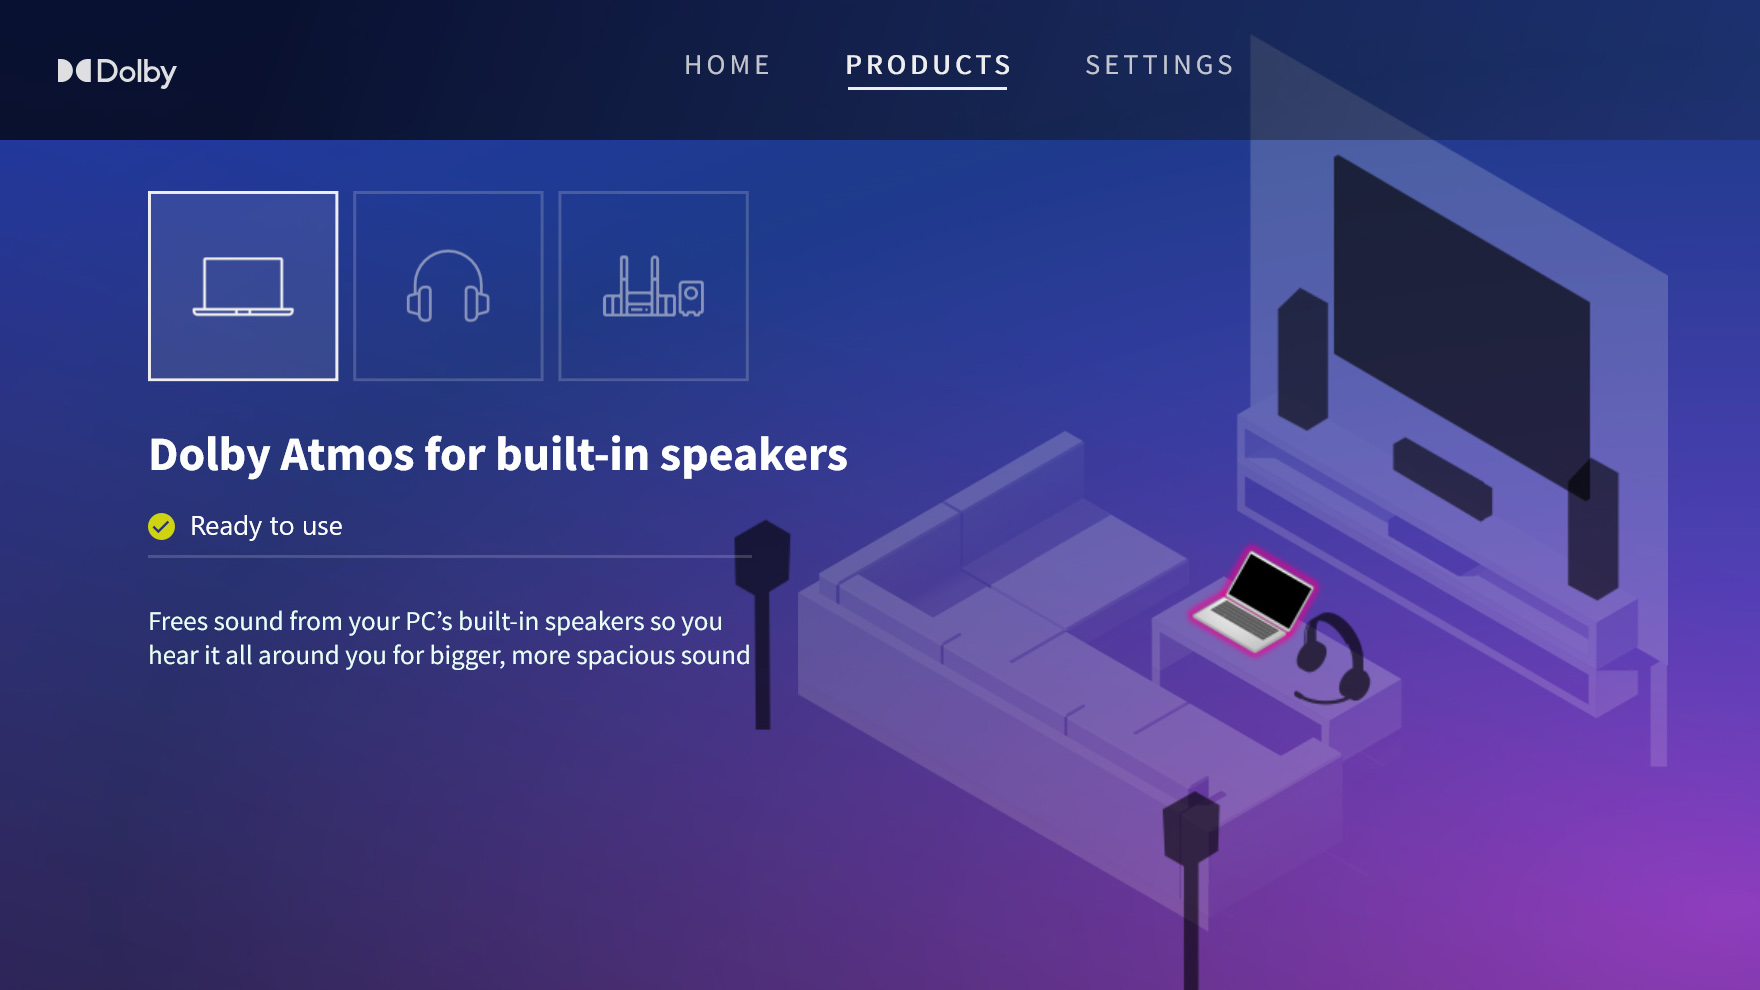
Just like our laptops, ROG Ally handhelds come with Dolby Atmos built-in, allowing you to get a virtual surround sound experience from the speakers, headphones, or a full home theater (more on that below). To enable Dolby Atmos and customize the sound profile, head to the Windows desktop, open the Start menu, and tap the Dolby Access app. Dolby Atmos is already enabled for the built-in speakers, but you can also enable it for your earbuds by heading to the Products tab and setting up Dolby Atmos for Headphones. Check out our full guide to Dolby Atmos virtual surround to see how it works.
Dock your Ally to a TV or external monitor for ultra-comfy couch play
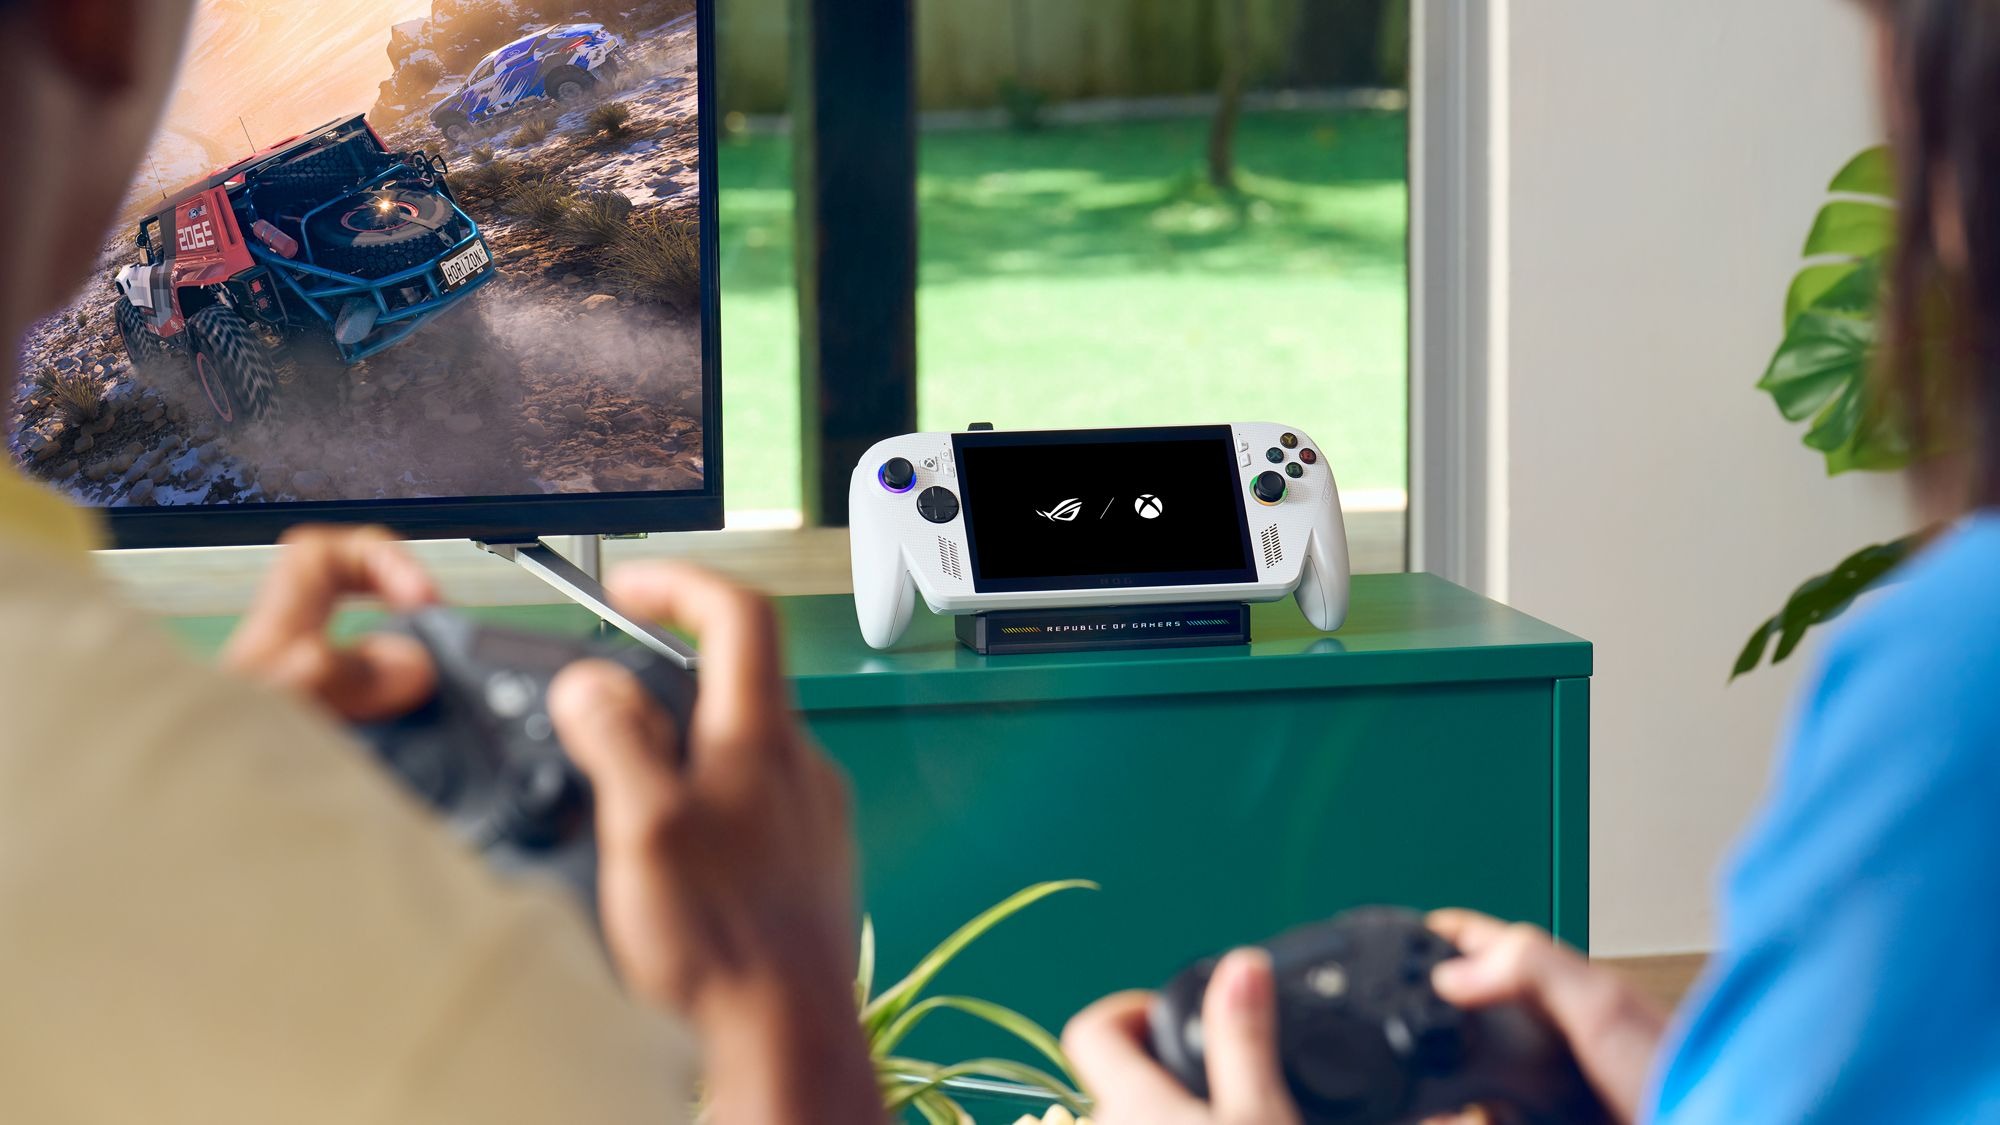
The ROG Ally doesn’t just provide a portable solo gaming experience — with one of our compatible docks, you can play games right on your TV with a few friends and wireless controllers. The ROG 100W Gaming Charger Dock provides a simple all-in-one wall brick with USB ports for your gamepads and Type-C ports compatible with display output, while the ROG Bulwark Dock gives you a literal stand for your Ally to rest, with plenty of IO including HDMI, ethernet, and lots of USB.
If you’d like to play with even more graphics power, an external GPU like the ROG XG Mobile can take Ally gaming to a whole new level. Not only do you get expanded IO like the other docks, but you’ll be able to take advantage of up to an NVIDIA GeForce RTX 5090 Laptop GPU, letting you play at higher resolutions, pump up the graphics settings, or dominate the battlefield in esports titles at ultra-high refresh rates.
| Model | Type | Where to Buy (US) | Where to Buy (CA) |
|---|---|---|---|
| ROG Xbox Ally | Handheld PC | ASUS Microsoft Best Buy |
ASUS Microsoft Best Buy |
| ROG Xbox Ally X | Handheld PC | ASUS Microsoft Best Buy |
ASUS Microsoft Best Buy |
| ROG Ally X | Handheld PC | ASUS Best Buy |
ASUS Best Buy |
| ROG Ally (Ryzen Z1 Extreme) | Handheld PC | ASUS Best Buy |
ASUS Best Buy Newegg Amazon |
Author
Popular Posts

Prepare for Tandem OLED splendor with these new ROG gaming monitors

How to adjust your laptop's P-Cores and E-Cores for better performance and battery life

How to Cleanly Uninstall and Reinstall Armoury Crate
How to upgrade the SSD and reinstall Windows on your ROG Ally, ROG Xbox Ally, or ROG Xbox Ally X
ASUS GPU Tweak III: The ultimate tool for advanced GPU tuning
Related Products
LATEST ARTICLES

Level up your calls: ROG gear and tips to dominate Discord and Zoom alike
ROG headsets, laptops, and software give you the technology you need to effortlessly dominate virtual work meetings and gaming voice chats.

ROG Xbox Ally vs Gaming Laptop: which portable gaming device is right for you?
Both the ROG Xbox Ally and ROG gaming laptops have a lot to offer gamers, depending on what they're looking for.

Which ROG Xbox Ally to give the gamer in your life this holiday
The powerful, portable ROG Xbox Ally is the perfect gift for any gamer who wants to take their favorite games everywhere they go.
The best accessories to supercharge your ROG Xbox Ally
Here’s the must-have gear that’ll catapult your ROG Xbox Ally gaming to the next level.
15 tips & shortcuts to set up and optimize your ROG Ally or ROG Xbox Ally
So you’ve finally unboxed your brand new ROG Ally, and you're itching to get your game on. Here's what to do first.

How to boost gaming performance on the ROG Ally or ROG Xbox Ally
The ROG Ally is a true Full HD handheld ready to make your games look better than ever. Here's how to maximize its performance.