How to upgrade the RAM and SSD of your ROG Strix laptop
You painstakingly selected the ideal specs for your gaming laptop. Balancing your budget with performance, you thought for sure 16GB of RAM would be enough, and you felt like you could fit all your games on 1TB of storage. But a few years later, you're starting to hit your limits, and you need to upgrade.
Our Strix laptops are designed to offer top-tier performance in a robust chassis for serious gamers and esports enthusiasts, compared to the ultra-portable Zephyrus line or the versatile ROG Flow. But just because they already offer top-of-the-line hardware doesn't mean you can't customize and improve your Strix laptop to suit your needs. The ROG Strix lineup, along with many other ROG laptops, is user-upgradeable, meaning you can add in more RAM or storage with nothing more than a screwdriver. Here's how.
Step one: gather your parts
Before you get started, you'll need to collect the necessary tools and components. To open your machine, you'll only need two things:
- A size 0 phillips head screwdriver
- A guitar pick or other piece of thin plastic
Of course, you'll also need compatible components. For example, if you're adding more RAM to a Strix Scar 15 G533, like we are in this guide, you'll need a set of DDR4 SODIMM memory, ideally 3200MHz CL22 at 1.2V. That machine supports up to 64GB of memory, so if you're maxing it out, you'll want two 32GB sticks. You can find these at your favorite e-tailer or brick-and-mortar PC hardware store.
If you're upgrading the SSD, you'll need an M.2 NVMe solid-state drive, or SSD. You can find these in sizes ranging from 250GB to 2TB commonly, with some drives going as high as 8TB. Here's the nice part: your Strix laptop has two separate SSD slots, so you can keep your existing SSD and add the second as extra storage, rather than replacing the original completely. (If you'd prefer to replace the original, you can use ASUS Cloud Recovery from the BIOS to reinstall Windows from scratch with all the necessary drivers and software in tow. Just be sure to back up your data first.)
Check your laptop's product page on rog.asus.com for more information on which types of memory and storage it supports, or ask the reps at your favorite retailer if you aren't sure.
Step two: open your laptop

Before you get to work, discharge your battery to 25% or below.
Once you've done so, it's time to see what's inside. We've included photos below, but you can also follow along with our teardown video above. We're using the ROG Strix Scar G533 for this guide, but the steps are similar for other ROG Strix laptops as well.
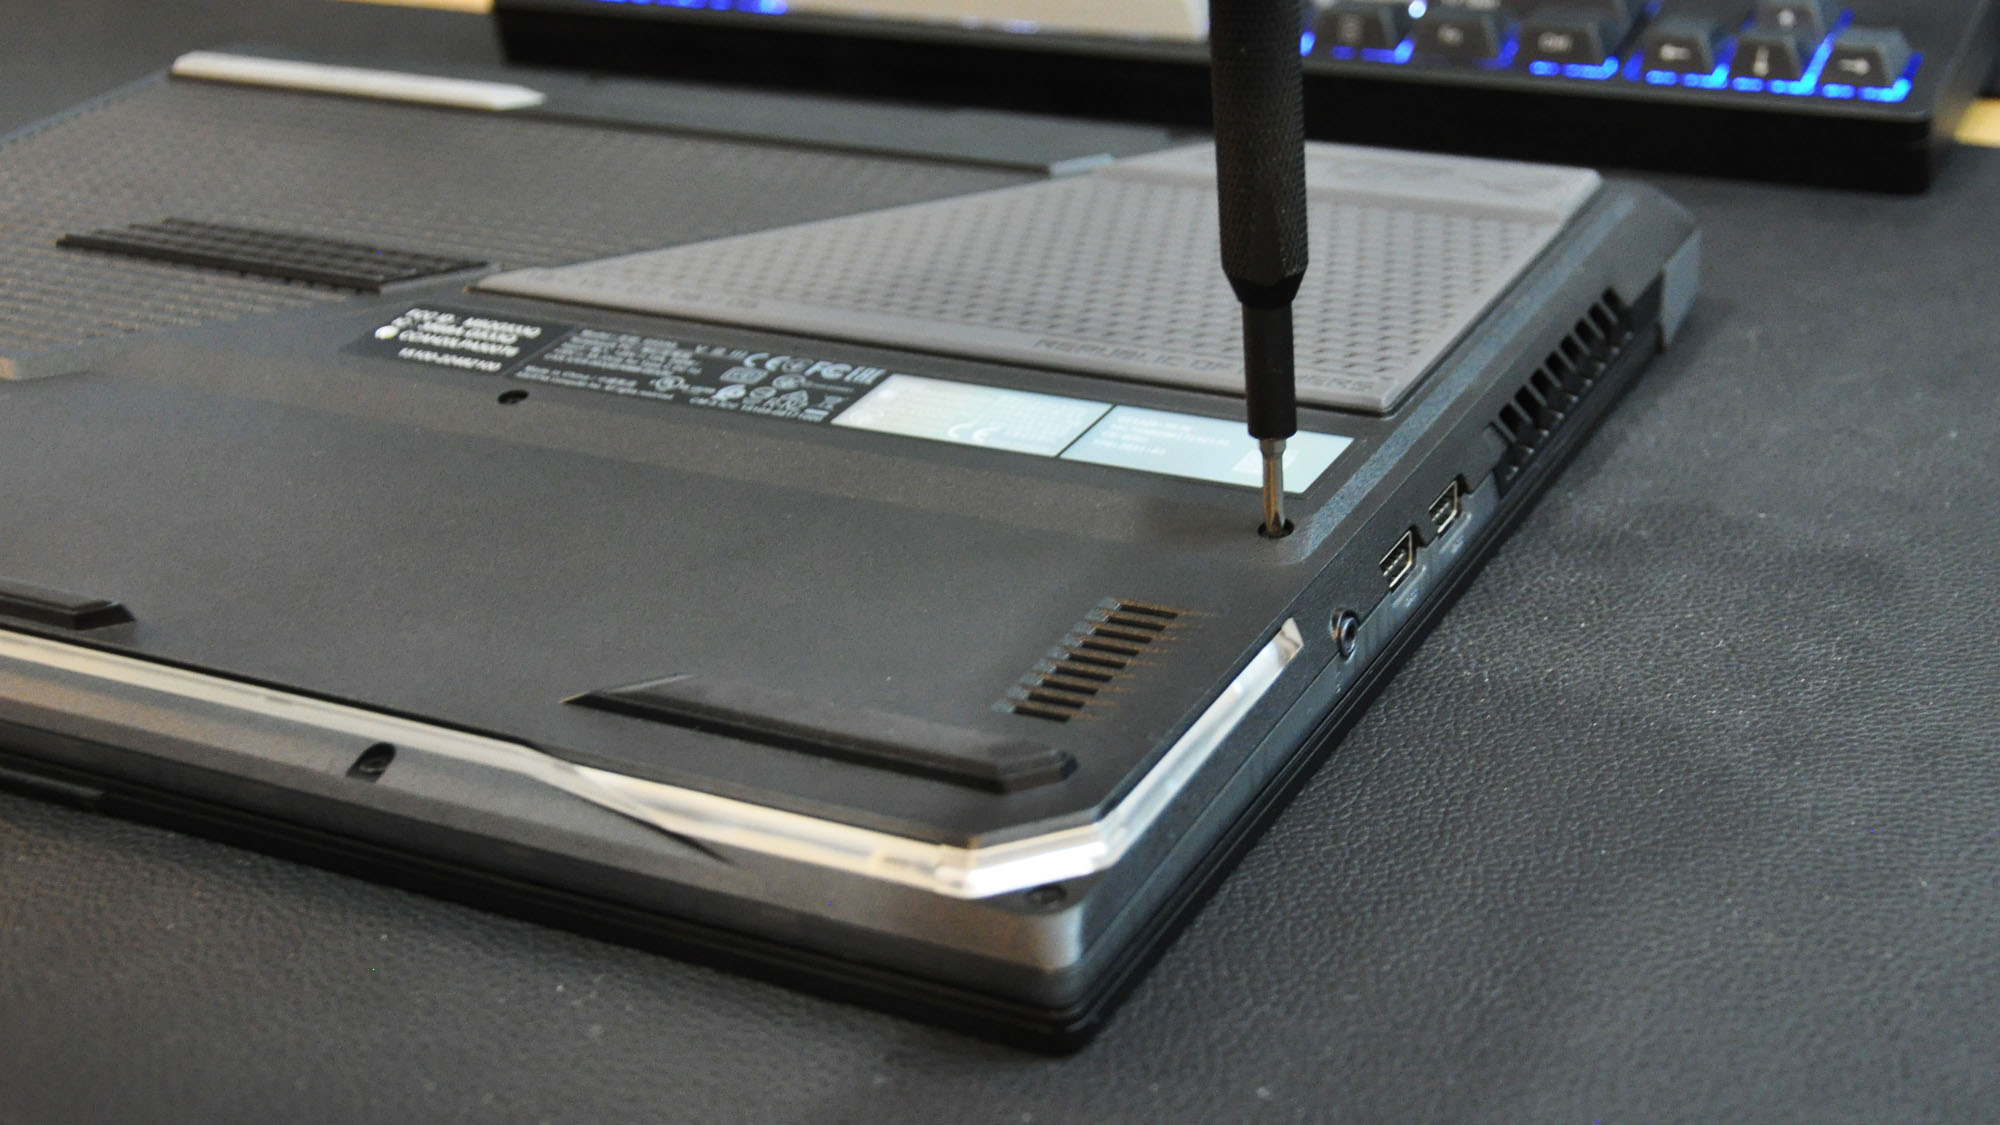
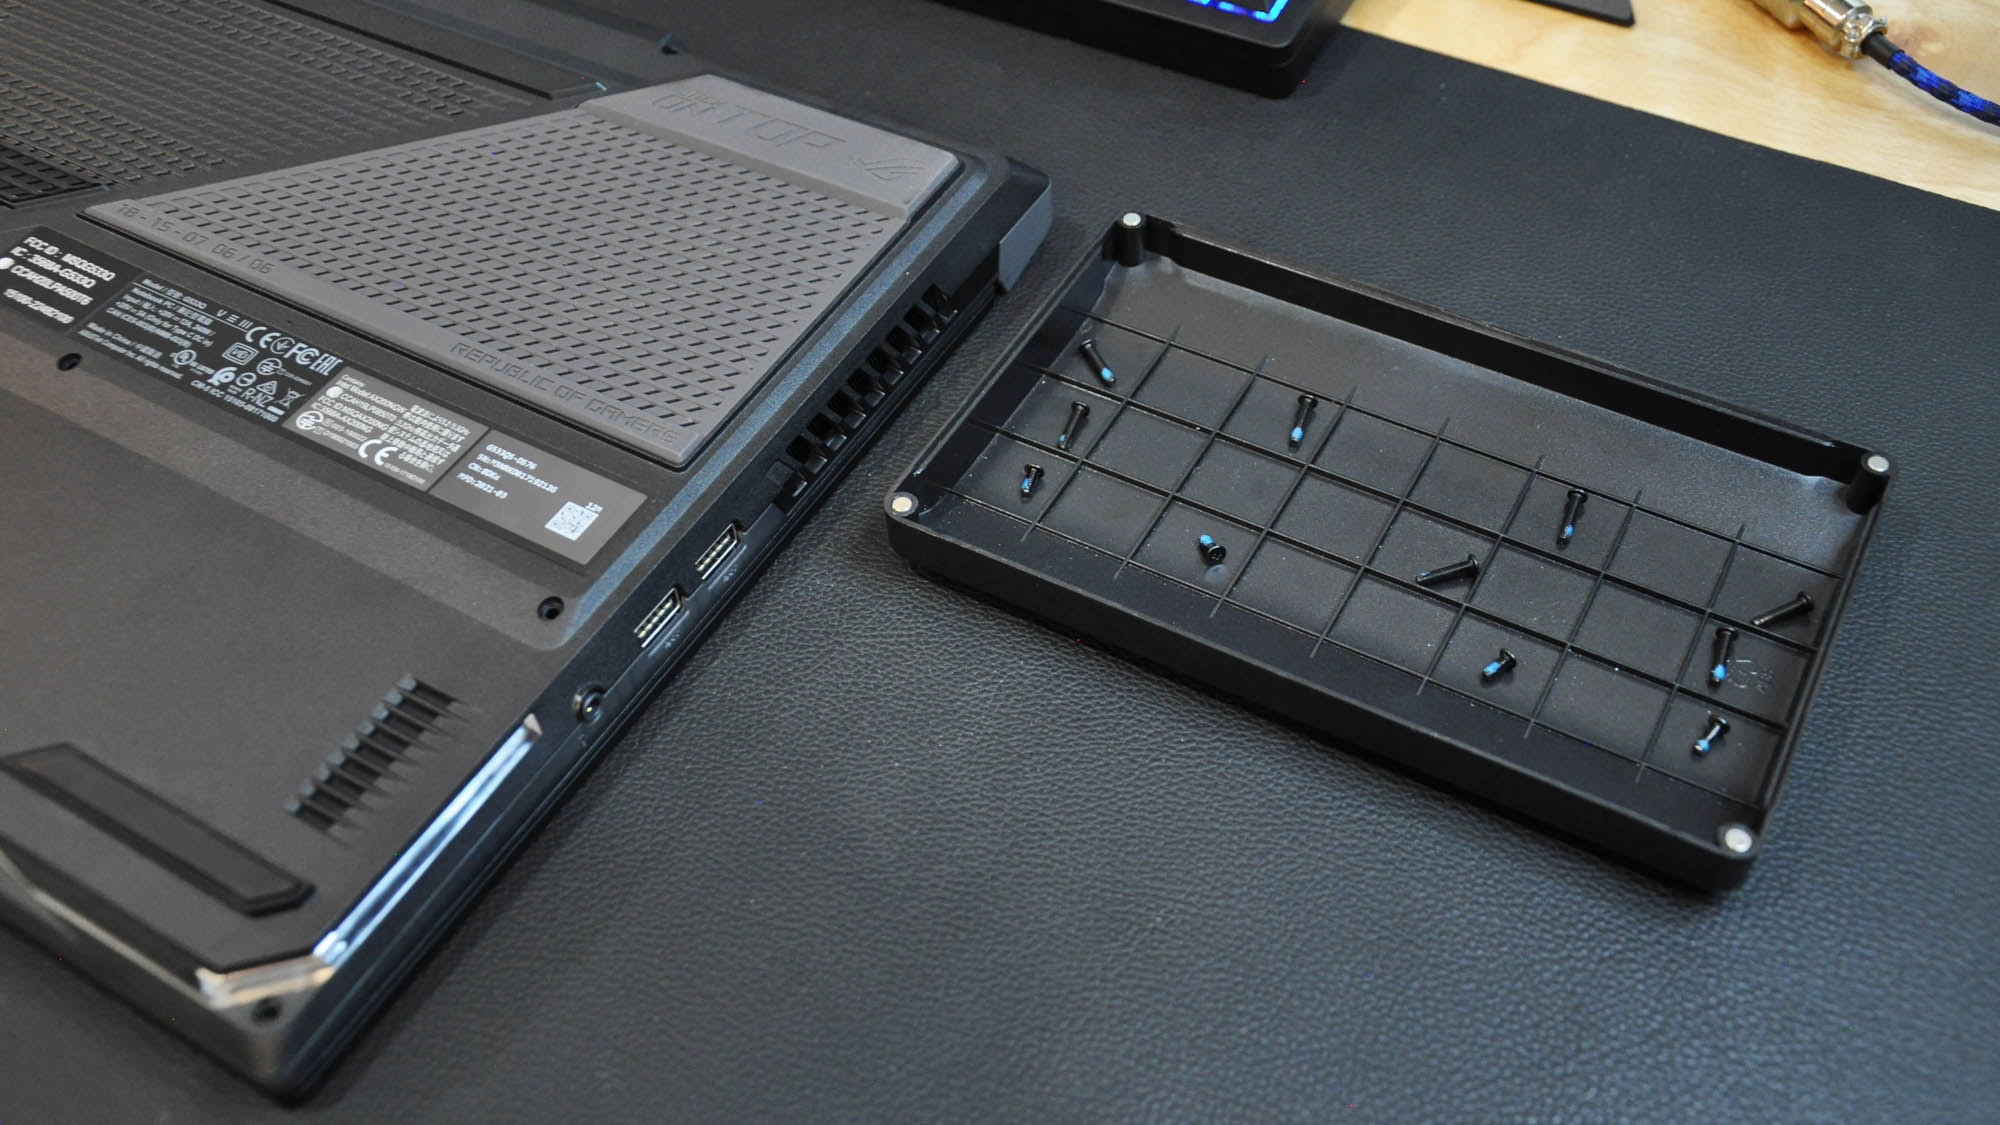
Place your laptop face down on a soft surface so it doesn't get scratched. Grab your small screwdriver and undo the screws along the bottom of the case. The screws aren’t all the same length, so it's best to keep your screws in a parts tray or on a baking sheet arranged in the same way they are on the laptop itself (in this case, keeping the short screws arranged along the bottom).
Note that there may be one screw on the bottom case that doesn't come out all the way, and that's by design—this captive Pop-open screw lifts the bottom cover of the laptop to ease access to the interior. Once it's loose, you should be able to move on to removing the bottom panel, and the screw will stay attached to it.
If the bottom panel doesn't pop off with that last screw, you can use your guitar pick (or other plastic pry tool) to undo the clips holding the bottom panel to the laptop. Slide it in between the panels, angled slightly as shown in the photo, and press upward and inward. You'll hear a clicking noise when each clip releases, and you can slide the guitar pick around the case to undo all the clips along the edges. Do not, however, pull up the bottom case yet! Just make sure all the clips are undone. (Again, you can watch the teardown video to see this process in action).
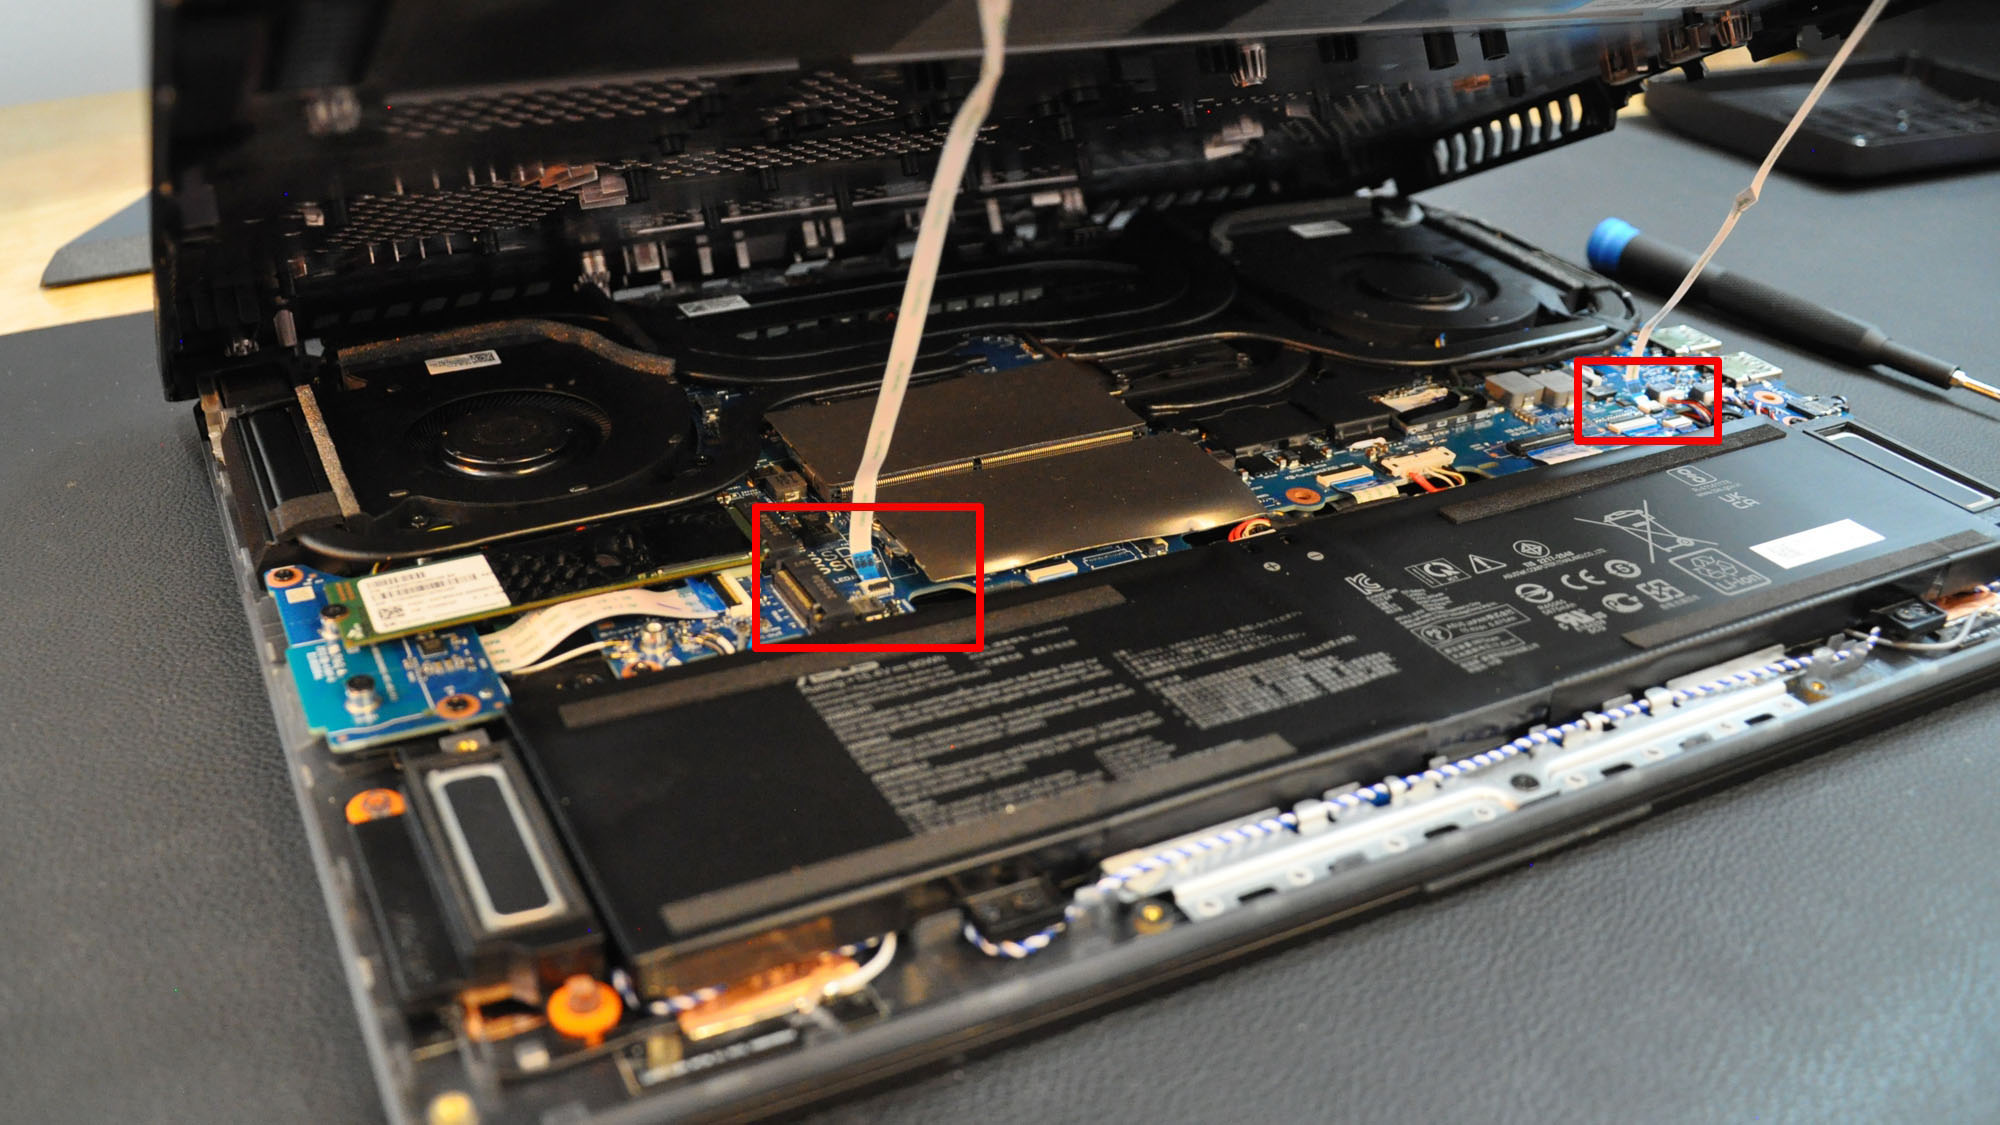
Be careful at this stage, because there are two ribbon cables connecting the bottom panel to the laptop's motherboard. If you get too excited and toss the bottom panel aside with reckless abandon, you can damage these cables. They power the awesome RGB downlighting on this machine, and you don’t want to lose that capability forever.
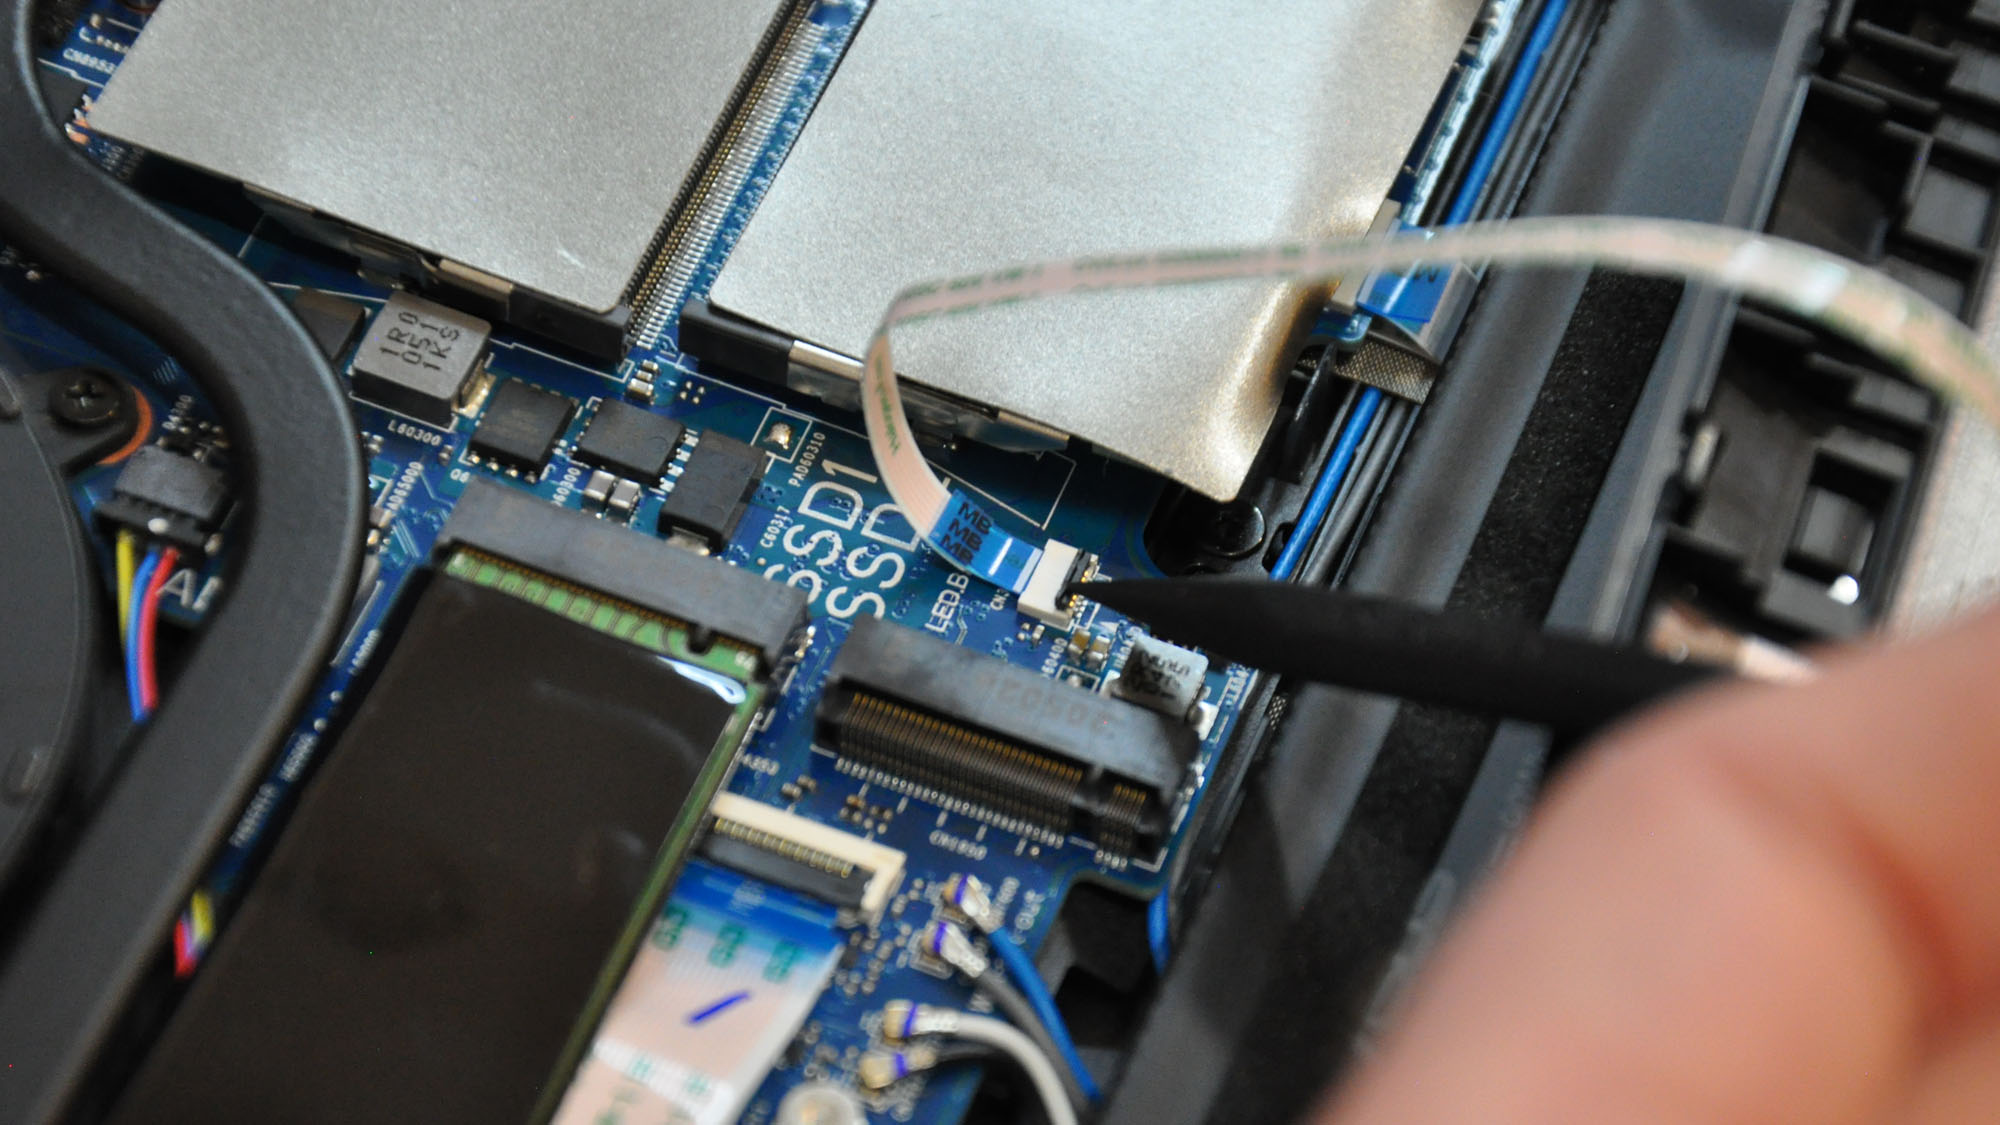
Trace the ribbon cables to their connectors on the motherboard, and use your plastic tool to lift up the black locking mechanism that holds it in place. Once that’s released, you should be able to gently pull the ribbon cable out of its socket.
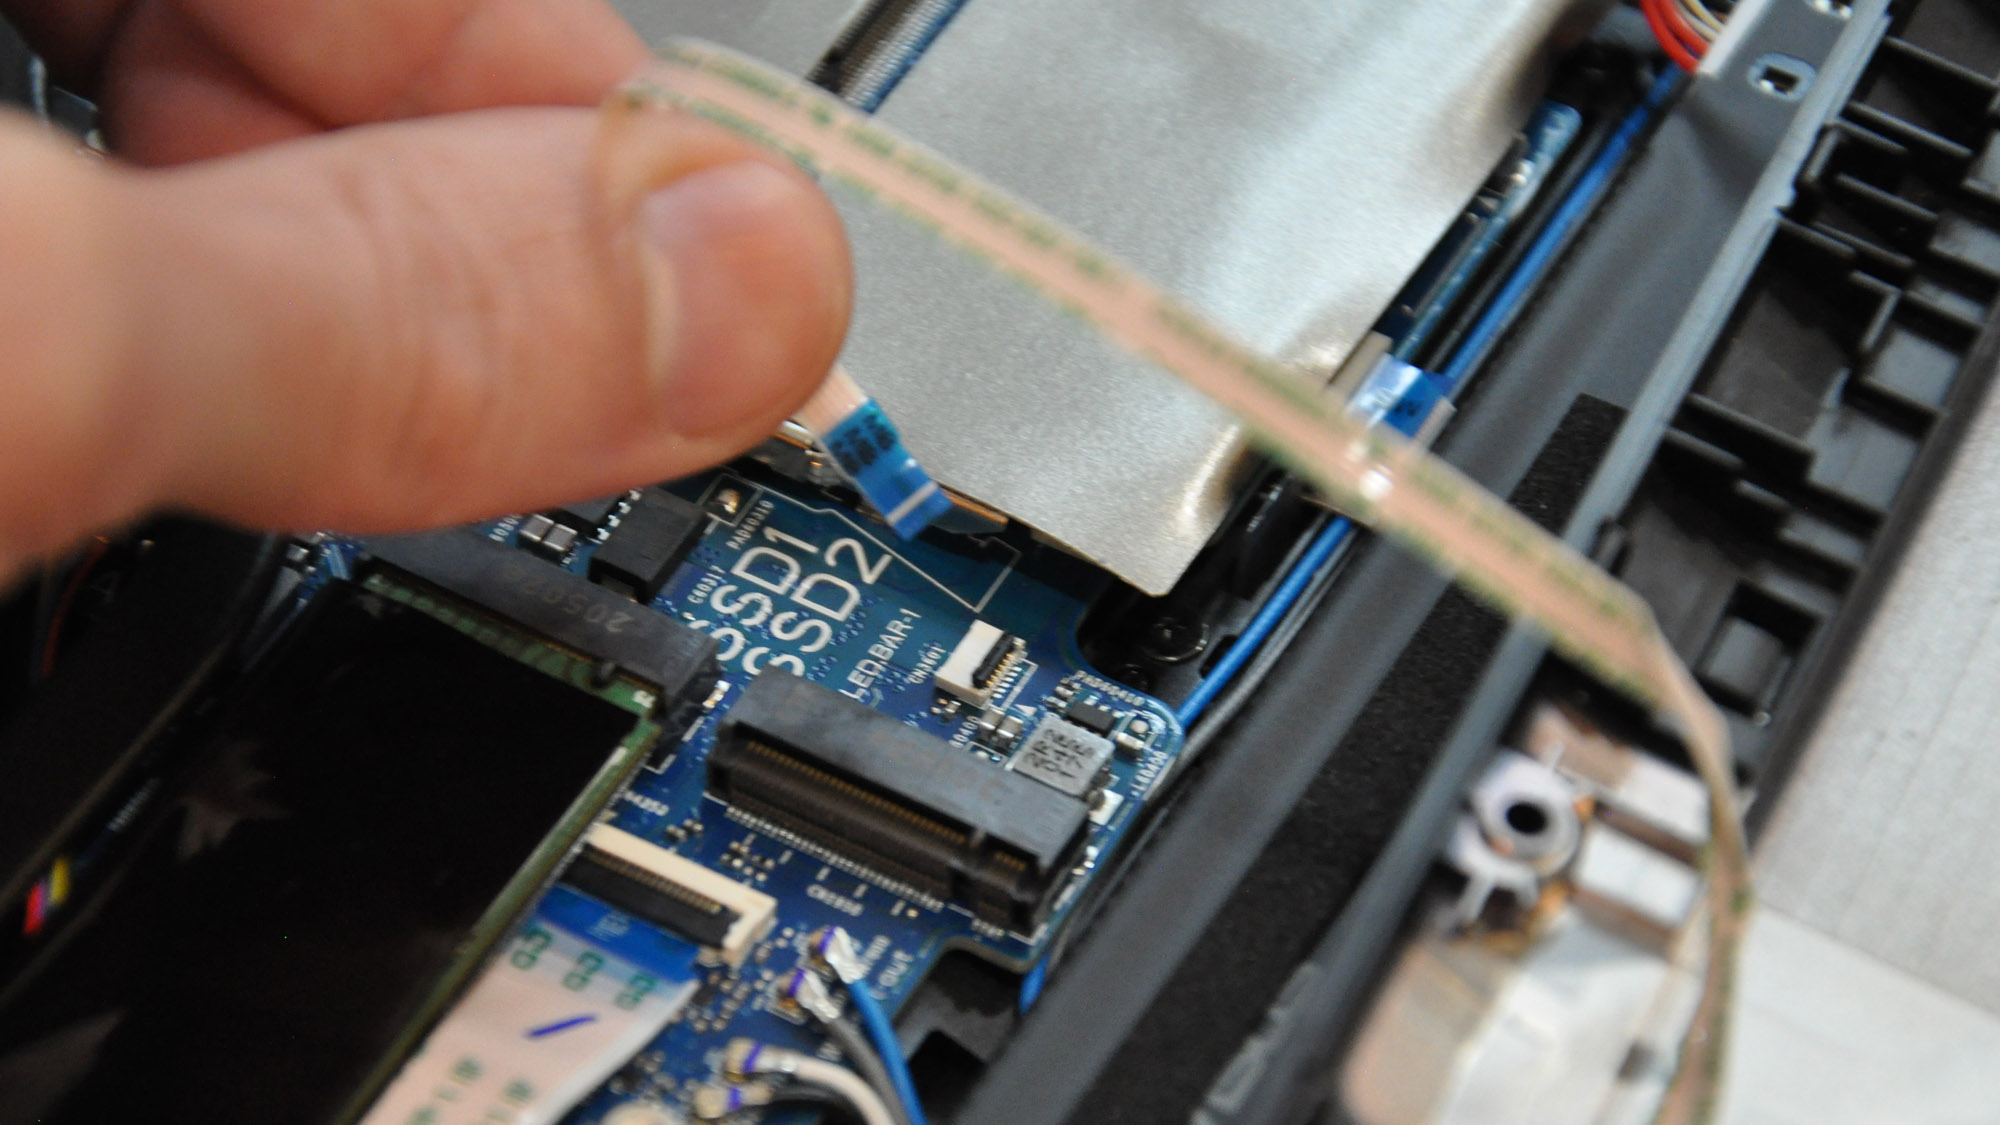
Repeat this process for any other ribbon cables attached to the bottom panel. Once they’re detached, you can set the bottom panel aside and gaze at the beautiful interior of your PC.
Step three: upgrade your components
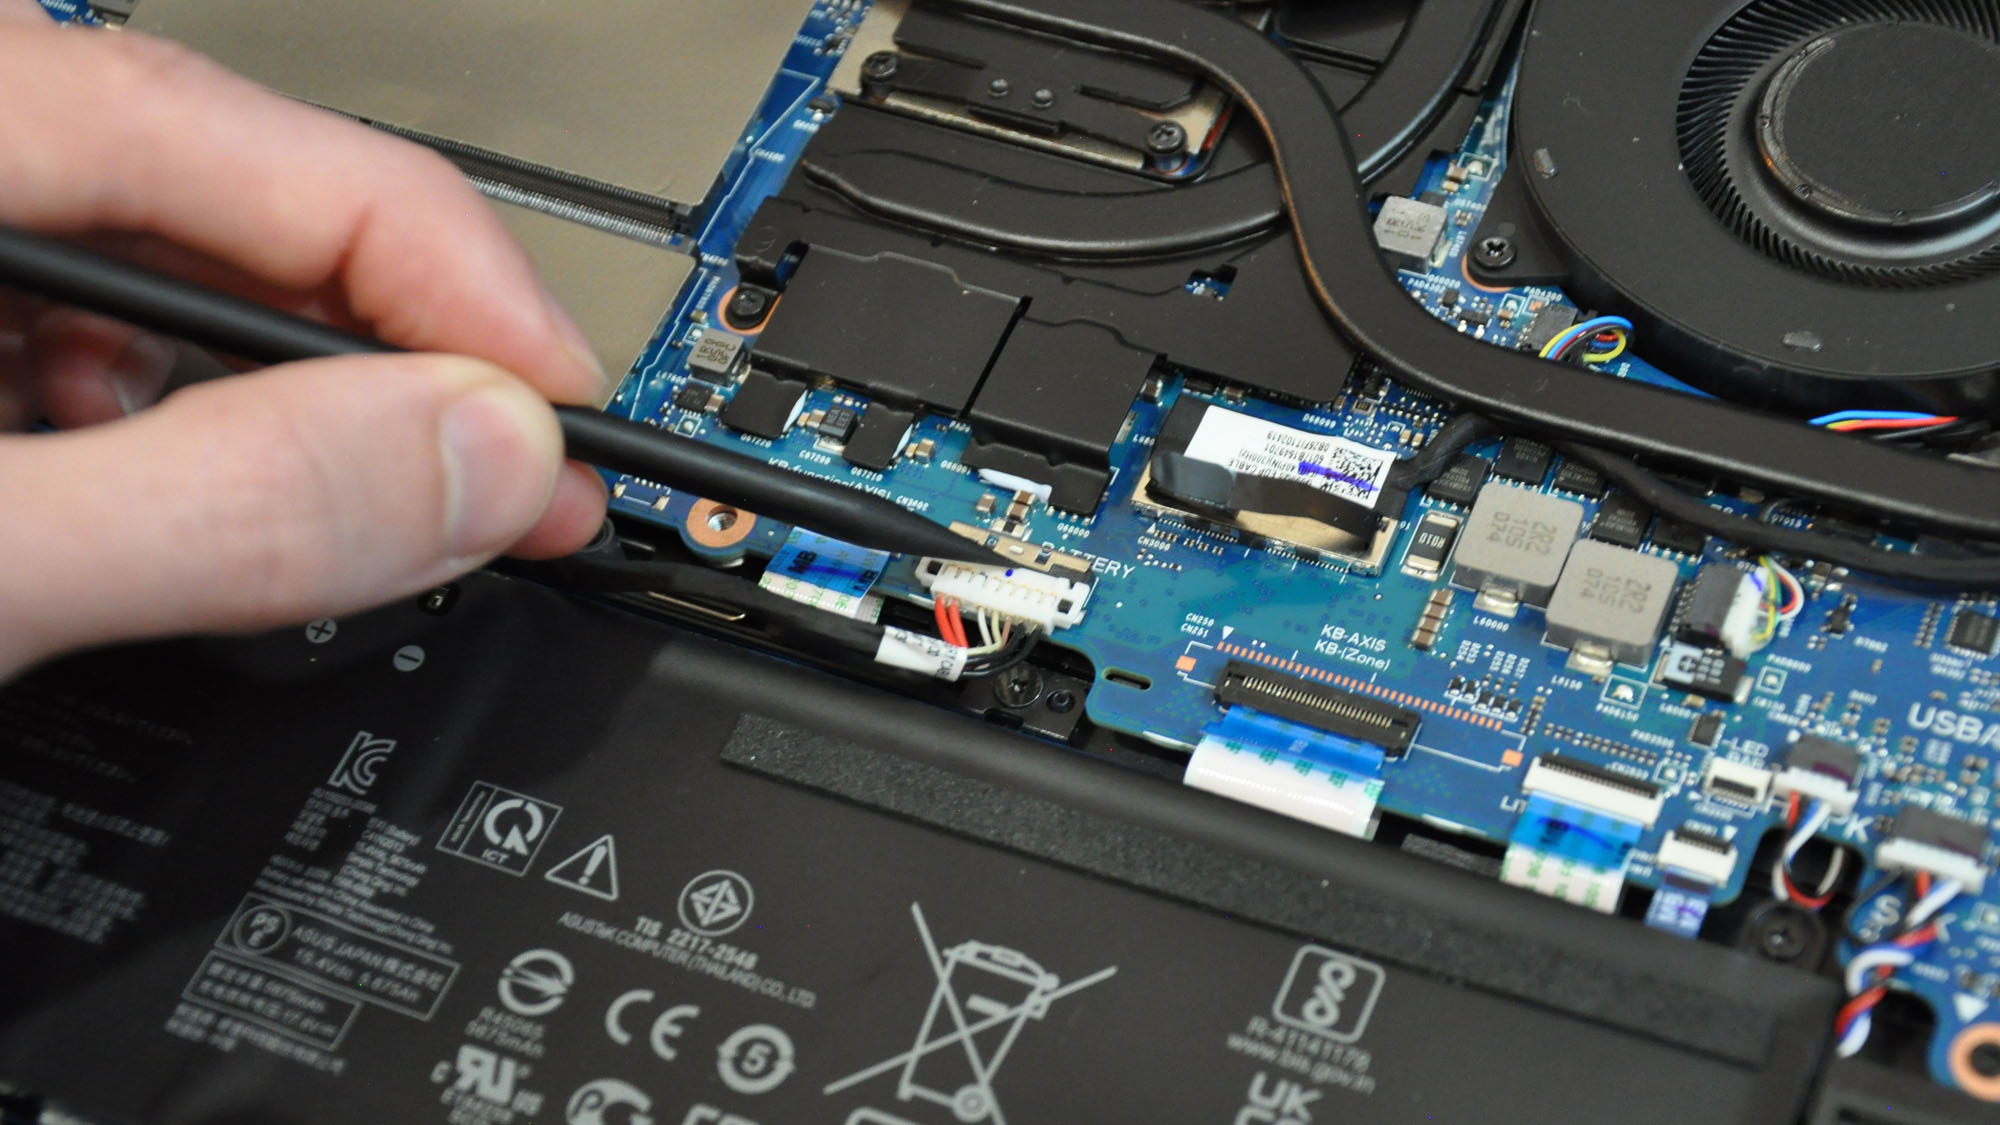
Before continuing any further, disconnect the battery for safety. You can trace the cords coming out of the battery to their socket on the motherboard. Slide the metal plate back, and you should be able to pull the battery connector upwards and out of its socket.
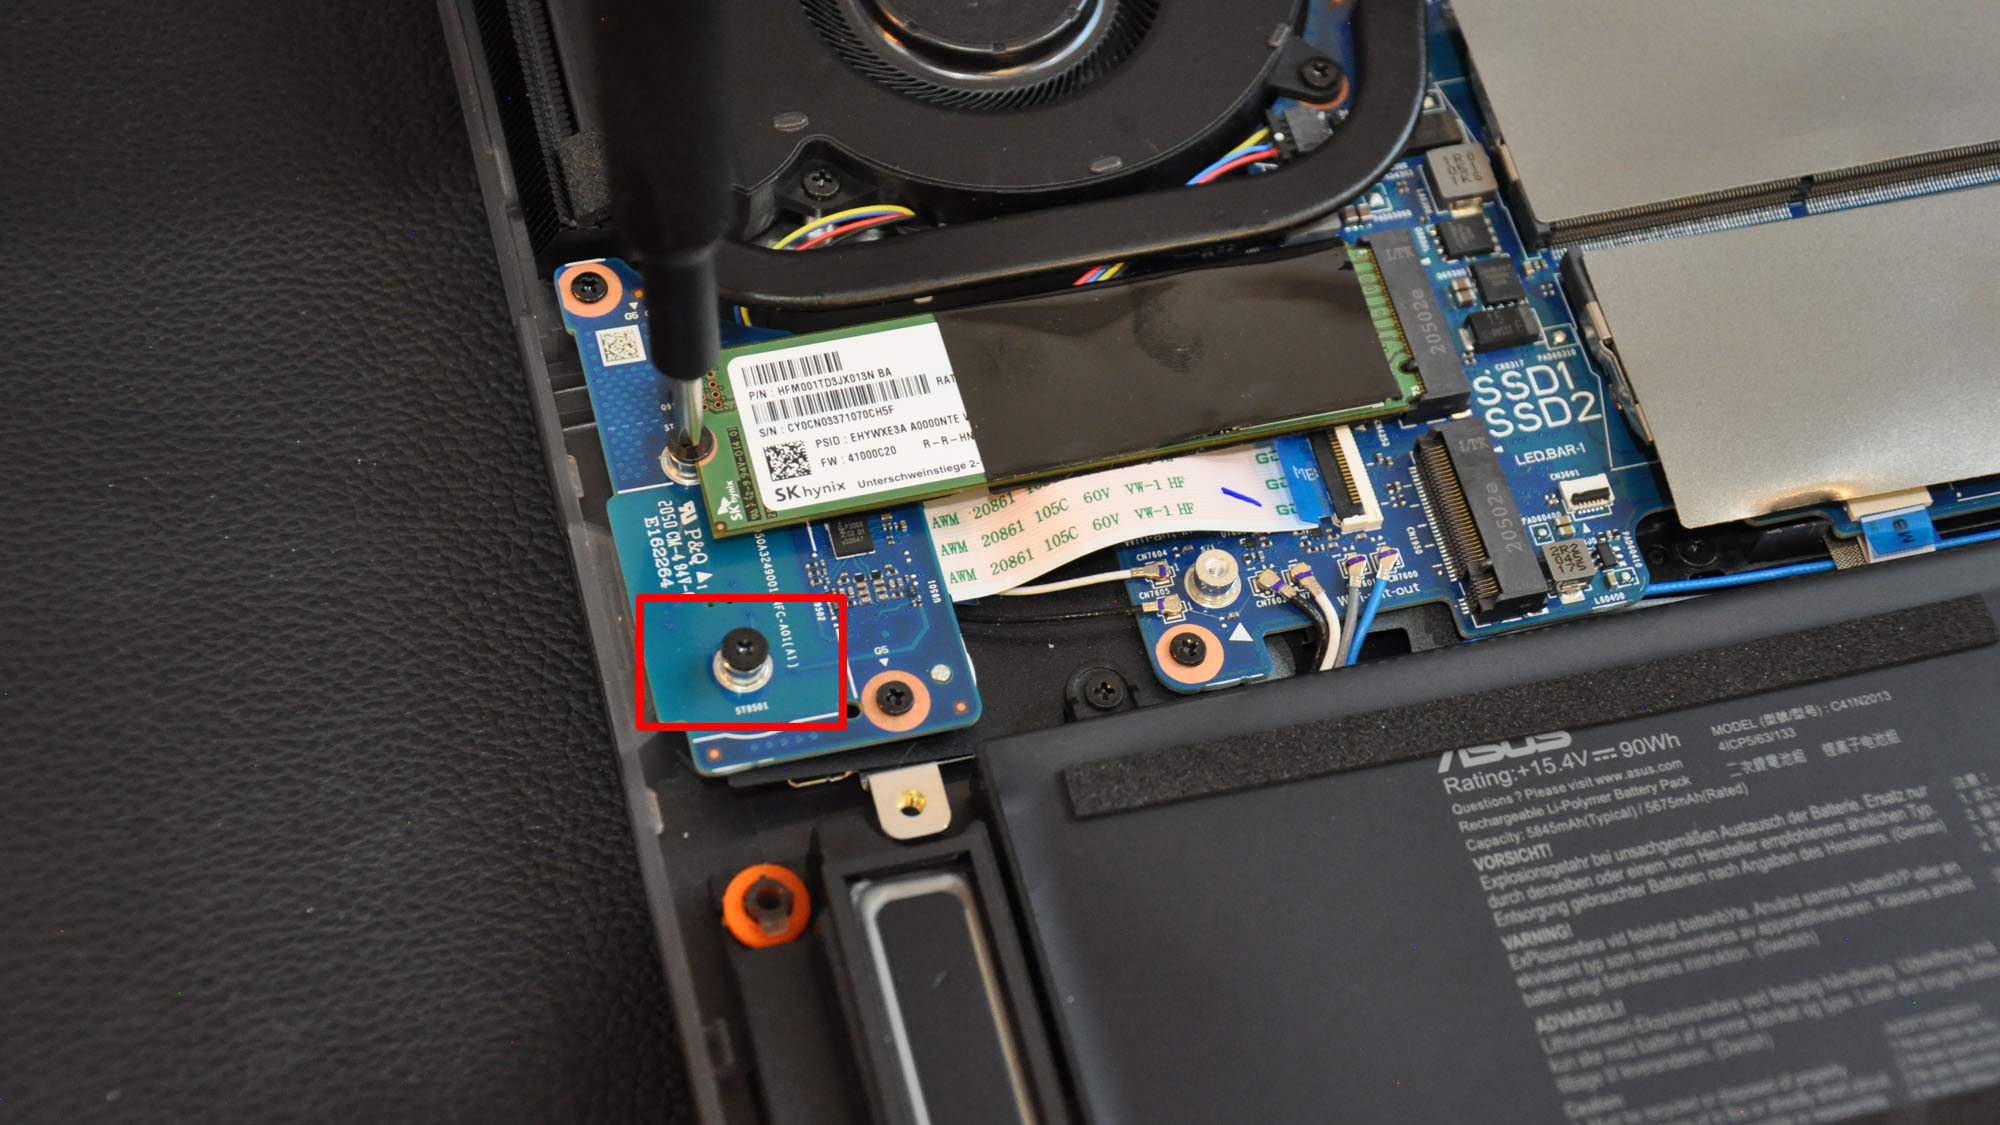
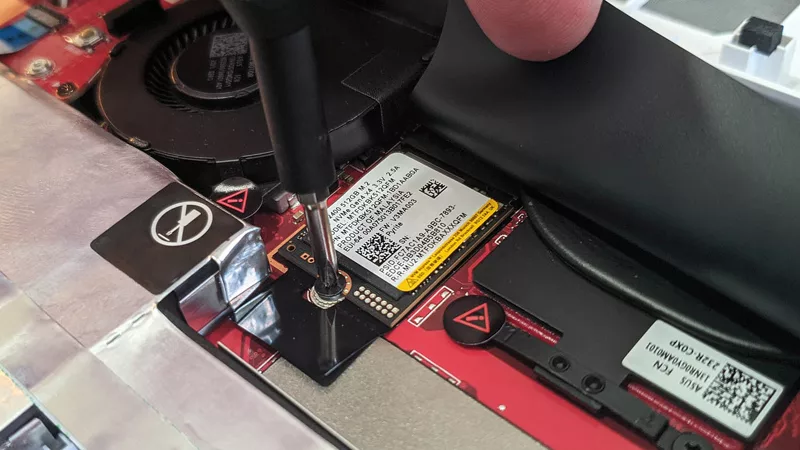
Now it's time to upgrade! If you're adding more storage, the process is easy. In most cases, you shouldn't have to replace the existing SSD—you can just add a second SSD in the slot below it. Unscrew the M.2 screw, slide your SSD in diagonally, then press down the far end and screw the M.2 screw back into place to hold the SSD parallel with the motherboard.
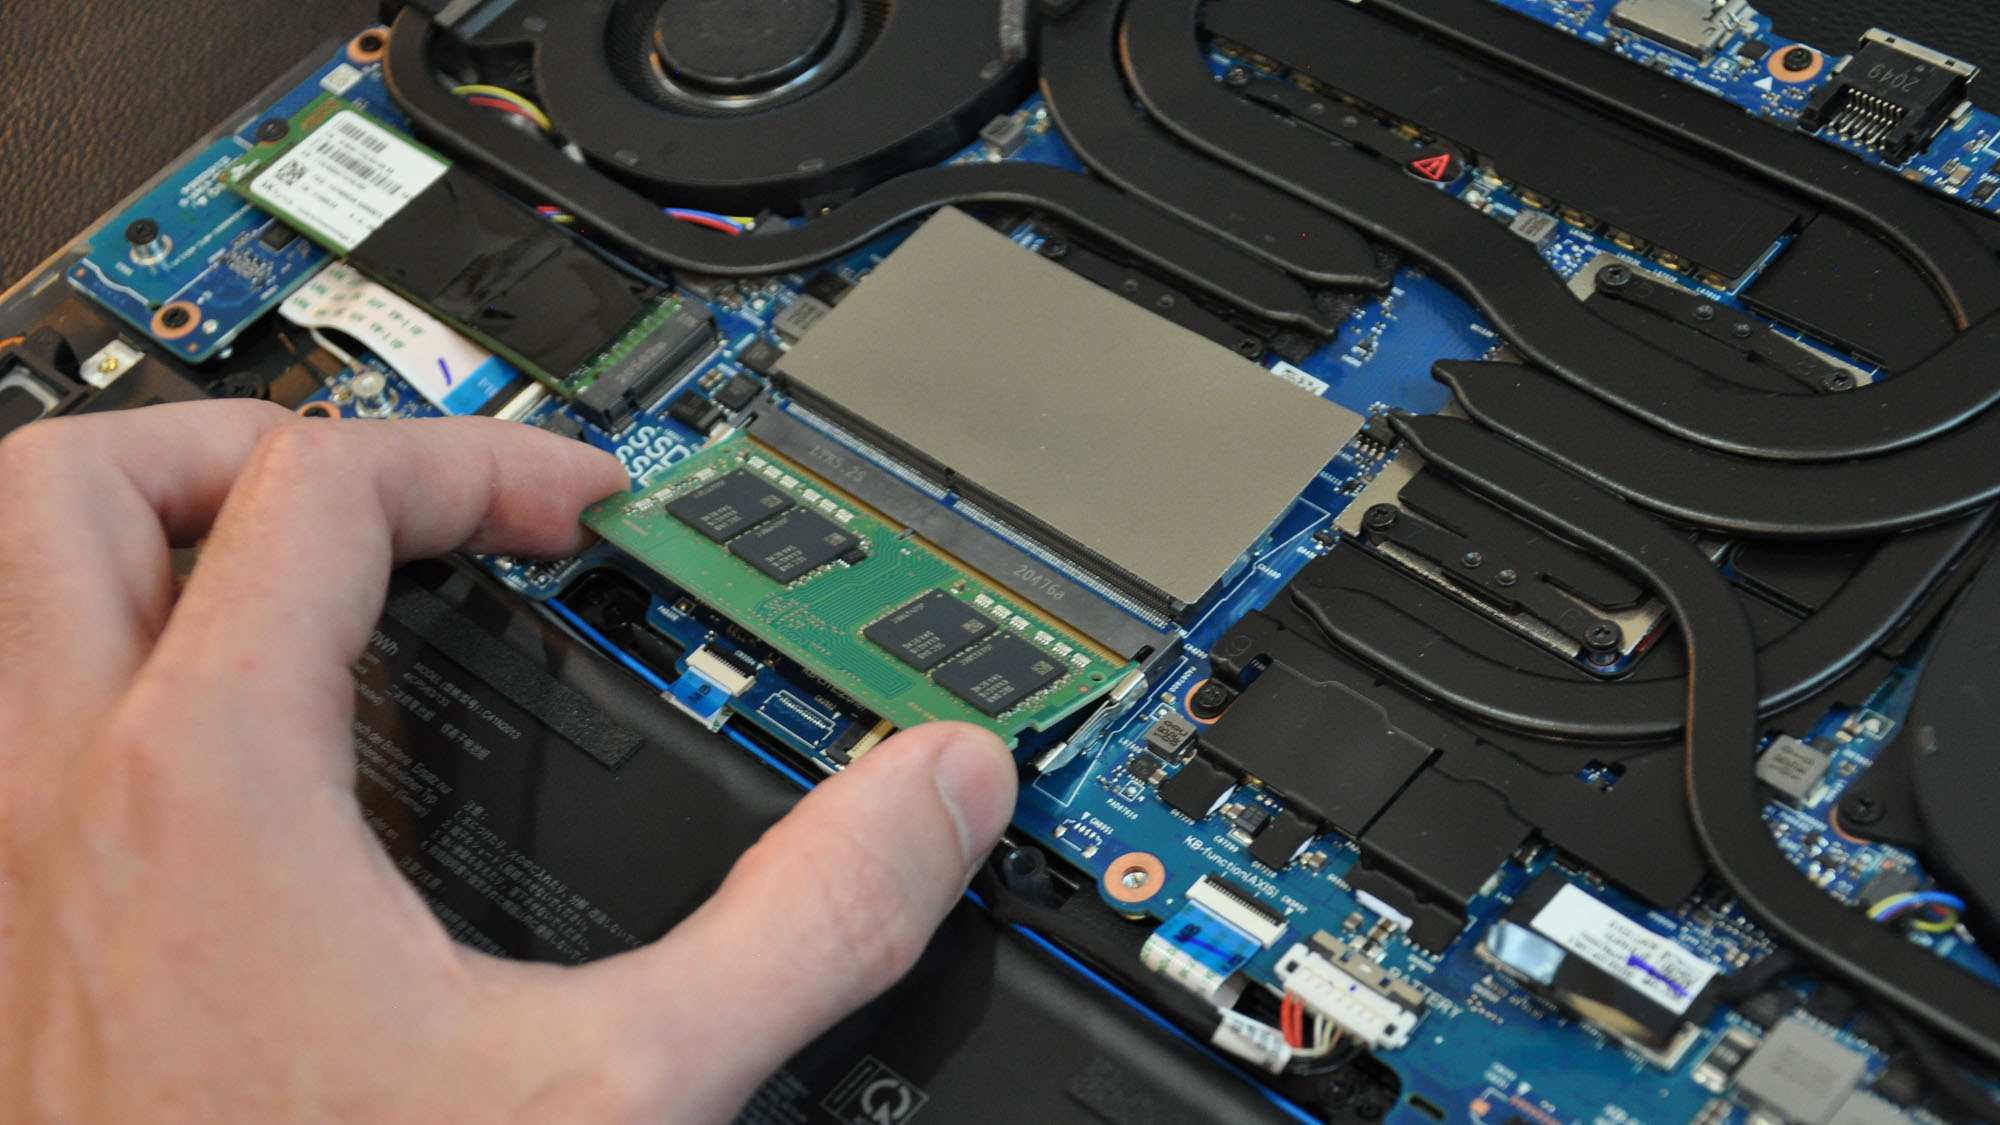
The memory, or RAM, is under two silver heat shields near the center of the motherboard. Pull the sticker back (but not all the way off) to reveal the RAM underneath. (We've removed it in the image so you can better see what's going on under the hood). Look for the two metal levers on the side of the RAM stick, then pull them outward to release the RAM stick from its slot. You can then pull the memory module out with ease. To insert your new stick, slide it in diagonally, then press down on the sides of the stick until the levers snap back into place. Re-apply the heat shields, and you’re all done.
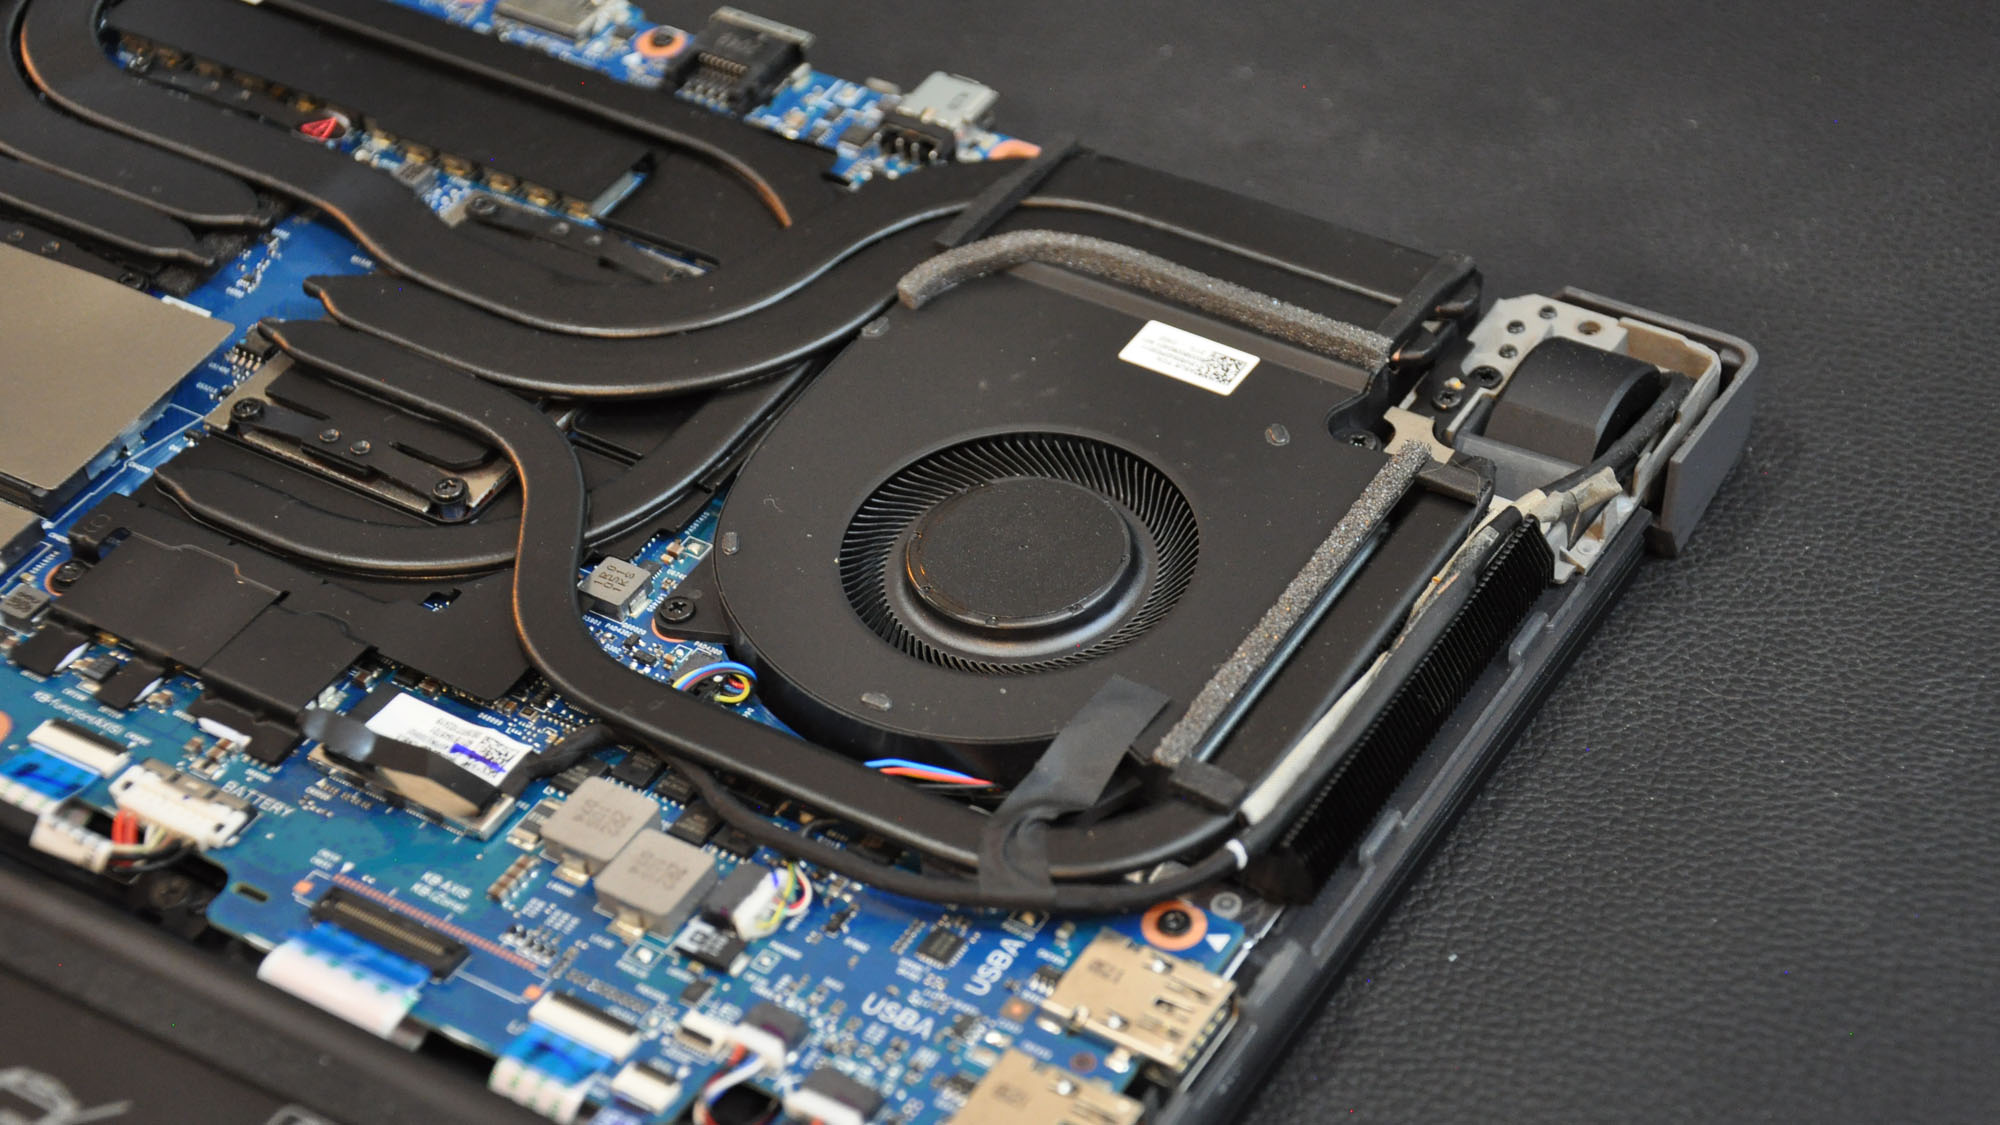
Before you close up, check the fans for dust and debris. Since you have the laptop open, now is a good time to clean out any excess dust with a soft cloth (or brush, if you have one) to keep everything running at peak performance.
Finally, plug the battery and LED cables back in, then close the laptop back up, ensuring all the clips snap back into place and all the screws are back in their rightful homes.
Step four: boot up and enjoy
If all went well, your laptop should boot back up normally when you press the power button. If you replaced the old SSD with a brand new one, you'll instead boot into the BIOS, where you can navigate to Advanced > ASUS Cloud Recovery and begin the Windows reinstallation process.
If you run into trouble along the way, ASUS customer support is here to help. In fact, in certain countries, our support staff may be able to install your upgrades for you, if you aren't comfortable doing it yourself. Reach out with any questions, and our talented support staff will lay out all your options.
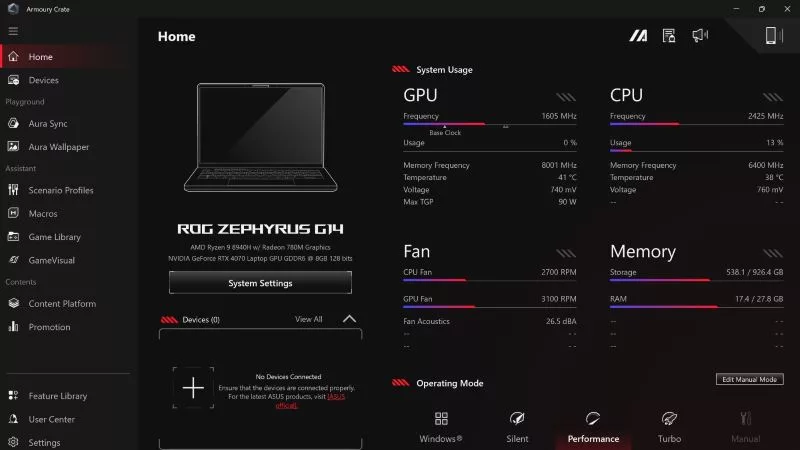
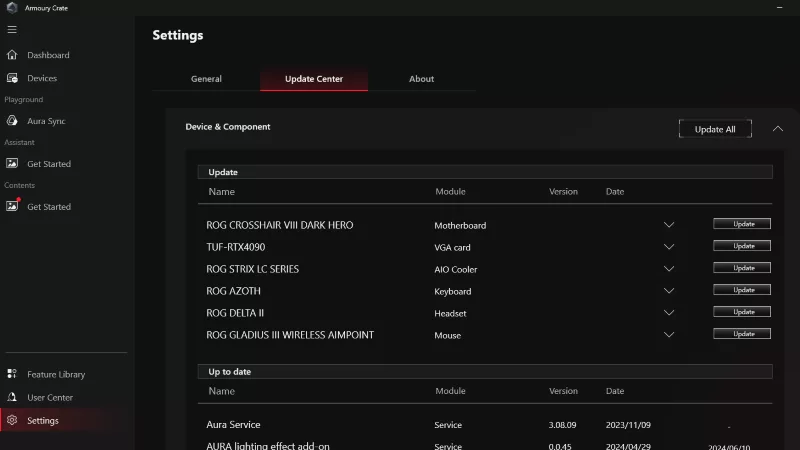
To double-check that your RAM was installed properly, open Armoury Crate to make sure it's reporting all the memory you've added. If you bought 64GB and it's only reporting 32GB, for example, one of the sticks may not be inserted all the way.
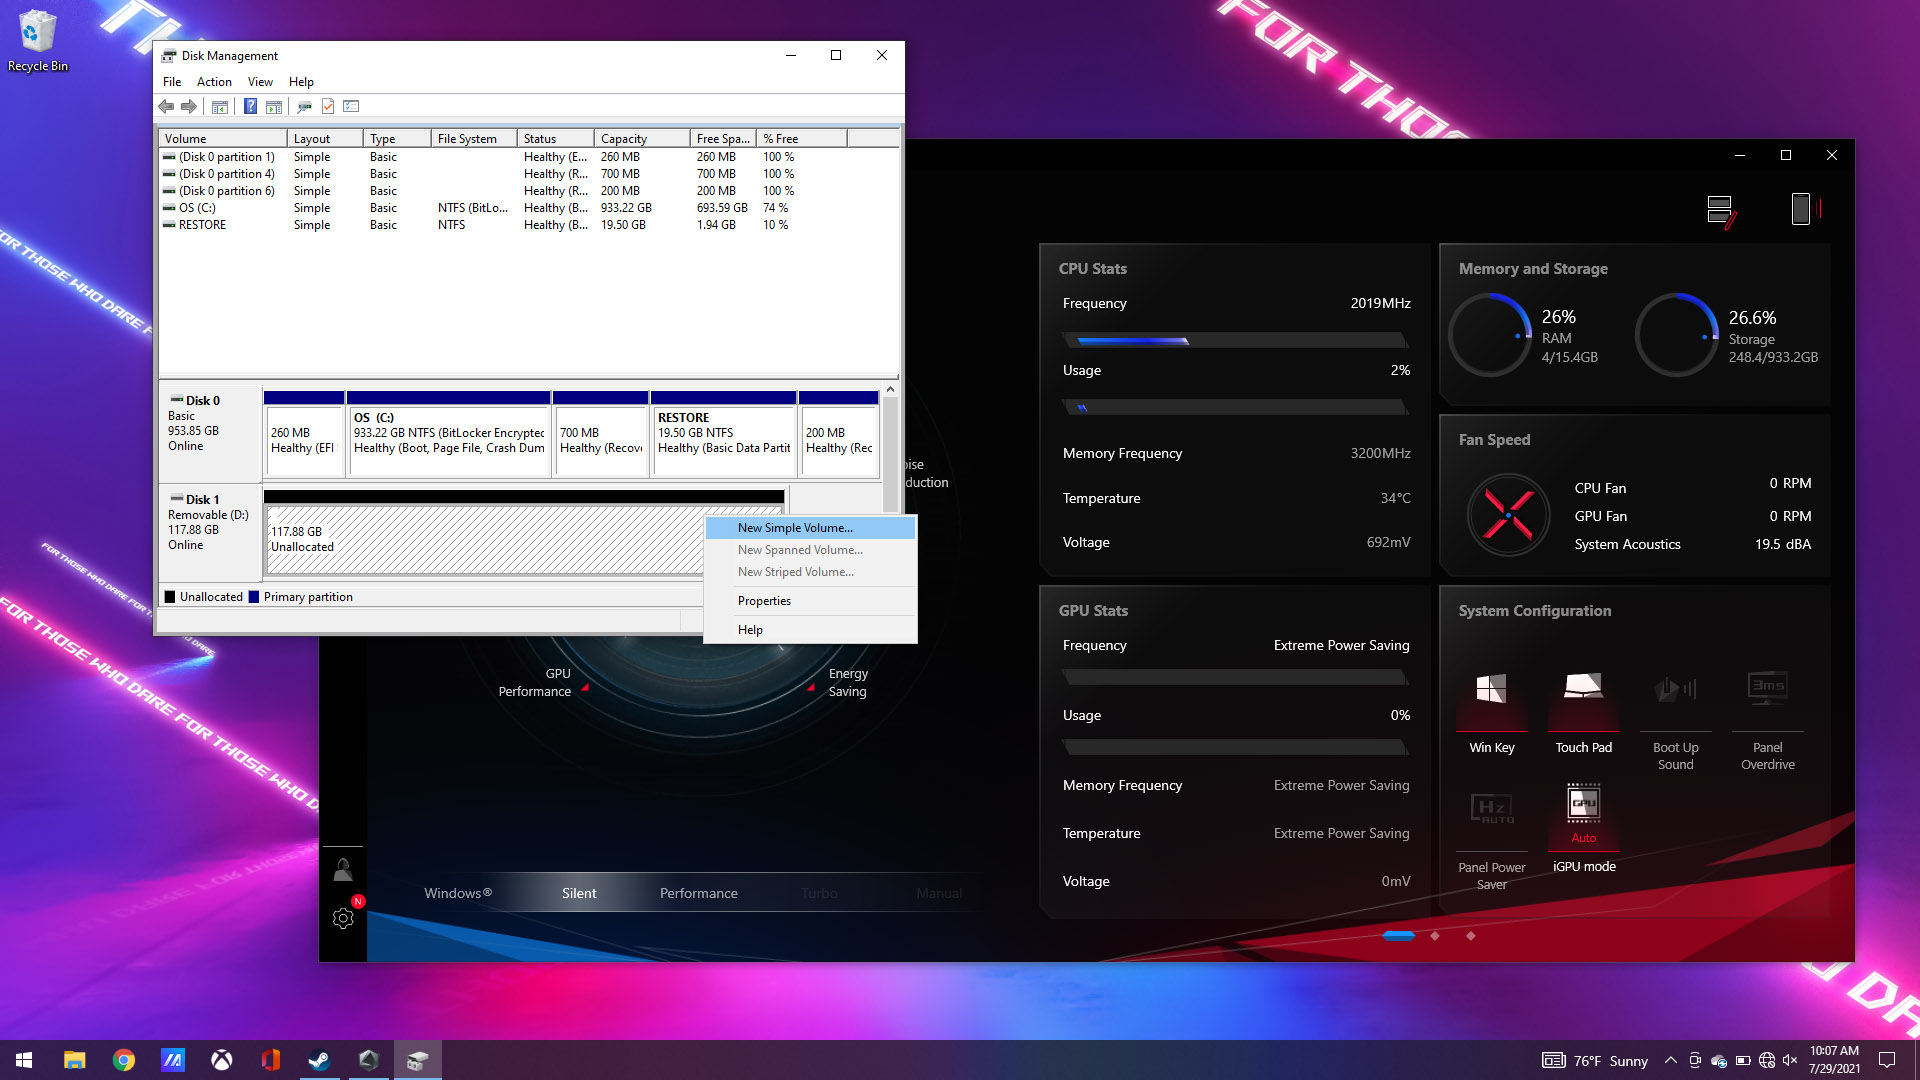
If you have a new SSD, it may pop up in Windows Explorer, but chances are you'll have to initialize and format it. Open the Start menu, search for Disk Management, and open the resulting application. Find your new drive in the list, right-click on it, and choose Initialize to set it up. After that, you can right click on it to set up a New Simple Volume. Once you do so, it should appear in Windows Explorer, with plenty of room for activities. So grab that new game you've been itching to play, fire it up, and enjoy the super-fast loading times of your new SSD.
Author
Popular Posts

How to adjust your laptop's P-Cores and E-Cores for better performance and battery life
Introducing the ROG Astral GeForce RTX 5090 and 5080: a new frontier of gaming graphics

How to Cleanly Uninstall and Reinstall Armoury Crate
How to configure your PC's RGB lighting with Aura Sync
How to upgrade the SSD and reinstall Windows on your ROG Ally or Ally X
LATEST ARTICLES
How to choose a gaming laptop: The ultimate 2025 buying guide
Learn how to choose a gaming laptop with our complete guide, ensuring you find the perfect match for your gaming needs and preferences.

Best Laptop for Students and Gaming in 2025: ROG’s Picks for College
No matter which university or major you choose this fall, ROG has the right gaming machine for your campus life.
Can I overclock my GPU with Armoury Crate?
If you have an ROG machine — whether it’s a gaming desktop or a gaming laptop — you can control most of its functions from the bundled Armoury Crate software. On laptops, this includes tuning your GPU performance and overclocking your graphics chip. On desktops, you'll need GPU Tweak III as well.
Do I need Armoury Crate on my PC?
If you just bought an ROG desktop PC or gaming laptop, you may be wondering what the preinstalled Armoury Crate software does. Here are its banner features.
How to fix a device that's not showing up in Armoury Crate
If Armoury Crate isn’t automatically detecting your new device, don't worry — you probably just need to download a quick update.

Reintegrated: An ROG stylebook for today's competitive corporate world
Working in a corporate office doesn't necessarily mean that you have to settle for bland, underwhelming PC hardware.