Fold For ROG: How To Install And Run Folding@Home on CPU and GPU
 Folding@Home is a distributed computing project that donates your CPU and GPU cycles to discovering the ins and outs of protein folding (literally how they twist and shape) in the body. Protein folding is linked to disease, such as Alzheimer's, ALS, Huntington's, Parkinson's disease, and many Cancers. By adding your spare CPU and GPU cycles to this project, you can join thousands of others in attempting to crack the biological code and help fight diseases.
Instead of being just a monotonous task of running a hidden program in the background, Folding@Home is a competitive adventure against many other teams, with names you'll recognize across the tech industry. Since the ROG ethos is aspiring to win, we have our own team which we'd love you to join: #183368. Come fight against other teams to reach the top spot then join the discussion with other Team ROG members in our Folding Forum.
WARNING: Keep in mind both the CPU and GPU based programs will greatly tax your system. Please keep a close eye on your system temperatures while Folding, as the heat will build up in a poorly ventilated case. These programs are automatically configured to be run in the background without affecting performance much, but you will likely notice performance decreases while gaming, so ASUS does not recommend running these programs during gaming or other heavy-load scenarios. If you find your system becomes unstable or too hot, stop Folding immediately.
How to setup Folding@Home
1. Firstly register your unique PASSKEY: HERE
You will need this passkey when you login the control panel below.
Running Folding@Home on your GPU
2. Download the GPU2 or GPU3 Client for Windows: HERE

- If you own a NVIDIA card, it must be compatible with CUDA (DirectX 10/11), so the 8, 9, 200, (300M), 400, 500 and future series are all compatible (a list is available to check if your card is compatible, including the GeForce, Tesla and Quadro lines).
- If you own and AMD card, it must be compatible with Stream processing, so 2000, 3000, 4000, 5000, 6000 or 7000 series, or newer (eventually) will be supported. For more information see here.
- Use the GPU2 (second generation) or GPU3 (third generation) client. Try both, test your PPD.
- Grab the latest official driver from the Nvidia or AMD website. Use the latest version unless there is a compelling reason to use a different one. To update the driver, as always we suggest that you uninstall the old driver, reboot, then install the new driver (selecting 'clean install' where possible).
- For further general information check here. http://folding.stanford.edu/English/WinGPUGuide
How to install the GPU client and join the ASUS Republic of Gamers Folding@Home Team!
Once the file is downloaded, double click on the .msi file as you would any other program.

You will be greeted by the following screen:

Click next, agree to the terms and conditions, and so on until it is installing:

It only takes a few moments to install, once it's complete click close to exit the install program:

You will find the program in your start menu under Programs > Folding@Home and Folding@Home-GPU. The first time you run the program, you will select a user name and the team number (the one you made in Part 1 above). This attributes all the scores to your personal profile, so you can track your progress and team ranking. Remember it's important to type in team 183368 to join ASUS Republic of Gamers Folding Team:

When you click OK, a new icon will appear in your task manager (normally in the lower-right of your creen by the clock). You are now Folding@Home with ASUS Republic of Gamers! If you want to see a graphical representation of your work, right click on the icon and click display.
How it should look on your desktop:

The next page details how to run Folding@Home on your CPU...
Running Folding@Home on your multicore CPU
3. Download the High Performance SMP CPU Client for Windows: HERE

Using this client is a little more involved as it requires command line used to setup SMP. AS ROGers we are assuming you're using a pretty recent CPU with multicores - there's you will benefit from SMP.
How to install the CPU client and join the ASUS Republic of Gamers Folding@Home Team!
Firstly download the latest SMP client above, then run the application:

Run the executable file and it will open a command box:

Follow the prompts inputting the following:
User Name [Anonymous]?
Enter your username you generated in point 1 on the previous page.
Team Number [0]?
Enter: 183368 , for Team ROG.
Passkey []?
Enter your passkey that you created with your username.
Ask before fetching/sending work (no/yes) [no]?
Because of the short deadlines on SMP work assignments, persistent connections are strongly recommended and this option should be set to no. If you want to control your internet connection though, select yes.
Use proxy (yes/no) [no]?
Yes/No depending on your own internet setup.
Acceptable size of work assignment and work result packets (bigger units may have large memory demands) -- 'small' is <5MB, 'normal' is <10MB, and 'big' is >10MB (small/normal/big) [normal]? big
This option states a preference for the size of work units downloaded and uploaded to the project servers. Note that all SMP WUs are large in size, so big is the required setting (type in big). Bigger units will also have bigger memory requirements. If you run on a slower broadband or dialup internet connection, small is the recommended setting to ease your bandwidth usage and you may want to switch to the CPU client instead.
Change advanced options (yes/no) [no]? yes
If you want to change the advanced options, enter yes. It is not mandatory but is recommended for SMP installs as you'll see;
Core Priority (idle/low) [idle]?
This adjusts the FAH client priority level. This is similar to, but not the same as the Windows priority setting. In most cases, the default idle setting is recommended so no need to change.
Note: For better performance when mixing CPU or SMP clients with GPU clients, raise the priority of the GPU clients by selecting the low priority setting but do NOT change the Windows priority settings for the client or fahcore.
CPU usage requested (5-100) [100]?
This will adjust the percentage of CPU usage. The FAH client only uses spare CPU cycles not used by other programs, so reducing this setting is not typically necessary. However, if you want to lower system temperatures, or reserve CPU cycles for more intensive computer tasks, enter a number below 100. In the SMP client, changing this setting does not reduce CPU usage.
Disable highly optimized assembly code (no/yes) [no]?
If you are having issues running the client, disable this. For 99.9% of the users, leave this at the default setting since this reduces the client performance a lot.
Pause if battery power is being used (useful for laptops) (no/yes) [no]?
If you are Folding on a G-series ROG notebook, set this to yes to pause if the laptop is not plugged on the wall. This will avoid the client draining the battery. The ROG team generally recommends NOT running Folding on G-series when on battery power.
Interval, in minutes, between checkpoints (3-30) [15]?
Number of minutes between each checkpoint where the client is writing the client progress to disk in case of unexpected interruption. 15 is the standard and recommended setting.
Memory, in MB, to indicate (1013 available) [1013]?
Sets the amount of memory seen by the work servers. By default, it shows the full system memory amount. Note that reducing this setting does not reserve more memory for other programs. However, reducing this setting will prevent the client from downloading memory intensive work units. A setting too low may prevent the client from getting any new work.
Note: For the SMP client we are using, .5 GB per CPU core is the minimum, while 1 GB per core is recommended. This means if you are running a quad-core like the Core i5-2500K you should have 4GB of memory, while hexa-core Phenom II X6 requires 6GB and a 12-thread Core i7-3930K requires 12GB.
Set -advmethods flag always, requesting new advanced scientific cores and/or work units if available (no/yes) [no]?
This is the same as using the -advmethods command line flag, except -advmethods will not appear on the arguments line in the fahlog. This option states a preference to request late stage beta work units, which may be less stable than regular work units. May cause work unit size and PPD to increase, decrease, or not change.
Ignore any deadline information (mainly useful if system clock frequently has errors) (no/yes) [no]?
Only set this to yes if your local computer clock is having issues keeping the correct date and time.
Machine ID (1-16) [1]?
This is the Machine Number of the client. If you are running more than one client under the same operating system, you need to have a different Machine ID for each client on that machine. If you are installing a single client on multiple computers, you do not need to change this since this is only for installing multiple clients on the same computer.
Launch automatically, install as a service in this directory (yes/no) [no]?
If you want the client to run as a service, say yes and it will install a new entry in the services list. The next time you restart the computer, the service will start automatically and run in the background. SMP as a service is only supported in v6.30 and newer.
The following options require you to restart the client before they take effect Disable CPU affinity lock (no/yes) [no]?
Not useful for SMP since it use all cores. Keep this option as no.
Additional client parameters []?
Here you need to enter the string -smp . Note the - is required too. This sets up the client to always run in SMP mode to use all your CPU cores.
IP address to bind core to (for viewer) []?
For future use when the Viewer is working better. Specifies the IP address of the machine of which the viewer should display the client output. Once this is all running, the client will download the work unit (WU) to process and then proceed to churn through it. Note that this version is less 'pretty' than the GPU client with its visual molecule, but it still does the same job.

Let us know how you get on!
Author
Popular Posts

How to adjust your laptop's P-Cores and E-Cores for better performance and battery life

Introducing the ROG Astral GeForce RTX 5090 and 5080: a new frontier of gaming graphics

How to Cleanly Uninstall and Reinstall Armoury Crate
How to configure your PC's RGB lighting with Aura Sync
How to upgrade the SSD and reinstall Windows on your ROG Ally or Ally X
LATEST ARTICLES
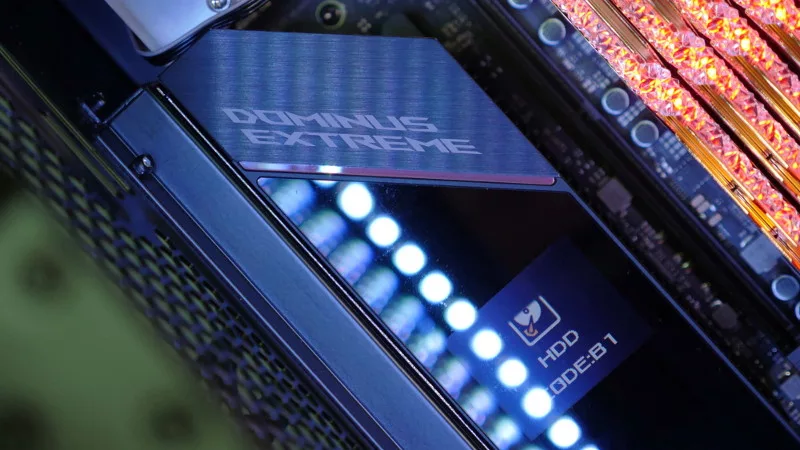
See the mammoth ROG Dominus build that takes Intel's 28-core Xeon W-3175X to the Extreme
The ROG Dominus Extreme pushes the boundaries of PC performance in our awesome CES 2019 build.

Breaking world records with the ROG Maximus XI Gene and the Intel Core i9-9900K
Tasked with pushing performance on the Z390 platform as far as possible, we invited the best overclockers to ROG HQ for a week of extreme overclocking.
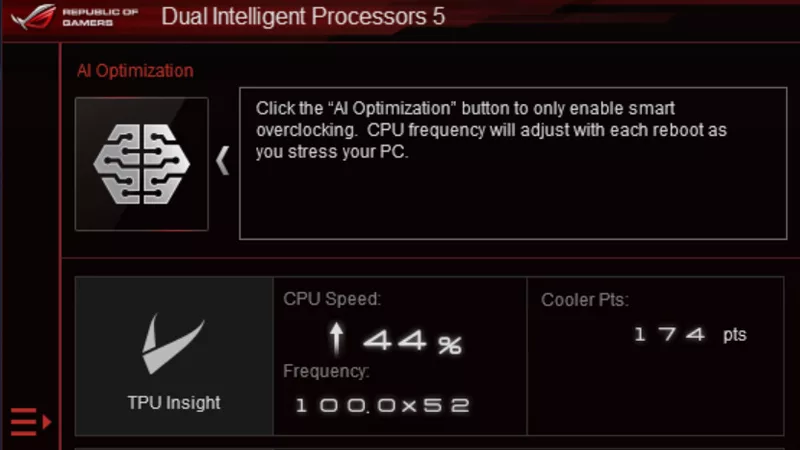
How to overclock your system using AI Overclocking
AI Overclocking one-click tuning makes its debut on Z390 motherboards and we have a quick how-to guide to get you started.

HW GURUS win the ROG OC Showdown Team Edition 2
The results are in from our second ROG OC Showdown Team Edition. See who posted the top scores.
Breaking records with the Maximus X Apex and i7-8700K
ROG is obsessed with chasing the highest overclocks and fastest performance, and Coffee Lake is our new muse on the Maximus X Apex.
The Rampage VI Apex claims more performance victories with Intel's new Core i9-7940X and i9-7980XE
After dominating extreme overclocking with the first wave of Skylake-X CPUs, we've taken the latest 14- and 18-core models to sub-zero extremes.