Sub Zero Overclocking Motherboard Preparation
Overclocking was once considered a dark and forbidden art, but no more. Now overclocking is an accepted part of computer components. From the CPU manufactures across the board (bad pun intended) and ASUS has been at the forefront of that evolution with the ROG range of motherboards. Just as the hardware used for overclocking has evolved and developed so has the manner in which overclocking is practiced.  Back in the early days of overclocking it was immediately apparent that with increased performance came a corresponding increase in heat. Heat caused by the increased voltages needed to produce the higher frequency of the hardware being overclocked. At that time air coolers were the only options. Pioneers of that time developed the then radical notion of water cooling your CPU. For a while this was enough, but only for a short while. Even with new and innovative design idea and a rapid take up by the enthusiast market water cooling would never be enough to satisfy the need for raw speed.
  Folks tried all sorts of novel solutions and it was inevitable that sub zero cooling would be the next logical step either using mechanical means such as a electrical refridgeration unit modified or custom built to suite purpose.
  Or how about this:
  Sub zero cooling can be achieved in many different ways. Our friends who live in very cold climates are able to have air coolers at sub zero cooling simply by opening a window. But that solution is no practical at all. A lot of fun possibly if you are wrapped up warm and snug. A far more elegant and universal solution was to use materials that are commercially available and can be used as and when required. Iced water was experimented with and used quite successfully back in the day and still is a very popular way of gaining a few extra megahertz without going the extreme route.

The real leap forward in what can only be described as extreme overclocking came about when substances like Dry Ice and Liquid Nitrogen were introduced to the over-clocking scene. Just where the first Liquid Nitrogen benching session happened is open to discussion and debate but once the first drop had been poured the sport was changed forever.

However with most developments or radical changes in how things are done, there are new situations or challenges that need to be overcome. Dry Ice or LN2 overclocking was no different. There are two main challenges. The first is condensation and water and electronics are not a good combination, the second are the effects of cold on other components. This guide will discuss the innovative and different ways people from all over the globe have managed both challenges. 
The difference between prepping for condensation and insulation
Condensation
- the process of changing from a gaseous to a liquid or solid state
- atmospheric moisture that has condensed because of cold

Thermal Insulation
- To separate, detach, or isolate
- To separate a body or material from others, to prevent the transfer of heat

So we can see that the preparation needed for sub zero is made up of two components. One to keep moister off the electronics and the other to keep the cold from components that might not operate correctly if too cold.
Motherboard preparation step one - Condensation
 Since the source of the extreme cold is going to be located on top of the CPU which is latched into the socket it is the immediate area around the socket that we need to focus on first. There are a couple of ways to prevent condensation from damaging or killing your motherboard. Remember that condensation damage is user damage and not a valid reason to institute a RMA claim. You overclock your motherboard and CPU using LN2 or any other extreme cooling solution at your own risk. That being said there are ways to prevent that unfortunate eventuality.
Coatings
There are many different kinds of coatings that have been used over the years. One of the very first coatings that were used was nail varnish. The entire socket area was painted with nail varnish. The idea being that since nail varnish was not conductive, very important for obvious reasons, and easily accessible. If not blagged from mothers or sisters then easily bought at the local stores. And added bonus for using nail varnish was the ease of removal by simply applying some acetone based nail varnish removal liquid. Downside is that the nail varnish can crack and split when under extreme cold.  Others borrowed from allied industries such as the electronic engineering industry and used Conformal coating material as applied to electronic circuitry to act as protection against moisture, dust, chemicals, and temperature extremes that, if uncoated (non-protected), could result in damage or failure of the electronics to function. The similarities in application are quite close and they work very well, cost of course is a consideration. Another consideration as to why conformal coatings have not gained the popularity of other methods was the difficulty of removing the conformal coating after the sub zero session had ended. Many differrent brand names and types to choose from. Simply search for conformal coatings in your country if you want to try this type of coating.
  Normal varnish – Varnish will work depending on the kind and type, the easy test is to paint a section of any surface with the varnish and then freeze that surface using LN2 and testing for conductivity once the surface is frozen. Some varnishes have proven to be conductive when frozen and as such has not been very popular with extreme benchers. Certain types can crack when subjected to long periods of sub zero temperature.
  Other coatings have been tried including artist liquid latex membranes that is mixed and applied with a brush. I have not tried this method but have used liquid rubber which is very similar and works well.
  But one coating is the one that in my view is the best available. Liquid Electrical Tape – used primarily in the maritime industry the liquid electrical tape is guaranteed not to be conductive and is easily applied to any PCB type surface. Removal is not too difficult if you have applied a thick enough coating. You can acquire the Liquid Electrical Tape in a couple of colours but the most common colour is black. Cost is a factor as the coating is rather expensive.
  Not everyone wants to paint their motherboard which may have cost them $500 with a coating. The alternative is to use solid type or semi solid materials to provide the condensation protection that is required.
Semi-solid materials
This method has gained far more traction than any of the other. The use of pliable materials to pack around the socket and protect vulnerable components from condensation is currently the choice of most extreme sub zero overclockers. The materials used range from Plasticine, Crazy-putty and rubber based artist’s eraser. The ease of application coupled with reusable nature of the materials make this medium choice number one. Those expensive motherboards that we buy for benching can now be benched under LN2 and once done with the session within a few minutes look pristine and as good as new. Like most things you get what you pay for. There are cheap and nasty Eraser type products but the one I have found to be the best and most reusable are the Faber Castell artist's kneadable eraser.  Crazy-putty. Crazy-goo, Bionic Putty (every country has its own name for this type of product) was a substance that I played around with and while it works a treat it is quite amazing to use due to the nature of the product never solidifying. All you need to do is put some of the putty around the socket area and over the next hour or so the putty will flow and fill all the spaces. Very cool as that way things are completely protected. Downside is if you have used too much or the material starts to flow into your socket area. That is not good. So make sure your board is always stored flat if you use this product.
  My Old Commando board prepared once and never a moments problems since.
Solid materials
Paper or fabric gaskets, foam insulation gaskets are used as layers of protection, most of the time in conjunction with a coating or semi-solid material. Industrial paper towels or paper waste wipes are favourites because they hold the any liquid that might result from the sub zero benching session, therefore preventing the liquid from reaching the motherboard PCB and potentially shorting the whole system out. 
Socket Preparation
Insure that the socket area is clean and free from any grease residues or bits of extraneous materials  And the back too. If you are using a coating apply the coating carefully to the area around the socket. Ensure that you get under the capacitors and power regulators. Repeat on the underside of the motherboard.
  Let the coating dry before you proceed. You can either user eraser on the back of your motherboard or simply use a square of closed cell insulation foam; I like to use both methods as shown in the below.

Once the back area of the board has been completed mount your back bracket. You want to have the back plate mounted before you start the front otherwise when you push the rod through the holes it will lift the eraser. Install your CPU into the socket and latch.

Knead your eraser into a soft ball and begin to push the eraser into all potential problem areas.
 Pay attention to the areas around the heat sinks and capacitors. When you are done the whole area should be covered.
  Cut out a foam gasket; use any thickness of foam that works for your needs.

As long as the foam gasket is made from closed cell insulation materials it will do the job of keeping your system dry. There are a number of different types you can use. I like the cheap and cheerful too so I use a neoprene camping sleep mat.
Last part of the condensation side of the preparation is the layer of absorbent towel, cut the drying mat or industrial paper towel gasket so that it frames the CPU socket.

Insulation
Insulation does slightly different work than the condensation barrier we have created. The insulation keeps the cold where it will do most work. The barrier that the insulation material creates helps with the condensation too.
There are a number of different materials that can be and are used. The most commonly used materials are closed cell foam based insulation. ARMAFLEX is a very well know global brand name and is normally available everywhere that air-conditioning or refrigeration is found.

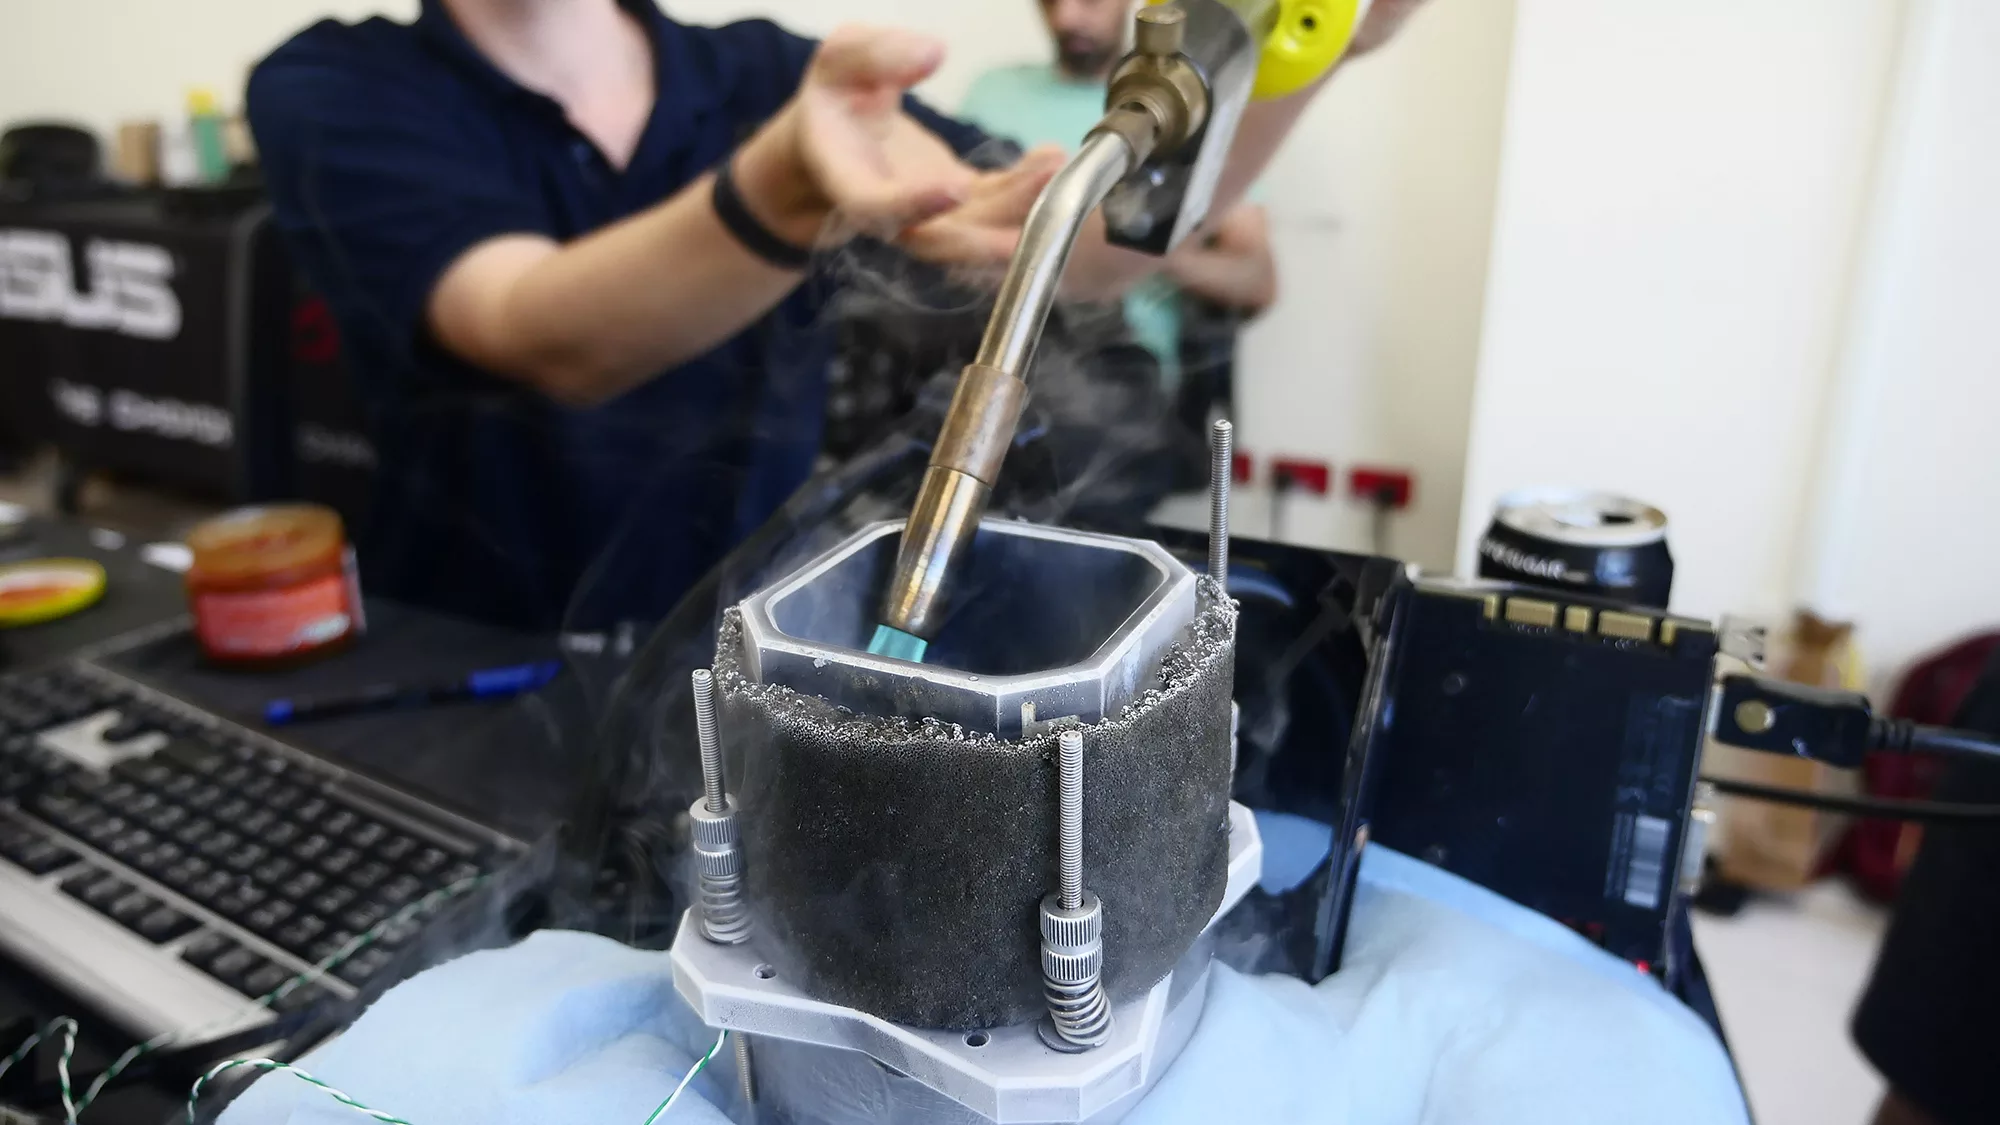
Place your CPU pot on top of the foam and press down hard. That will leave an indentation what you can use as a guide for the cut out. Take your time and do not rush this. The aim is to have a close a fit as possible, airtight is our goal here.

Place the square foam gasket over the socket and ensure that the hole is framing the CPU. Use Thermal Material of your choice – remember you just want to fill the microscopic valleys and troughs in the IHS and CPU pot surface not act as a barrier. So think; less is always more.

Different CPU pot designs will have different insulation methods and there are too many different kinds to cover here. Just ensure that your pot is seated correctly and that there is as good a seal between the CPU pot foam sleeve and the gasket around the socket.

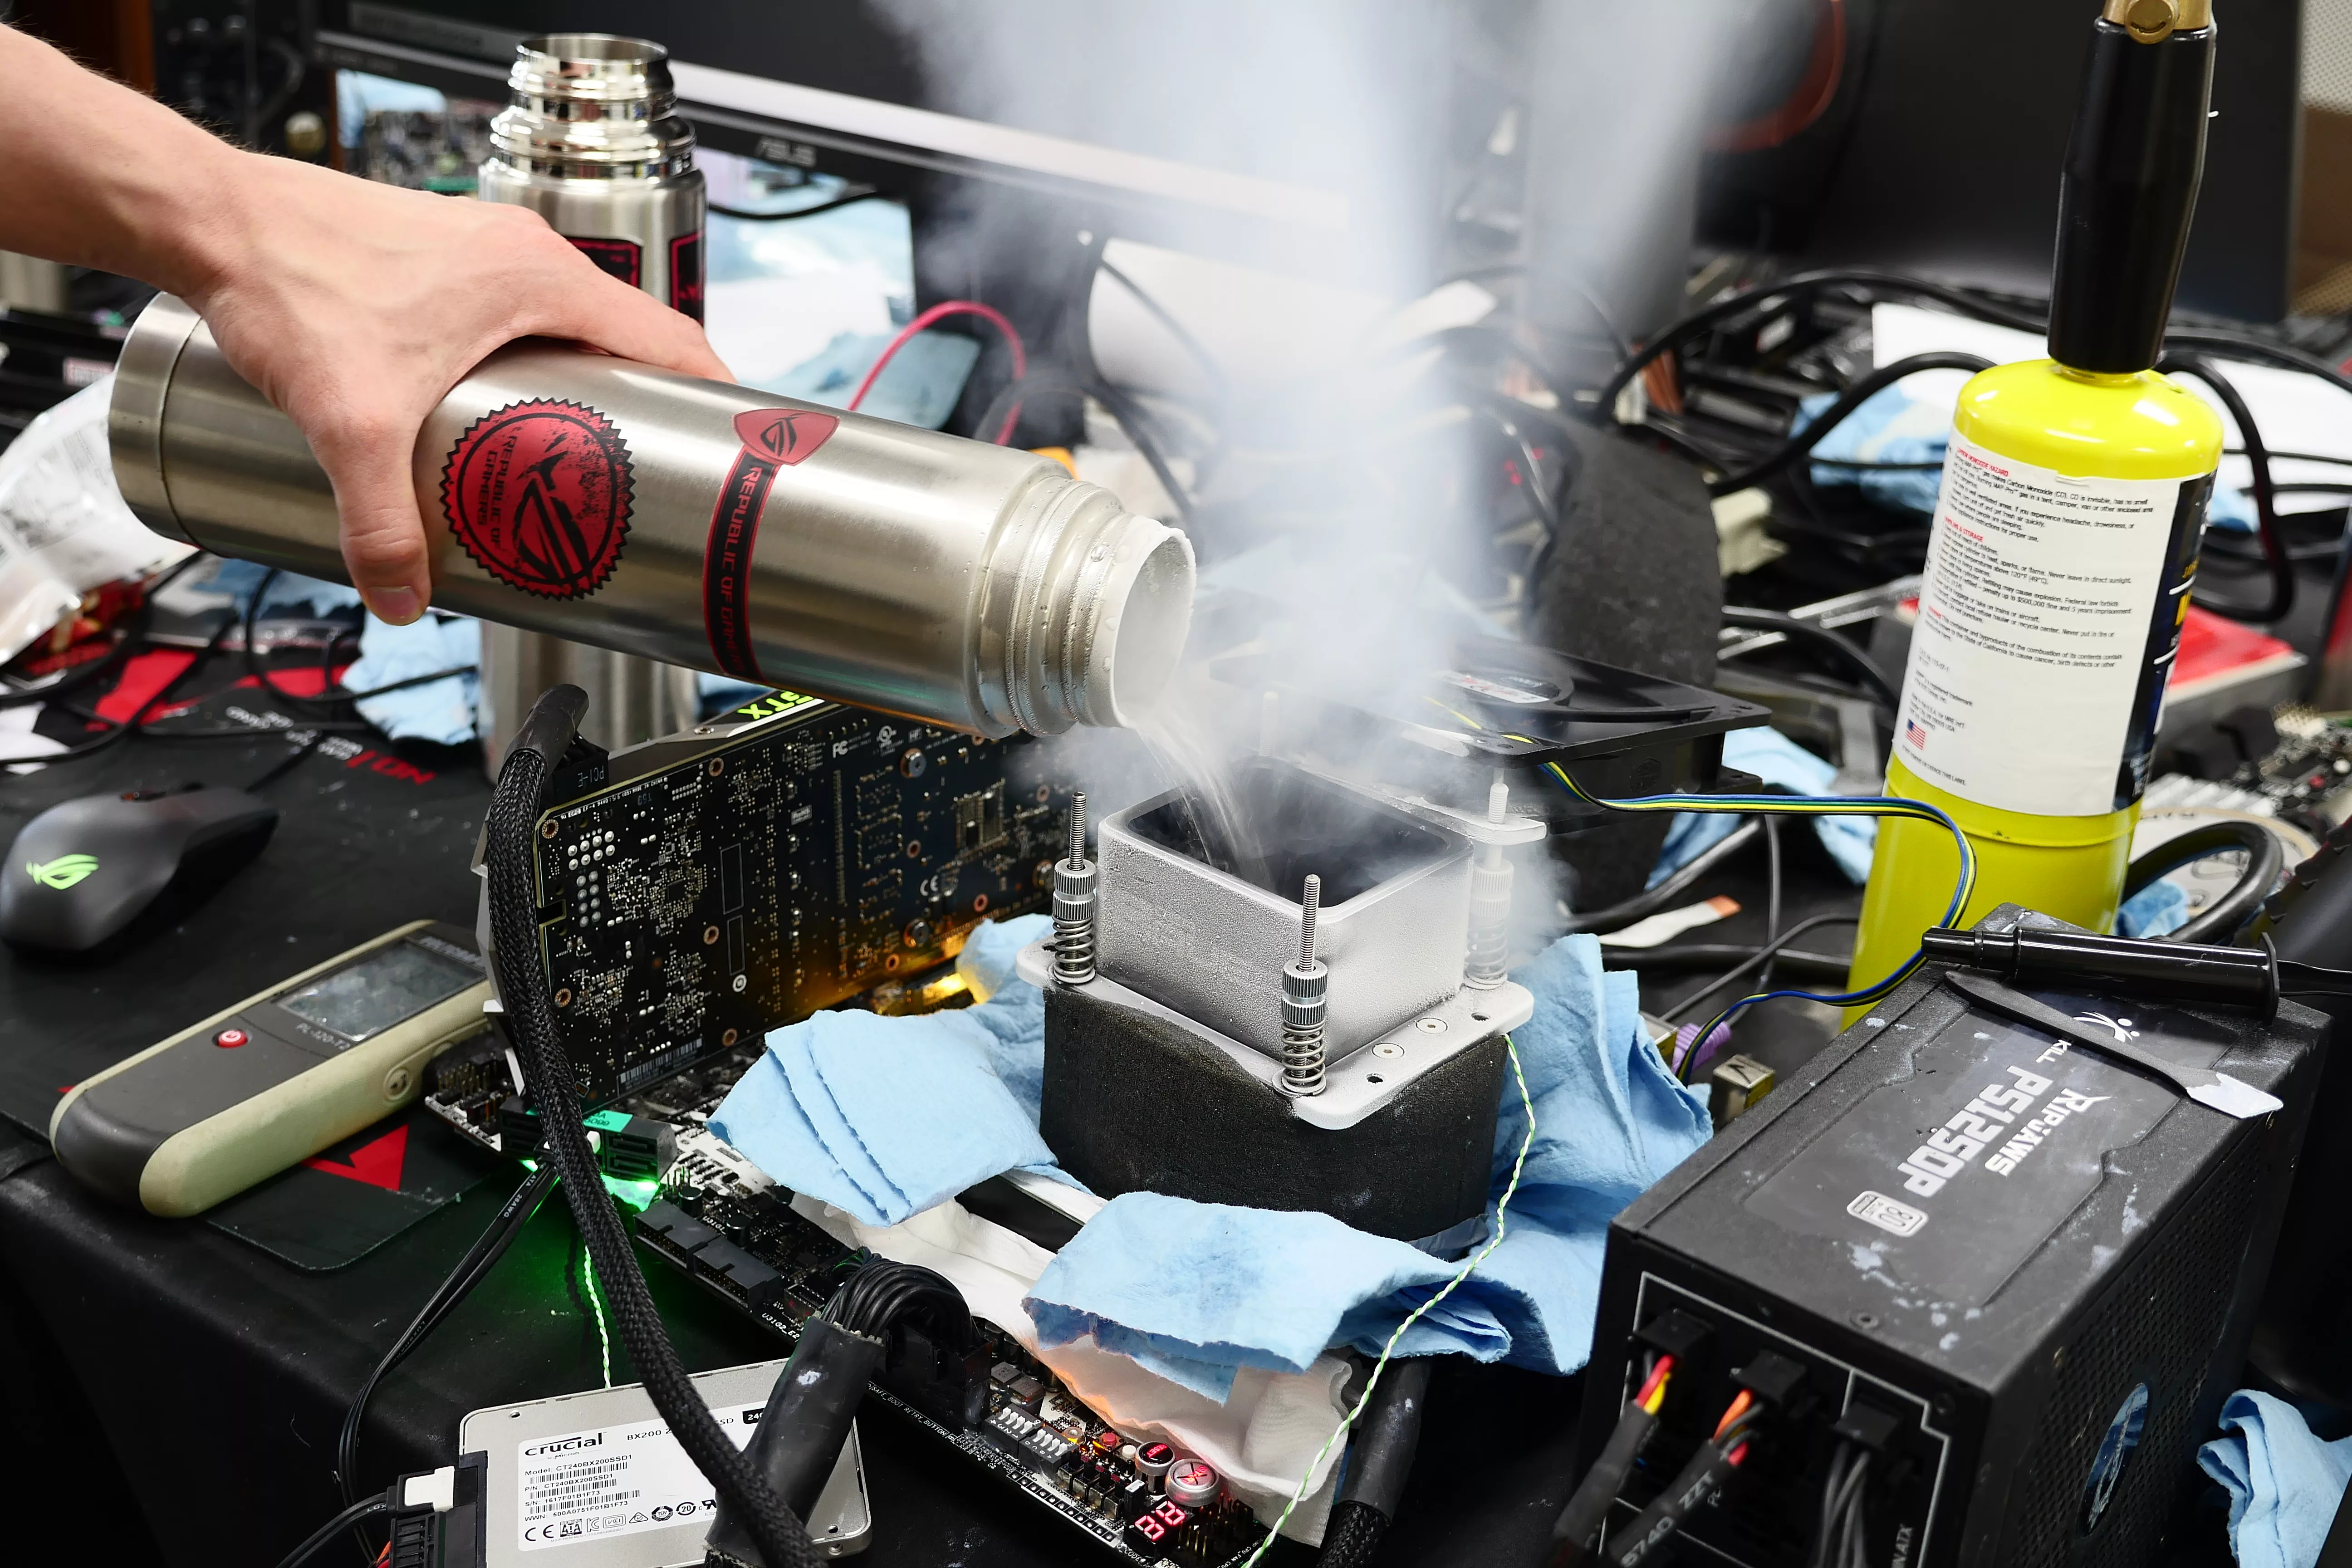
Nappy your CPU pot, I use normal paper kitchen towel for this and wrap it round the pot to prevent any moister or condensation that might form on the rods or the insulation itself from dripping down.

I pack the area around the base of the CPU pot with high absorbent paper towel. Twisting some kitchen paper towel into a rope and pushing it under the edge of the CPU pot sleeve adds one more layer of protection.

That is all that is needed for the CPU area to be well protected and allow many hours of subzero benching. Have you had a bit of a fun with LN2 or have other ways of preparing for sub zero temps? If so show us your extreme frozen pictures in the forums!
Author
Popular Posts

The ROG XREAL R1 gaming glasses let you game anywhere on a 171-inch 240Hz virtual screen

How to Cleanly Uninstall and Reinstall Armoury Crate

How to adjust your laptop's P-Cores and E-Cores for better performance and battery life

Prepare for ultra-sharp RGB Stripe OLED imagery with these three new ROG monitors
Check out the latest ROG gaming gear revealed at CES 2026
LATEST ARTICLES
See the mammoth ROG Dominus build that takes Intel's 28-core Xeon W-3175X to the Extreme
The ROG Dominus Extreme pushes the boundaries of PC performance in our awesome CES 2019 build.

Breaking world records with the ROG Maximus XI Gene and the Intel Core i9-9900K
Tasked with pushing performance on the Z390 platform as far as possible, we invited the best overclockers to ROG HQ for a week of extreme overclocking.

How to overclock your system using AI Overclocking
AI Overclocking one-click tuning makes its debut on Z390 motherboards and we have a quick how-to guide to get you started.

HW GURUS win the ROG OC Showdown Team Edition 2
The results are in from our second ROG OC Showdown Team Edition. See who posted the top scores.
Breaking records with the Maximus X Apex and i7-8700K
ROG is obsessed with chasing the highest overclocks and fastest performance, and Coffee Lake is our new muse on the Maximus X Apex.
The Rampage VI Apex claims more performance victories with Intel's new Core i9-7940X and i9-7980XE
After dominating extreme overclocking with the first wave of Skylake-X CPUs, we've taken the latest 14- and 18-core models to sub-zero extremes.