Guide: Overclocking the ROG Strix GTX 1080
One of the lucky owners of an ROG Strix GTX 1080? Find out how to get the most out of it by reading Chino's guide, it's a must read by our long-time ROG forum guru. Thanks Chino!
Owners of the new Strix GTX 1080 can attest that it’s an amazing graphics card with a respectable level of performance. But have you ever wondered to yourself if you’re getting the most out of it? The Strix GTX 1080 performs extremely well with boost clocks exceeding the 2GHz barrier. But I can bet that not many users are running their graphics card at peak performance much less know that there is still some gas in the tank. That’s the thing about performance. It’s so addictive. Having lots of it simply makes us want more of it. If you’re reading this guide, you’re probably curious to know how much extra performance you’re losing out on your Strix GTX 1080. Without further ado, let’s begin.
Overclocking Preparation
Squeezing very last drop of performance from your Strix GTX 1080 requires having the correct tools. Essentially you only need two programs to overclock your graphics card: one to make the real-time changes and monitor the graphics card’s vitals and the other to test the overclock’s stability.
To overclock our Strix GTX 1080, we will be using GPU Tweak II, ASUS' own in-house overclocking utility. It's good at what it does and there are certain functions that were developed specifically for ASUS graphics cards which are not available in other utilities.
When it comes to testing for stability, each user swears by a different program. In my case, I like using the Unigine Heaven 4.0 benchmark since it puts an insanely, high graphical load on the graphics card. What I have noticed is that if my overclock is stable in Heaven 4.0, it’s pretty much stable in the more demanding games. As always nothing is written in stone, so feel free to use the program of your choice for stability testing.
Testing The Strix GTX 1080 At Stock Settings
Although many users tend to overlook this part, I’m a firm believer that one should always test the graphics card at stock before overclocking it. You will obtain important insight about your Strix GTX 1080 like what kind of performance you’re getting at stock and more importantly, the thermal conditions that the graphics card is in.
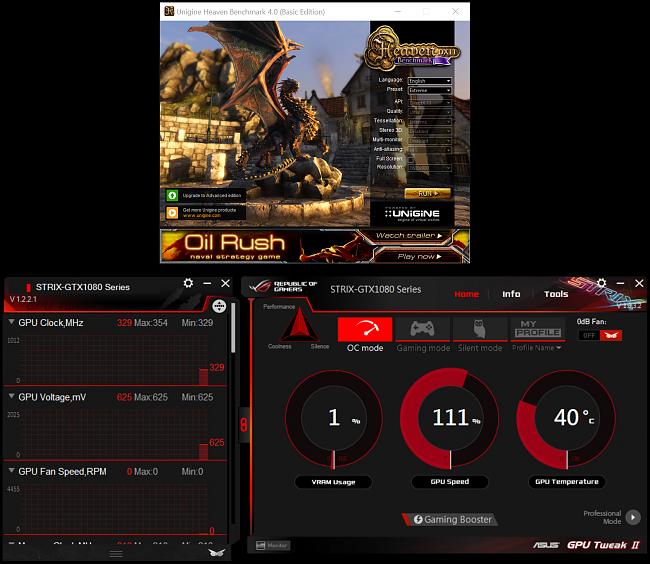
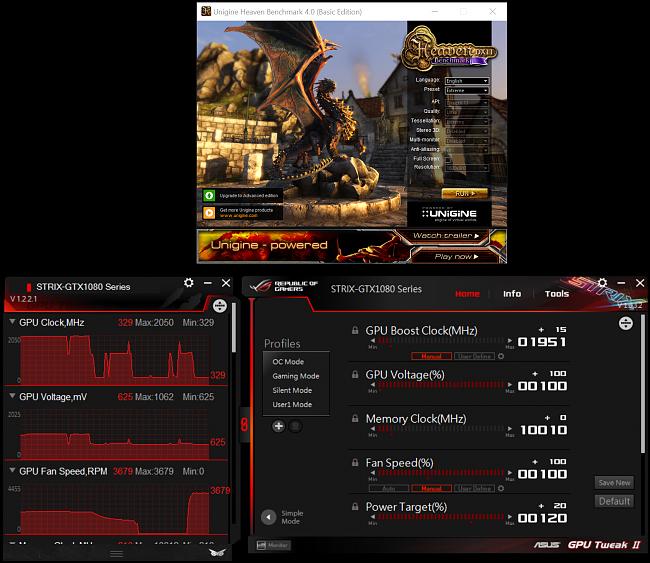
Let's start by running Unigine Heaven and GPU Tweak II. Make sure you have the Monitor window up for GPU Tweak II. Now proceed to select the Extreme preset for Heaven and let it do its thing. Once the program starts, press the F9 key to initiate the benchmark function.
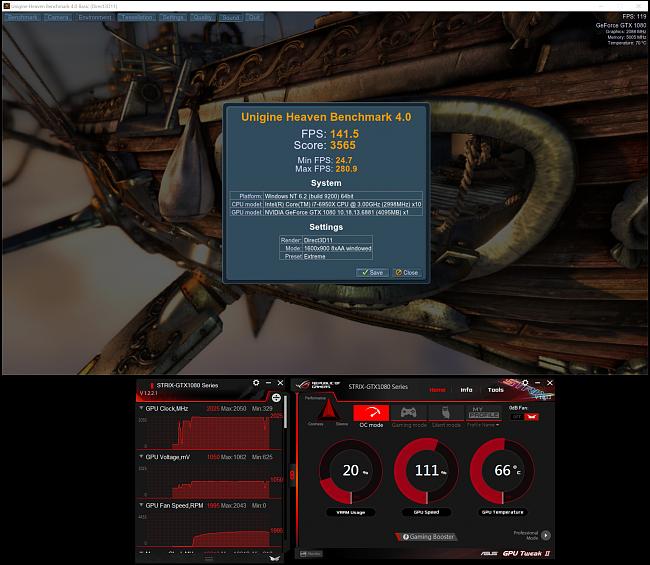
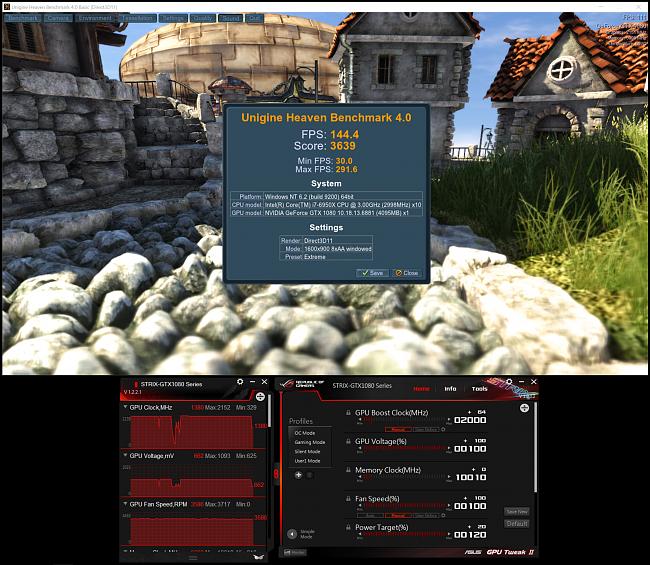
If your graphics card manages to finish the benchmark run, then you're on the right track. While the Strix GTX 1080 is guaranteed to reach a frequency of 1936MHz on paper, we all know that it has no problem boosting beyond that number. My particular sample boosts to 2050MHz in real-world usage. However, your mileage will vary.
The next parameter that we need to analyze is the GPU Temperature. So scroll down the Monitor window to find that information. GPU Temperature is one of the two factors that can hinder your overclocking experience. It’s important to keep the GPU's temperature below 80C at all times or the graphics card will start to throttle. In my case, my card gets around 70C which leaves me with some good headroom for overclocking.
Overclocking the GPU Clock
ASUS has hidden some of the more advanced options in GPU Tweak II. We will need to enable these options before we can start going crazy with the Strix GTX 1080.
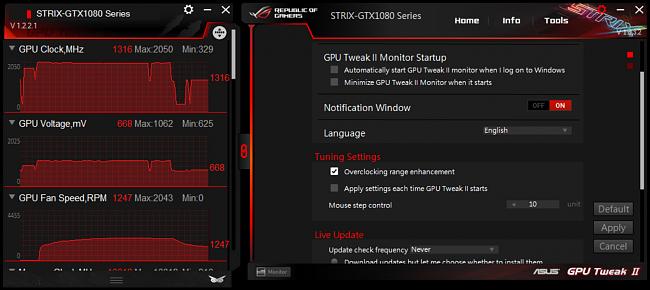
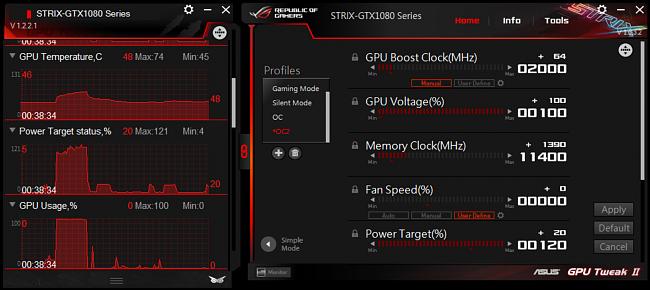
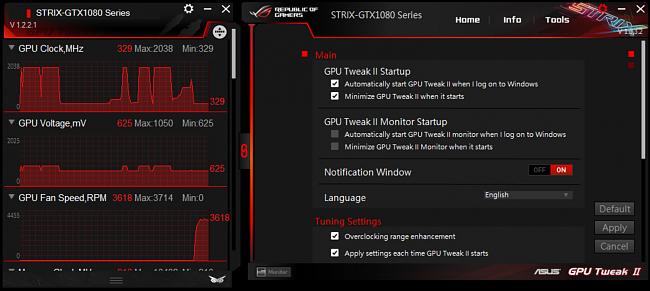
Once you're on the home screen, click the Professional Mode icon on the bottom right to switch over to a more advanced interface. Then click the cog icon on the upper right of the program to gain access to the program’s options. Scroll down and tick the Overclocking range enhancement option. Click Apply and you will be taken back to the home screen.
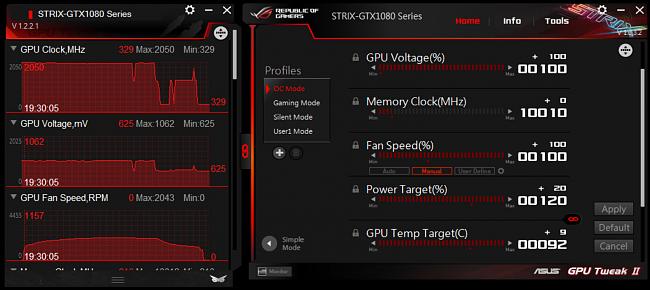
There are a few settings that we must change to ensure that the thermals and power usage won't limit us from finding our maximum overclock for our Strix GTX 1080.
- Increase the GPU Voltage (%) to 100% for maximum voltage frequency.
- Increase the Fan Speed (%) to 100% as well so that temperatures won’t be a problem.
- Increase the Power Target (%) to 120% to allocate more power to the graphics card and increase its TDP.
- Increase the GPU Temp Target (C) to 92C to allow for higher throttle temperature.
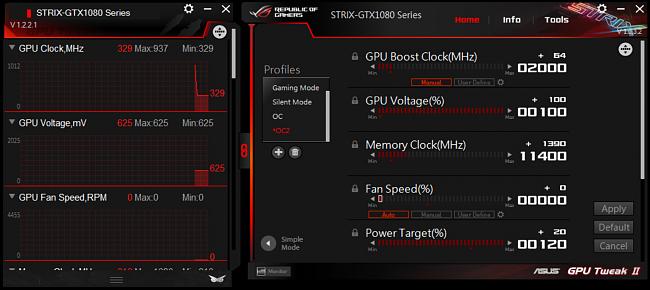
Let’s concentrate on overclocking the GPU Clock first. So for now we will be tweaking the GPU Boost Clock (MHz) option. Increase the GPU clock by 15MHz then run the Heaven 4.0 benchmark. Then repeat until you run into instability.
Instability usually shows itself in form of:
- NVIDIA driver crashes
- Application crashes
- Visual artifacts
- System lock ups
If you fall victim to any of these symptoms, restart your system and start decreasing the GPU Boost Clock by 1MHz to 5MHz, depending on your patience, until you are able to complete the benchmark.
My Strix GTX 1080, in particular, has a maximum GPU Boost Clock of 2152MHz. That’s a good 100MHz increase which isn’t too shabby at all. But we're not finished yet. We still need to overclock the Memory Clock to get us even more performance.
Overclocking The Memory Clock
So we took care of the Core and we’re one step closer to our final overclock. Now we'll be working with the Memory Clock (MHz) option.

Since the memory is a lot more forgiving so we can get away with using bigger increments. I use increments of 100MHz. Basically repeat the same process as we used to overclock the GPU Clock. When instability starts to appear, start decreasing your Memory Clock by 10MHz until you find your stable overclock.

By now you should have your maximum stable overclock for your Strix GTX 1080. I managed to get my sample to 2152MHz on the core and 11460MHz on the memory.
If you thought that this is the end of the line. Then you're wrong. Remember that no stress test can substitute real word usage. So I would recommend that you test your overclock in different games as well. If you experience instability, you know what to do.
Tuning The Fan Curve
During the entire overclocking process we've kept the Fan Speed at 100% so that high temperatures wouldn't be an issue. While that might give us the lowest temperatures, it’s also impractical to be running our fans at full throttle during daily usage. Besides it’s highly unlikely that our graphics card will be taxed at 100% all the time.
Change the Fan Speed (%) option from 100% back to Auto. The fan curve programmed into the Strix GTX 1080 will now dictate how fast the fan will spin. In most situations, this is more than sufficient. Now is the time to fire up some of your favorite games for real world testing.
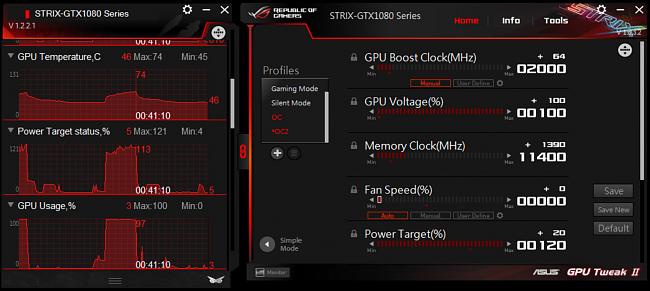
After gaming for a few, my Strix GTX 1080 got as hot as 74C. If your temperatures are too high for your taste, you can use a more aggressive fan curve for sure.
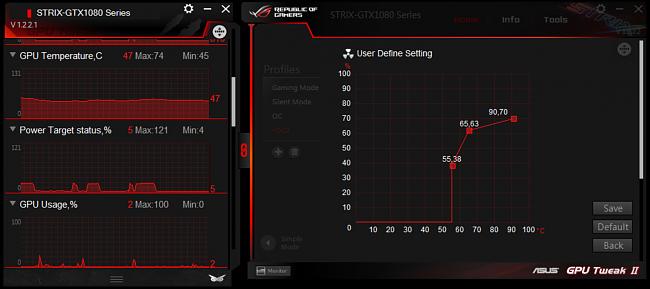
Start by changing the Fan Speed (%) option from Auto to User Define. Then click the cog icon on the right to open the fan curve window.
By default, this is how the fan curve looks like for the Strix GTX 1080. Basically the fans will start spinning when the GPU temperature hits 55C and they will continue to increase in speed in a linear fashion.
To add points to the graph, just left click on the part of the line where you want to add the point. Then just move the point up or down. Unfortunately, there’s no magic setting for this part of the guide. The perfect fan curve to achieve a balance between cooling and silence will vary from user to user depending on the ambient temperature and the case that houses the Strix GTX 1080. You will just have to experiment and see which works the best for you. Once you’re satisfied, click the Save button to finish up.
Applying The Finishing Touches
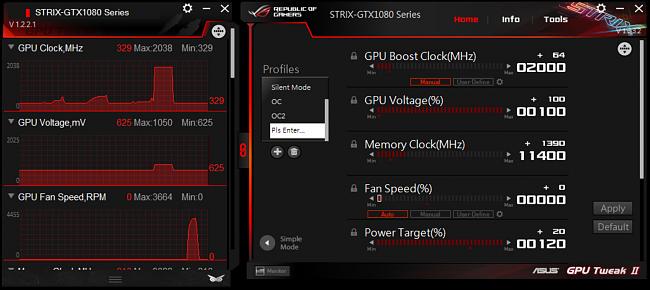
Now that we've finished overclocking our Strix GTX 1080 and tweaking the fan curve, the last step is to save our hard work to a profile.
Go to the home screen and locate the plus icon that's below the Profile section on the left side. Click it and the program will prompt you to provide a name for the profile. Once you've chosen a suitable name, hit the Enter key and the profile will be saved.
Navigate back to the program options and tick the following options:
- Automatically start GPU Tweak II when I log on to Windows
- Minimize GPU Tweak II when it starts
- Apply settings each time GPU Tweak II starts
That's all, folks! I hope this guide was of use to you. If you have any feedback, feel free to drop it in this thread.
Author
Popular Posts

Prepare for Tandem OLED splendor with these new ROG gaming monitors

How to adjust your laptop's P-Cores and E-Cores for better performance and battery life

How to Cleanly Uninstall and Reinstall Armoury Crate
How to upgrade the SSD and reinstall Windows on your ROG Ally, ROG Xbox Ally, or ROG Xbox Ally X
32-inch glossy WOLED panels debut in the ROG Strix OLED XG32UCWMG and XG32UCWG gaming monitors
LATEST ARTICLES
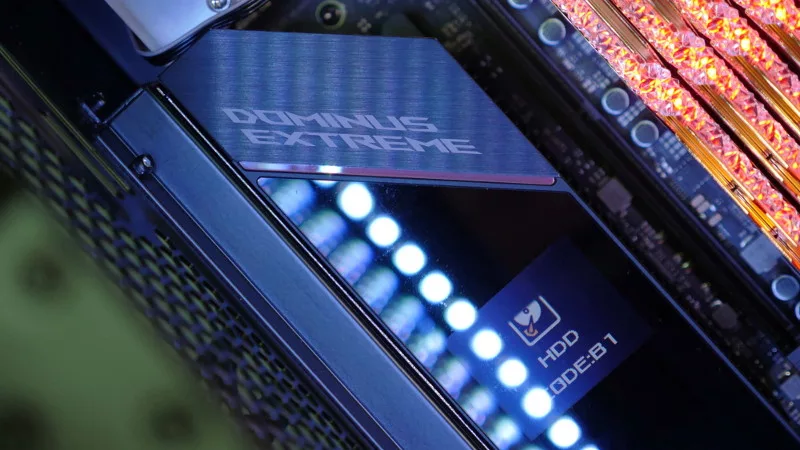
See the mammoth ROG Dominus build that takes Intel's 28-core Xeon W-3175X to the Extreme
The ROG Dominus Extreme pushes the boundaries of PC performance in our awesome CES 2019 build.

Breaking world records with the ROG Maximus XI Gene and the Intel Core i9-9900K
Tasked with pushing performance on the Z390 platform as far as possible, we invited the best overclockers to ROG HQ for a week of extreme overclocking.
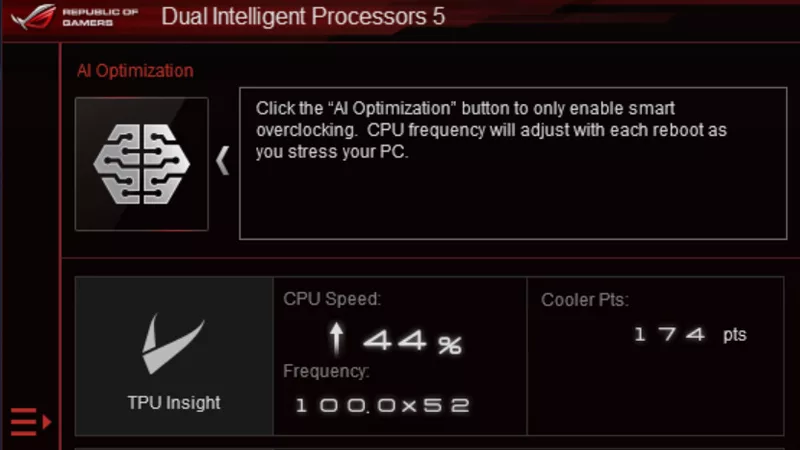
How to overclock your system using AI Overclocking
AI Overclocking one-click tuning makes its debut on Z390 motherboards and we have a quick how-to guide to get you started.

HW GURUS win the ROG OC Showdown Team Edition 2
The results are in from our second ROG OC Showdown Team Edition. See who posted the top scores.
Breaking records with the Maximus X Apex and i7-8700K
ROG is obsessed with chasing the highest overclocks and fastest performance, and Coffee Lake is our new muse on the Maximus X Apex.
The Rampage VI Apex claims more performance victories with Intel's new Core i9-7940X and i9-7980XE
After dominating extreme overclocking with the first wave of Skylake-X CPUs, we've taken the latest 14- and 18-core models to sub-zero extremes.